In this NetApp tutorial, I will explain NetApp Network Load Balancing. This is the seventh post in our NetApp networking video tutorial series. Links for the other videos in the series are at the bottom of the page. Scroll down for the video and also text tutorial.
NetApp Network Load Balancing Video Tutorial

Kyung Pastino

I took Netapp ONTAP classroom training about a month ago and then watched your tutorials 3 times each. Your tutorials were much better than the class. I took the test last week and passed it. I don’t think I could have done that without your tutorials. Thank you so much!!!
NetApp Network Load Balancing
When using NAS protocols, best practice is to assign one Data Logical Interface (LIF) per node, per Storage Virtual Machine (SVM). That allows the load to be spread across all nodes and leverages their available resources such as the CPU and RAM etc. You don't want to be hammering one node and have another node comparatively idle.
Each LIF will have a different IP address. We can use Off-box or On-box DNS load balancing to spread the incoming client connections across all of those different IP addresses on our different nodes.
Please note that this is for the NAS protocols of CIFS and NFS only. When it comes to SAN protocols, we don’t need to configure failover groups and policies because redundancy is handled by the multipathing intelligence on the clients. As well as redundancy where the client will fail over if a path goes down, the multipathing functionality also enables load balancing over multiple paths.
NAS Protocols: One Data LIF per Node, per SVM
Let's take a look at how we configure one Data LIF per node, per SVM:
NetApp Network Load Balancing
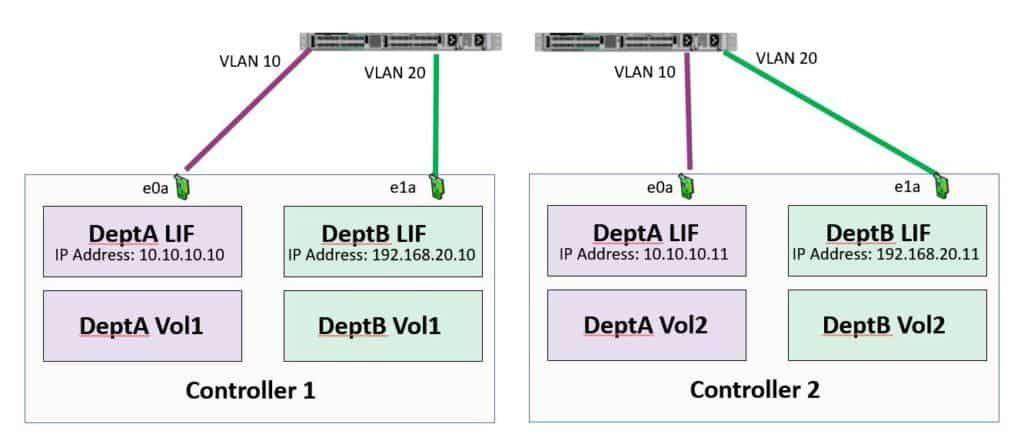
Here we have a simple two node cluster. We've got an SVM for DeptA and an SVM for DeptB. DeptA has got a LIF with the IP address 10.10.10.10 on node 1 and another LIF with the address 10.10.10.11 on node 2. We want to balance the incoming client connections across those two LIFs.
We do the same thing for DeptB. They've got a LIF with IP address 192.168.20.10 on node 1, and a LIF with address 192.168.20.11 on node 2. Again, we're going to balance the incoming client connections across all the available nodes.
There are three different ways we can configure load balancing.
Off-Box Round Robin DNS Load Balancing
The first way is with the Off-Box DNS method, using the company's normal existing internal DNS server. It's 'Off-Box' from the point of view of the NetApp cluster.
A DNS “A record” with the same Fully Qualified Domain Name is created for each of the LIFs for that SVM.
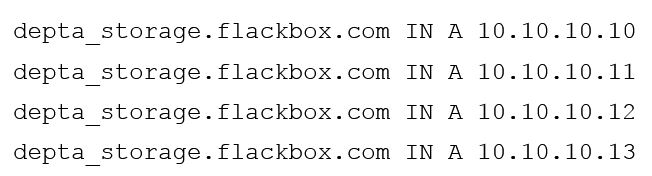
The example below shows how we would do this if we had four nodes, with one LIF (and IP address) per node:
DNS A Records
In the example above, we've given our DeptA storage the FQDN “depta_storage.www.flackbox.com”. We configure an A record, using the same FQDN, for each of our LIFs and therefore each of our IP addresses (eg, if you had created 4 LIFs for DeptA with the addresses 10-13, you’d create one record for 10.10.10.10, one for .11, one for .12, one for .13).
Whenever clients want to connect to their storage, they would now connect to “depta_storage.www.flackbox.com”. The first client that sends in a DNS request will be told by the company DNS server to go to .10, the next client will be told to go to .11, the next one to go to .12 and so on. The DNS server will cycle through the LIFs using a round robin method when responding to client DNS requests, spreading the load across our different nodes. No additional configuration is necessary as this takes advantage of standard round robin load balancing which is built into the DNS protocol.
At first glance, it looks like we would get an equal 25% load on each of the LIFs, but it's not necessarily going to work out that way. This is because some clients might be accessing the storage for longer periods and sending in more read and write requests.
It’s possible that by coincidence all the clients which are utilising the storage more happen to end up on the LIF with IP address 10.10.10.10. In that case, we would have more of a load on .10 than on .11, .12 or .13.
The load on each node will probably be close to 25%, but not always. There is a way we can get a more even spread of the load across all the available LIFs. This method is On-Box DNS load balancing.
On-Box DNS Load Balancing
It's called On-Box because the NetApp system is going to be the DNS server that is responding to client DNS requests.
The way it works is the company's existing DNS server is configured to forward requests for the storage FQDN to the storage system. The cluster will then respond with the IP address of the LIF which is under the lowest load at that time.
It's more intelligent than just using a simple round robin load balancing technique where it sequentially cycles through .10, then .11, then .12, and so on. It checks to see which LIF is under the lowest current load and then tells the client to use that LIF. This gives us a more even balance across all of our nodes.
Weights can also be assigned to our LIFs if we want to put more of a load on a particular node. This could be useful if we had different model controllers in our cluster.
The advantage of On-Box load balancing is it can give a more even distribution of connections, but companies may prefer to use Off-Box because it is a very simple and popular method that their network engineers will already be comfortable with.
There can still be an imbalance with On-Box DNS because it only balances new incoming connections. As clients drop off we can have some LIFs under more load than others.
Automatic LIF Rebalancing
The third method of NetApp network load balancing is Automatic LIF Rebalancing. This can give us the most even spread of client connections because it doesn't just distribute new incoming connections, it can also move existing connections to a less loaded LIF. This functionality is built into the NFS version 3 protocol rather than using DNS. It is simple to configure as it basically just needs to be turned on.
It's an obvious disadvantage over the DNS methods is that it is only available for specifically NFS version 3, it does not offer load balancing for other NFS versions or CIFS.
Additional Resources
Balancing Network Loads to Optimize User Traffic from NetApp.
Check out the rest of our NetApp networking tutorial series:
Part 1: NetApp Interface Groups
Part 3: NetApp Logical Interfaces (LIFs)
Part 5: NetApp Broadcast Domains and Failover Groups
And more coming soon...
Click Here to get my 'NetApp ONTAP 9 Storage Complete' training course.

Text by Alex Papas, Technical Writer at www.flackbox.com
Alex has been working with Data Center technologies for over 20 years. Currently he is the Network Lead for Costa, one of the largest agricultural companies in Australia. When he’s not knee deep in technology you can find Alex performing with his band 2am