In this NetApp tutorial, we will cover NetApp Storage Virtual Machines (SVMs). SVMs allow us to implement secure multi-tenancy in ONTAP. Scroll down for the video and also text tutorial.
NetApp Storage Virtual Machines (SVMs) Video Tutorial

Ben Lilley

I just passed my NCDA and I owe many thanks to your in-depth, straight forward and enthusiastic content. Being able to see you teach all the features and functionality and then test them out myself was fantastic and helped the info sink in. The ability to come back to the content whenever I need a refresher on something complicated is extremely valuable. Whenever I hear of a new engineer looking to get their NCDA I always point them in your direction first.
NetApp Storage Virtual Machines (SVMs)
Let’s say we have two departments, Department A and Department B, and they want to have separate storage systems that are secure from each other. The old way of doing it would be to buy two separate physical storage systems and supporting infrastructure for each, which would be an expensive solution.
With ONTAP, we can virtualize the system into two different logical storage systems, and have them both running on the same physical cluster. We get great cost savings from this feature.
Data SVMs are the fundamental unit of secure multi-tenancy in ONTAP. They enable partitioning of the cluster so that it appears as multiple independent storage systems. Each SVM appears as a single independent server to its clients. No data flows between SVMs unless an administrator explicitly enables it.
If you don't need to support multi-tenancy, you're still going to have at least one Data SVM because a Data SVM is required for client data access.
SVMs and vServers
SVMs used to be called vServers, and the two terms can still be used interchangeably. In the System Manager GUI they are referred to as SVMs and there's a Storage Virtual Machine section. The command line still calls them vServers and the commands begin with ‘vserver’.
You can have just one or multiple SVMs on the cluster. A single SVM can serve SAN or NAS protocols, or both. If it's a small deployment, then quite often a single data SVM will be just fine. If you need to support multi-tenancy, or if you would like to split up your different client access protocols into different SVMs, then you can do that too.
If you do have multiple SVMs, each one appears as a single dedicated server to its clients. If we had Department A and Department B, clients would access the Department A and the Department B SVM as two completely different servers, even though they're on the same physical cluster.
Data Storage Virtual Machines
Data SVMs are independent of nodes and aggregates. They can be spread over multiple nodes and aggregates, or they could be on just one. Different Data SVMs can be in the same node and use the same aggregate. We could have volumes for both Department A and Department B on Aggregate 1, for example. You can also dedicate a particular aggregate to a particular SVM.
Volumes and data Logical Interfaces (LIFs) are dedicated to a particular SVM. As mentioned previously, no data flows between SVMs in the cluster unless an administrator explicitly enables it.
The way SVMs are secured is by having their own dedicated volumes and data LIFs. Department A will have their volumes, which will be in the Department A SVM, and Department B will have their volumes, which will be in the Department B SVM. We also want to keep their network connectivity separate as well. We do that by having dedicated data LIFs which is where the IP addresses live.
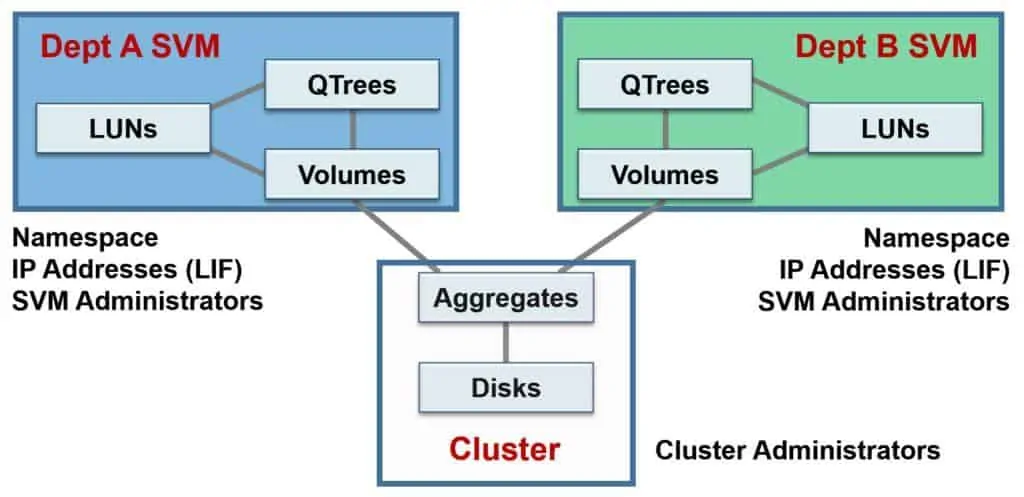
Looking at the architecture of our Data SVMs in the diagram below, we've got our physical resources (disks) at the cluster level. The disks are then grouped into aggregates. They can be shared between different SVMs.
In the example here we've got the Department A SVM on the left. It's got its own volumes, QTrees, and LUNs. Whenever you create a volume, you have to specify the SVM that it's going to be for. Department B has also got its volumes, QTrees, and LUNs.

Data Storage Virtual Machines
The Storage Virtual Machine Namespace
The volumes make up the namespace which is the directory structure of the SVM. Each SVM has its own unique namespace for NAS protocols. When you create the SVM, its root volume is also created. This is one of the mandatory parameters when you create the SVM.
No user data should be placed in an SVM root volume. You could do that but it's very bad practice to do so.
To build the namespace, the volumes within each SVM are related to each other through junctions, and are mounted on junction paths. The root volume resides at the top level of the namespace hierarchy above additional volumes, which lead back to the root volume via junction paths.
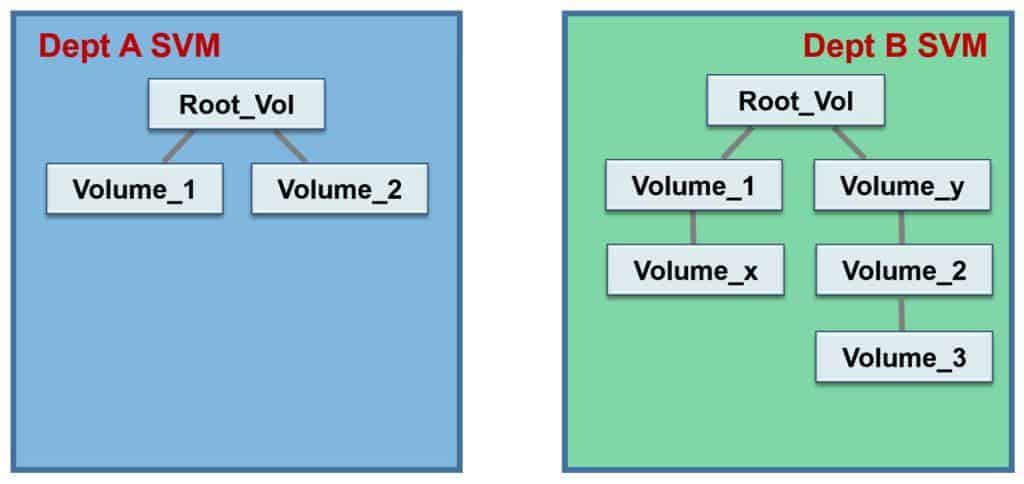
As you can see below, we've got the Department A SVM and its namespace on the left. The directory structure shown includes the root volume as well as two we’ve created called Volume_1 and Volume_2. Both volumes we created have junction paths leading back directly to the root volume.
For Department B we've got its root volume, which is a separate root volume dedicated for Department B, and we've got Volume_X, which has got a junction path going back to Volume_1. Volume_1 is directly connected to the root volume.
We've also got Volume_Y, Volume_2, and Volume_3. You can see that the volumes don't need to have a junction path directly connected to the root volume, but all volumes have to eventually lead back there.
The namespace is how clients are going to see the directory structure of the SVM. If I shared the root volume for Department B and a client mapped that as a network drive, it would see Volume_1 and Volume_Y as folders in the root volume.

Data SVM Namespace
Admin SVMs
So far we've been talking about Data SVMs. When people talk about SVMs in general, they’re usually referring to Data SVMs. There are, however, a couple of other special SVMs, and these are used for management of the system.
We've got the Administrative SVM, which represents the physical cluster. It's associated with the cluster management LIF.
We've also got our Node SVM, which represents each physical node. It's associated with our node management LIFs.
NetApp Storage Virtual Machine (SVM) Configuration Example
This configuration example is an excerpt from my ‘NetApp ONTAP 9 Complete’ course. Full configuration examples using both the CLI and System Manager GUI are available in the course.
Want to practice this configuration for free on your laptop? Download your free step-by-step guide ‘How to Build a NetApp ONTAP Lab for Free’

- Log in to Cluster 1. Create and verify these aggregates, use RAID-DP and 5 FCAL disks for each:
aggr1_C1N1 owned by C1N1.
aggr2_C1N1 owned by C1N1.
aggr3_C1N1 owned by C1N1.
aggr4_C1N1 owned by C1N1.
aggr1_C1N2 owned by C1N2.
aggr2_C1N2 owned by C1N2.
aggr3_C1N2 owned by C1N2.
aggr4_C1N2 owned by C1N2.
cluster1::> storage aggregate create -aggregate aggr1_C1N1 -diskcount 5 -disktype FCAL -node cluster1-01
cluster1::> storage aggregate create -aggregate aggr2_C1N1 -diskcount 5 -disktype FCAL -node cluster1-01
cluster1::> storage aggregate create -aggregate aggr3_C1N1 -diskcount 5 -disktype FCAL -node cluster1-01
cluster1::> storage aggregate create -aggregate aggr4_C1N1 -diskcount 5 -disktype FCAL -node cluster1-01
cluster1::> storage aggregate create -aggregate aggr1_C1N2 -diskcount 5 -disktype FCAL -node cluster1-02
cluster1::> storage aggregate create -aggregate aggr2_C1N2 -diskcount 5 -disktype FCAL -node cluster1-02
cluster1::> storage aggregate create -aggregate aggr3_C1N2 -diskcount 5 -disktype FCAL -node cluster1-02
cluster1::> storage aggregate create -aggregate aggr4_C1N2 -diskcount 5 -disktype FCAL -node cluster1-02
cluster1::> storage aggregate show
Aggregate Size Available Used% State #Vols Nodes RAID Status
--------- -------- --------- ----- ------- ------ ---------------- --------
aggr0_cluster1_01
1.67GB 0B 100% online 1 cluster1-01 raid_dp, normal
aggr0_cluster1_02
855MB 32.09MB 96% online 1 cluster1-02 raid_dp, normal
aggr1_C1N1 2.64GB 2.64GB 0% online 0 cluster1-01 raid_dp, normal
aggr1_C1N2 2.64GB 2.64GB 0% online 0 cluster1-02 raid_dp, normal
aggr2_C1N1 2.64GB 2.64GB 0% online 0 cluster1-01 raid_dp, normal
aggr2_C1N2 2.64GB 2.64GB 0% online 0 cluster1-02 raid_dp, normal
aggr3_C1N1 2.64GB 2.64GB 0% online 0 cluster1-01 raid_dp, normal
aggr3_C1N2 2.64GB 2.64GB 0% online 0 cluster1-02 raid_dp, normal
aggr4_C1N1 2.64GB 2.64GB 0% online 0 cluster1-01 raid_dp, normal
aggr4_C1N2 2.64GB 2.64GB 0% online 0 cluster1-02 raid_dp, normal
10 entries were displayed.
- Add the licenses for Fibre Channel, iSCSI, and NFS.
Ensure you use the correct licenses for the VMware Workstation, VMware Player, and VMware Fusion build and add the licenses for both nodes.
cluster1::> license add WKQGSRRRYVHXCFABGAAAAAAAAAAA, KQSRRRRRYVHXCFABGAAAAAAAAAAA, MBXNQRRRYVHXCFABGAAAAAAAAAAA, KWZBMUNFXMSMUCEZFAAAAAAAAAAA, YBCNLUNFXMSMUCEZFAAAAAAAAAAA, ANGJKUNFXMSMUCEZFAAAAAAAAAAA
(system license add)
License for package "FCP" and serial number "1-81-0000000000000004082368507" installed successfully.
License for package "iSCSI" and serial number "1-81-0000000000000004082368507" installed successfully.
License for package "NFS" and serial number "1-81-0000000000000004082368507" installed successfully.
License for package "FCP" and serial number "1-81-0000000000000004034389062" installed successfully.
License for package "iSCSI" and serial number "1-81-0000000000000004034389062" installed successfully.
License for package "NFS" and serial number "1-81-0000000000000004034389062" installed successfully.
(6 of 6 added successfully)
- View the currently configured Storage Virtual Machines.
cluster1::> vserver show
Admin Operational Root
Vserver Type Subtype State State Volume Aggregate
----------- ------- ---------- ---------- ----------- ---------- ----------
cluster1 admin - - - - -
cluster1-01 node - - - - -
cluster1-02 node - - - - -
3 entries were displayed.
No Data SVMs have been configured yet, only the Admin SVMs are present.
- Create and verify a Storage Virtual Machine named ‘DeptA’. Name the root volume DeptA_root and place it in aggr1_C1N1. Use the UNIX Security Style and do not configure SVM level administrative access or any client access protocols. Accept the defaults for all other values.
cluster1::> vserver create -vserver DeptA -rootvolume DeptA_root -aggregate aggr1_C1N1
[Job 34] Job succeeded:
Vserver creation completed.
UNIX is the default security style so does not have to be explicitly configured.
cluster1::> vserver show
Admin Operational Root Vserver Type Subtype State State Volume Aggregate
DeptA data default running running DeptA_root aggr1_C1N1
cluster1 admin - - - - -
cluster1-01 node - - - - -
cluster1-02 node - - - - -
4 entries were displayed.
- If using System Manager, why did you not see the option to configure CIFS on the SVM?
A license for CIFS has not been added.
- Create and verify a Storage Virtual Machine named ‘DeptB’. Name the root volume DeptB_root and place it in aggr1_C1N2. Use the UNIX Security Style and do not configure SVM level administrative access or any client access protocols. Accept the defaults for all other values.
cluster1::> vserver create -vserver DeptB -rootvolume DeptB_root -aggregate aggr1_C1N2
[Job 34] Job succeeded:
Vserver creation completed.
cluster1::> vserver show
Admin Operational Root
Vserver Type Subtype State State Volume Aggregate
----------- ------- ---------- ---------- ----------- ---------- ----------
DeptA data default running running DeptA_root aggr1_C1N1
DeptB data default running running DeptB_root aggr1_C1N2
cluster1 admin - - - - -
cluster1-01 node - - - - -
cluster1-02 node - - - - -
5 entries were displayed.
Additional Resources
What SVMs Are by NetApp.

Text by Alex Papas, Technical Writer at www.flackbox.com
Alex has been working with Data Center technologies for over 20 years. Currently he is the Network Lead for Costa, one of the largest agricultural companies in Australia. When he’s not knee deep in technology you can find Alex performing with his band 2am