In this NetApp training tutorial, I will explain about NetApp VLANs. This is the second post in our NetApp networking video tutorial series. Scroll down for the video and also text tutorial.
NetApp VLANs Networking Video Tutorial

Kashif Ali

I have never seen any training course in Netapp the way Neil conducted this and the way he breaks down every concept is like watching a movie…I am feeling so motivated and pumped up to retain all this knowledge…thank you!
VLANs are ubiquitous in networking in general, where they are used to enhance performance and security on the campus. VLANs can optionally be extended down into the NetApp storage system to provide OSI Layer 2 segregation between Logical Interfaces homed on the same physical port or Interface Group. You can find links to the other videos in the series at the bottom of the page.
NetApp VLANs (Virtual Local Area Networks)
The way that secure multitenancy is enabled on our NetApp systems is with the use of Storage Virtual Machines (SVMs). Two of the main components that are specific at the SVM level are Volumes and Logical Interfaces (LIFs).
Let's say that we have a couple of SVMs, one for “Department A” and one for “Department B”. Our “Department A” volumes are specifically for the “DeptA” SVM and, likewise, our “Department B” volumes are for the “DeptB” SVM. This is to ensure that there is no way that each department can get access to the other one’s data. We keep our volumes separate and dedicated to their respective departments at the SVM level.
Our LIFs are also dedicated at the SVM level. Each SVM will show up as a separate storage system to the client. This means that the “DeptA” SVM will show up as one storage system and the “DeptB” SVM will show up as another (separate) storage system.
We're going to give our clients in “Department A” connectivity to the “DeptA” SVM and the “Department B” clients will get connectivity to the “DeptB” SVM, but we're going to keep connectivity strictly separated between them. The “Department A” clients won't have any connectivity to the “DeptB” SVM and vice versa. Each LIF is dedicated to a specific SVM. IP Addresses are configured on the LIFs.
Dedicated Physical Interfaces
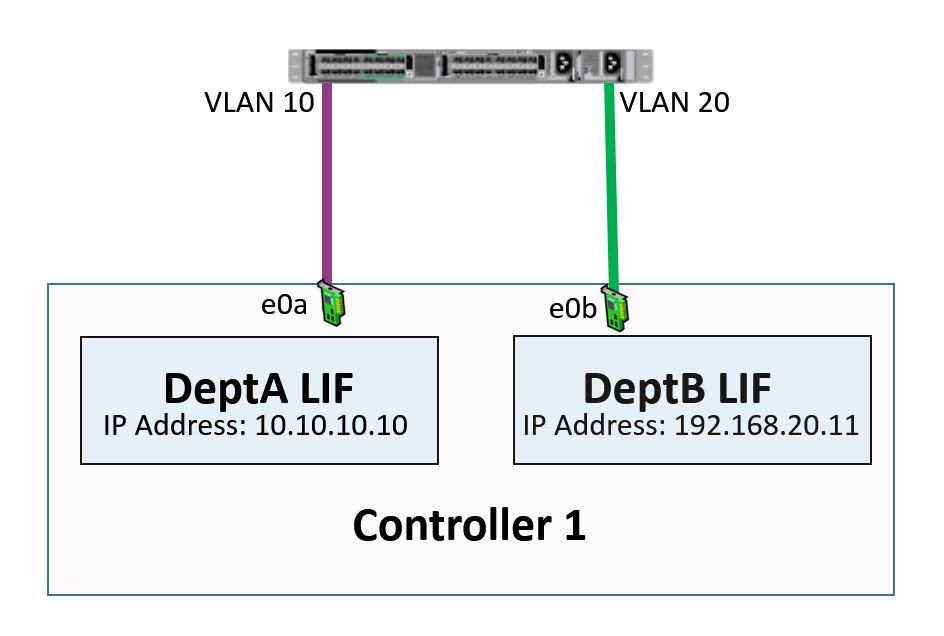
Now, in an ideal world, we'd like to have a Physical Interface dedicated to each of our LIFs, as shown in the following diagram:

NetApp Networking - Dedicated Physical Ports
- First, we've got physical interface e0a. This has been assigned a LIF called “DeptA LIF” with the IP address 10.10.10.10 as its home port.
- We've also got physical interface e0b. The LIF here is called “DeptB LIF” with an IP address of 192.168.20.11 as its home port.
In this example we're just using one switch, so we would split up the two departments over two different VLANS which would be created on the switch. Another way to do it would be to have two separate switches, one for each department.
Whichever way we do it, the two departments are kept strictly separate from each other. In this scenario, as mentioned earlier, we only need to configure the VLANS on the switch, a standard practice in networking. There is no need to configure VLANS on the NetApp system in this example. That's an “ideal world” scenario, where we've got a dedicated Physical Interface for each of our LIFs.
NetApp VLANs
Unfortunately, we don't live in an ideal world, so that configuration will not always be possible. We might have more LIFs than we've got Physical Interfaces available to home them on. This is particularly likely in a storage service provider environment, where they can have lots of customers. In a case like this, we're going to have multiple LIFs using the same Physical Interface.
This means we're going to have different customers coming in on the same Physical Interface. We still need to keep them strictly separate from each other. In this case, we’ll need to configure VLANs on the storage system as well as our switch. The VLANs are going to be trunked all the way through.
In the example below, you can see that both the “DeptA” and “DeptB” SVMs are using the same physical interface, e0a:

NetApp VLAN interfaces on shared physical port
We configure VLAN 10 for the “DeptA” SVM and VLAN 20 for the “DeptB” SVM. As a result, our physical interface e0a is going to be split into two sub-interfaces:
- e0a.10 for “DeptA” VLAN 10
- e0a.20 for “DeptB” VLAN 20
Our “DeptA” LIF will be homed on e0a.10 and our “DeptB” LIF will be homed on e0a.20.
NetApp VLANs and Interface Groups
Now let's consider how our VLANs are going to interact with our Interface Groups. In our example below, we don't configure VLANs on the NetApp storage. Again, we've got “DeptA” and “DeptB”. In this case, we've got enough Physical Interfaces to allow us to dedicate a couple to “DeptA” and another couple to “DeptB”.

NetApp Interface Groups
We group our interfaces e0a and e1a into the interface group a0a, which is going to be used by the “DeptA” LIF. We then group e0b and e1b into another interface group called a0b, which is going to be used by our “DeptB” LIF. That would be the preferred way to do it if we want to use Interface Groups and we've got enough physical interfaces for each of our departments or customers.
Combining VLANs and Interface Groups
If we don't have enough physical interfaces to allow us to dedicate them per SVM, then we can run VLANs on top of an interface group. That's what we've done here:

NetApp VLANs and Interface Groups Combined
We've got physical interfaces e0a, e1a, e0b, and e1b, and we've grouped these four physical interfaces into one interface group called a0a. We’ve then split the a0a interface group into a couple of VLAN interfaces:
- 10: This is running VLAN 10 and is where our “DeptA” LIF is homed
- 20: This is running VLAN 20 and is where our “DeptB” LIF is homed
Our VLAN interfaces use standard 802.1Q tagging. Whenever the switch sends traffic for “DeptA”, it will be tagged with VLAN 10 and will hit interface e0a.10. Whenever the switch sends traffic for “DeptB”, it will be tagged as VLAN 20 and will hit interface e0a.20.
Work with the Networking Team
Now, I want to give you a final word on Interface Groups and VLANs. If you're inexperienced in networking, right now you might be thinking: "Okay, I think I understand interfaces and VLANs, but I'm not sure how I'd actually implement them in my real-world environment." Well, that's where your networking team comes in.
Ask them about this and they’ll be able to show you how it should be done. You're actually going to have to talk to them anyway because you’ll need to make sure that you've got a matching configuration on your switches which ties in with the configuration on your NetApp system.
Your networking team eat, breathe and sleep VLANs and Interface Groups. They will be very comfortable with this. If you tell them what it is that you want to achieve, they will be able to give you advice on the best way to configure your Interface Groups and your VLANs.
It's quite possible that you won't actually need to configure VLANs. You'd only need to do that if you've got IP addresses in different IP subnets and different VLANs that are homed on the same interface.
NetApp VLANs Networking Tutorial Configuration Example
This configuration example is an excerpt from my ‘NetApp ONTAP 9 Complete’ course. Full configuration examples using both the CLI and System Manager GUI are available in the course.
Want to practice this configuration for free on your laptop? Download your free step-by-step guide ‘How to Build a NetApp ONTAP Lab for Free’

- Create VLAN 14 for DeptA and VLAN 15 for DeptB on Interface Group a0a on both nodes.
cluster1::> network port vlan create -node cluster1-01 -vlan-name a0a-14
cluster1::> network port vlan create -node cluster1-02 -vlan-name a0a-14
cluster1::> network port vlan create -node cluster1-01 -vlan-name a0a-15
cluster1::> network port vlan create -node cluster1-02 -vlan-name a0a-15
- Verify the VLANs are created.
cluster1::> network port vlan show
Network Network
Node VLAN Name Port VLAN ID MAC Address
------ --------- ------- -------- -----------------
cluster1-01
a0a-14 a0a 14 02:0c:29:6f:94:1d
a0a-15 a0a 15 02:0c:29:6f:94:1d
cluster1-02
a0a-14 a0a 14 02:0c:29:a6:17:1a
a0a-15 a0a 15 02:0c:29:a6:17:1a
4 entries were displayed.
- Configure failover so that LIFs will fail over to the same VLAN on the other node if there is a network outage on either node.
cluster1::> network port broadcast-domain create -ipspace Default -broadcast-domain DeptA -mtu 1500
cluster1::> network port broadcast-domain add-ports -broadcast-domain DeptA -ports cluster1-01:a0a-14
cluster1::> network port broadcast-domain add-ports -broadcast-domain DeptA -ports cluster1-02:a0a-14
cluster1::> network port broadcast-domain create -ipspace Default -broadcast-domain DeptB -mtu 1500
cluster1::> network port broadcast-domain add-ports -broadcast-domain DeptB -ports cluster1-01:a0a-15
cluster1::> network port broadcast-domain add-ports -broadcast-domain DeptB -ports cluster1-02:a0a-15
- Verify your failover configuration.
cluster1::> network port broadcast-domain show
IPspace Broadcast Update
Name Domain Name MTU Port List Status Details
------- ----------- ------ ----------------------------- --------------
Cluster Cluster 1500
cluster1-01:e0a complete
cluster1-01:e0b complete
cluster1-02:e0a complete
cluster1-02:e0b complete
Default DeptA 1500
cluster1-01:a0a-14 complete
cluster1-02:a0a-14 complete
DeptB 1500
cluster1-01:a0a-15 complete
cluster1-02:a0a-15 complete
Management 1500
cluster1-01:e0c complete
cluster1-01:e0f complete
cluster1-02:e0c complete
cluster1-02:e0f complete
4 entries were displayed.
cluster1::> network interface failover-groups show
Failover
Vserver Group Targets
---------------- ---------------- -----------------------------------------
Cluster
Cluster
cluster1-01:e0a, cluster1-01:e0b,
cluster1-02:e0a, cluster1-02:e0b
cluster1
DeptA
cluster1-01:a0a-14, cluster1-02:a0a-14
DeptB
cluster1-01:a0a-15, cluster1-02:a0a-15
Management
cluster1-01:e0c, cluster1-01:e0f,
cluster1-02:e0c, cluster1-02:e0f
4 entries were displayed.
Additional Resources
Check out the rest of our NetApp networking tutorial series:
Part 1: NetApp Interface Groups
Part 3: NetApp Logical Interfaces (LIFs)
Part 5: NetApp Broadcast Domains and Failover Groups
And more coming soon...
Click Here to get my 'NetApp ONTAP 9 Storage Complete' training course.

Text by Alex Papas, Technical Writer at www.flackbox.com
Alex has been working with Data Center technologies for over 20 years. Currently he is the Network Lead for Costa, one of the largest agricultural companies in Australia. When he’s not knee deep in technology you can find Alex performing with his band 2am