In this NetApp training tutorial, you’ll learn about unified replication which allows you to configure both SnapMirror and SnapVault on the same destination volume to provide both disaster recovery and backup capability. Scroll down for the video and also text tutorials.
NetApp Unified Replication Video Tutorial
Rohit Kumar

Thanks to your courses I have cracked multiple job interviews on NetApp. I was previously working as a Technical Support Engineer for NetApp and I’m a NetApp Administrator at Capgemini now. Thank you for the awesome tutorials!
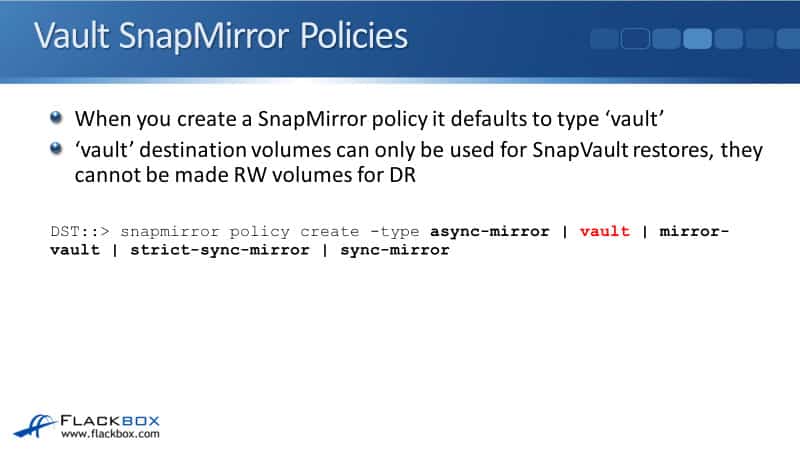
Vault SnapMirror Policies
When you create a SnapMirror policy it defaults to type ‘vault’. Vault destination volumes can only be used for SnapVault restores. They cannot be made to rewrite volumes for disaster recovery.
You can see below in the creation of SnapMirror policy that the default create type is the vault option. That is the default type if you do not explicitly specify another type.
DR Snap Mirror Policies
There are other types you can see there as well. We've got async-mirror, strict-sync-mirror, and sync-mirror. When you configure those types as your policy and a destination volume, it will be used for Disaster Recovery (DR). They do not keep multiple copies of snapshots for backup and restore like SnapVault does.
We've got our async mirror, which is obviously used for DP async-mirrors. We've also got strict-sync-mirror and sync-mirror, which are used for SnapMirror synchronous.

Unified Replication
There's one other option left, mirror-vault, which is used for unified replication. Unified replication does use a SnapMirror policy type of mirror-vault and it combines SnapMirror DR and also SnapVault functionality on the same destination volume.
The rest of the configuration is identical to when you're configuring normal SnapVault. Unified replication replicates SnapMirror DR snapshots to the destination volume in addition to the SnapVault snapshots.
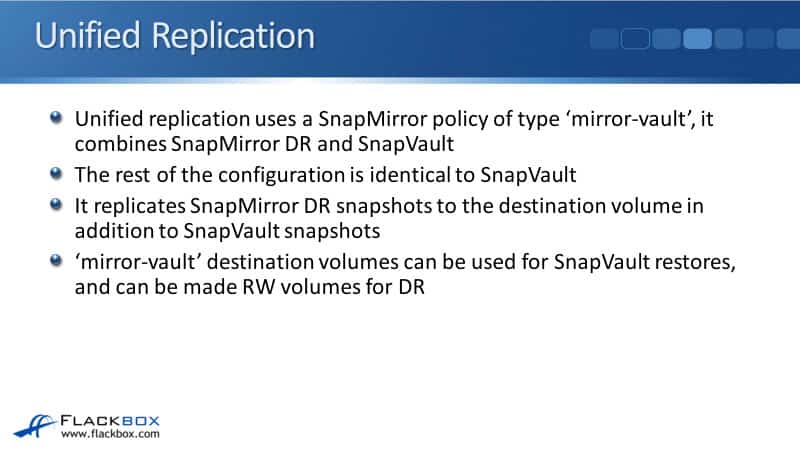
So, if you use one of the DR types, that destination volume can only be used for DR. If you use vault type, it can only be used for SnapVault. But if you use type mirror-vault it can be used for both SnapMirror and SnapVault.
The benefit you get from using unified replication is that the source volume could be replicated to one destination volume for SnapMirror, and a different destination volume for SnapVault. That would take up more disk space on the destination system, and it would also use up additional bandwidth.
It's much more efficient to just do that application to one destination volume that can be used both DR and for backups and restores as well.
Initial Configuration Steps on Both Clusters
Looking at the configuration below, the configuration is exactly the same as it is for SnapVault. The one difference is you specify the SnapMirror policy type as mirror-vault rather than vault. We have to do the usual initial steps which are:
- Licensing SnapMirror on both sides
- Creating our intercluster LIFs on every node on both clusters
- Peering the clusters
- Peering the SVMs

Create Snapshot Policy on Primary Cluster
After that, we need to do the SnapVault configuration the same as before. We're going to have our snapshot policy on the primary source cluster. On the source side, we say:
snapshot policy create -vserver DeptA -policy vol3 enabled true -schedule1 hourly -count1 5 -schedule2 daily -count2 5 –snapmirror-label2 daily -schedule3 weekly -count3 2 -snapmirror-label3 weekly
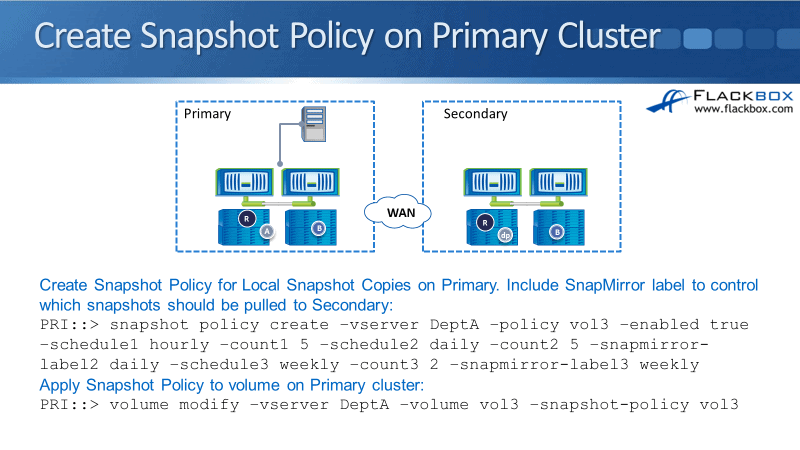
We created a snapshot palicy for vserver Department A. We're going to take five hourly snapshots on the source volume and we're going to keep the last five of those. We don't want to replicate those across to the SnapVault system, so we have not specified a label on there.
We’re also going to take daily snapshots and we're going to keep the last five of those. We do want to replicate those across, so we've put a SnapMirror label of daily.
We’ve got schedule1 and count1, that ties those two together. Schedule2, count2, and snapmirror-label2 attributes were tied together. Finally, we're also going to take weekly snapshots, that’s schedule3 and we're going to keep the last two of those. As for snapmirror-label3, we're going to put the label of weekly on there because we are going to pull those across to the SnapVault system.
Then, we need to apply it to the source volume. We say:
volume modify -vserver DeptA. -volume vol3 -snapshot-policy vol3
Create SnapMirror Policy on Secondary Cluster
Next, we're ready to move over to the destination cluster. We're configuring a custom policy here to specify which snapshots we're going to pull across and how many of them we are going to keep.
Under the destination secondary cluster, we say:
snapmirror policy create -vserver DeptA_M -policy vol3 -type mirror-vault
DeptA_M is my destination SVM. The one difference to the SnapVault policy is the type which is mirror-vault. If we don't put that in, it's going to default to type vault, and it's only going to use SnapVault snapshots there. It's not going to have met SnapMirror snapshots for the DR. We want to have both, so we've said type mirror-vault.
Then, I need to specify the snapshots where I'm going to pull over for my SnapVault backups. So I say:
snapmirror policy add-rule -vserver DeptA_M -policy vol3 -snapmirror-label daily -keep 31
I added a rule to the policy that I just created. Every time it connects to the source cluster, it's going to look in the source volume for snapshots that have got the label of daily on there. When it finds a new one, it will pull it across, and it's going to keep them for 31 days. Thus, we're keeping them for longer on the destination side.
We then say:
snapmirror policy add-rule -vserver DeptA_M -policy vol3 -snapmirror-label weekly -keep 52
Now, we're looking for snapshots with a SnapMirror label of weekly and we're going to keep 52 of those. We're keeping a lot more snapshots on a destination SnapVault system for our longterm backups.
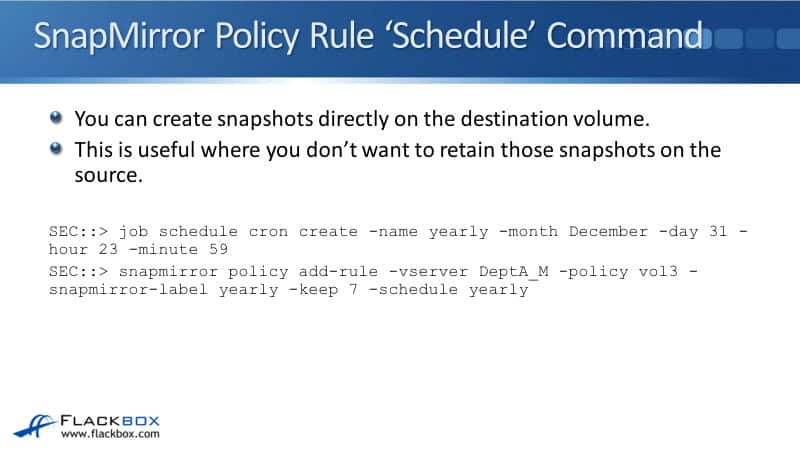
SnapMirror Policy Rule ‘Schedule’ Command
You can also take a snapshot directly on the destination cluster if you don't want to have that snapshot on the source side. Here, we are going to take a snapshot once a year as well. We're going to call that yearly.
Since there is no default cron schedule for yearly, I need to add that as a custom cron schedule:
job schedule cron create -name yearly -month December -day 31 -hour 23 -minute 59
I've named it yearly and the time that this is going to occur is on December 31st, one minute to midnight. It's going to happen just about one time a year, just before new year falls.
Then I'm going to add that to my SnapMirror policy that I already created. So, I say:
snapmirror policy add-rule -vserver DeptA_M -policy vol3 snapmirror-label yearly -keep 7 -schedule yearly
That is going to take a snapshot directly on the destination cluster, you use the schedule command as part of your SnapMirror policy add rule.
The yearly snapshots are only going to be on the destination volume, not on the source volume. I don't want to keep a snapshot for a year on the source side because that would start taking up too much space.
Create and Initialize Volume Mirror Relationship
Next up, I'm ready to create and initialize the volume mirror relationship. On the secondary destination site, I need to create the volume first:
volume create -vserver DeptA_M -volume vol3_M -aggr aggr1 -size 100g -type do
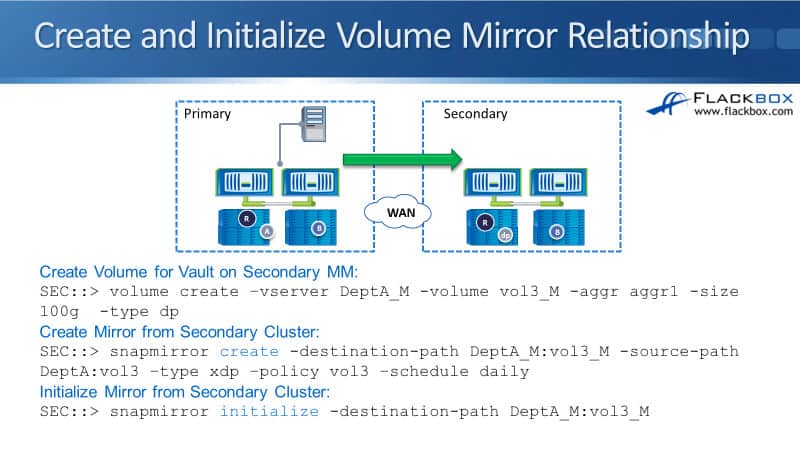
Then, I create the Mirror again on the secondary cluster side:
snapmirror create -destination-path DeptA_M:vol 3_M -source-path DeptA:vol3 -type xdp -policy vol3 -schedule daily
It is going to check every day for snapshots to pull across and it will do the replication for DR daily here as well because I've set the schedule of daily.
To do the initial baseline transfer, we say:
snapmirror initialize -destination-path DeptA_M:vol 3_M
You can see the commands are exactly the same as if I was configuring standard SnapMirror or SnapVault. The only difference is when I created the policy, I specified type mirror-vault. That is is the only difference that you need to configure for unified replication.
SnapMirror Protect Command
You can alternatively use the SnapMirror protect command rather than using the three separate commands for volume create, SnapMirror create, and SnapMirror initialize.
SnapMirror protect will do all those three together in a single command:
snapmirror protect -path-list SVM:volume destination-vserver destination_SVM -policy policy -schedule schedule -auto-initialize true|false -destination-volume-prefix prefix -destination-volume-suffix suffix
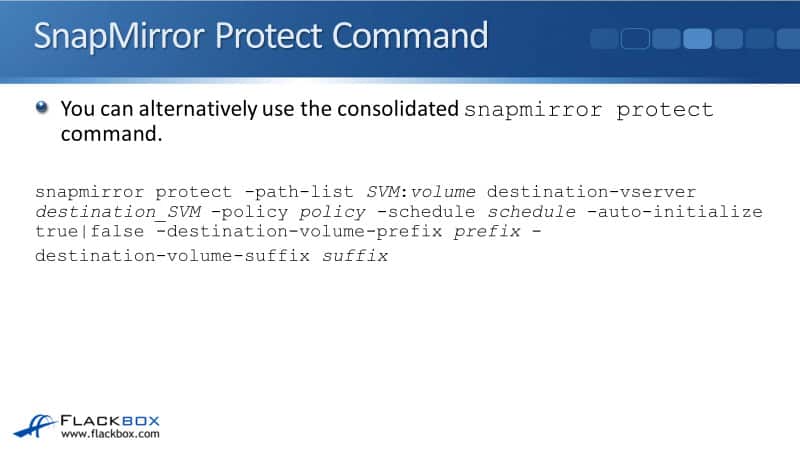
If we have got three volumes on the source site, vol1, vol2, and vol3, and we want to replicate all of those, we can do that in a single command. We can specify the path list as SVM:vol because they all start with vol. Therefore it will match all three of them.
We could then configure a destination volume suffix of _DST for destination, and that will create vol1_DST, vol2 _DST, and vol3 _DST. It will protect all three of the volumes with a unified replication policy.
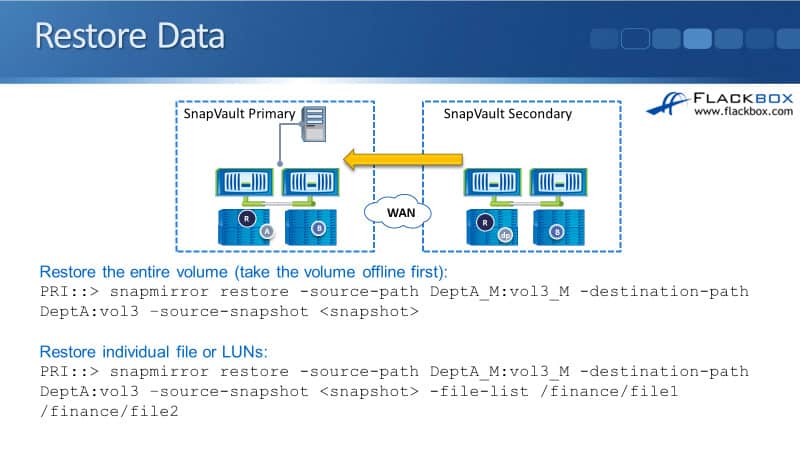
Restore Data
To restore data with the SnapVault functionality, the commands are exactly the same again as when we were using SnapVault:
snapmirror restore -source-path DeptA_M:vol3_M -destination-path DeptA:vol3 -source-snapshot <snapshot>
If you do that, it will restore the entire volume. You can also restore individual files, folders, and LUNs. To do that, it's the same command, but you specify a file list in the end. When you do the restore, that is done on the cluster that you are doing the restore to.
So, when you are configuring the replication, that's done on the destination side that you're replicating to. When you're doing a restore, you configure the command on the system that you are restoring to.
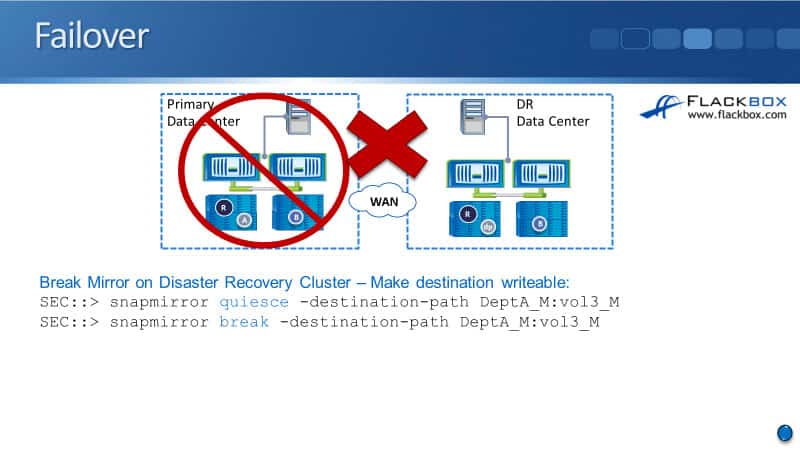
Failover
Finally for failover for the DR, again, it’s exactly the same commands as for standard SnapMirror. On the destination cluster, you say:
- snapmirror quiesce, to pause any updates after that and then,
- snapmirror break, to break the SnapMirror relationship and make the destination side read and write.
Additional Resources
SnapMirror Unified Replication Basics: https://docs.netapp.com/us-en/ontap/data-protection/snapmirror-unified-replication-concept.html
About SnapMirror Volume Replication: https://docs.netapp.com/us-en/ontap/data-protection/snapmirror-replication-concept.html
About SnapMirror SVM Replication: https://docs.netapp.com/us-en/ontap/data-protection/snapmirror-svm-replication-concept.html
Libby Teofilo

Text by Libby Teofilo, Technical Writer at www.flackbox.com
Libby’s passion for technology drives her to constantly learn and share her insights. When she’s not immersed in the tech world, she’s either lost in a good book with a cup of coffee or out exploring on her next adventure. Always curious, always inspired.