In this Cisco CCNA training tutorial, you’ll learn about Cisco VLAN Trunking Protocol (VTP) which enables the deletion, renaming, and addition of VLANs on switches configured as VTP servers. Scroll down for the video and also text tutorial.
Cisco VTP VLAN Trunking Protocol Video Tutorial
Pedro Almeida

I just did the CCNA exam and passed with a score of 958! Your course is amazing, thank you really much for the content!
What is the Purpose of VTP?
VTP is a Cisco proprietary protocol operating in layer 2. It allows users to change switch configurations centrally, and automatically apply those changes across the network switches.
Switches that are configured as VTP clients synchronize their VLAN database with the VTP servers. This saves you from having to add, edit, or delete the VLANs on every switch in your campus. Thus, requiring these switches to be in a single VTP domain.
VTP also minimizes misconfigurations that cause problems such as security violations, incorrect VLAN specifications, and duplicate VLAN names.
A Guide to the VTP Domain
VTP domains, which are also known as VLAN management domains, are composed of multiple interconnected switches configured with the same VTP domain name.
A switch can only belong to a single VTP domain. Switches are kept in the no-management-domain state by default. That is until they receive advertisements for domains over trunk links or until a management domain is manually configured.
The Benefits of VTP
For example, there are no configurations yet on any of your switches. You log in to a VTP server switch and create the Eng and Sales VLANs. This configuration will be pushed to the VTP client switches. Therefore, you would only need to add them to the VTP server switch.
It would be the same if you need to delete a VLAN, you would only do it on the VTP server switch. The VLAN will be then automatically be deleted on all the clients. The same goes if you would edit a VLAN, changing its name for example.
Once you do this on the VTP server, the information will be synchronized across all your switches. This is convenient especially when managing a large campus with a lot of switches.
Be aware that when you use VTP, you still need to perform the port level VLAN configuration on each switch. The switches don’t know which physical ports need to be in the Eng VLAN or Sales VLAN unless you configure it.
Individual ports as access ports or trunk ports and other associated configurations are done on each switch. What VTP does is save you from having to configure the VLAN database on all of your different switches.
VTP Allows Users to Share Information Easier
VTP eliminates the hassle and risk of manually configuring multiple VLANs throughout a network. Placing switches in a single VTP domain enables our VLAN database to be configured and propagated in the network’s switches easily.
How Does VTP Work?
You have to be careful when using VTP because it doesn’t just allow you to add VLANs, you can edit and delete them as well. Let’s say you need to add a switch to the campus quickly and you find an old switch from another office in the cupboard.
It’s a VTP server by default, and it happens to have a higher VLAN database revision number than the other switches. When you will add it to the network, all the other switches will synchronize their VLAN databases with it and it will wipe out all of the VLANs in the office, dropping connectivity to all hosts. This obviously isn’t a good scenario and could be a career-limiting mistake to make!
There are safeguards to prevent this happening such as configuring a VTP domain name and revision numbers. VTP switches will only synchronize with another switch in the same VTP domain and with a higher revision number (the revision number is incremented every time a change is made). Using different VTP domain names in different offices prevents the situation described above.
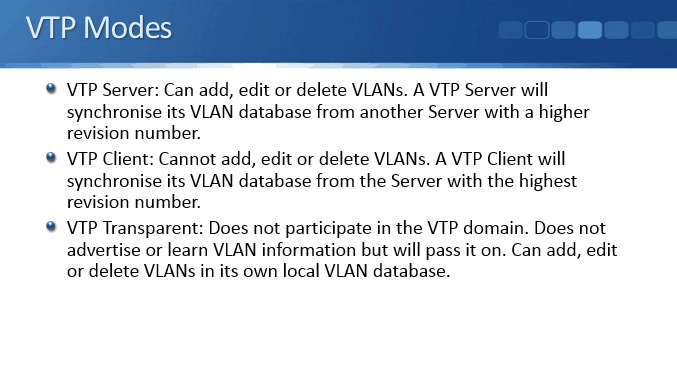
What Are the Different VTP Modes?
Every Cisco switch can function in one of these three VTP modes:
- VTP Server mode: Cisco switches are VTP servers by default. When a switch operates as a VTP server, the users can delete, modify, and create VLANs. It’s also possible to outline other configuration parameters on the server, such as VTP pruning and VTP version.
A VTP server will synchronize its VLAN database from another server with a higher revision number. You can have multiple servers for redundancy, but only one of them is going to be the actual master copy of the VLAN database.
To configure switches for VTP server mode, utilize this command: vtp mode server
- VTP Client mode: When a switch functions in VTP client mode, it cannot change its configuration. Users can’t delete, change, or create VLANs on VTP clients. It can only get the information from a VTP server. A VTP client will synchronize its VLAN database from the server with the highest revision number.
To bring a switch into VTP client configuration, use this command: vtp mode client
- VTP Transparent mode: Switches working in VTP transparent mode do not take part in the VTP domain. VTP transparent switches do not advertise or learn VLAN information, but they do forward received advertisements. Users may delete, edit, and create VLANs on VTP transparent switches but it is stored in its local VLAN database instead.
For example, you have a VTP server, a VTP client, and a VTP transparent switch in between the two. The VTP transparent switch will pass on the server information downstream to the client.
To configure a switch to use transparent mode, use the command: vtp mode transparent
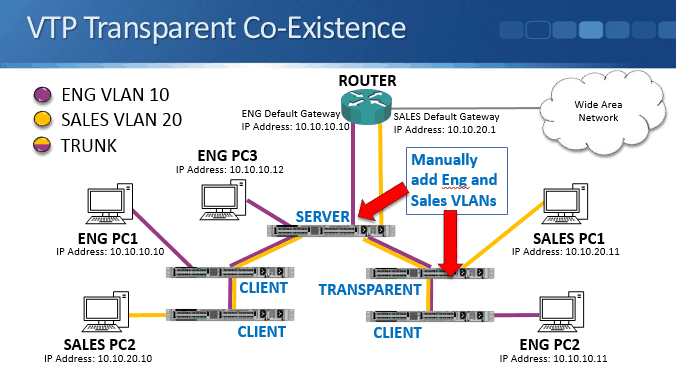
Cisco VTP Transparent Co-Existence
Now, let’s look at how VTP coexistence works with your different modes of switches. On the above example, we have a VTP server at the top and the other switches downstream from there are VTP clients apart from the VTP transparent switch.
For this network, we need the VLAN Eng and the VLAN Sales, so we configure those two on the VTP server. The client switches will learn about those VLANs and they will add them to their database once they synchronize with the server.
The VTP client down in the bottom right will also learn the information because the VTP transparent switch will pass it on to it, but the VTP transparent switch will not update its VLAN database with the information. You will need to manually add the VLANs on the VTP transparent switch.
VTP and DTP
If you use both DTP (Dynamic Trunking Protocol) and Cisco VTP, the VTP domain name has to match its neighbor switches for trunks to be formed by DTP. This does not normally come into effect because it is recommended to configure trunks manually rather than by using DTP.
How is VTP Configured?
To configure VTP, you would need to specify the VTP domain, for example,
vtp domain Flackbox
Then, set its mode to either VTP mode server, VTP mode client, or VTP mode transparent. Cisco switches are VTP servers by default.
You also need to add your VLAN information on the server and transparent switches. You cannot add VLAN information on a switch set to client mode. So for this example, we enter these commands to the VTP server and transparent switches:
VLAN 10
name Eng
VLAN 20
name Sales
After this, all of the switches know about all of the different VLANs. We just need to configure the ports attached to PCs as access ports in the correct VLAN and configure our trunk ports between switches.
Switches receive advertisements via the trunk links. The VTP revision number and the VTP domain name are also received by the switches to disregard advertisements with lower revision number and advertisements from other VTP domains.
VTP Configuration Guidelines
To guarantee VTP connectivity success, you should follow these guidelines during VTP configuration:
- All of the switches must have the same VTP domain and VTP version. If a password was configured, it must also be the same for all of the switches.
- Configuration revision number must be the same in every VTP server in the domain. The revision number must be the highest in the domain as well.
- Trunk ports are configured to connect the switches in the VTP domain.
- Create VLANs after enabling VTP on the server. Upon enabling VTP on the server, the existing VLANs on the switch would be deleted.
- When adding previously configured switches, make sure to reset the revision number before connecting it to the VTP domain.
How to Set Up VTP Client Switches
To ensure that the VTP clients would receive advertisements from the VTP server, you must accomplish the following:
- Configure the switch to VTP client mode, switches are in VTP server mode by default.
- Configure the VTP trunks.
- Connect to the appropriate VTP server. It may take a few minutes for the connection to converge.
- Verify the VTP status. Before beginning the access port configuration, ensure that the VLANs, VTP domain, and revision number are correct.
- Configure the access ports.
Cisco VTP Verification
This command will show what the domain name is, the switch mode (server, client, or transparent), and the current revision number:
show VTP status

What is VTP Pruning?
VTP sometimes creates unwanted traffic by flooding unknown VLAN unicasts, multicasts, and/or broadcasts. All switches in the VTP domain will be receiving unwanted traffic as a result. The VTP pruning feature is used to prune or inhibit traffic going to unnecessary switches.
VTP pruning is disabled by default. Enabling VTP pruning would reduce the consumed bandwidth by restricting traffic to the trunk links.
How to Enable VTP Pruning?
VTP pruning is needed to be configured on VTP Server switches only. To enable VTP pruning on our switches, we need to enter the command in the global configuration mode:
vtp pruning
After enabling VTP pruning in our VTP Server, we can now configure the list of VLANs to be pruned in the trunk link. VLAN 1 and the extended-range VLANs,1006 to 4094, are ineligible to be pruned.
In the interface configuration mode of the trunk link, we can configure the list of VLANs allowed to be pruned by using the command:
switchport trunk pruning vlan { add | except | none | remove } vlan-list [ ,vlan [ ,vlan [ ,,, ]]
Is There a Way to Stop VTP From Pruning?
VTP pruning is disabled in Cisco devices by default. The feature needs to be enabled to be used. To disable VTP pruning in VTP switches, you need to issue the command in the global configuration mode:
no vtp pruning
Cisco VTP VLAN Trunking Protocol Configuration Example
This configuration example is taken from my free ‘Cisco CCNA Lab Guide’ which includes over 350 pages of lab exercises and full instructions to set up the lab for free on your laptop.
Click here to download your free Cisco CCNA Lab Guide.
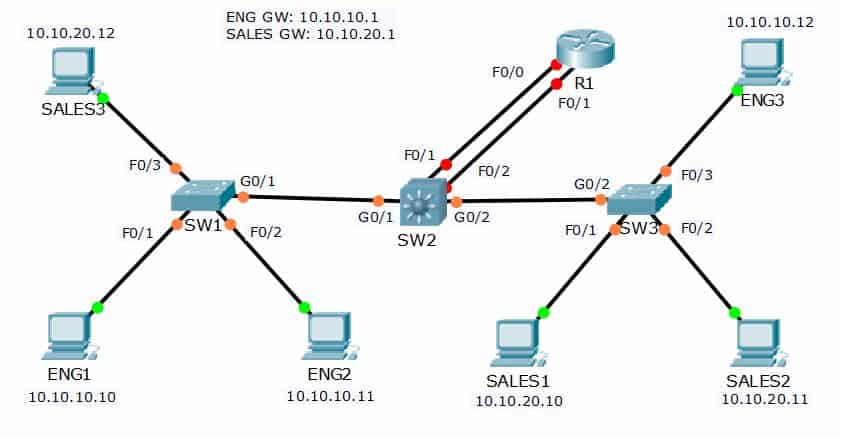
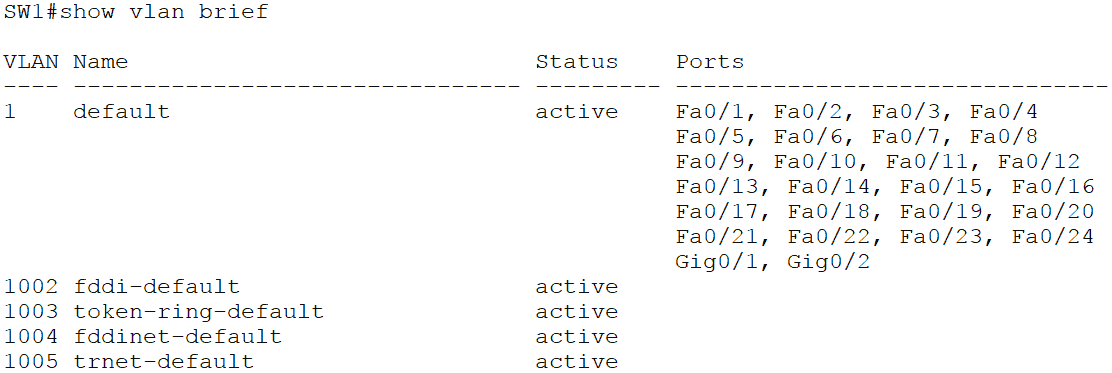
- All routers and switches are in a factory default state. View the VLAN database on SW1 to verify no VLANs have been added.
2. View the default switchport status on the link from SW1 to SW2.
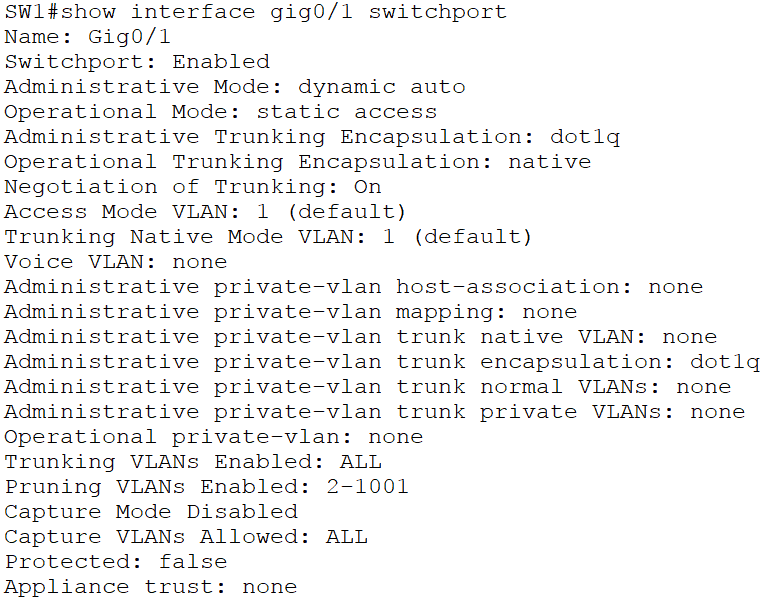
The trunking mode is set to dynamic auto and the interface is currently in the access port operational mode using the default VLAN 1.
3. Configure the links between switches as trunks.
SW1(config)#int g0/1
SW1(config-if)#switch mode trunk
SW2(config)#int g0/1
SW2(config-if)#switch trunk encap dot1q
SW2(config-if)#switch mode trunk
SW2(config-if)#int g0/2
SW2(config-if)#switch trunk encap dot1q
SW2(config-if)#switch mode trunk
SW3(config)#int g0/2
SW3(config-if)#switch mode trunk
4. Configure SW1 as a VTP Server in the VTP domain Flackbox.
SW1(config)#vtp domain Flackbox
Changing VTP domain name from NULL to Flackbox
SW1(config)#vtp mode server
Device mode already VTP SERVER.
5. SW2 must not synchronise its VLAN database with SW1.
SW2(config)#vtp mode transparent
Setting device to VTP TRANSPARENT mode.
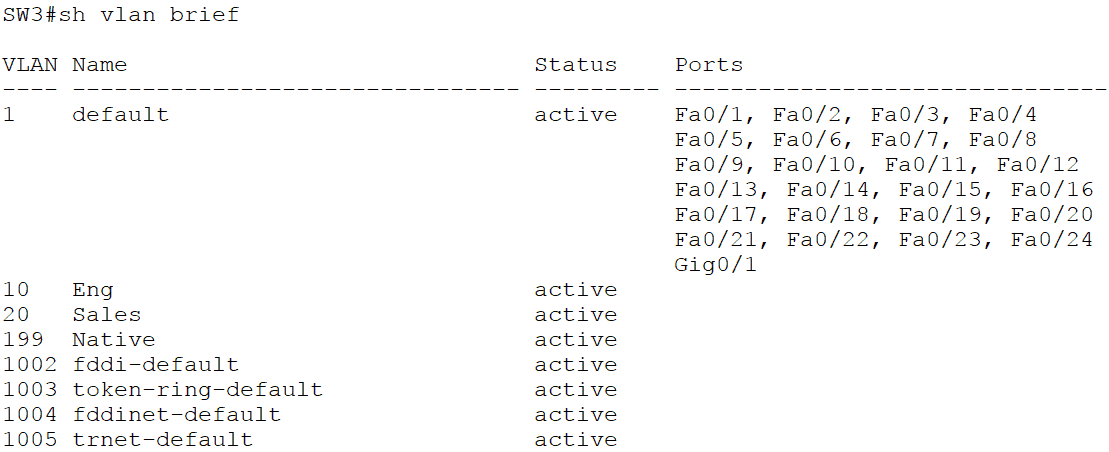
6. SW3 must learn VLAN information from SW1. VLANs should not be edited on SW3.
SW3(config)#vtp mode client
Setting device to VTP CLIENT mode.
SW3(config)#vtp domain Flackbox
Changing VTP domain name from NULL to Flackbox
7. Add the Eng, Sales and Native VLANs on all switches.
VLANs must be configured on the VTP Server SW1 and on VTP Transparent SW2. VTP Client SW3 will learn the VLANs from SW1.
SW1(config)#vlan 10
SW1(config-vlan)#name Eng
SW1(config-vlan)#vlan 20
SW1(config-vlan)#name Sales
SW1(config-vlan)#vlan 199
SW1(config-vlan)#name Native
SW2(config)#vlan 10
SW2(config-vlan)#name Eng
SW2(config-vlan)#vlan 20
SW2(config-vlan)#name Sales
SW2(config-vlan)#vlan 199
SW2(config-vlan)#name Native
8. Verify the VLANs are in the database on each switch.
9. Configure the trunk links to use VLAN 199 as the native VLAN for better security.
SW1(config)#interface gig0/1
SW1(config-if)#switch trunk native vlan 199
SW2(config)#int gig0/1
SW2(config-if)#switch trunk native vlan 199
SW2(config-if)#int gig0/2
SW2(config-if)#switch trunk native vlan 199
SW3(config)#int gig0/2
SW3(config-if)#switch trunk native vlan 199
10. Configure the switchports connected to the PCs with the correct VLAN configuration.
Eng PCs should be in VLAN 10, Sales PCs in VLAN 20.
SW1(config)#int range f0/1 - 2
SW1(config-if-range)#switch mode access
SW1(config-if-range)#switch access vlan 10
SW1(config-if-range)#int f0/3
SW1(config-if)#switch mode access
SW1(config-if)#switch access vlan 20
SW3(config)#int range f0/1 - 2
SW3(config-if-range)#switch mode access
SW3(config-if-range)#switch access vlan 20
SW3(config-if-range)#int f0/3
SW3(config-if)#switch mode access
SW3(config-if)#switch access vlan 10
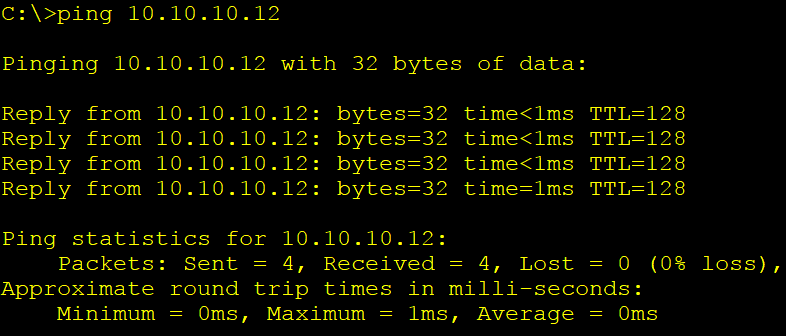
11. Verify the Eng1 PC has connectivity to Eng3.
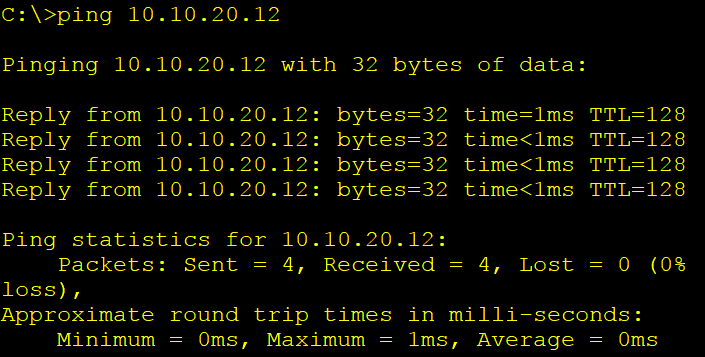
12. Verify Sales1 has connectivity to Sales3.
Additional Resources
Understanding VTP from Cisco.