In this Cisco CCNA training tutorial, you’ll learn about ARP, what the Address Resolution Protocol is, how it works, and what are the commands to be used. Scroll down for the video and also text tutorial.
ARP – The Address Resolution Protocol Video Tutorial

Allan Gomez

I am already qualified and reviewing everything from the scratch. That is why I took this course which I liked a lot since it is more related to real work than other courses I have taken before.
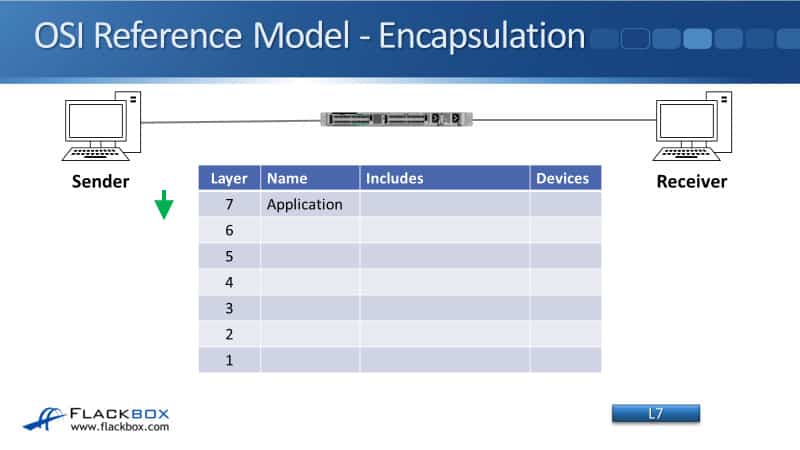
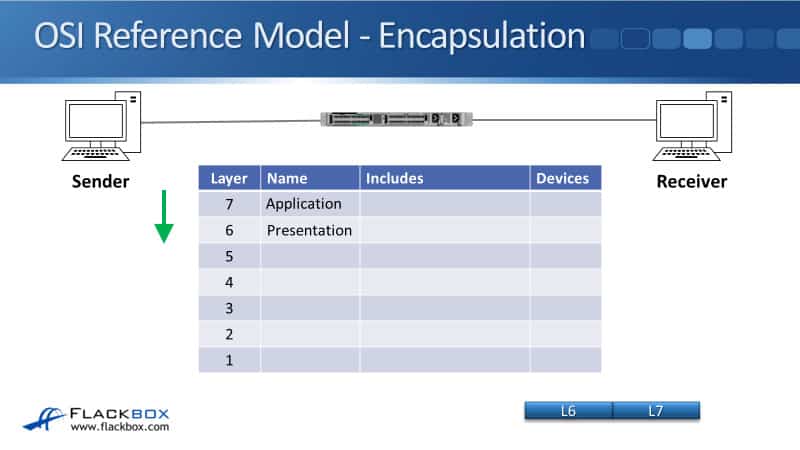
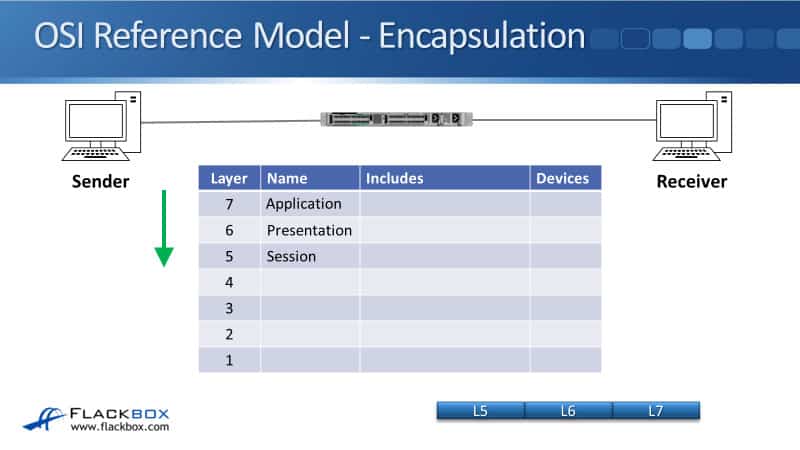
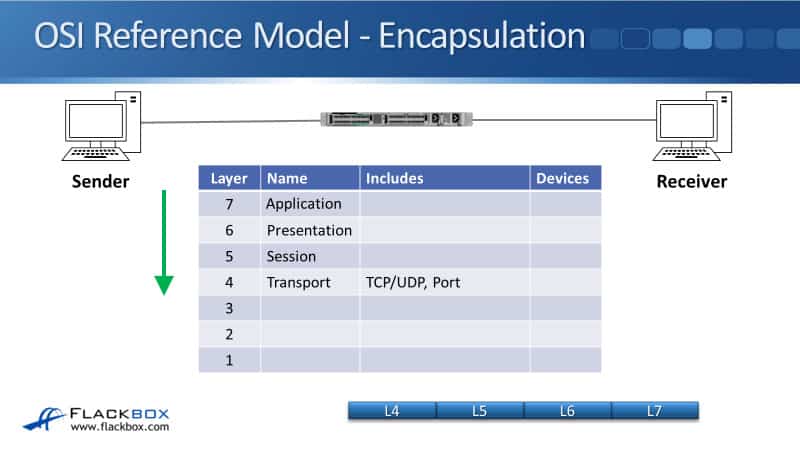
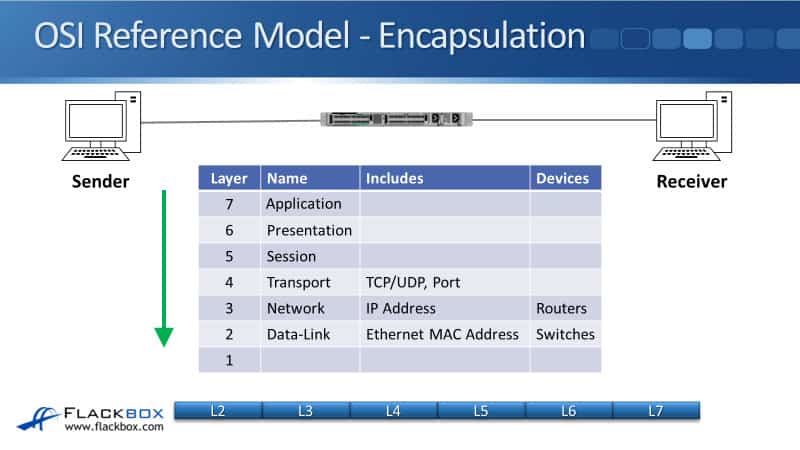
OSI Reference Model - Encapsulation
We’ll start by looking at how this fits into the OSI stack. So, we've got a sender on the left, it's going to send some traffic to the receiver on the right. The sender will compose the packet, starting with the Layer 7 information, that's the Application Layer.
It will then encapsulate that with Layer 6, the Presentation Layer header.
That will be encapsulated in the Session Layer header.
Then at Layer 4, with the Transport Layer header, it will include information, such as whether it's TCP or UDP, and the port number.
That will then get encapsulated with the Layer 3 IP header, which includes the source and destination IP address.

Then it will be encapsulated in the Layer 2 Data-Link header, which includes the source and destination MAC address, and that will then get put onto the physical wire.
IP to MAC Address Resolution
The sender can either send directly to an IP address or it can send to an FQDN. If it sends to that Fully Qualified Domain Name, then that will need to be resolved into the IP address using DNS.
We'll find the destination IP address, then when the packet gets down to Layer 2, the sender also needs to know the destination and MAC address. So when it composes a packet, it needs to know both the destination IP address and the MAC address as well.
Now, the IP address is a logical address, which is controlled by administrators. It makes sense that we can have that referenced in the application, either directly as the destination IP address or as the FQDN, which can be dissolved by DNS.
The MAC address, on the other hand, is not a logical address. We just have that great, big, flat global address space, so it's not really possible either for the user to enter the destination MAC address themself or for it to be configured in the application.
Because of that, we need a way that it can be automatically derived. We need a protocol that's it's going to be able to figure out what the MAC address is automatically, and that's what ARP is, the Address Resolution Protocol. ARP maps the destination IP address to the destination MAC address.
ARP Address Resolution Protocol
In the example here, we've got a sender on the left at 172.23.4.1, and its MAC address is 1111.2222.3333. It's going to send some traffic to the receiver on the right with IP address 172.23.4.2 and the MAC address 2222.3333.4444.
In our example, the sender already knows that it wants to send traffic to IP address 172.23.4.2. It can compose the packet as far as the Layer 3 IP header, but it doesn't know the receiver's MAC address yet. It's going to use ARP to find that out.
It will send out an ARP request, which is a Layer 2 broadcast. The ARP request says, "Hey, I'm looking for 172.23.4.2, what's your MAC address?" That will come from the sender's MAC address of 1111.2222.3333, and it goes to a destination MAC address of FFFF.FFFF.FFFF. That is the Layer 2 broadcast address.
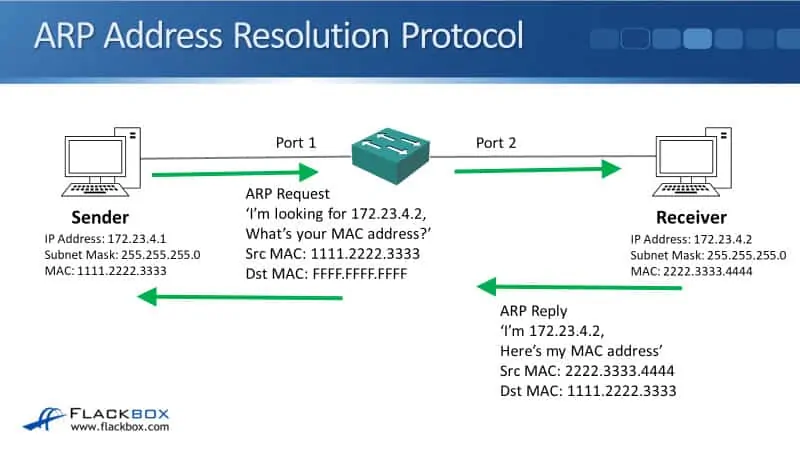
Obviously, the sender has to send it out everywhere because it doesn't know what the intended destination's MAC address is yet. That will come into the switch, the switch will see that it is broadcast traffic, so it will flood it at all ports.
It will hit everything plugged into that switch, including, in our example, the receiver on the right, which will process that ARP request.
It will see that it's looking for 172.23.4.2, and that is it's own IP address, so it will respond to the ARP request. It will send an ARP reply back, saying, "I'm 172.23.4.2, and here's my MAC address." That comes from its source MAC of 2222.3333.4444, and the destination MAC address is the original sender's unicast MAC address of 1111.2222.3333.
The receiver knows exactly what to send it back to because that original MAC address of 1111.2222.3333 was in the ARP request. The switch will then send that ARP reply just out of Port 1, down to the original sender. That was unicast traffic and it's for a known MAC address which is already in its MAC address table.
That is how ARP works when both of the hosts are on the same IP subnet. ARP replies are saved in a host ARP cache so that it doesn't need to send an ARP request every time it wants to communicate with somebody else.
Host ARP Commands
To view the ARP cache, we can do that on Windows with the arp -a command. On a Linux host, we use the arp -n command.
To flush the cache on Windows, we use the command:
netsh interface ip delete arpcache
To flush the cache on Linux, we use the command:
ip -s -s neigh flush all
We wouldn't normally do that, but if we were troubleshooting it or if the ARP cache had somehow got corrupted, that's how we would clear it.

Routed Traffic

On a Windows host with an IP address of 172.23.4.1, for example, I've got a Linux host at 172.23.4.2. Let's ping that to generate some traffic. In the Windows host here, I'm going to ping 172.23.4.2. It knows what the destination IP addresses, but it doesn't know what the matching destination MAC address is yet.
It's going to do an ARP request to find that out. If I now do an arp -a, I should see an entry for 172.23.4.2, which is our Linux host, and I can see what its MAC address is.
If I jump onto that Linux host, and I do an arp -n there, then I'll see an entry for 172.23.4.2. Because I had some traffic between those two hosts, it's got an entry in its ARP cache for that host IP address and its MAC address as well. That's how ARP works when both hosts are in the same subnet.
Now, we'll see how ARP works when the traffic has to go through a router. In the example, 172.23.4.1 wants to send a packet to 192.168.10.1, so that's two different IP subnets.
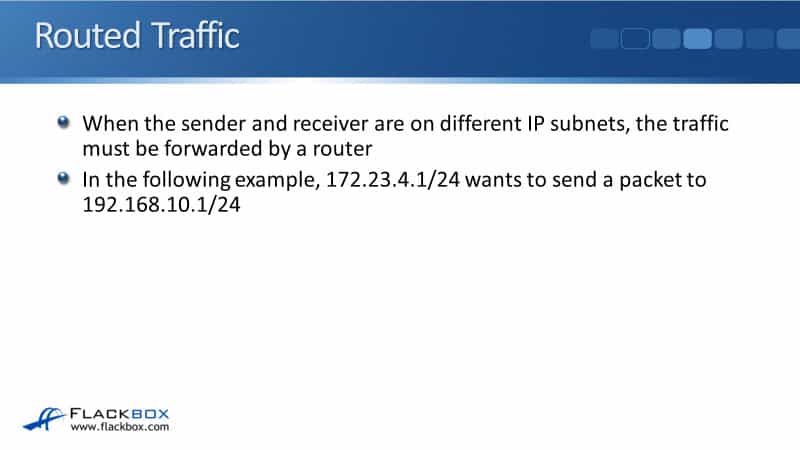
You see the sender over there on the left, the receiver is on the right, and we've got a router that is going to route traffic between those two subnets.
We can't have ARP working the way it did earlier when both hosts were on the same subnet. If the sender on the left sends out a normal ARP request for 192.168.10.1, that will go out as a Layer 2 broadcast, and it wouldn't be forwarded by the router.
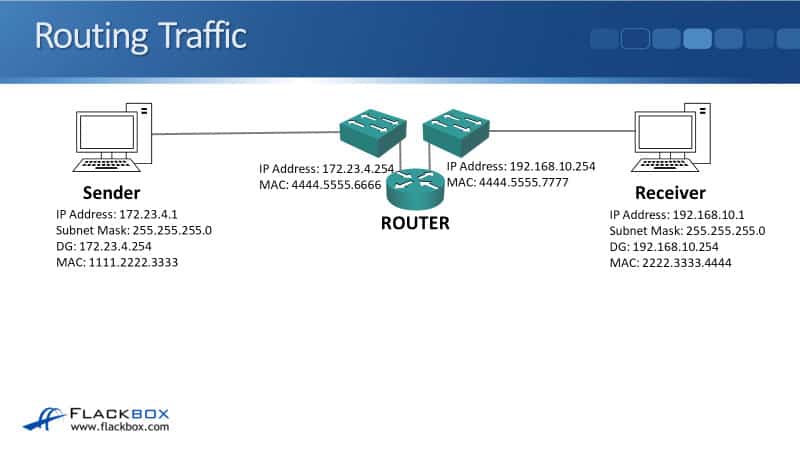
The ARP request would never get to the receiver. Also, we knew that when we send traffic between two different IP subnets, it has to be sent via a router. So, the sender is not going to send an ARP request for 192.168.10.1.
It knows not to do that because it compares its own IP address and subnet mask with the destination IP address, and it can see that it's on a different IP subnet. So, the sender knows that it has to send the traffic via a router.
It doesn't send an ARP request for the final destination, instead, it sends an ARP request for its default gateway. The sender at 172.23.4.1 will send an ARP request for 172.23.4.254, which is its default gateway. That comes from a source MAC of 1111.2222.3333 of the sender. The destination MAC is, as usual, for an ARP request, FFFF.FFFF.FFFF, the Layer 2 broadcast address.
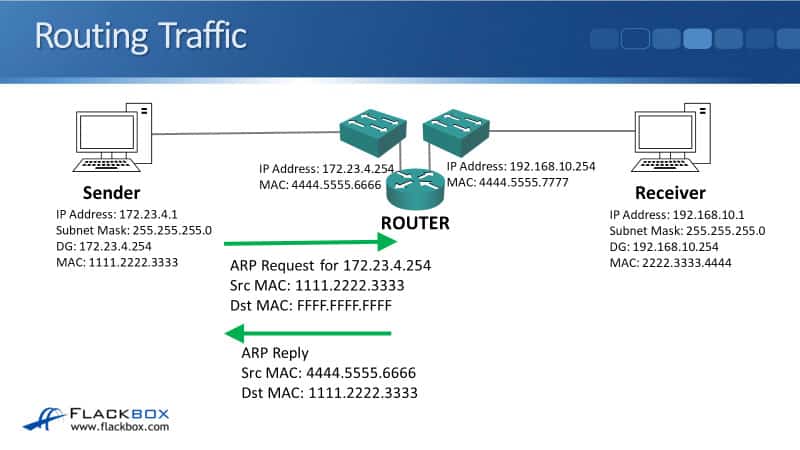
In the ARP request, it says it's a request for 172.23.4.25, asking it for its MAC address. That will hit everything in the 172.23.4.0 subnet, including the router. The router will see it's an ARP request for itself, so it will send an ARP reply.
That comes from its source MAC of the 172.23.4.254 IP address, which was 4444.5555.6666 and the destination MAC address is 1111.2222.3333. The router knows to send it there because that source MAC was in the original ARP request.
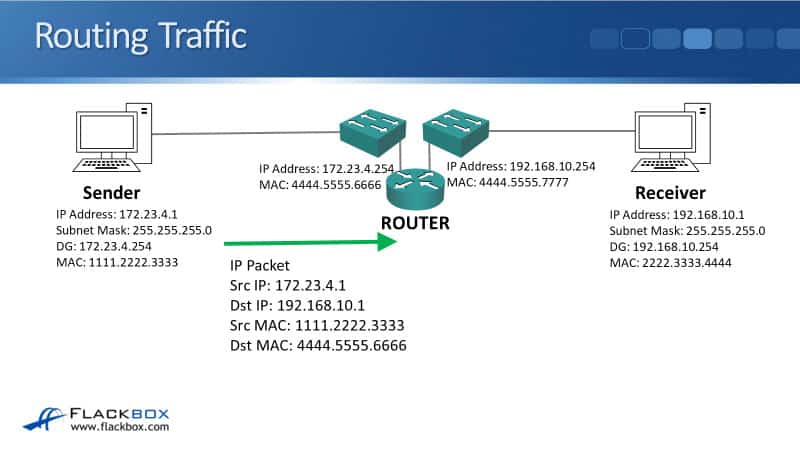
The sender will have been holding the IP packet that's intended for the final destination while it sent out the original ARP request there. It now knows where to send it to for the destination MAC address, so it will now send that IP packet.
The IP packet comes from a source IP address of the sender, 172.23.4.1. The destination IP address is the IP address of the final destination, so that will be 192.168.10.1. The source MAC is 1111.2222.3333, and the destination MAC is for that sender's default gateway, which was 4444.5555.6666.
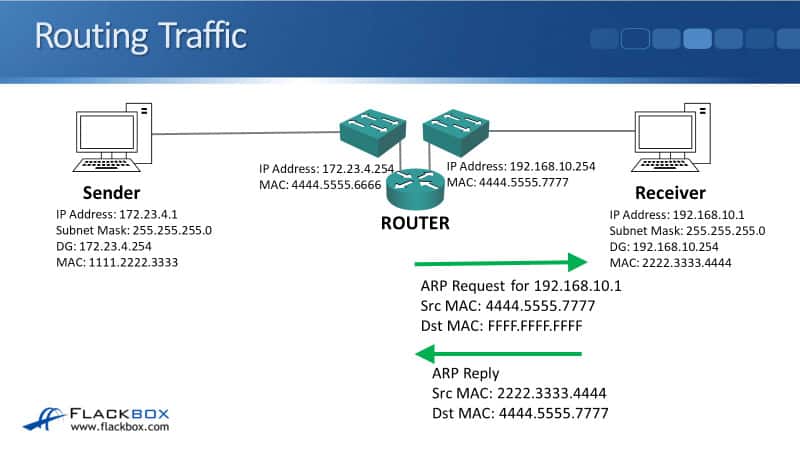
That packet will hit the router, and the router sees that it needs to send it to 192.168.10.1. The router does not know the MAC address of 192.168.10.1, because it hasn't communicated with it before in our example, so it's not in the ARP cache.
The router will hold the IP packet from the sender on the left, and it will send an ARP request for 192.168.10.1. That will go out its interface on the right, which has got IP address 192.168.10.254, so it's in the same IP subnet as the final destination.
It will say it's an ARP request for 192.168.10.1, it comes from the source MAC of the router's IP address, 192.168.10.254. That was MAC address 4444.5555.7777, and it's an ARP request, so it goes to a destination MAC of the Layer 2 broadcast, FFFF.FFFF.FFFF.
That will hit everything in the 192.168.10 subnet, including the receiver over on the right. The receiver on the right will see it's an ARP request for its IP address of 192.168.10.1, so it will send the ARP reply.
The ARP reply comes from its source MAC 2222.3333.4444, and it goes to the destination MAC of the router's interface on the right-hand side there, which was 4444.5555.7777. The router now knows the MAC address of the final destination on the right, so it will send the IP packet.
The IP formation in the packet never changes. The source IP address is always the original sender, which is 172.23.4.1 in our example, and the destination IP is always the final destination address, which was 192.168.10.1.
The source MAC is the router's interface on the right-hand side, which was 4444.5555.7777, and the destination MAC is 2222.3333.4444.

The source and the destination IP address never change end to end, but the MAC address source and destination will change physical hop by physical hop.
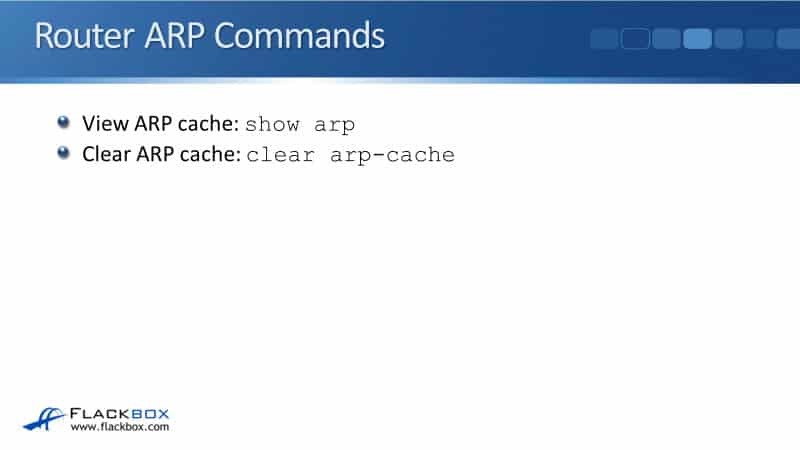
Router ARP Commands
If you want to view the ARP cache on a Cisco router, the command is:
show arp
To clear the ARP cache, the command is:
clear arp-cache
In the example below, we have R1 at 10.10.10.1, R2 is at 10.10.10.2, and R3 is at 10.10.20.1. So if I jump onto R1 here, and I'll do a show arp, it's already done pings to R1 and R2. The MAC address is reachable at interface FastEthernet 0/0. Same through with R2 and R3.
If I go onto R3 and do a show arp on here, we’ll see that R3 is in the 10.10.20 subnet. It got entries for 10.10.20.1 and 10.10.20.2. The show arp command shows you the known IP address, the MAC address, and the interface it is reachable on.
ARP - The Address Resolution Protocol Configuration Example
This configuration example is taken from my free ‘Cisco CCNA Lab Guide’ which includes over 350 pages of lab exercises and full instructions to set up the lab for free on your laptop.
Click here to download your free Cisco CCNA Lab Guide.
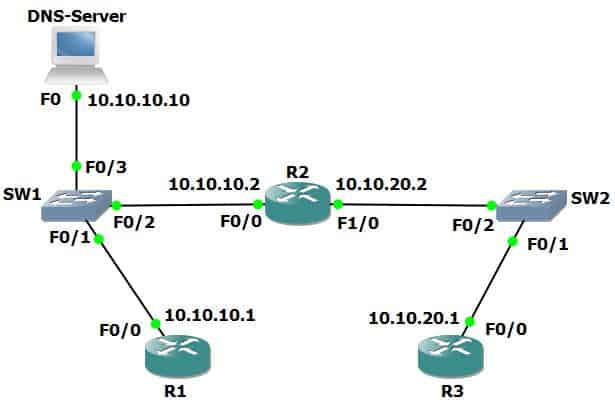
- Do you expect to see an entry for R3 in the ARP cache of R1? Why or why not?
ARP requests use broadcast traffic so they are not forwarded by a router. R1 will have entries in its ARP cache for all hosts it has seen on its directly connected networks (10.10.10.0/24).
R1 is not directly connected to the 10.10.20.0/24 network so it will not have an entry in the ARP cache for R3 at 10.10.20.1.
R1 can reach R3 via R2’s IP address 10.10.10.2 – this IP address is included in the ARP cache.
The DNS server at 10.10.10.10 is also in the same IP subnet as R1 so will also appear in the ARP cache.
2. Verify the ARP cache on R1, R2, and R3.
R1#show arp
Protocol Address Age (min) Hardware Addr Type Interface
Internet 10.10.10.1 - 0090.0CD7.0D01 ARPA FastEthernet0/0
Internet 10.10.10.2 4 0004.9A96.A9A5 ARPA FastEthernet0/0
Internet 10.10.10.10 2 0090.21C6.D284 ARPA FastEthernet0/0
R2#show arp
Protocol Address Age (min) Hardware Addr Type Interface
Internet 10.10.10.1 4 0090.0CD7.0D01 ARPA FastEthernet0/0
Internet 10.10.10.2 - 0004.9A96.A9A5 ARPA FastEthernet0/0
Internet 10.10.10.10 1 0090.21C6.D284 ARPA FastEthernet0/0
Internet 10.10.20.1 4 0030.F2BA.30E7 ARPA FastEthernet1/0
Internet 10.10.20.2 - 0060.2FCA.ACA0 ARPA FastEthernet1/0
R3#show arp
Protocol Address Age (min) Hardware Addr Type Interface
Internet 10.10.20.1 - 0030.F2BA.30E7 ARPA FastEthernet0/0
Internet 10.10.20.2 4 0060.2FCA.ACA0 ARPA FastEthernet0/0
R2 is directly connected to 10.10.10.0/24 and 10.10.20.0/24 so it has entries in its ARP cache for both networks.
R3 is directly connected to the 10.10.20.0/24 network so it has entries in its ARP cache for that network only. It does not have any entries for the 10.10.10.0/24 network.
Additional Resources
Address Resolution Protocol: https://www.cisco.com/c/en/us/td/docs/ios-xml/ios/ipaddr_arp/configuration/15-s/arp-15-s-book/Configuring-Address-Resolution-Protocol.html
Monitoring and Maintaining ARP Information: https://www.cisco.com/c/en/us/td/docs/ios-xml/ios/ipaddr_arp/configuration/15-s/arp-15-s-book/Monitoring-and-Maintaining-ARP-Information.html
The ARP table on a Cisco router: https://study-ccna.com/the-arp-table-on-a-cisco-router/
Libby Teofilo

Text by Libby Teofilo, Technical Writer at www.flackbox.com
Libby’s passion for technology drives her to constantly learn and share her insights. When she’s not immersed in the tech world, she’s either lost in a good book with a cup of coffee or out exploring on her next adventure. Always curious, always inspired.