In this NetApp tutorial, you’ll learn about the installation of the NetApp VSC, the Virtual Storage Console. Scroll down for the video and also text tutorial.
NetApp VSC Installation Video Tutorial
Abhishek Khulbe

I just cleared my NCDA in 1st attempt and all thanks to Neil’s amazing content on Flackbox, his training material, and guidance. His hands-on approach to coaching, detailed explanation with diagrams has won my respect. I am hopeful he will deliver even more in NetApp storage world.
VSC UVA Deployment
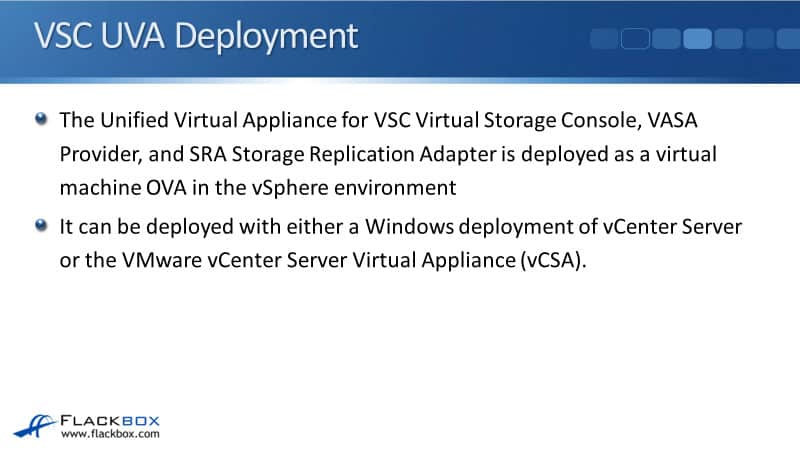
The Unified Virtual Appliance (UVA) for Virtual Storage Console (VSC), the VASA Provider, and Storage Replication Adapter (SRA) is deployed as a virtual machine OVA in the vSphere environment. OVA files are used very commonly in VMware. What they are is a virtual machine with prepackaged settings.
So, if you weren't using an OVA file, the way that you would normally install and configure a virtual machine is you would install the operating system and then any other additional applications and software on there. Then, you would also configure the settings.
When you use an OVA file, it means that you don't have to go through all those different steps. It's a prepackaged virtual machine, which includes that virtual machine’s operating system, the additional software, and any desired settings on there as well. It allows you to get that virtual machine deployed a lot more quickly.
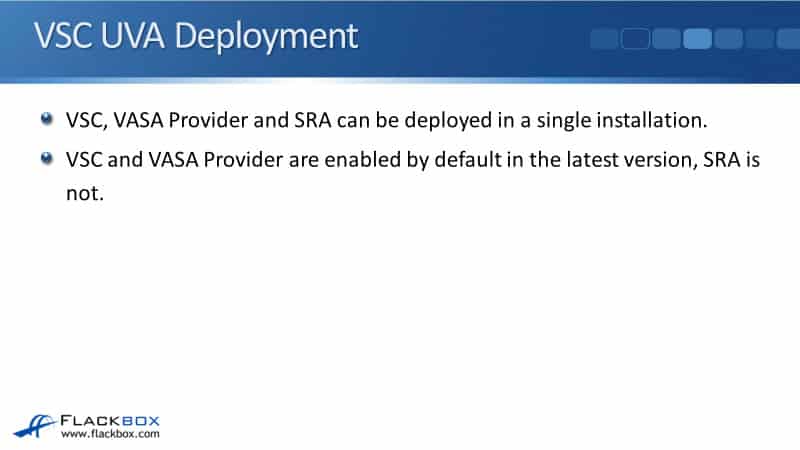
The UVA can be deployed with either a windows deployment of vCenter Server or the newer VMware vCenter Server Virtual Appliance, the vCSA, which runs its own Linux-based virtual machine. VSC, VASA Provider, and SRA can be deployed in a single installation.
Before the UVA was available, VSC, VASA Provider, and SRA were three separate pieces of software that had to be installed on configured separately. Now that the UVA is available, it includes all three. So you just have to do one installation, and you can do all the configuration from there as well. It makes things a lot more convenient.
For the terminology, the VSC has been available for quite a long time, and when people are talking about the VSC, they call it the VSC, but they may also be talking about the UVA.
So if you hear a NetApp storage engineer talking about the VSC, the Virtual Storage Console, in general, they're talking about the VSC, VASA Provider, and SRA all rolled into one, which is the UVA. The UVA and the VSC do actually have slightly different meanings.
UVA is the OVA file, which includes all three of them rolled together. The VSC is a component of the UVA. However, it’s unlikely that you would hear somebody talking about the UVA in general conversation. Typically, we just call the whole thing the VSC.
So when you hear me talking about the VSC, Virtual Storage Console in this tutorial, I'm not generally just talking about VSC. Typically, I'll also be including the VASA Provider and the SRA in that. The VSC and VASA Provider are enabled by default in the latest version. When you deploy the UVA, SRA is not.
The vCenter Server and the VSC UVA must be deployed on different VMware hosts. So that's why in our lab environment, we've got the vCSA Virtual Machine running on the ESXi one host, and we've got the VSC Virtual Machine running on the ESXi two host. We needed to install two separate hosts because they can't both be running on the same one.
The UVA should be installed on an ESXi host traditional datastore or ONTAP storage. The reason is it can't be installed in a VVol, because the VASA Provider, which is required to manage VVols, must be outside the VVol datastore to manage it. So you would have a chicken and an egg problem if you try to install it in a VVol datastore.
UVA Redundancy
Redundancy for the VSC can be provided through the standard vSphere High Availability or Fault Tolerance Features. The VSC runs as a virtual machine, so you can use VMware's built-in redundancy features, which is HA and Fault Tolerance to provide redundancy for that virtual machine.
No extra or special redundancy configuration is required on the UVA itself. You just use the standard settings inside VMware.
UVA Registration
Each VSC instance must be registered with only one vCenter server instance, but 1:1 pairing between VSC and vCenter enables you to manage all instances in both linked and non-linked mode from a single vSphere client. So it does still work across your different vSphere environment and data centers, but it's registered with only one vCenter Server instance.
If you're using SRA, each SRA instance must be registered with Site Recovery Manager (SRM), which must be registered with vCenter Server. SRM is a VMware software product that helps you manage disaster recovery. The SRA integrates with that to integrate your ONTAP storage with the SRM.
ONTAP License Requirements
A FlexClone license is required for virtual machine snapshots, which are supported in VVol datastores and also clone operations. If you’re using Storage Replication Adapter (SRA), it requires a FlexClone license to test failovers and a SnapMirror license to perform failovers. You're only going to be using SRA if you are using VMware SRM.
Default Port Numbers
You must open ports 9083, 443, and 8143 if you have a firewall between VSC and the vCenter Server. Very often you won't, but if you do have a firewall, make sure you've got those ports open.
Host and Storage in Different IP Subnets
If the host and storage are in different IP subnets, which it shouldn't be, if you use IP storage, iSCSI, or NFS, it's recommended that the ESXi hosts communicate with the ONTAP storage over the same IP subnet.
Your ESXi hosts and the logical interfaces that they connect you onto the ONTAP storage system should be on the same IP subnet, for example, 10.10.10.10 on the ESXi host and 10.10.10.50 on the ONTAP storage system.
It should be in the same IP subnet so that the storage traffic does not have to go via a router. But if the subnet is different between your ESXi host and the storage system, which is not recommended, you have to modify the VSC preference files.
The way that you do that is you use ‘vi’, and the file that you need to edit is ‘kaminoprefs.xml’ in the VSC maintenance console. To get more information on this, look at the installation guide for VSC. It tells you exactly what to do in there.
You only need to do it if the hosts and the storage are in different IP subnets, which they should not be. If you don't modify your preferences file when they are in different subnets though, then datastore provisioning will fail because VSC cannot mount the datastore.
VASA Provider and OnCommand API services. The VASA Provider is enabled by default in the latest version. Didn't use to be in previous versions. It's required to manage VVols, storage capability profiles, and alarms.
You must also register OnCommand API services with the VASA Provider to enable the VVol dashboard and VVol datastore and virtual machine reports. So, if you want to use VVols, then you need to have the VASA Provider enabled.
With having just the VASA Provider enabled, you can provision and manage your VVol data stores, but you can not see reports, and you're not going to get any information in the dashboard.
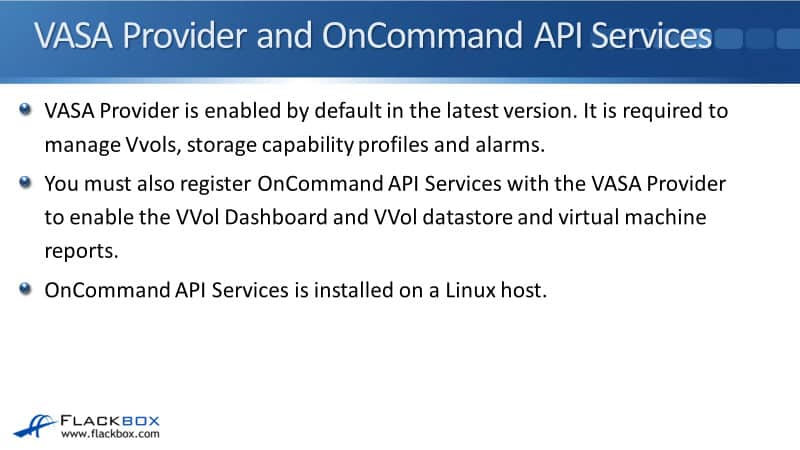
So if you are using VVols, you are going to want to get those reports. What you need to do is you have to also install OnCommand API Services. OnCommand API Services is separate software from VSC and that gets installed into a Linux host, running either CentOS or Red Hat Linux. That Linux host will typically be running as a virtual machine in your VMware environment.
NetApp VSC Installation and Configuration Example
This configuration example is an excerpt from my ‘NetApp ONTAP 9 Complete’ course. Full configuration examples using both the CLI and System Manager GUI are available in the course.
Want to practice this configuration for free on your laptop? Download your free step-by-step guide ‘How to Build a NetApp ONTAP Lab for Free’

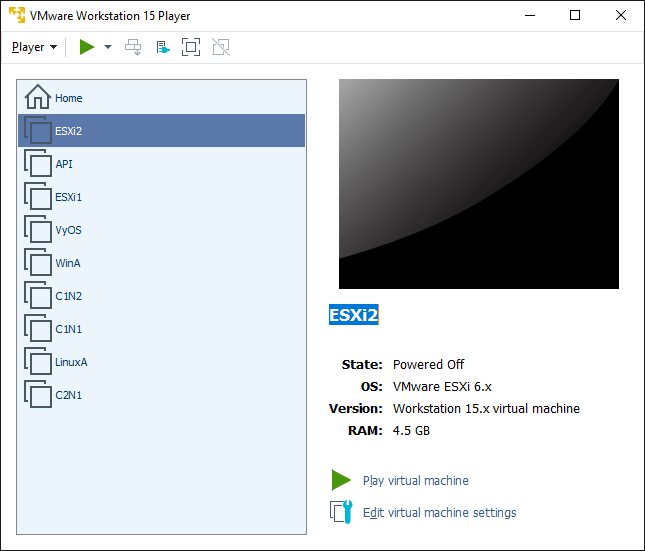
1. Suspend the C2N1 virtual machine in VMware Workstation Player. Power on the ESXi2 virtual machine. You should have only the VyOS, ESXi1, ESXi2 and WinA virtual machines running.
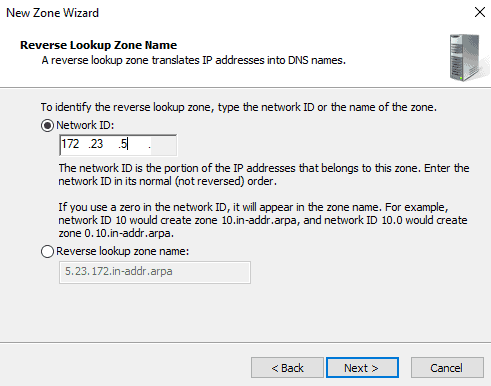
2. Create a DNS reverse lookup zone on the WinA server for the 172.23.5.0/24 network
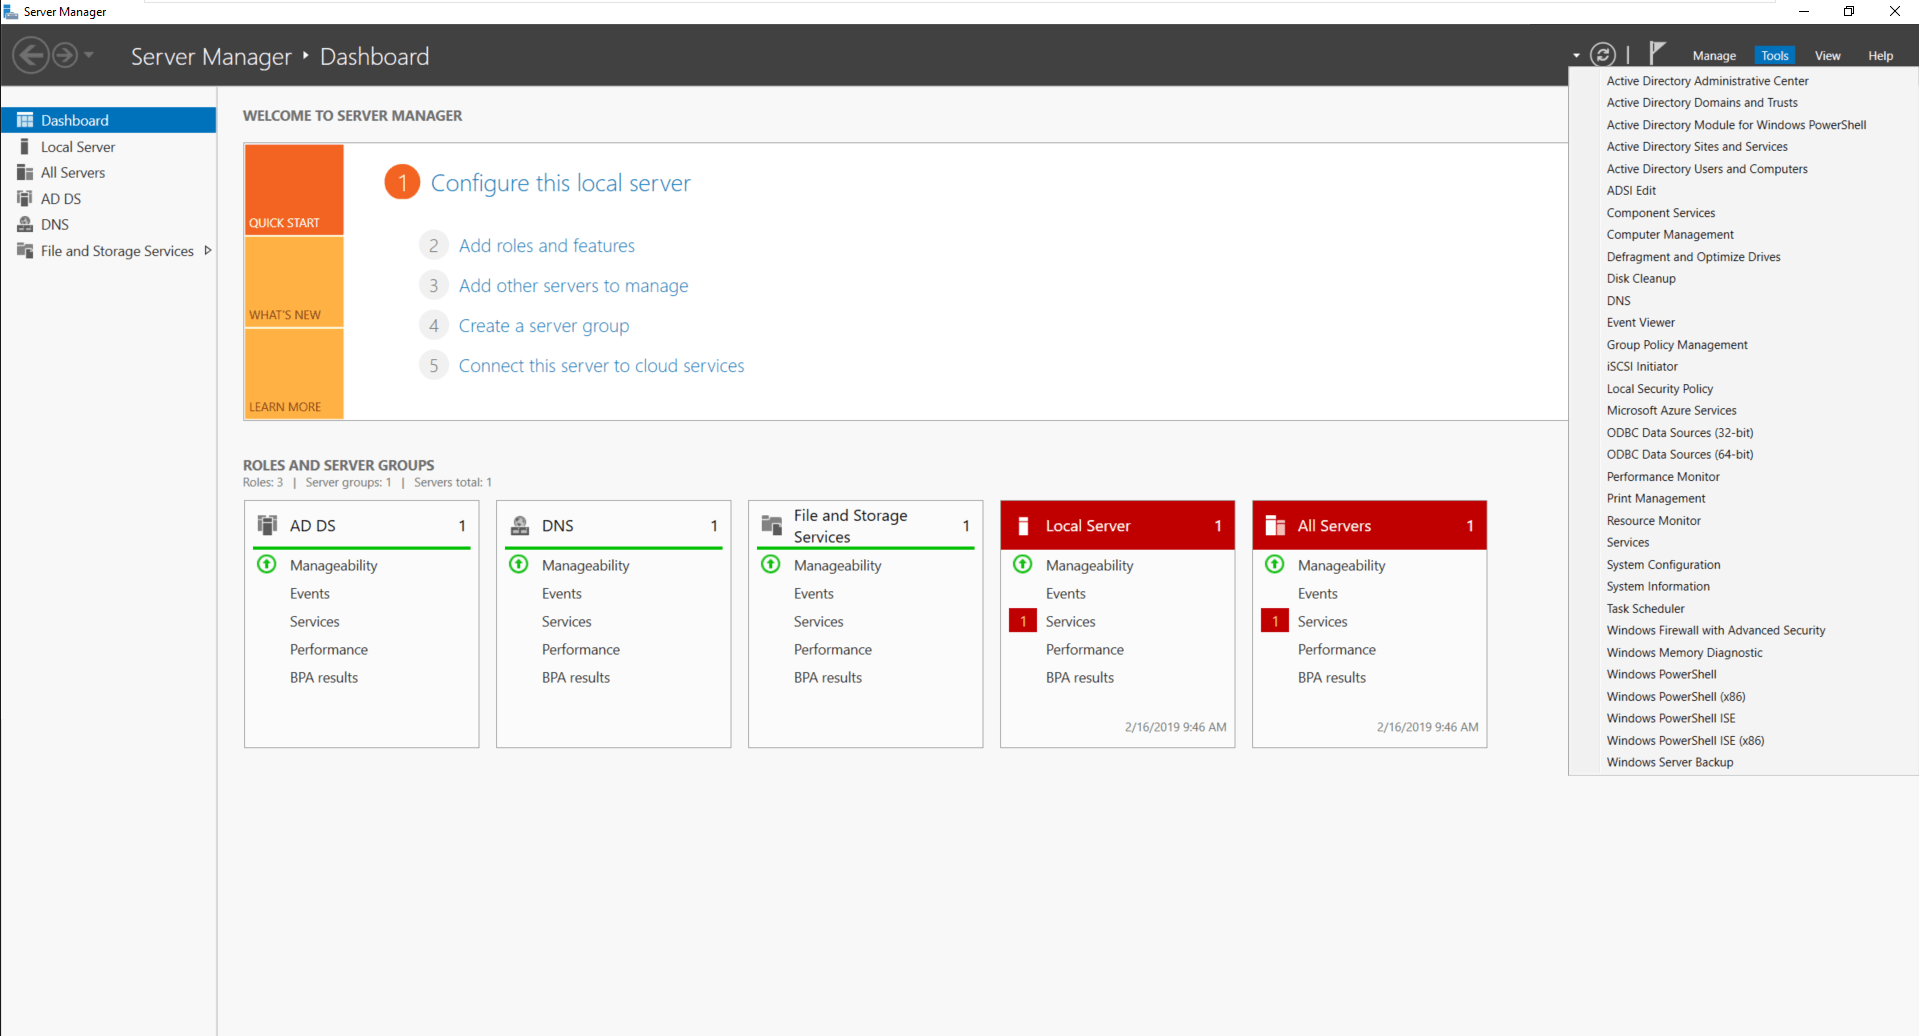
Log in to the WinA server then open the Tools > DNS applet from Server Manager.
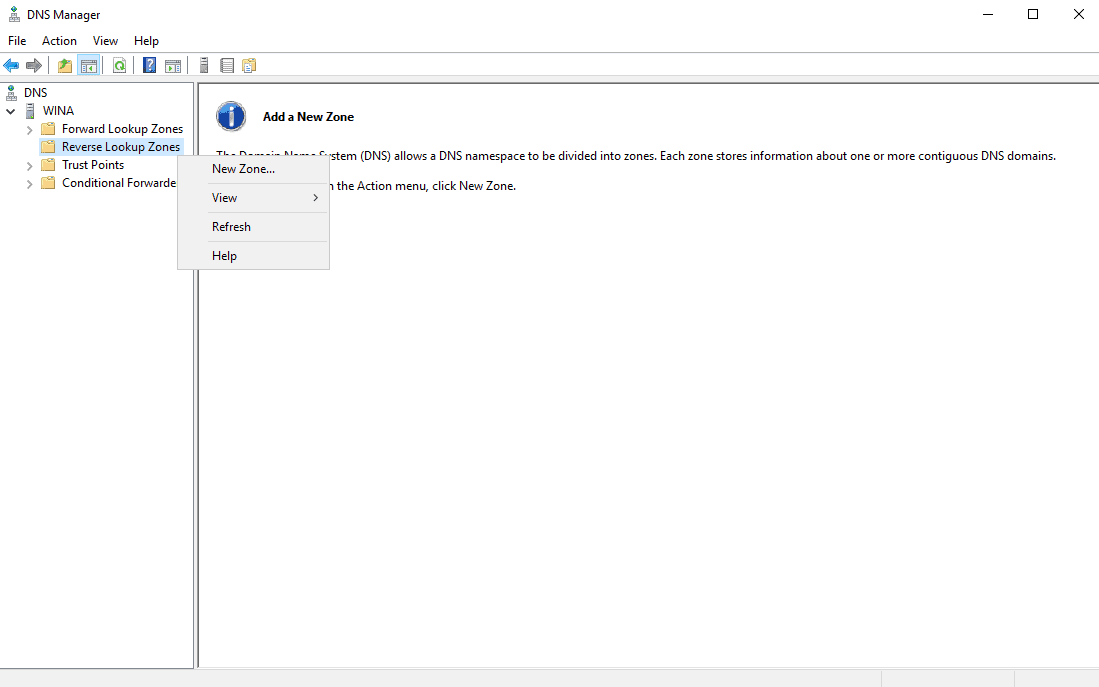
Expand the menu in the left-hand window, then right-click on Reverse Lookup Zones and select New Zone…
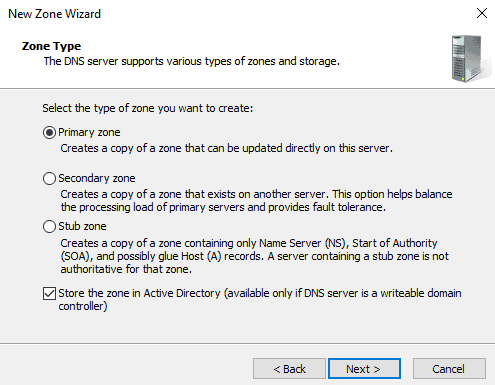
Click Next on the New Zone Wizard welcome page
Accept the defaults on the Zone Type page and click Next
Click Next on the Active Directory Zone Replication Scope page
Click Next on the Reverse Lookup Zone Name Scope page
Enter 172.23.5 as the Network ID and click Next
Click Next on the Dynamic Update page
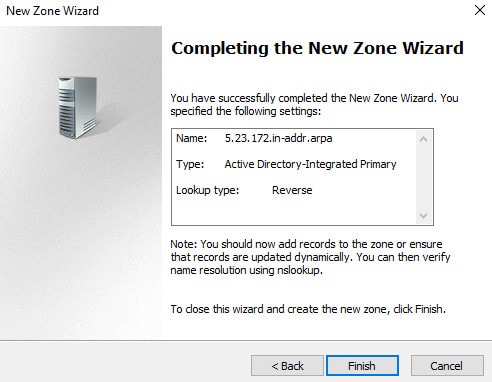
Click Finish to complete the New Zone Wizard
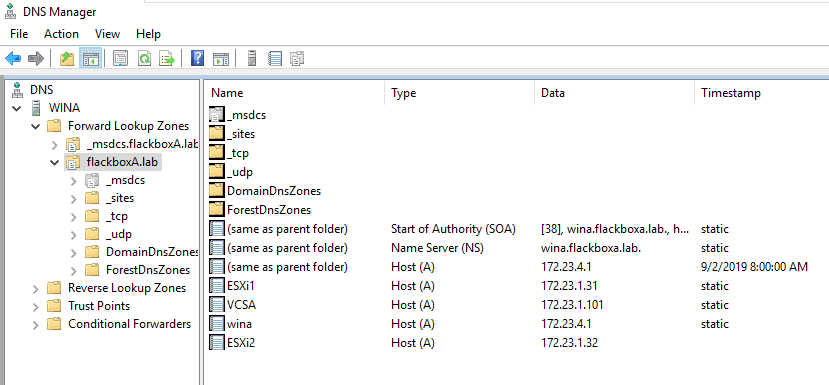
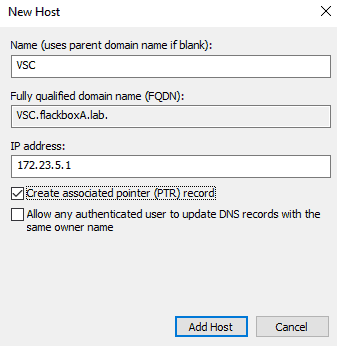
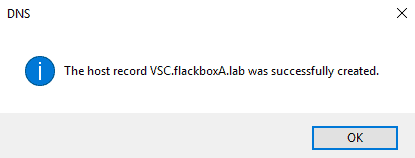
3. Configure an address record in DNS on the WinA server for vcs.flackboxa.lab with IP address 172.23.5.1
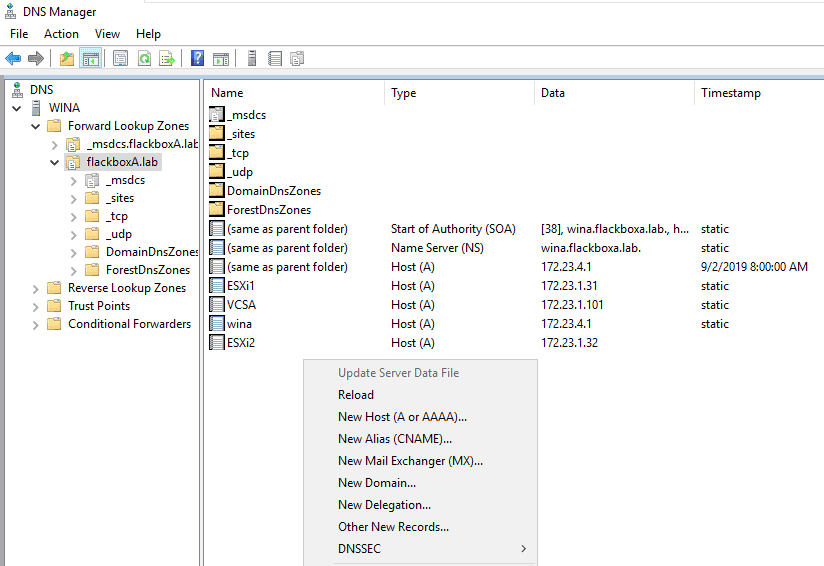
Expand Forward Lookup Zones in the left-hand window and select the flackboxA.lab domain.
Right-click in the right-hand window and select New Host (A or AAAA)…
Add an Address (A) record for the VSC Virtual Storage Console with these details:
Name: VCS
FQDN: VCS.flackboxA.lab (this will be populated for you)
IP address: 172.23.5.1
Create associated pointer (PTR) record: checked
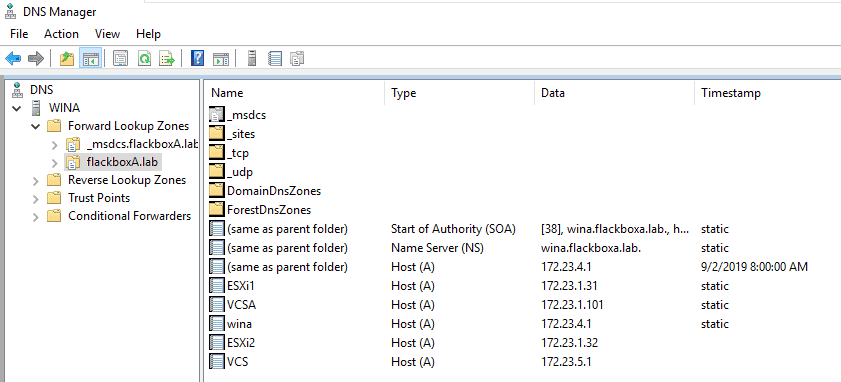
You should now have the DNS records shown below.

4. Download the Virtual Storage Console ova installation file on your laptop.
Open https://mysupport.netapp.com/site/ in a web browser. Click on Support then enter your NetApp.com username and password to sign in.
Click Downloads then Software
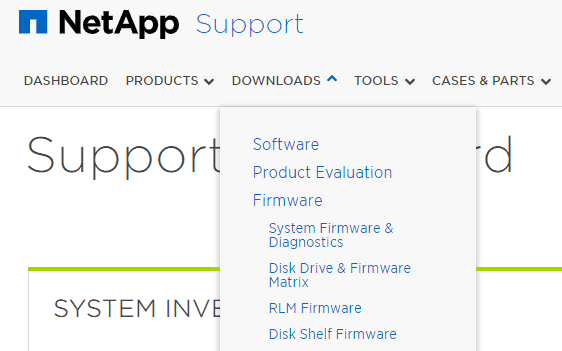
Select Virtual Storage Console > VMware vSphere then click Go!

Click View & Download for Virtual Storage Console 9.6

Click Continue at the bottom of the page

Click Accept at the bottom of the page
Click Installation package to download the software

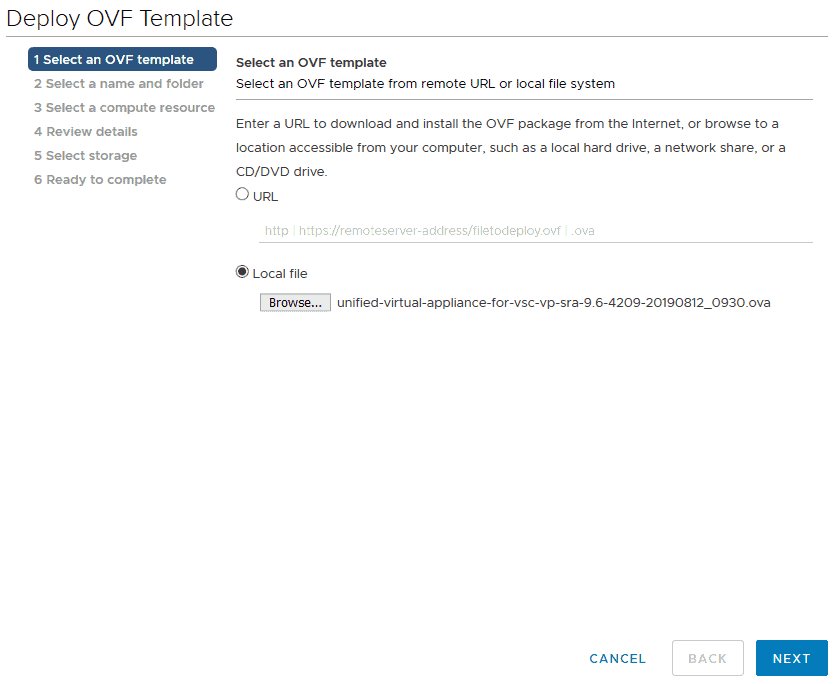
5. Install the Virtual Storage Console virtual machine on the ESXi2 host
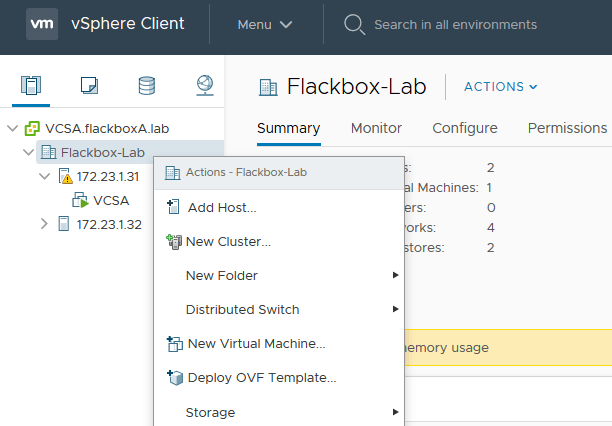
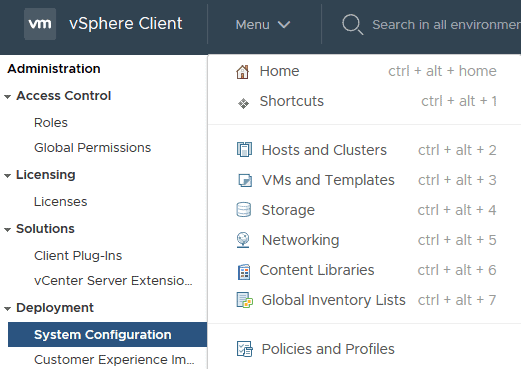
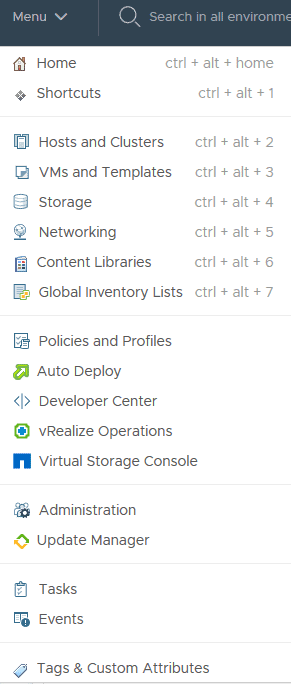
Click Menu > Hosts and Clusters in the vSphere client

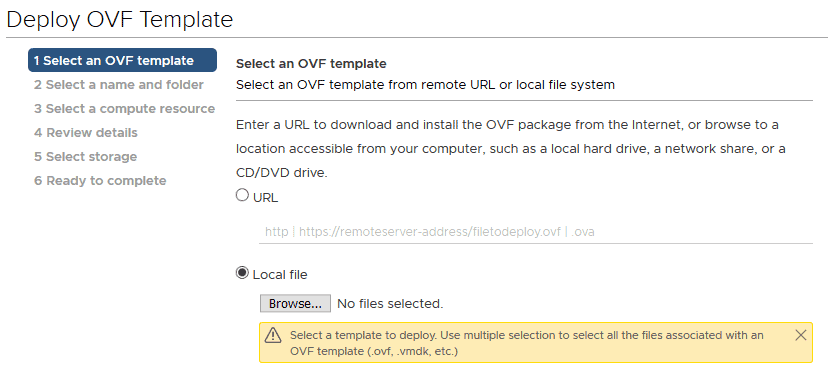
Right-click on the Flackbox-Lab datacentre and select Deploy OVF Template
Select Local file then Browse…
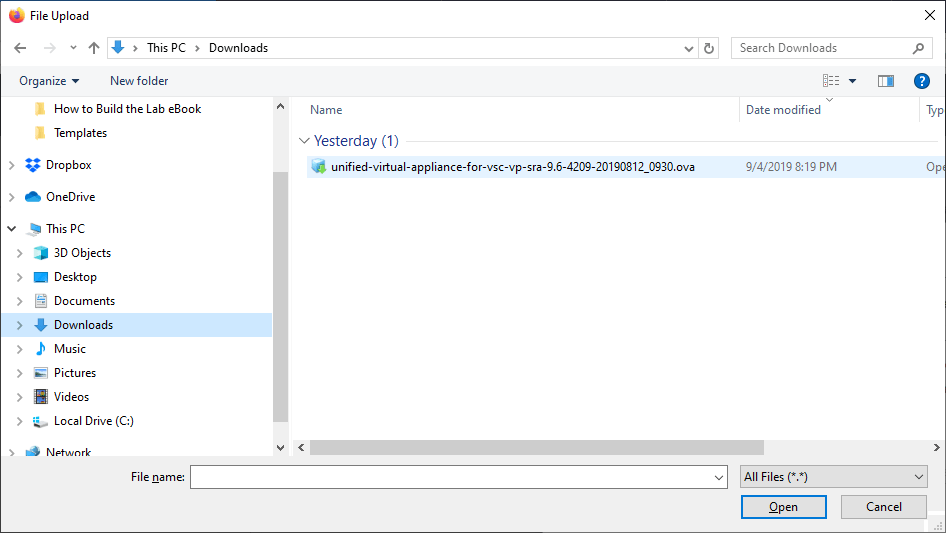
Browse to your Downloads folder, select the Unified Virtual Appliance for VSC OVA file you downloaded and click Open.
Click Next
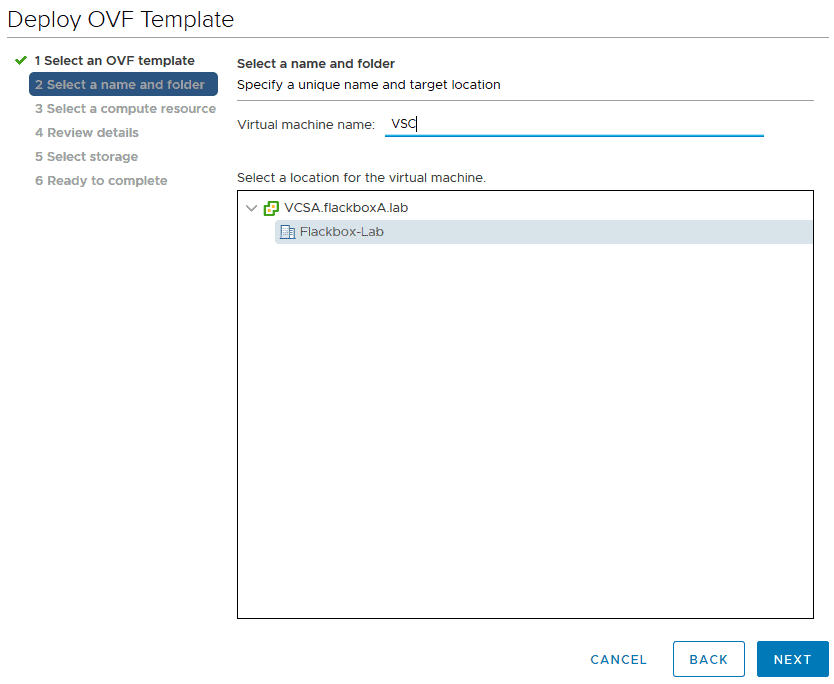
Name the virtual machine VSC and select Flackbox-Lab as the target location. Click Next
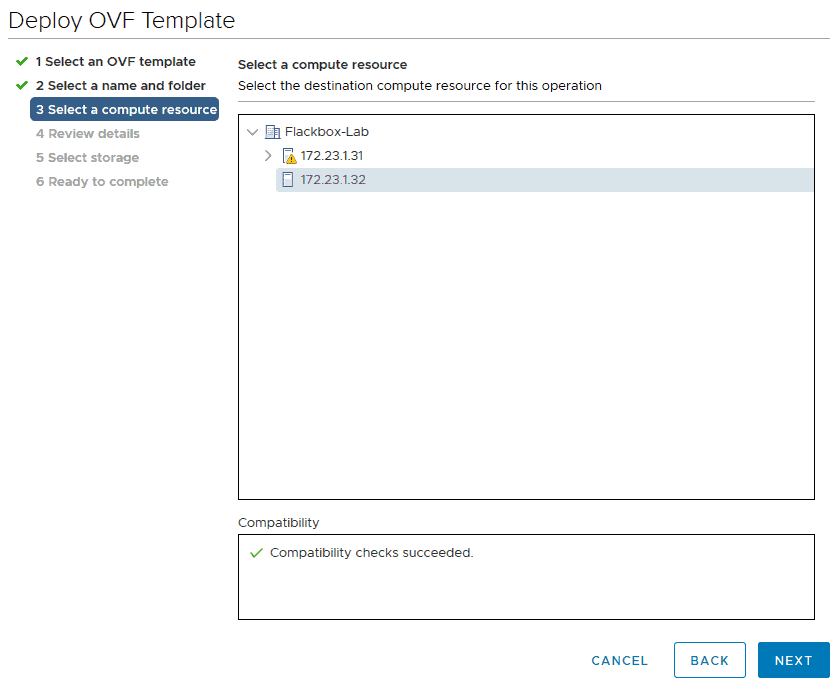
Select 172.23.1.32 as the compute resource and click Next
Click Next on the Review Details page

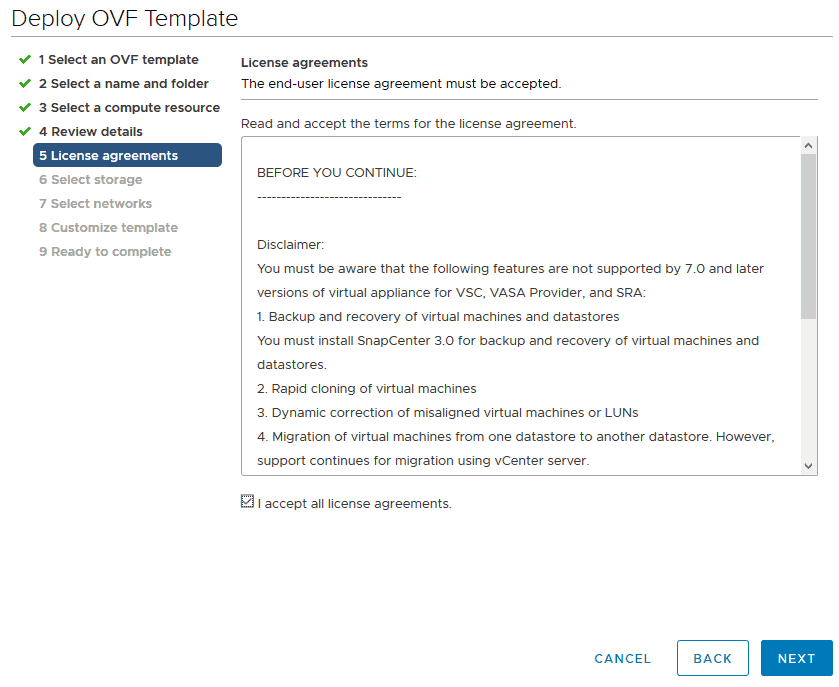
Click the checkbox I accept all license agreements and click Next
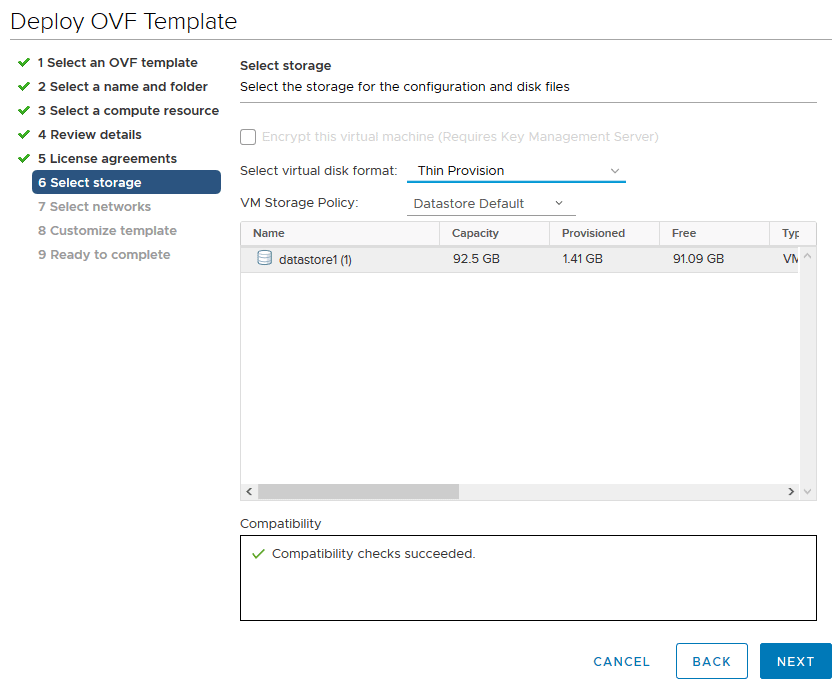
Select virtual disk format: Thin Provision then click Next
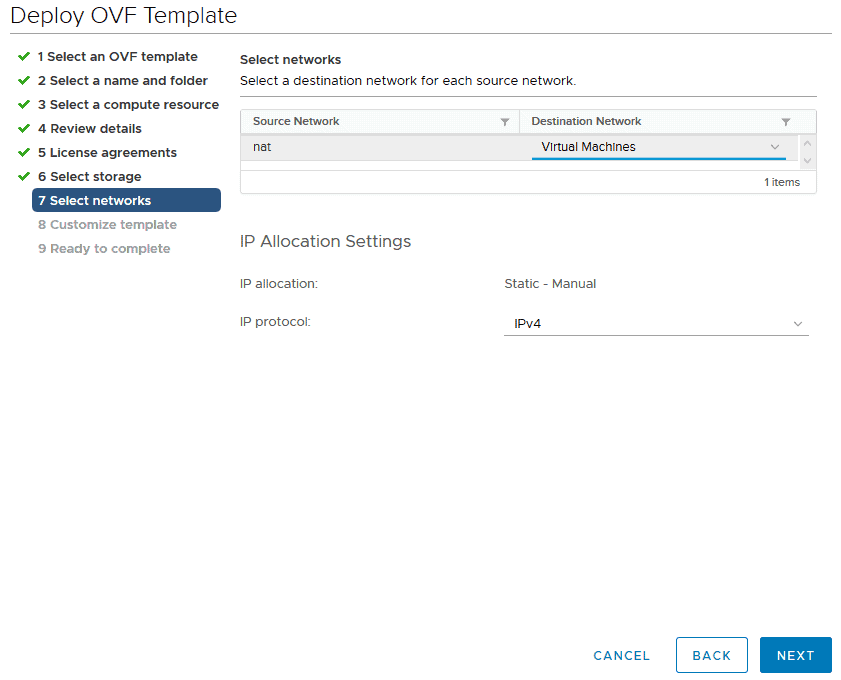
Select the Destination Network Virtual Machines and click Next
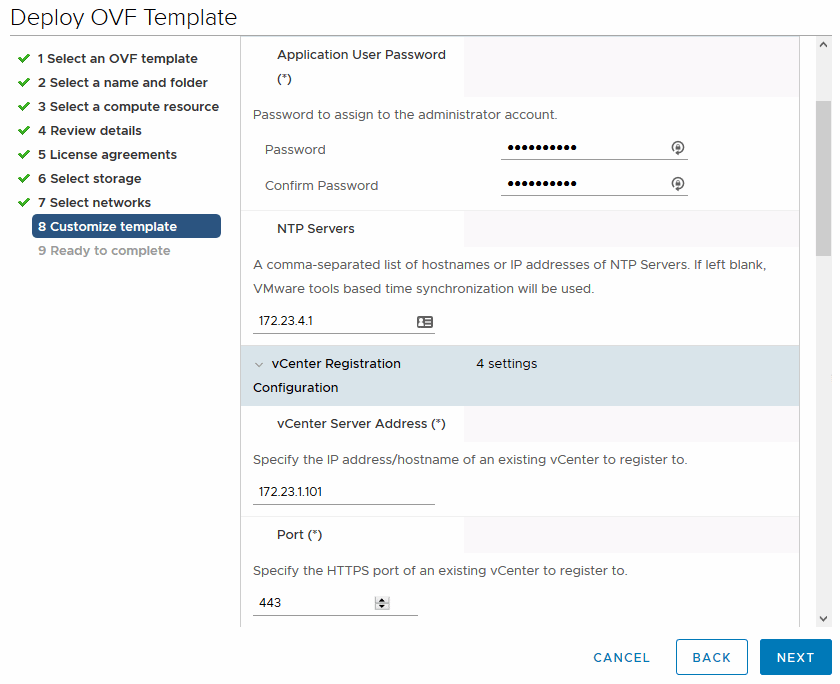
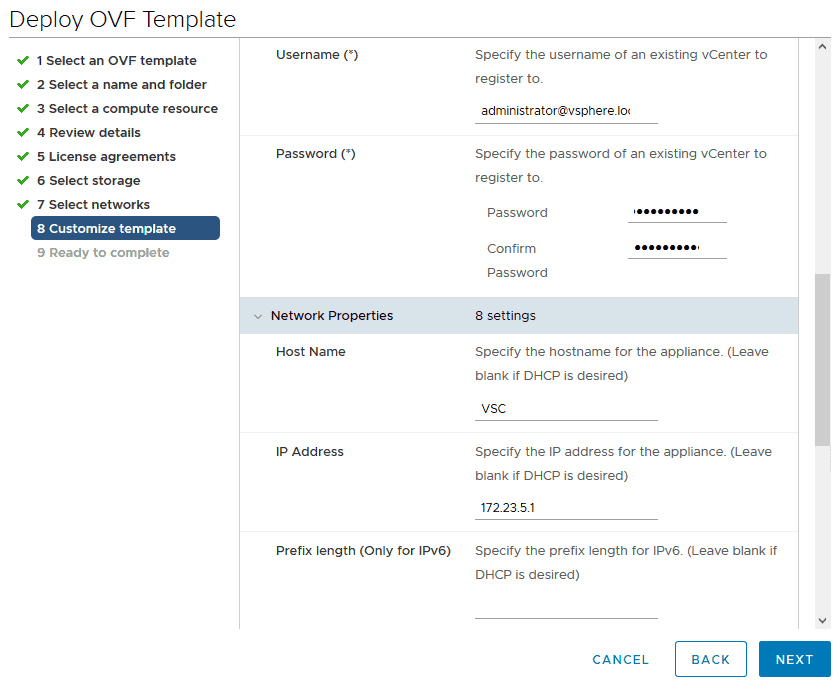
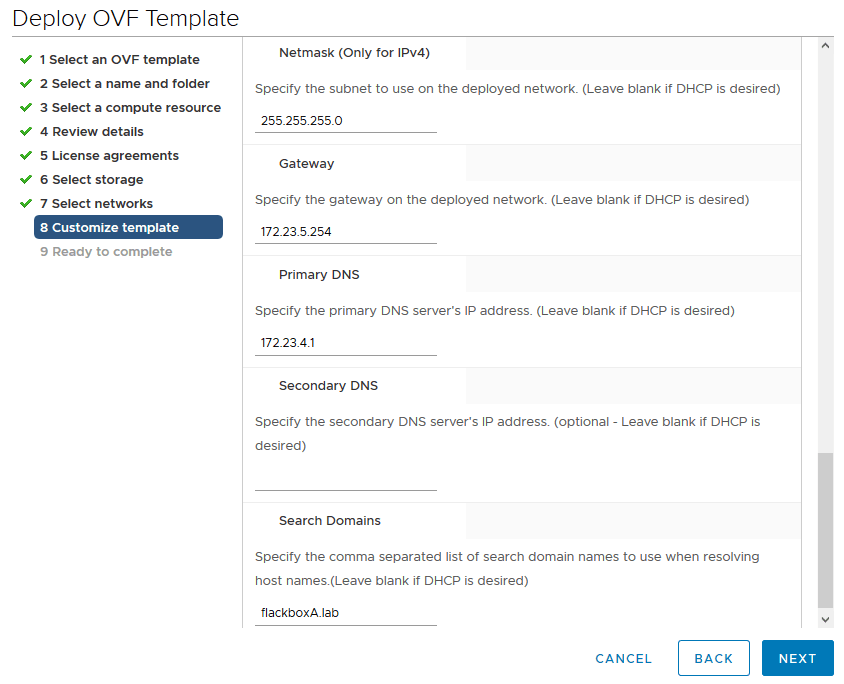
Enter these details on the Customize template page then click Next:
Password to assign to the administrator account: Flackbox1!
NTP Server: 172.23.4.1
vCenter Server Address: 172.23.1.101
Port: 443
Username:
Password: Flackbox1!
Host Name: VSC
IP Address: 172.23.5.1
Prefix length (Only for IPv6): Leave blank
Netmask (Only for IPv4): 255.255.255.0
Gateway: 172.23.5.254
Primary DNS: 172.23.4.1
Secondary DNS: Leave blank
Search Domains: flackboxA.lab
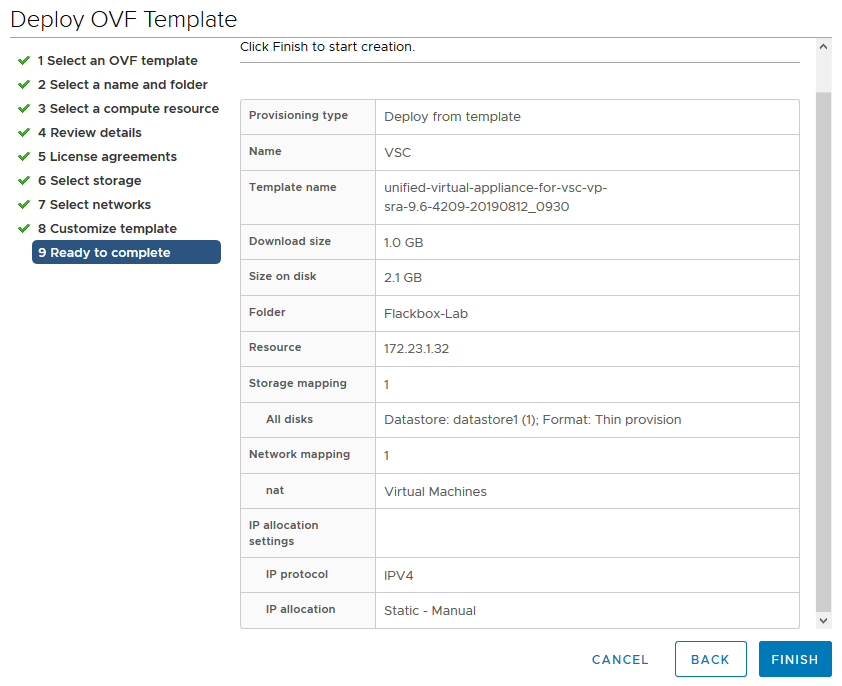
Click Finish on the Ready to complete page
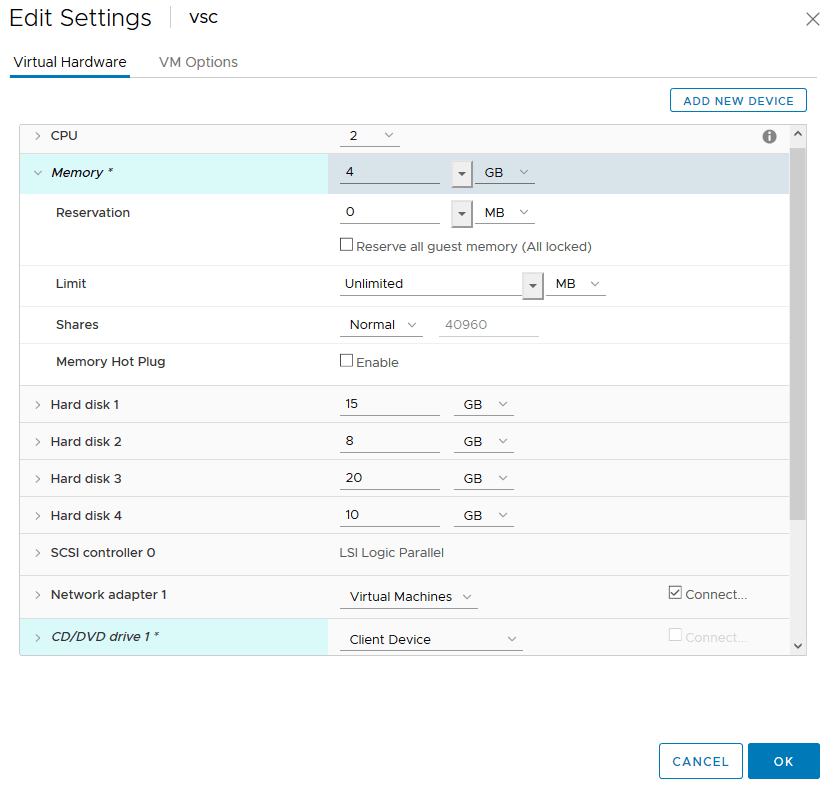
6. Reduce the amount of Memory for the VSC virtual machine to 4 GB and set its CD/DVD drive type as ‘Client Device’
In the vSphere Client, click Menu > Hosts and Clusters
Click on the VSC virtual machine then Actions > Edit Settings…
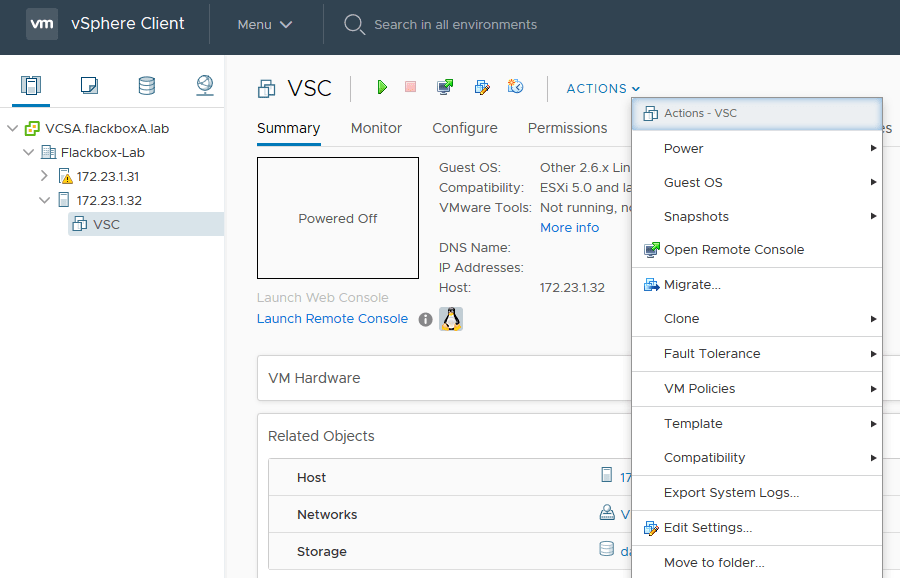
Set the Memory to 4 GB and Reservation to 0 MB, and CD/DVD drive 1 to Client Device then click OK
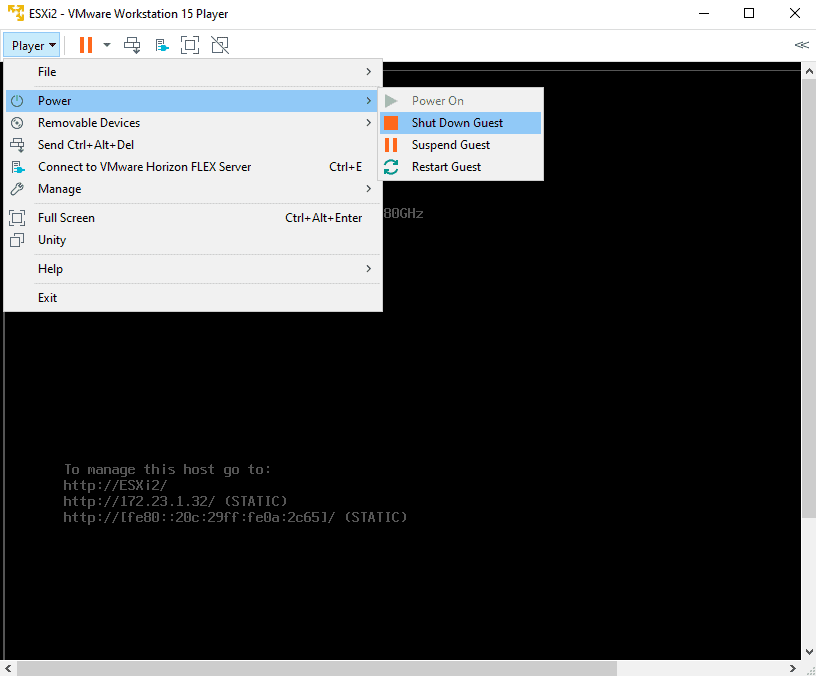
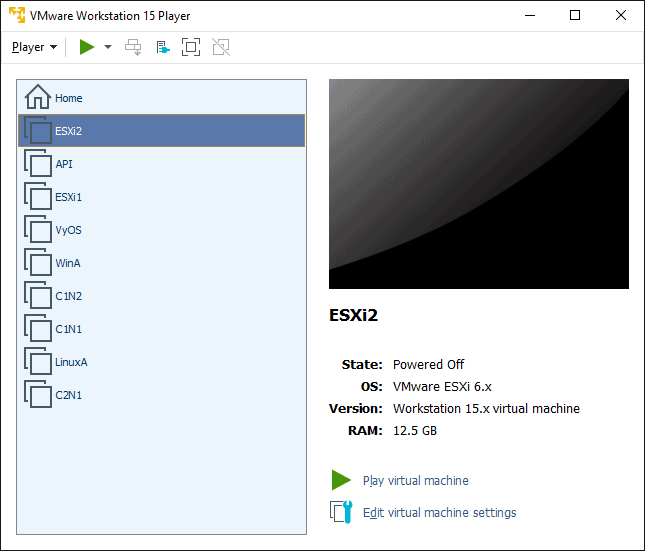
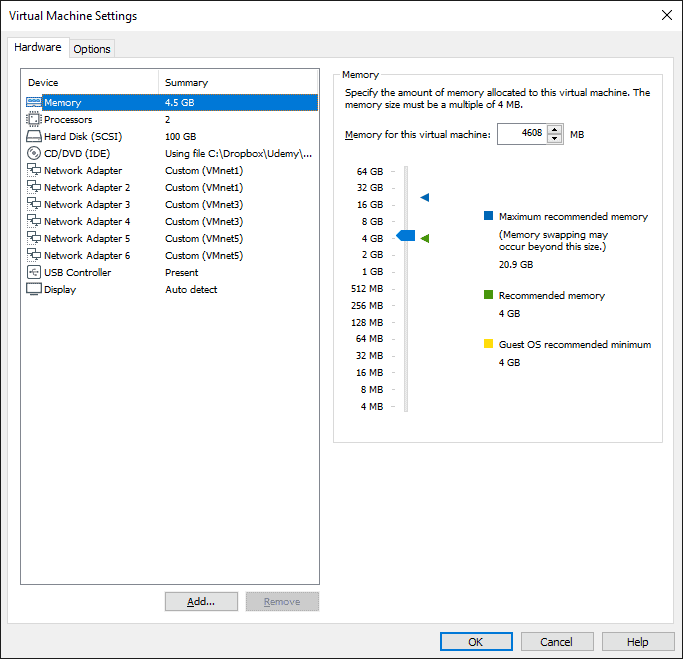
7. In VMware Workstation Player, set the Memory for the ESXi2 virtual machine as 4.5 GB. Power the ESXi2 virtual machine back on when completed.
In VMware Workstation Player, click Player > Power > Shut Down Guest on the ESXi2 virtual machine.
Open a new instance of VMware Workstation Player, select ESXi2 and click Edit virtual machine settings
Set the Memory to 4608 MB
Click Play virtual machine in VMware Workstation Player
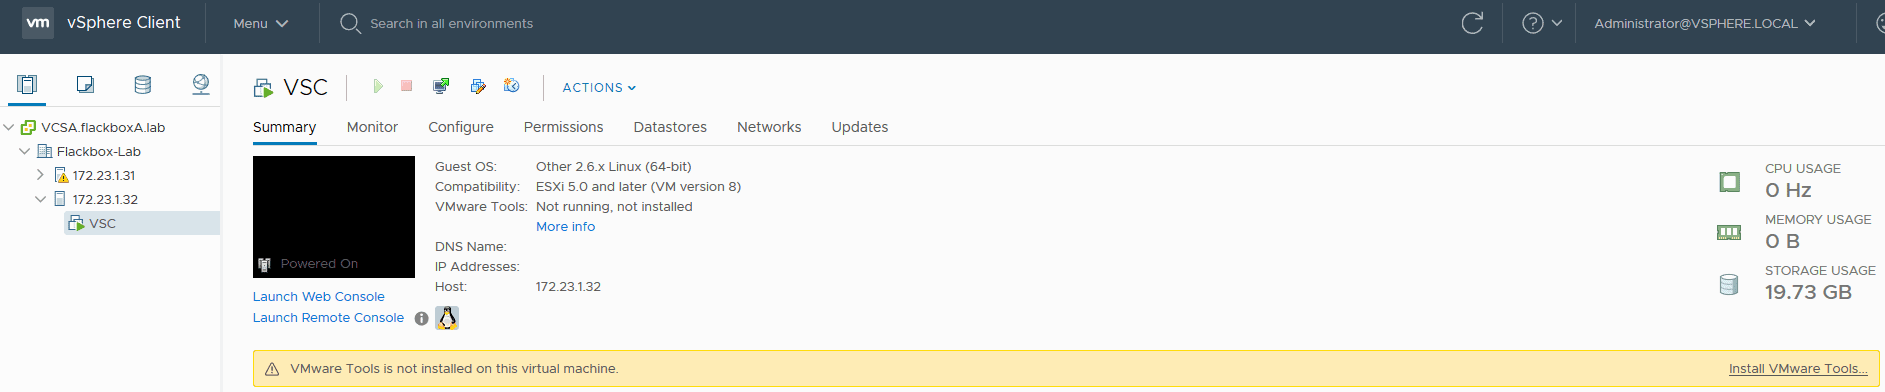
8. Install VMware Tools on the VSC virtual machine
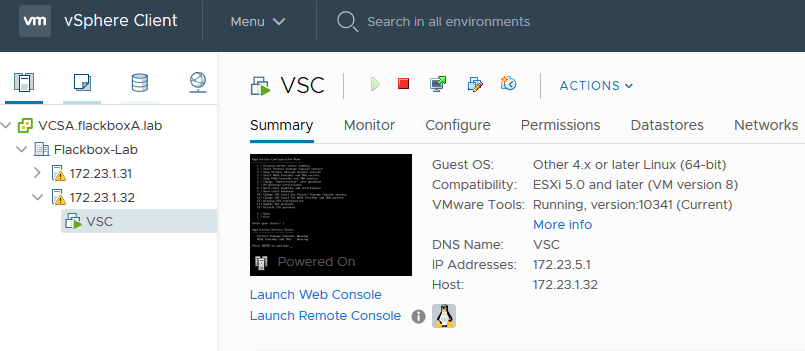
Power on the VSC virtual machine in the vSphere Client
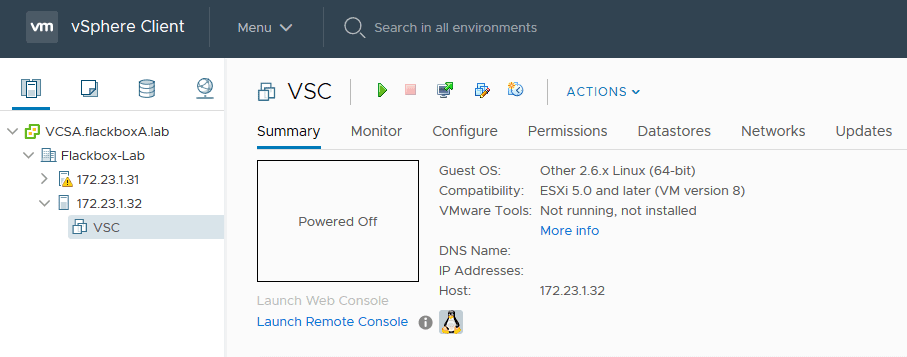
Launch the Web Console
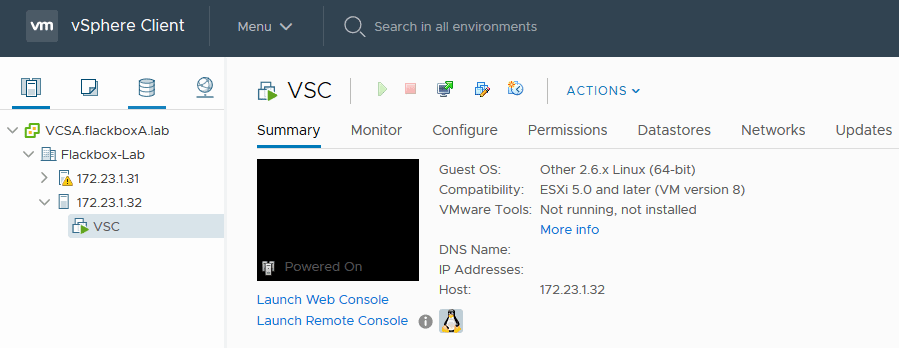
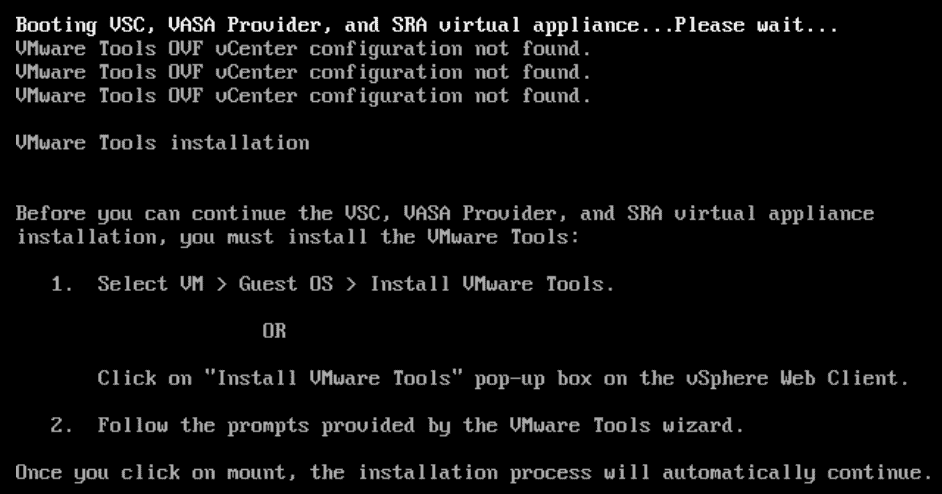
In the vSphere Client, click Install VMware Tools
Click Mount
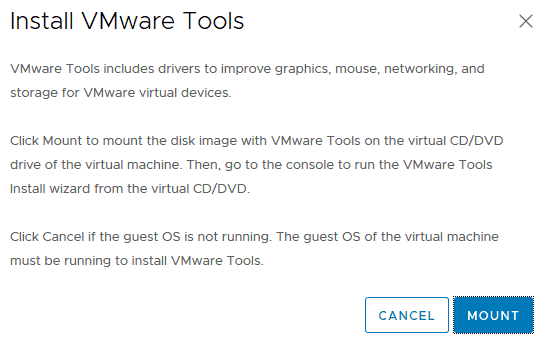
VMware Tools will automatically install and the VSC virtual machine will reboot.
9. Ensure Virtual Storage Console is visible in the vSphere Client menu.
Log out of the vSphere Client.
Close all browser windows.
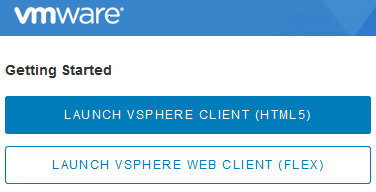
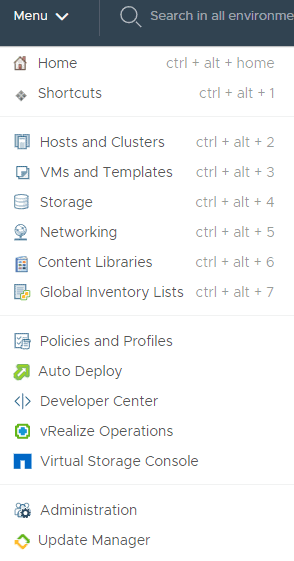
Open a new browser window then Launch vSphere Client (HTML5) at https://vcsa.flackboxa.lab
Click Refresh Browser to enable VSC

Virtual Storage Console show now be available in the Menu
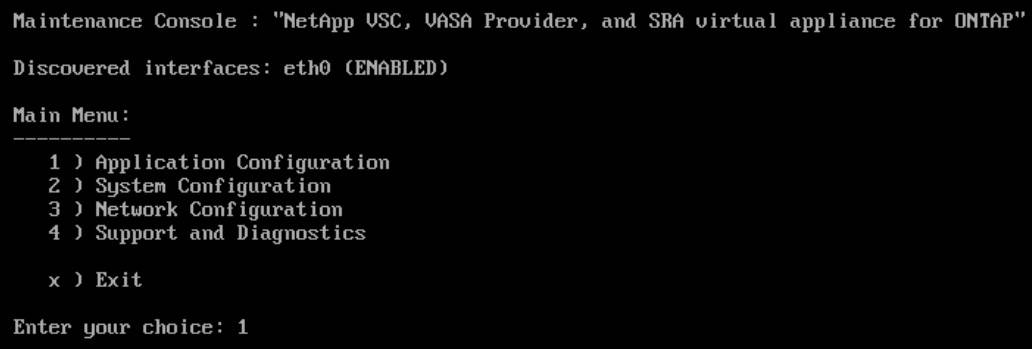
10. Use the VSC Maintenance Console to verify the Virtual Storage Console and VASA Provider and SRA services are running.
Click Menu > Hosts and Clusters in the vSphere Client
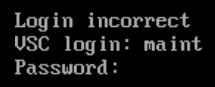
Click on the VSC virtual machine then the Launch Console button
Log in with VSC login username maint and password admin123
Enter option 1 for Application Configuration
Enter option 1 to Display server status summary and check the services are Running
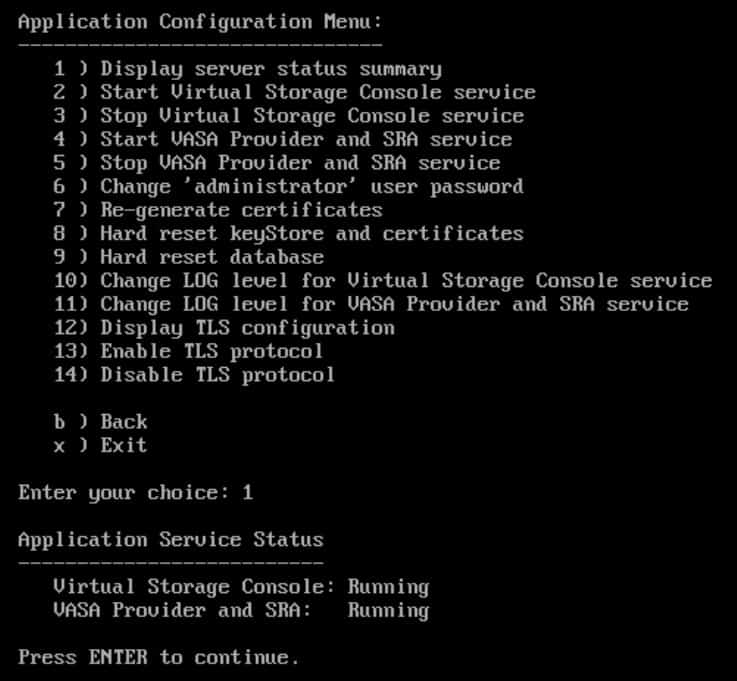
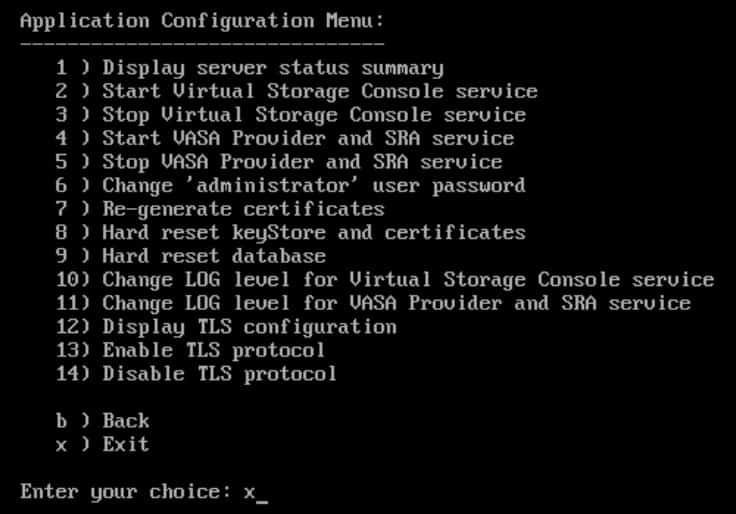
Enter to continue then enter x to exit the Maintenance Console
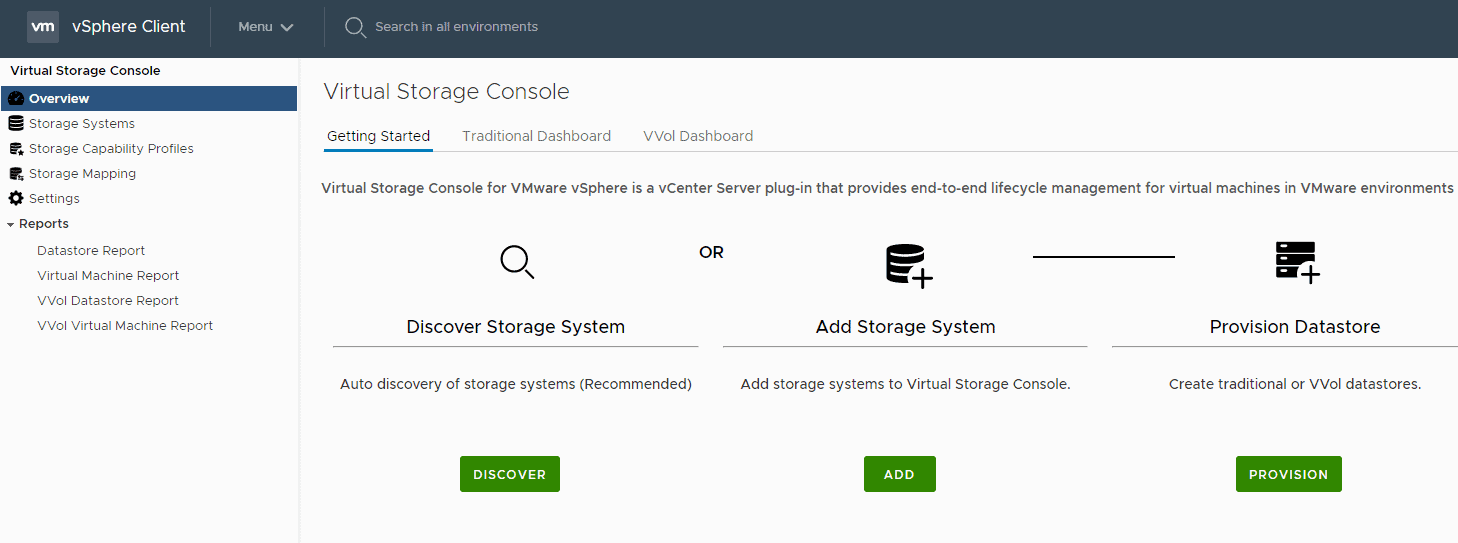
11. View the VSC Traditional Dashboard. What information can you see about the existing NFS and iSCSI datastores?
Click Menu > Virtual Storage Console
Click Overview > Traditional Dashboard
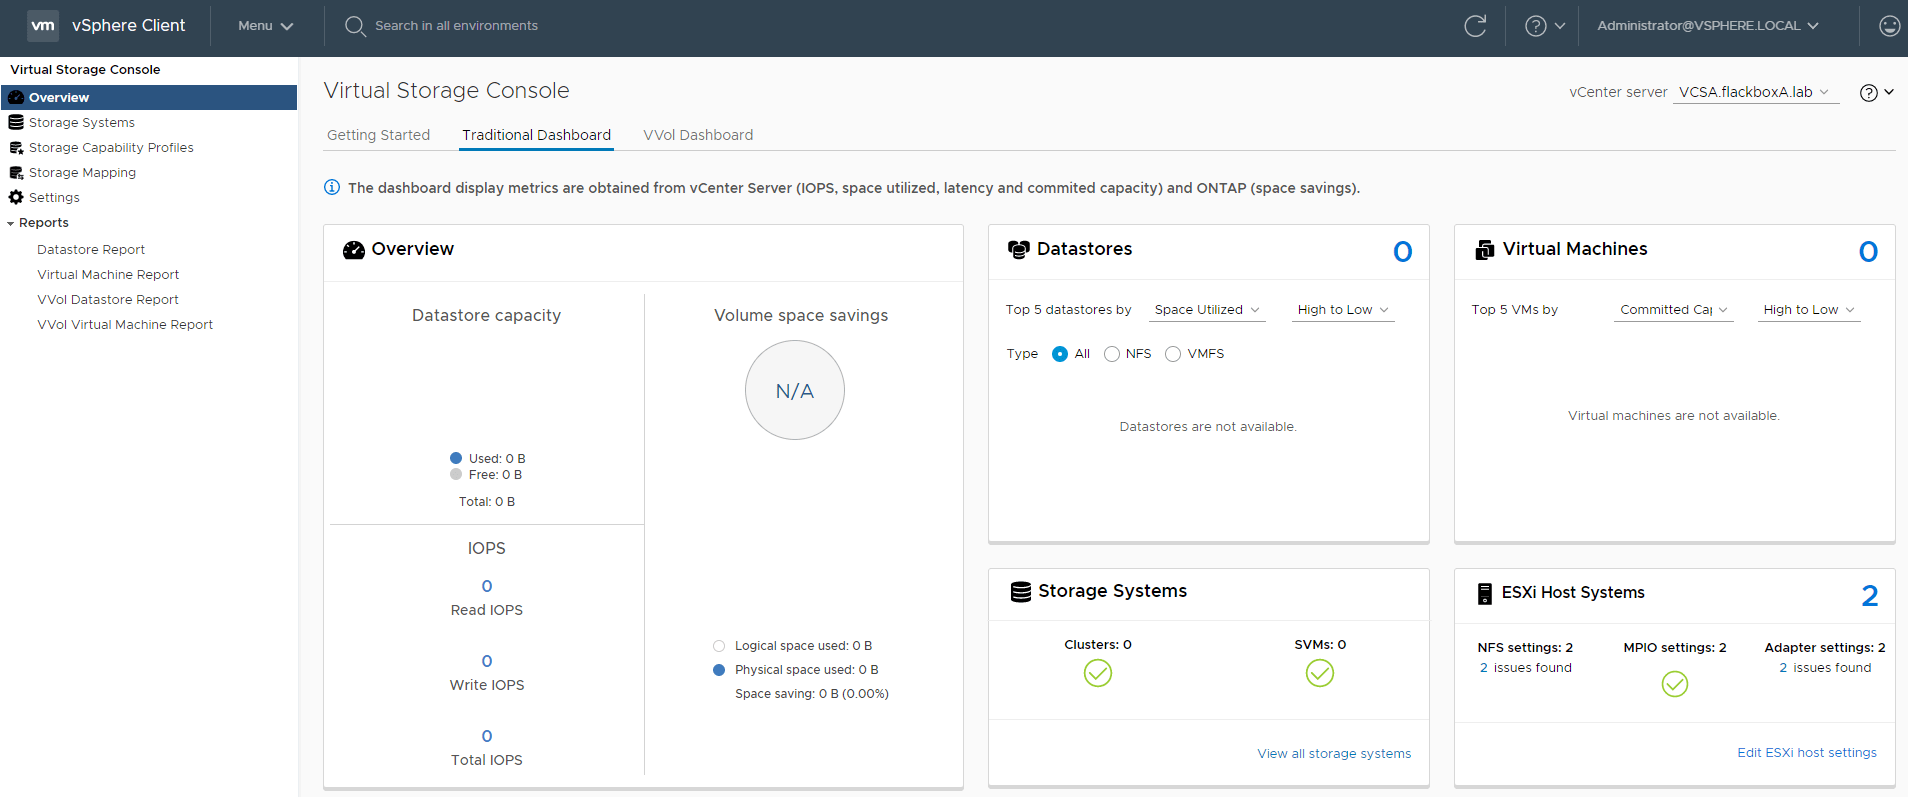
No information is available about the existing datastores because the storage system has not been added to VSC.
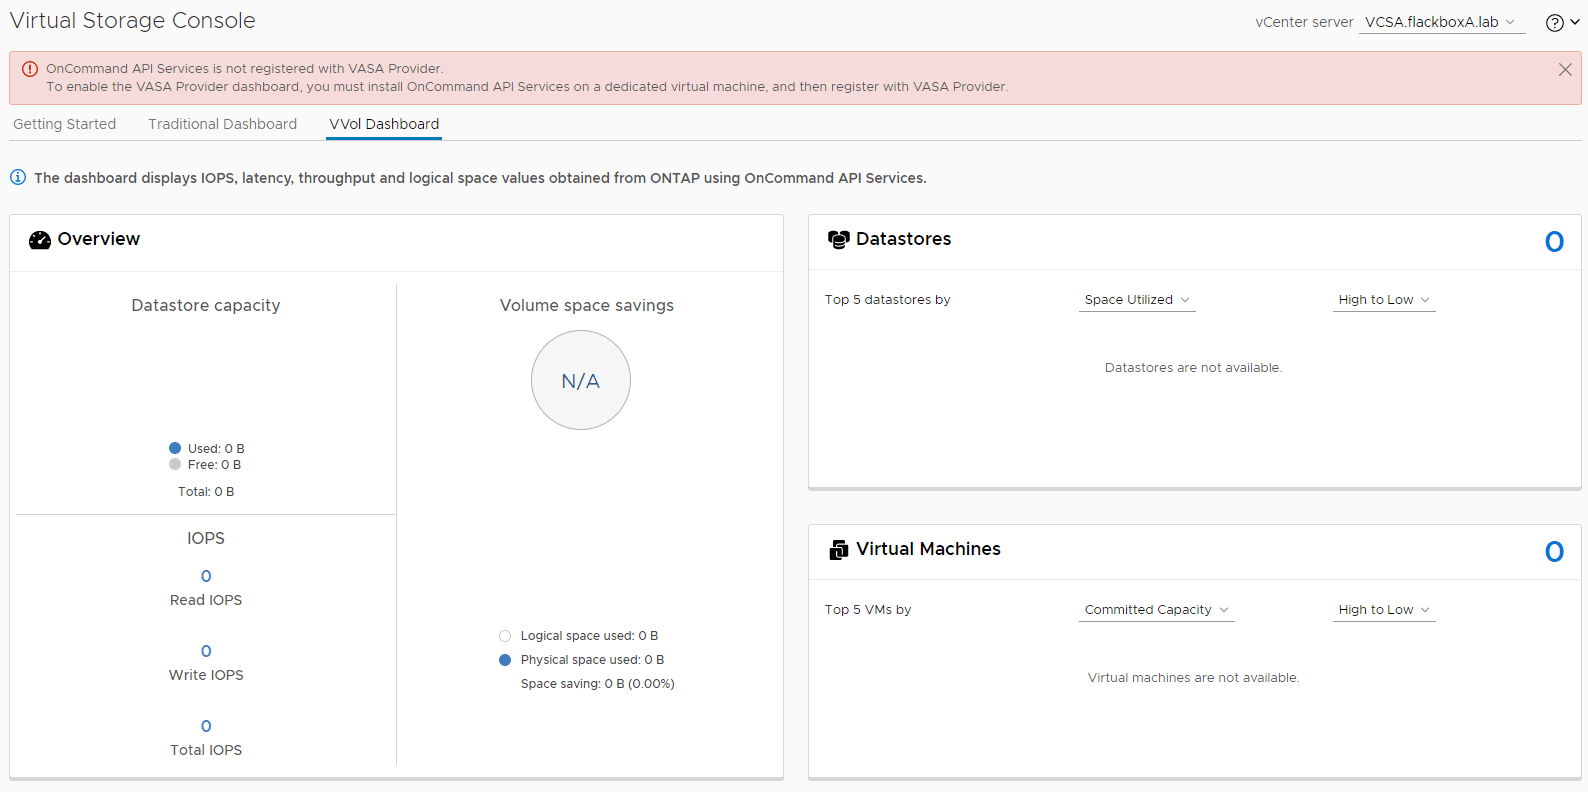
12. What information is available on the VVol Dashboard?

No information is available because the storage system is not added and OnCommand API Services is not registered.
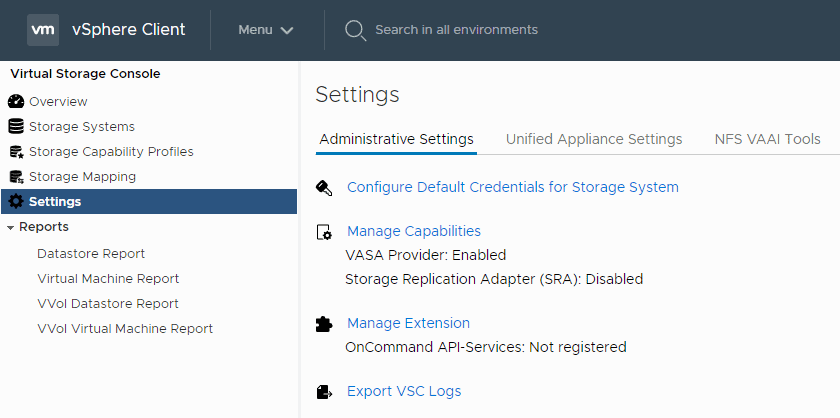
13. Are the VASA Provider and Storage Replication Adapter enabled? Verify this.
Settings > Administrative Settings > Manage Capabilities

The VASA Provider is enabled by default in the latest version of VSC, SRA is not.
14. What are the default volume and aggregate capacity alarm thresholds? Verify this.
Settings > Unified Appliance Settings
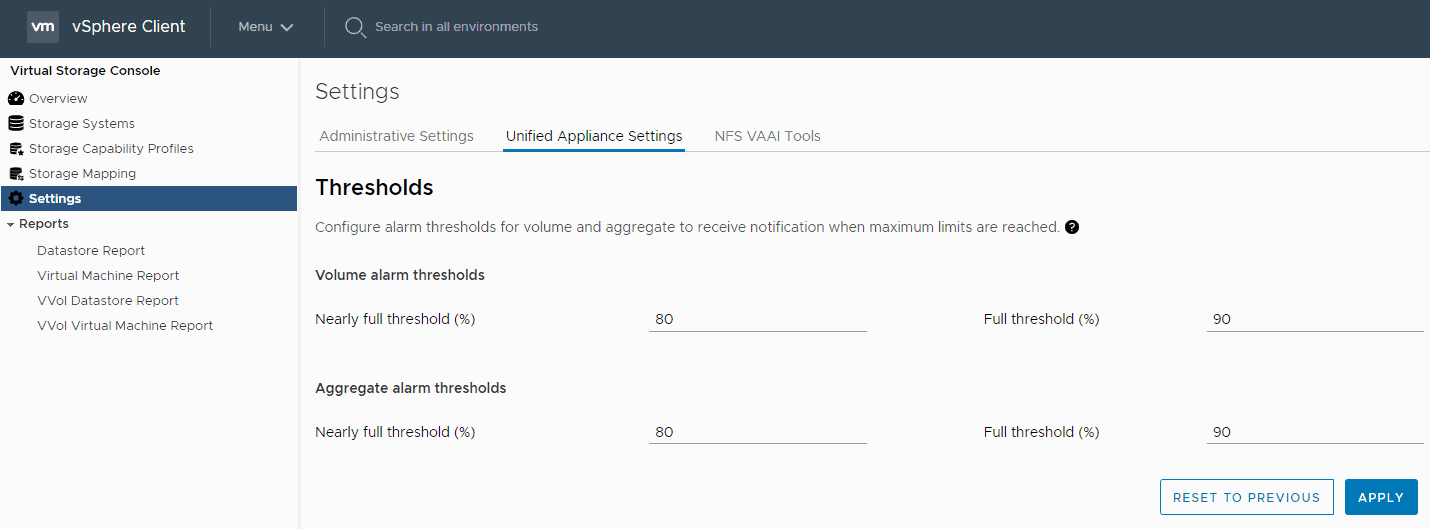
The ‘nearly full threshold’ is 80%, and the ‘full threshold’ is 90%, for both volumes and aggregates.
- Start the C2N1 virtual machine in VMware Workstation Player.
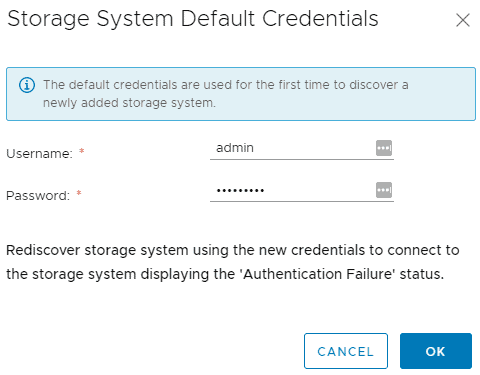
- Discover the Cluster2 storage system through Auto Discovery.
Valid login credentials for Cluster2 must be configured first. Click Settings > Administrative Settings > Configure Default Credentials for Storage System
Enter the username admin and password Flackbox1 then click OK
Click on Overview then Discover and Yes. You can view the discovery progress in the Recent Tasks tab at the bottom of the window.
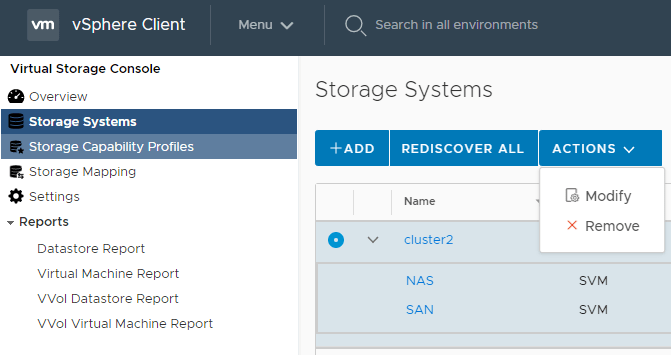
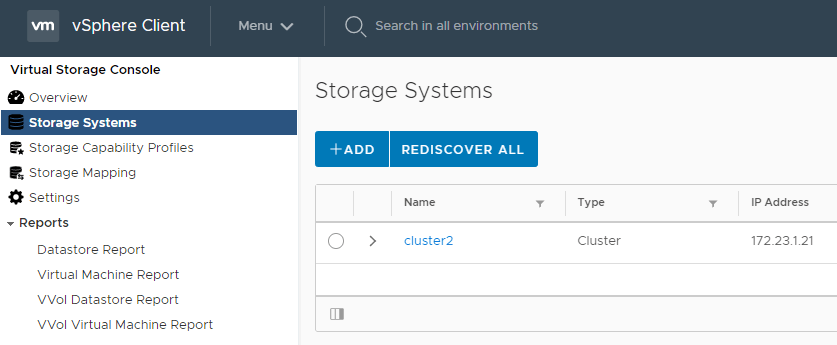
15. Verify the Cluster2 storage system has been added and the NAS and SAN SVMs are visible.
Click Storage Systems and expand cluster2

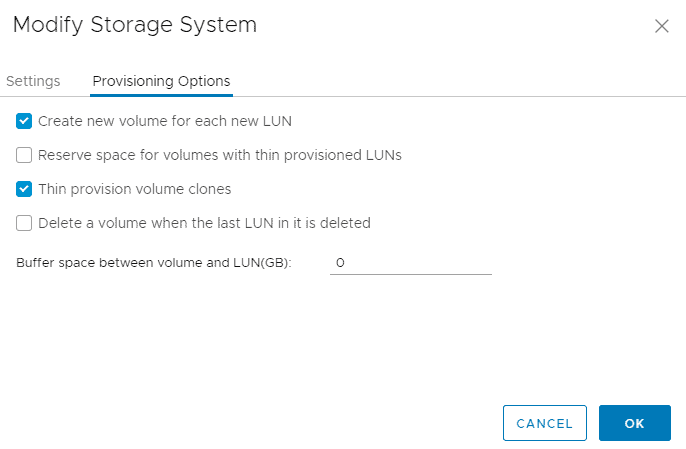
16. Enter the correct credentials to allow VSC to make changes on Cluster2. Ensure that whenever a new LUN is created by VSC, a new volume should also be created for the LUN. The volume should be the same size as the LUN.
Click the radio button to select cluster2, then select Actions > Modify
Enter the username admin and password Flackbox1 on the Settings tab
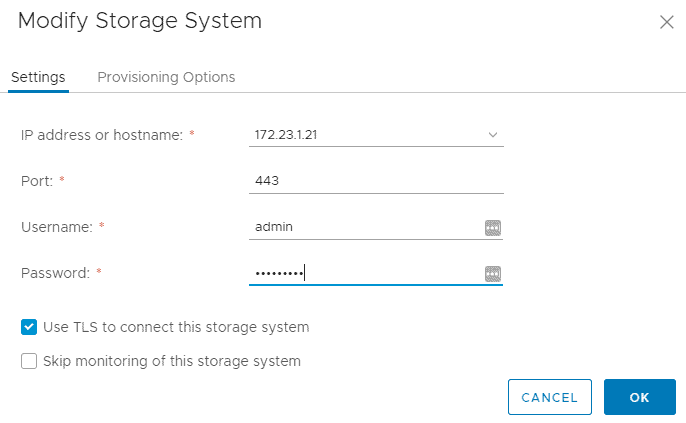
Enter the username admin and password Flackbox1 on the Provisioning Options tab then click Authenticate
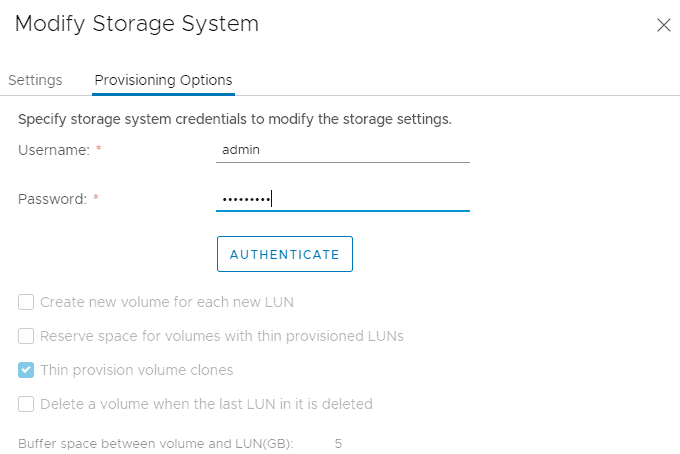
Click the checkbox to Create new volume for each new LUN, and set the Buffer space between volume and LUN (GB) to 0 to save space in the lab environment then click OK.
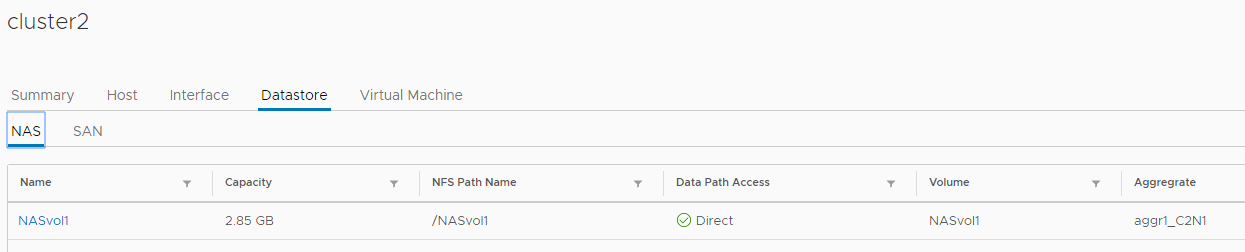
17. Verify that VSC has visibility of the NASvol1 and SANlun1 datastores.
Click on cluster2
Click on Datastore then SAN

Click on NAS
18. View the VSC Traditional Dashboard. What information can you see about the existing NFS and iSCSI datastores now?
Click Overview > Traditional Dashboard
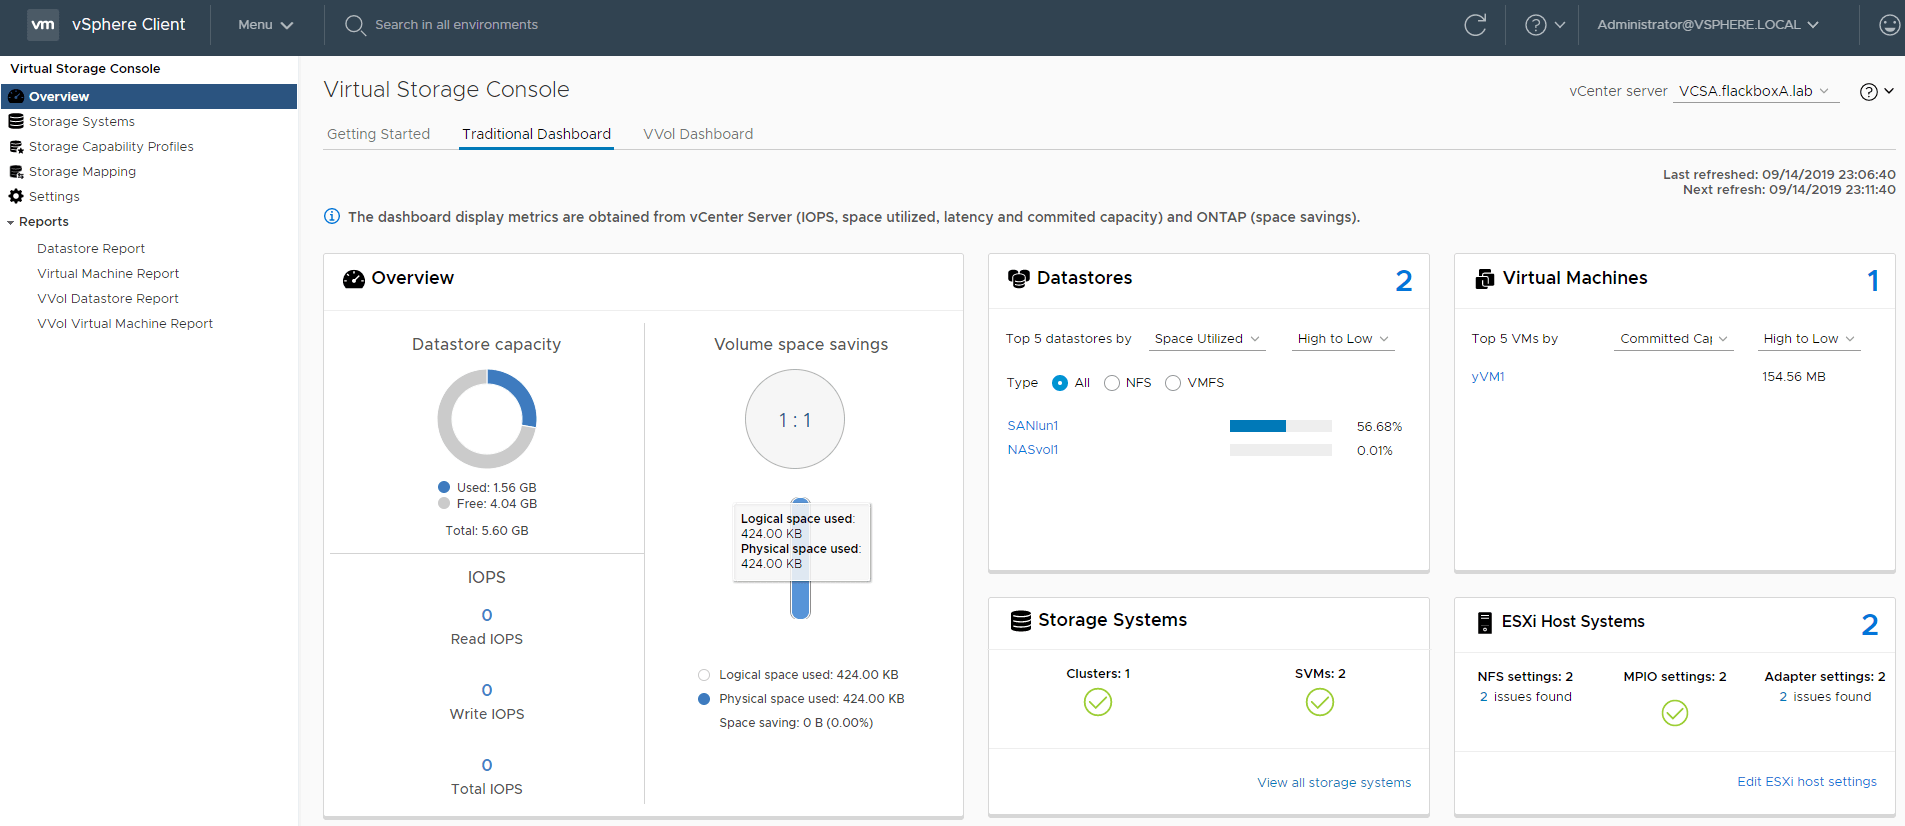
Performance, capacity and space savings are now reported for the datastores. Virtual machine information is also available.
19. What information is available on the VVol Dashboard now?
Information is still not available because OnCommand API Services is not registered.
20. View the Datastore Report, Virtual Machine Report, VVol Datastore Report and VVol Virtual Machine Report. What is the issue with the VVol reports?


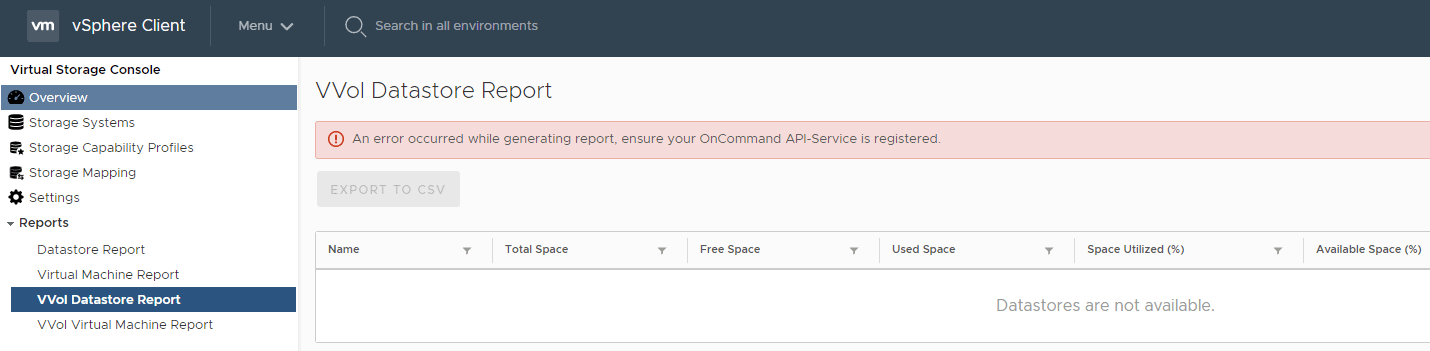
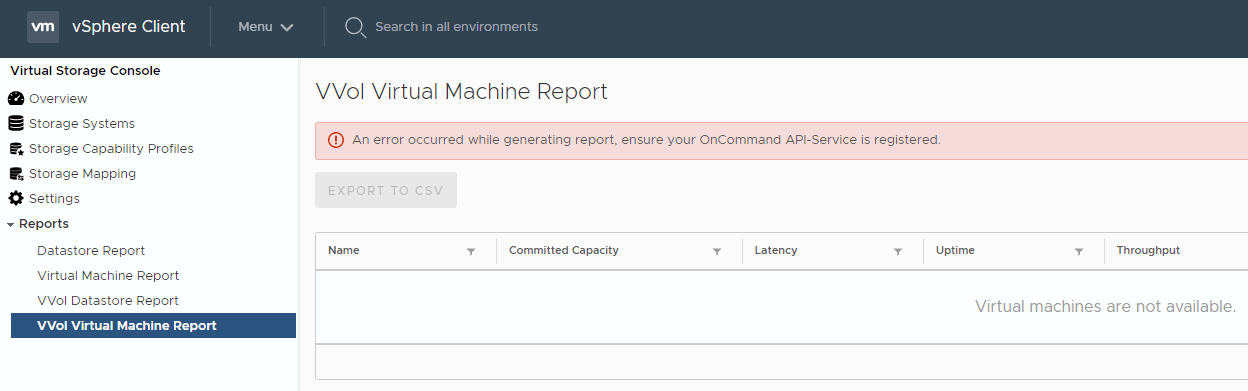
The VVol reports are not available because OnCommand API Services is not registered.
Additional Resources
Install Virtual Storage Console: https://docs.netapp.com/us-en/ontap-sm-classic/fc-config-esxi/task_installing_virtual_storage_console_for_vmware_vsphere.html
Provision NFS Storage for VMware Datastores: https://docs.netapp.com/us-en/ontap/task_nas_provision_nfs_vmware.html
Deploying the Virtual Appliance for VSC, VASA Provider, and SRA: https://library.netapp.com/ecmdocs/ECMLP2770249/html/GUID-D9D215A5-7F46-468D-8497-C479B3EEF51B.html
Libby Teofilo

Text by Libby Teofilo, Technical Writer at www.flackbox.com
Libby’s passion for technology drives her to constantly learn and share her insights. When she’s not immersed in the tech world, she’s either lost in a good book with a cup of coffee or out exploring on her next adventure. Always curious, always inspired.