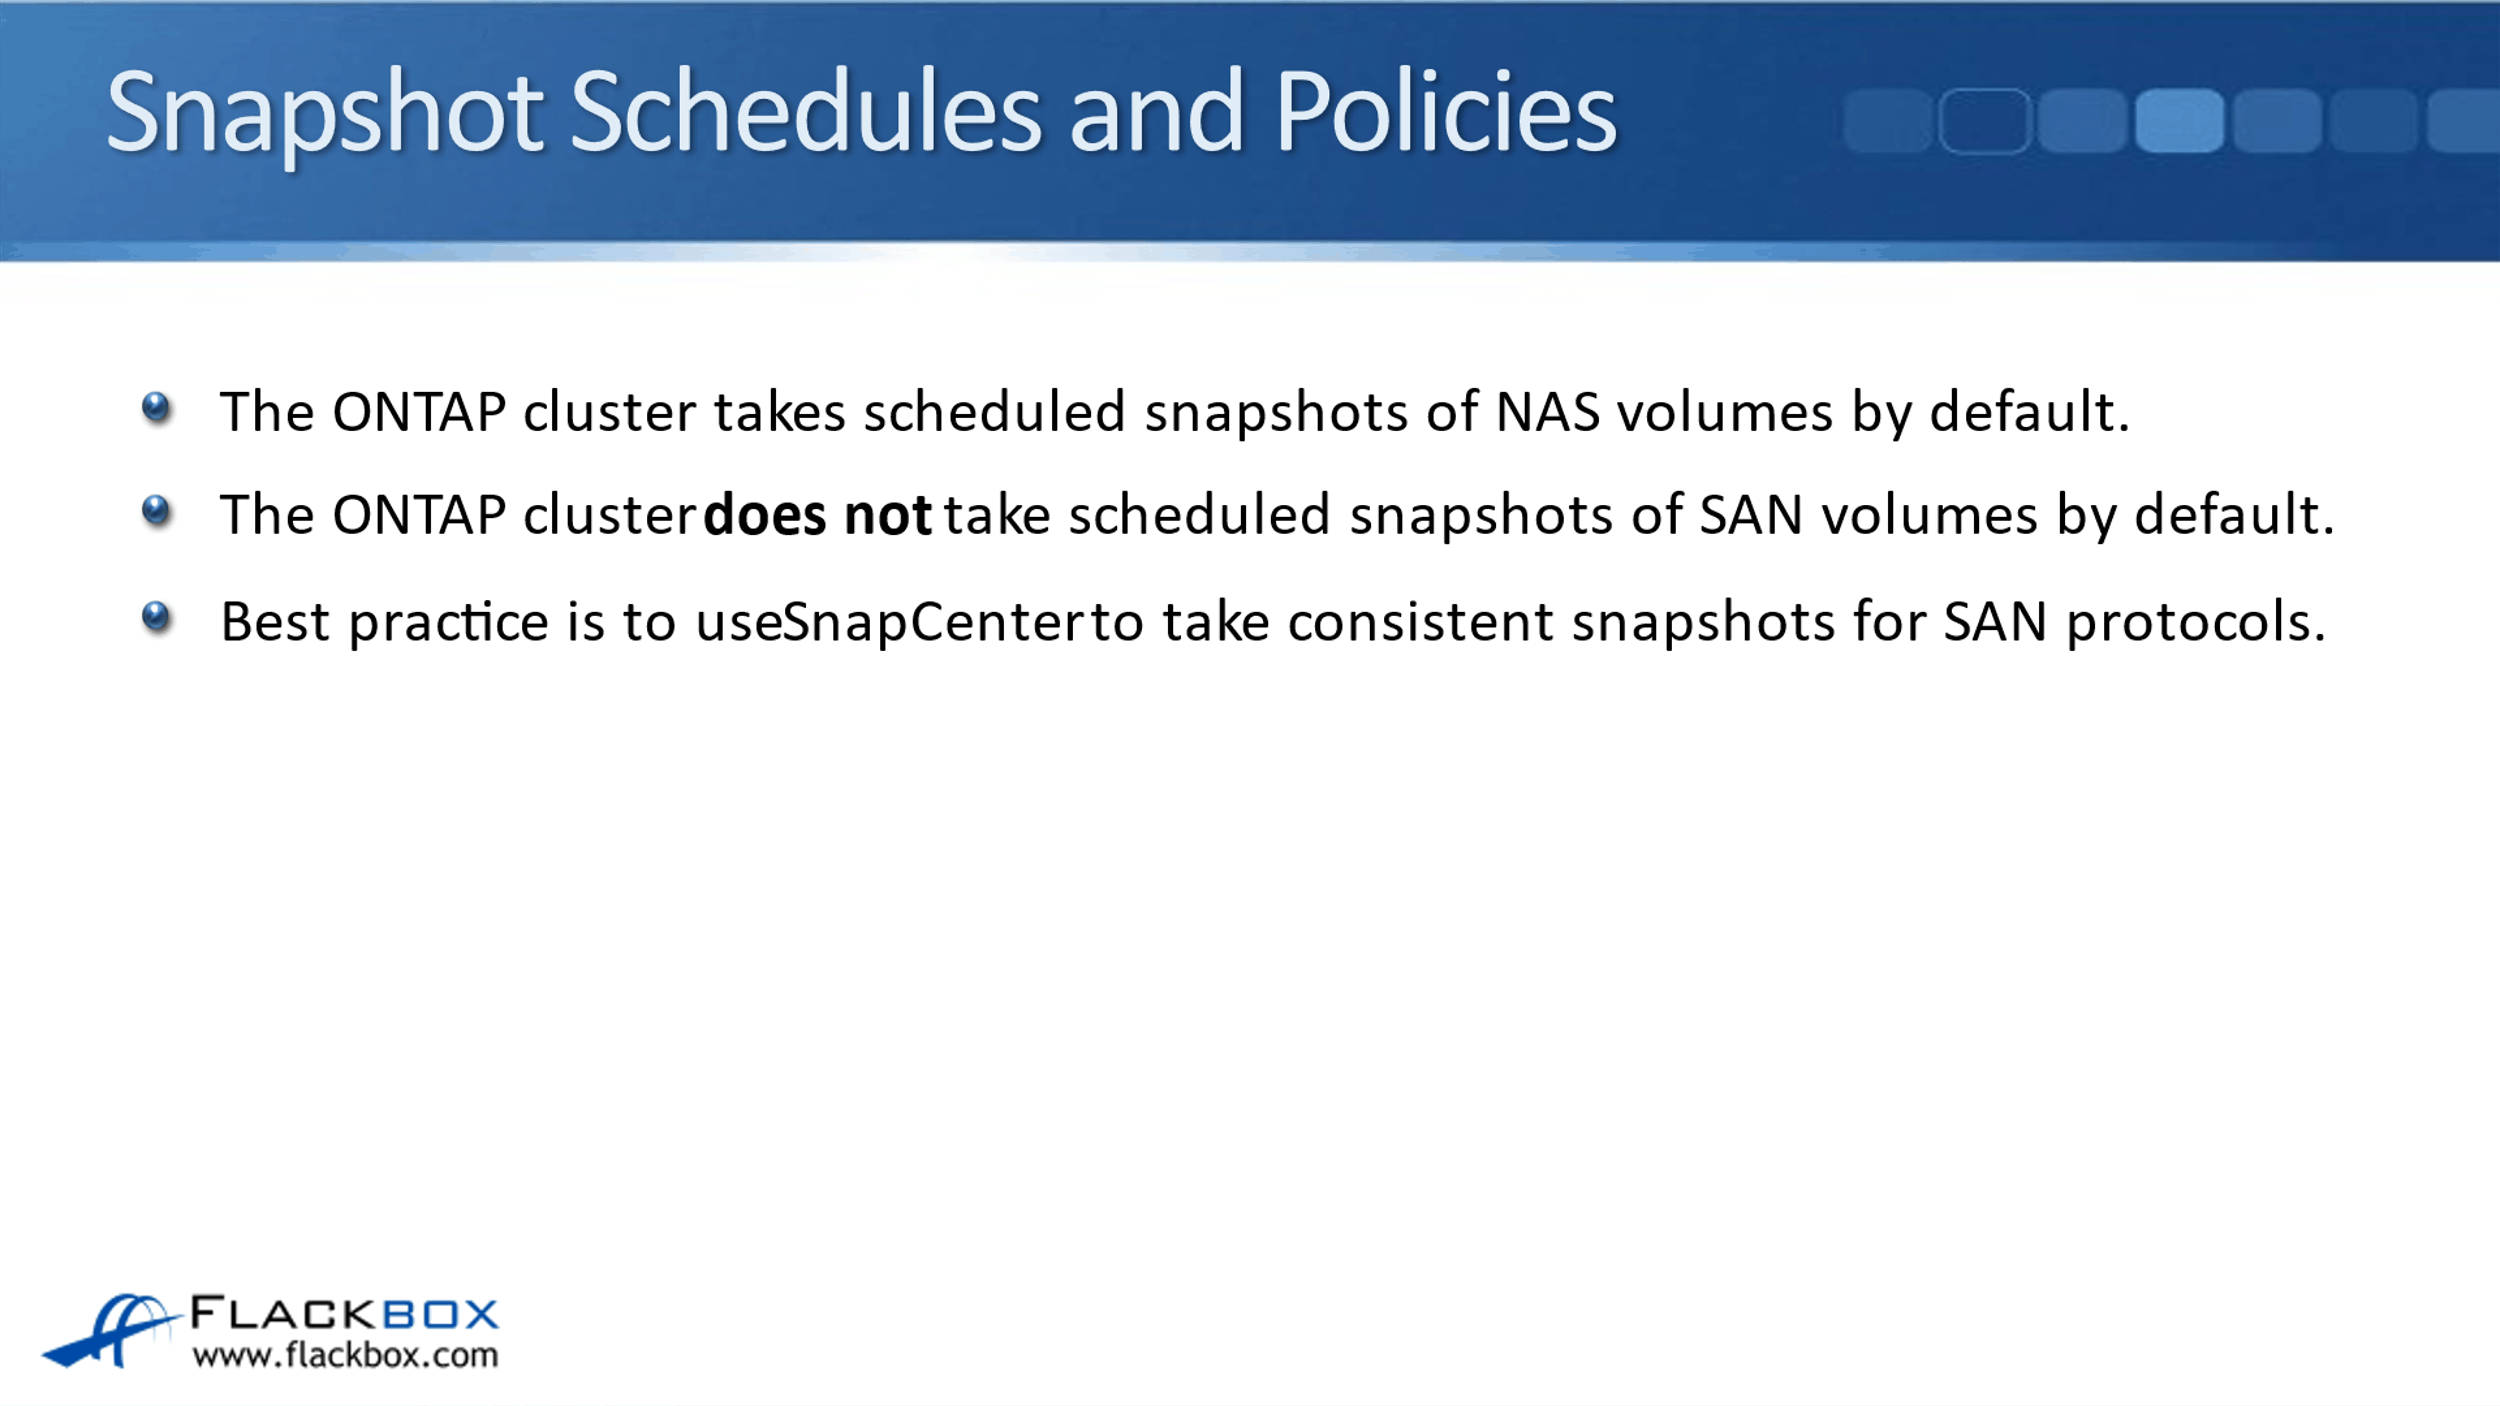
In this NetApp tutorial, you’ll learn how snapshot schedules and policies work. The ONTAP cluster takes scheduled snapshots of NAS volumes by default, now, you’re going to learn how those schedules work. Scroll down for the video and also text tutorial.
NetApp Snapshot Schedules Video Tutorial

Randy Johnson

The concepts, explanations, and applications to real world scenarios are exceptional. The hands-on labs reinforce the learning, and are actually better than the vendors’ labs.
I always feel fully engaged and fully oriented to the teaching. There has never been a time when I was scratching my head or not understanding the explanations or examples. And I can take the labs and examples and apply them directly in real environments.
Snapshot Schedules and Policies
The ONTAP cluster does not take scheduled snapshots of SAN volumes by default because we want those to be managed with Client Integration. Best practice is to use SnapCenter to take consistent snapshots for SAN protocols.
You could apply a schedule to a volume being used for a SAN protocol, but it's best practice not to do that. You should use SnapCenter instead.
Snapshot Policies
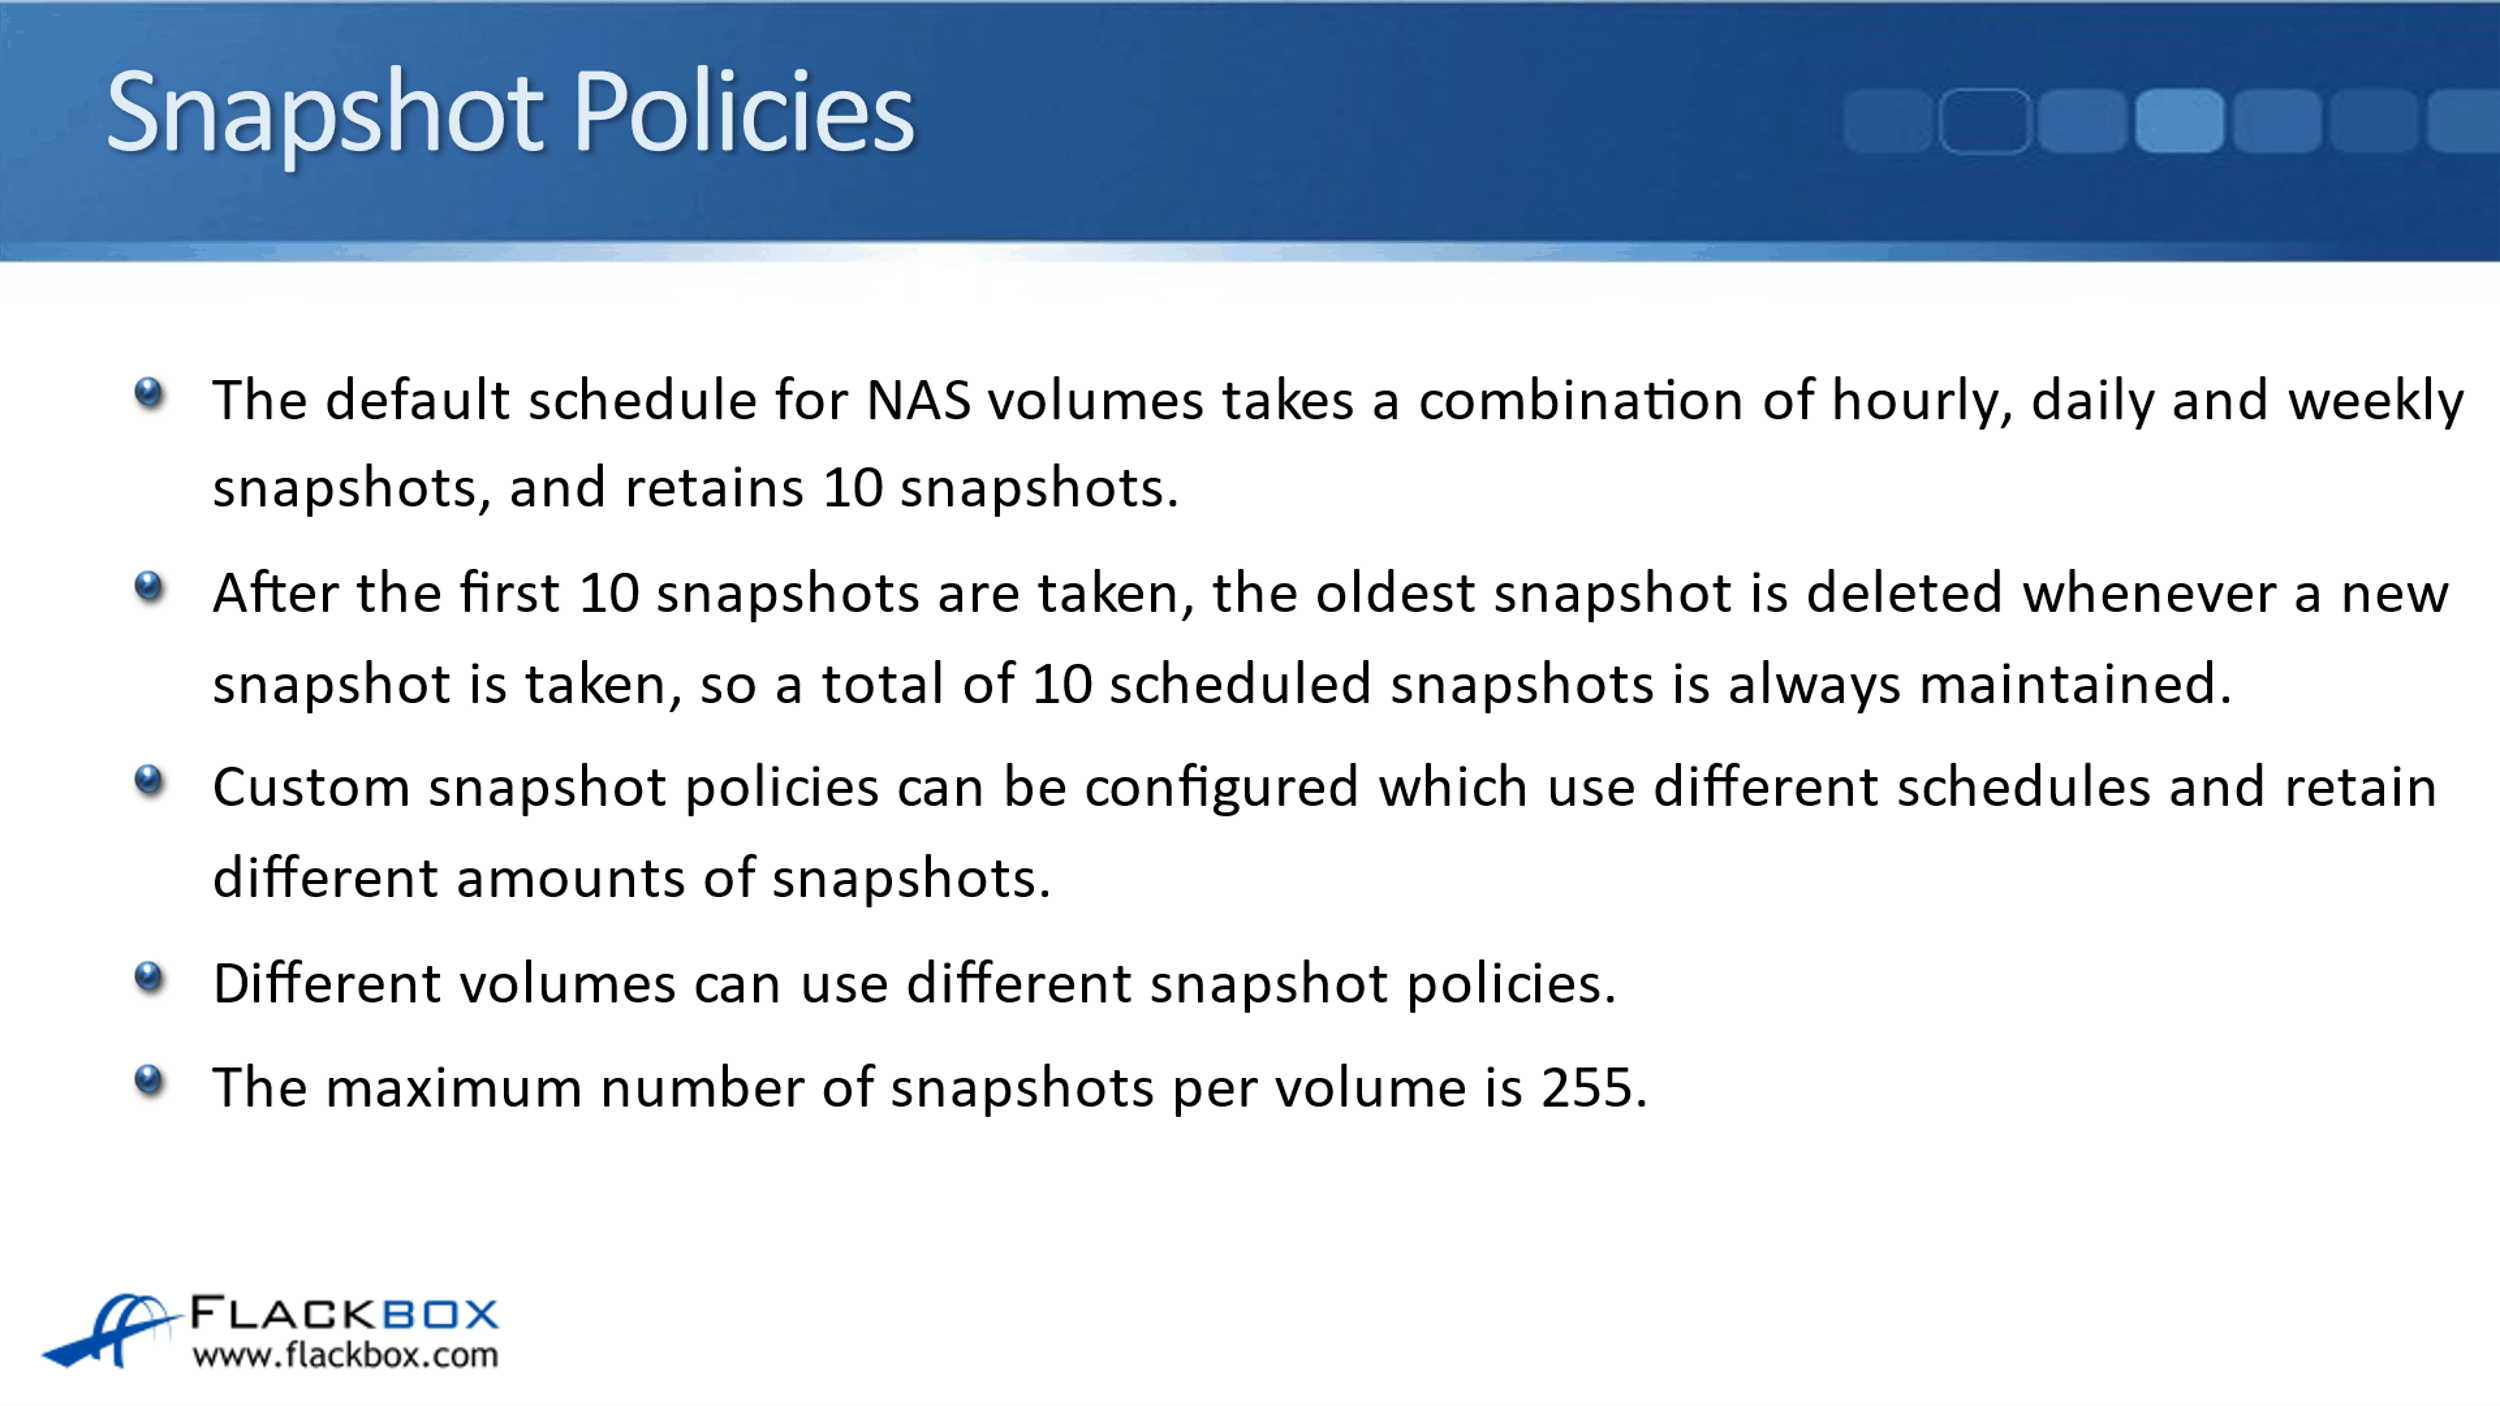
The default schedule for NAS volumes takes a combination of hourly, daily, and weekly snapshots and retains 10 snapshots. After the first 10 snapshots are taken, the oldest snapshot is deleted whenever a new snapshot is taken. So, a total of 10 scheduled snapshots is always maintained. It's always going to be 10 snapshots, which are going back to the same amount of time.
The amount of space that your snapshots are taking up should remain consistent over time. Custom snapshot policies can be configured, which use different schedules and retain different amounts of snapshots. Different volumes can also use different snapshot policies. The maximum number of snapshots that you can have per volume is 255.
The Default Snapshot Schedule
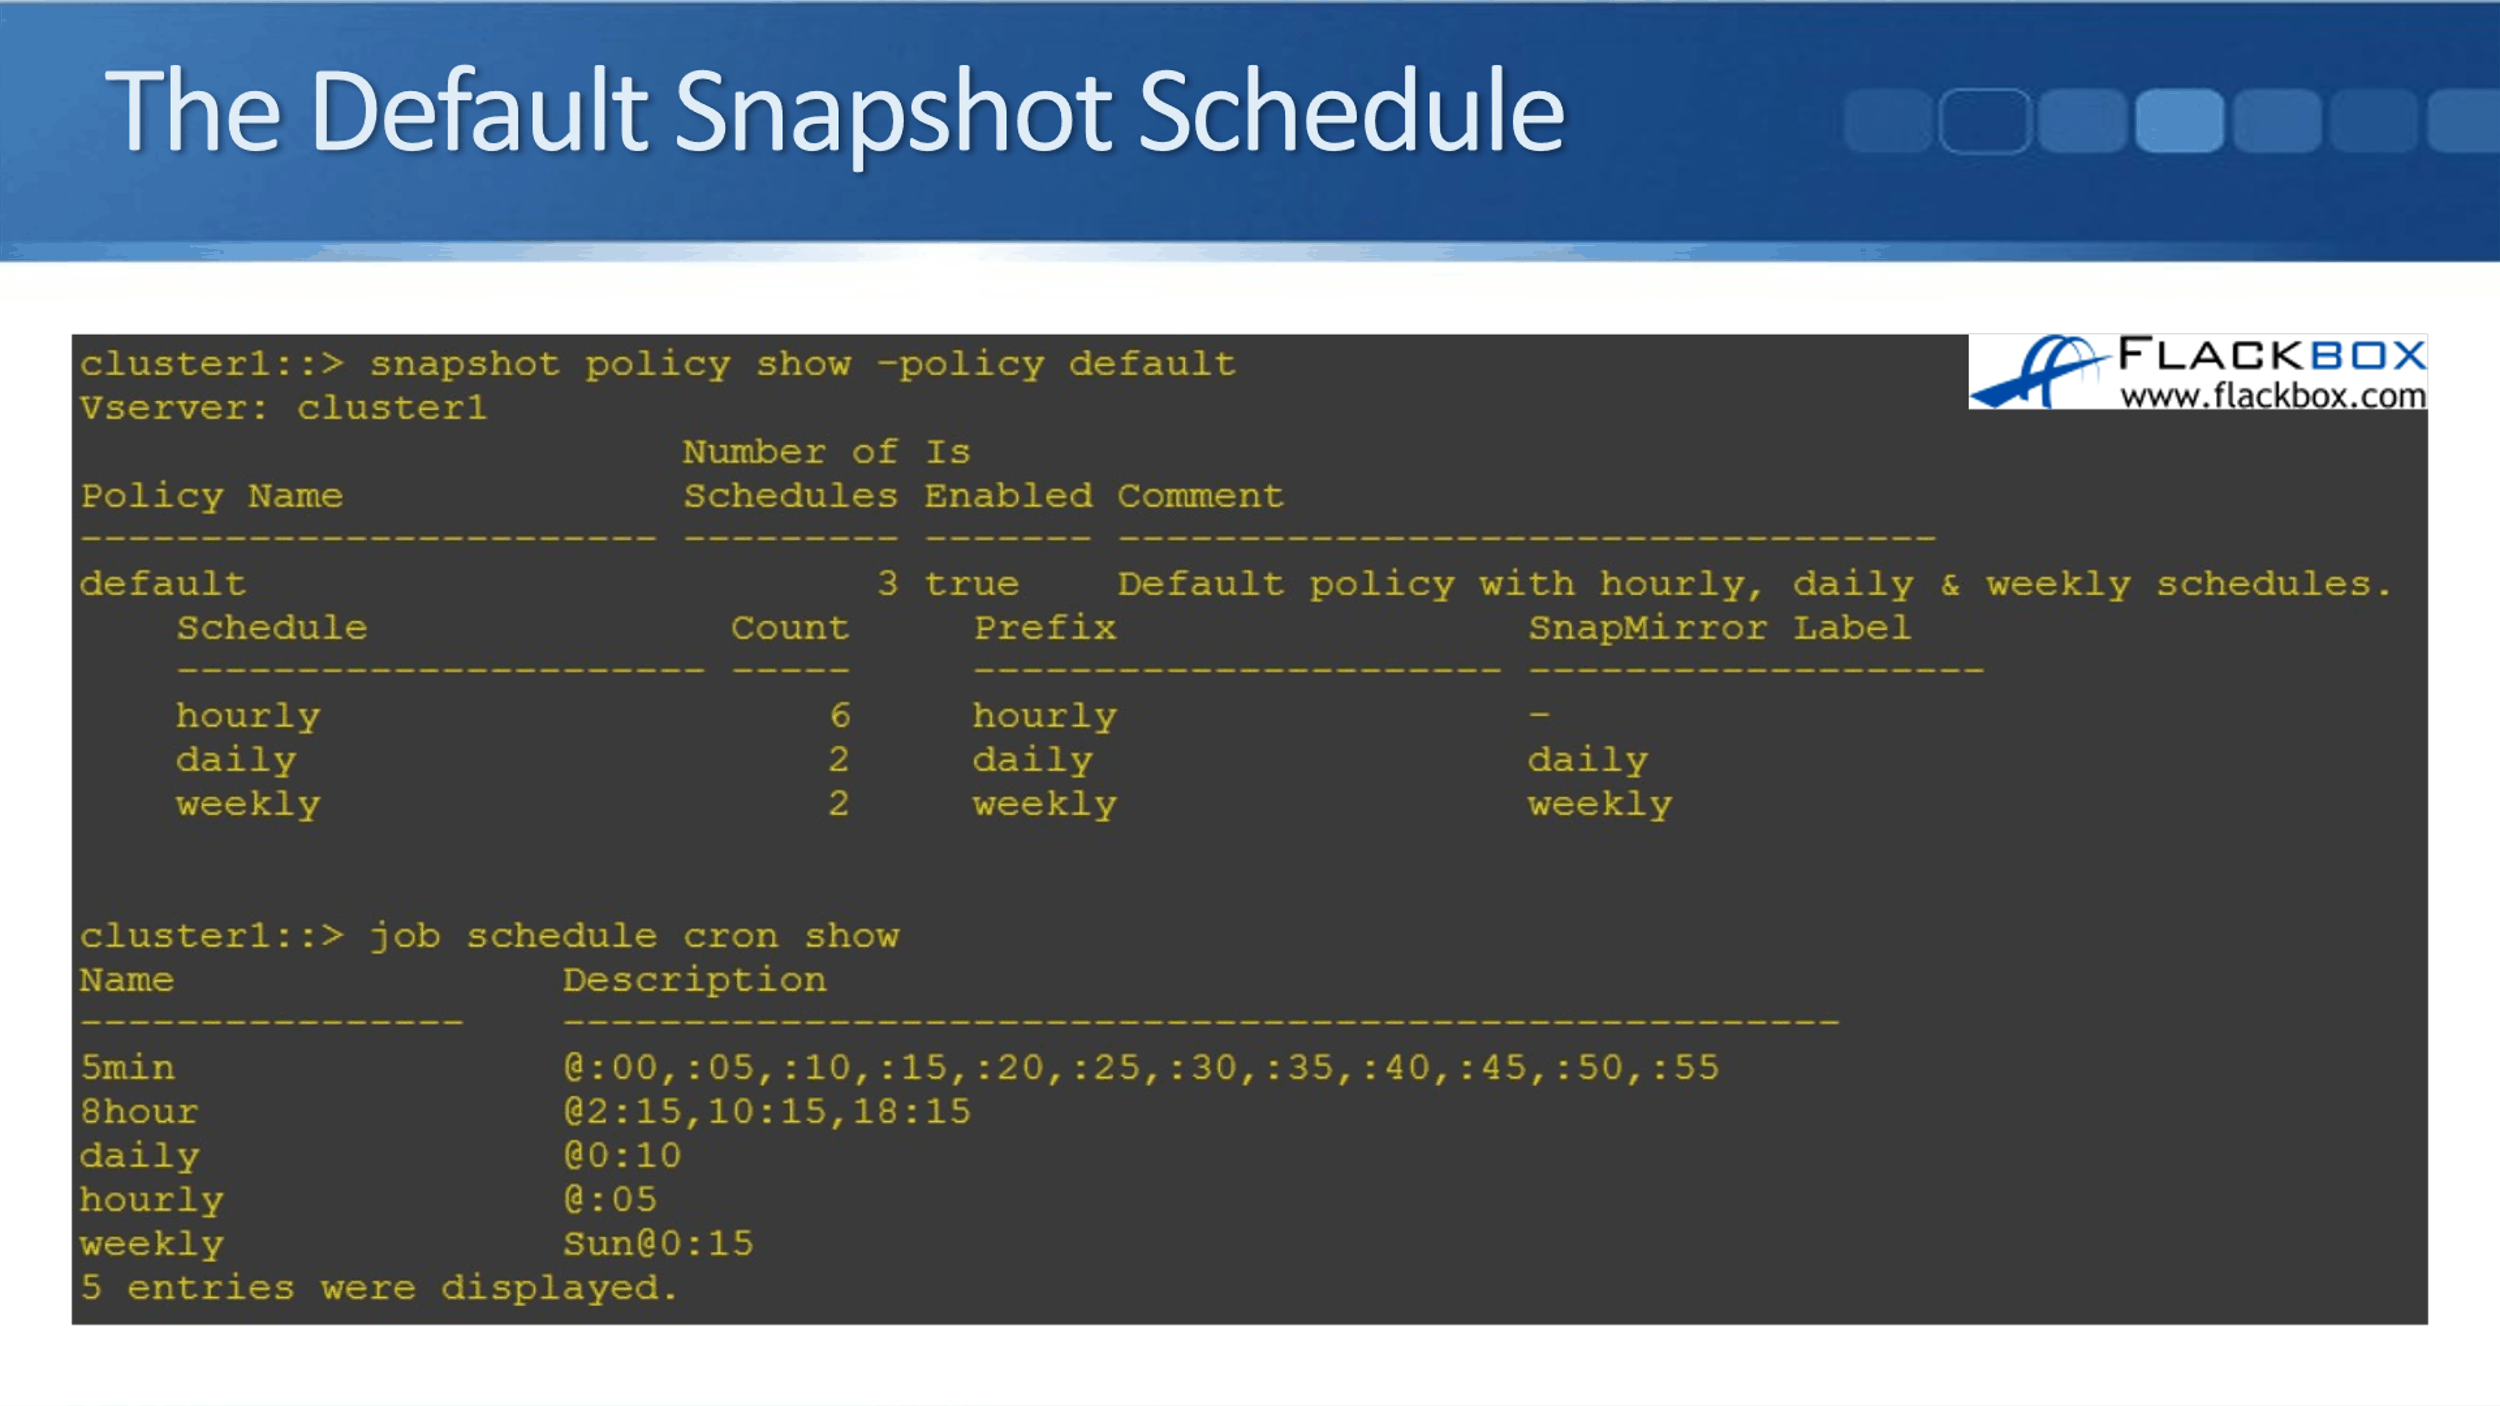
Let’s look at the default snapshot policy now. To do that, I've entered the command:
snapshot policy show -policy default
You can see in there that the default schedule takes hourly snapshots and it retains the most previous six of those. It takes daily snapshots and retains the most recent two, and it takes weekly snapshots and retains the most recent two copies of those as well.
Snapshot Schedule Example
Looking at when those actually occur, we can do that by using the command:
job schedule cron show
For the hourly snapshots, we can see that they happen every hour, at five minutes past the hour. The daily snapshots happen every day, at 10 minutes past midnight, and the weekly snapshots happen every Sunday, at 15 minutes past midnight. You can see that the times are staggered there to keep them apart.
With this default schedule, it will take a snapshot at five minutes past the hour, every hour, and it will keep the last six copies of those. It will take dailies at 10 past midnight every day, and it will keep the most recent two. It'll take a weekly, every Sunday, at a quarter past midnight, and it'll keep the most recent two of those as well.
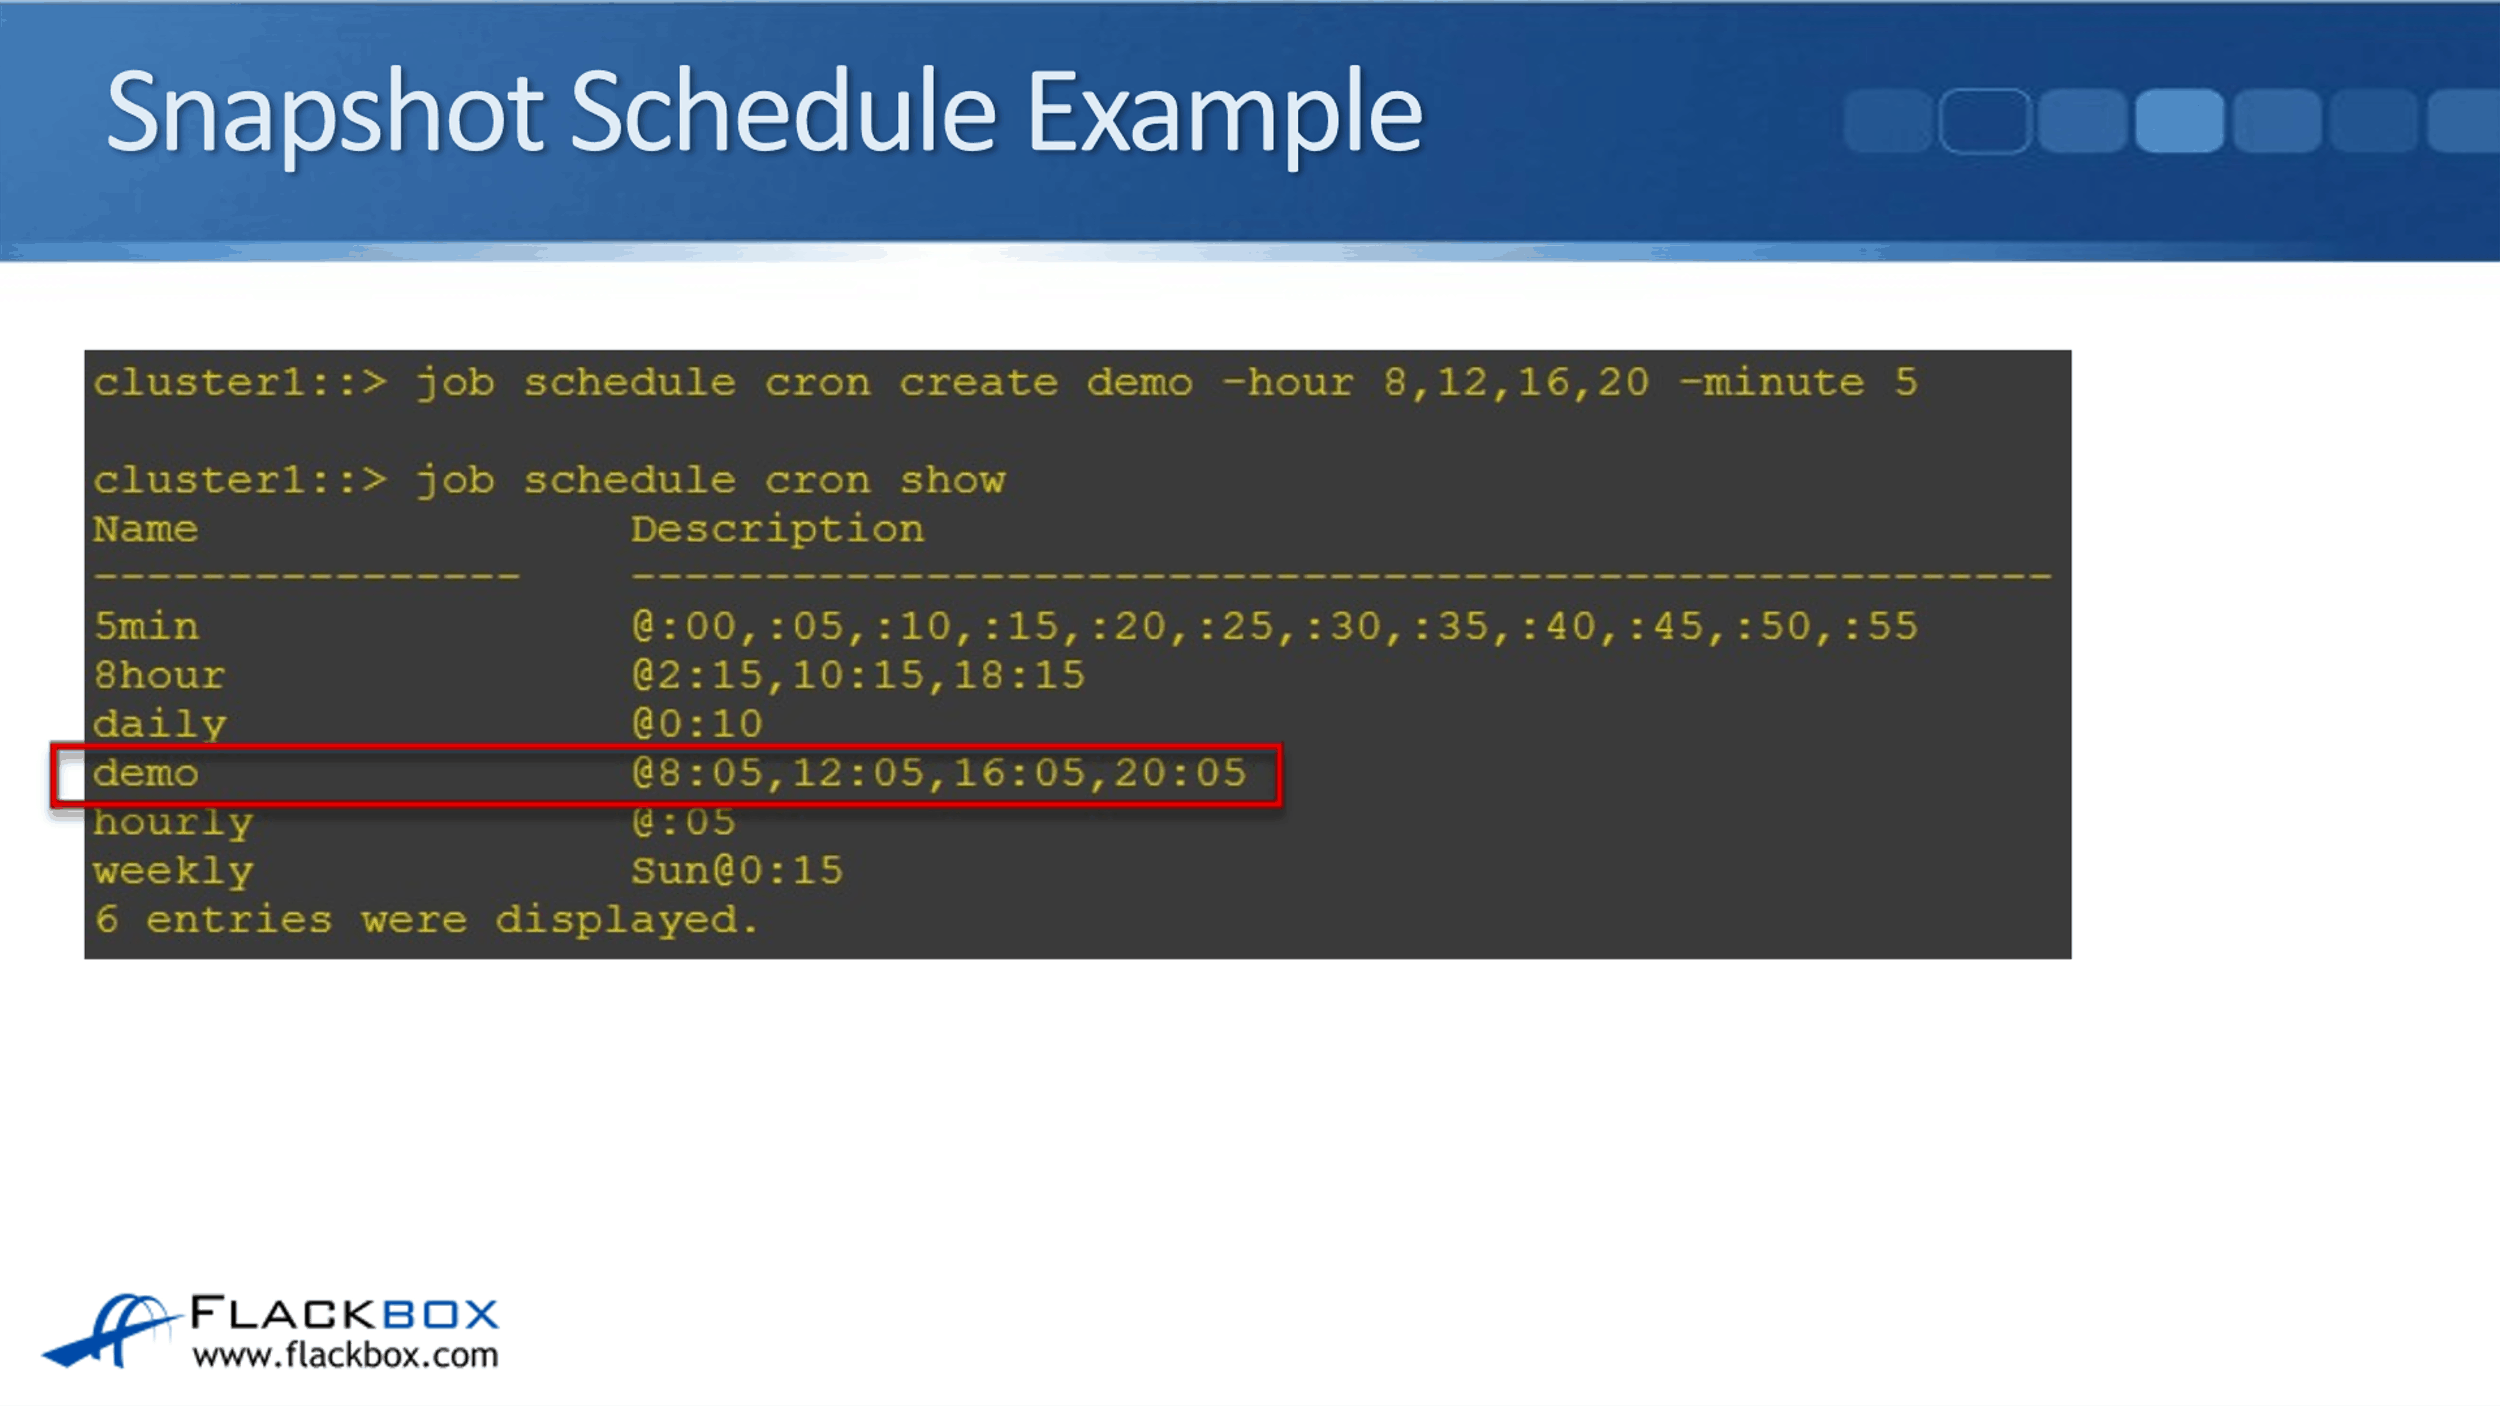
With the default snapshot schedule, it's going to have snapshots going back up to two weeks in time. Let's have a look at creating a custom schedule now. To do that, the command is:
job schedule cron create demo -hour 8, 12, 16, 20 -minute 5
Here, I've called my schedule, demo, and I've said that the times I want this to occur at five minutes past 8:00 in the morning, at five minutes past midday, at five minutes past 4:00 PM, and at five minutes past 8:00 PM.
To verify this, we can do:
job schedule cron show
This will show us all of our available job schedules. All the rest that you see here are there by default anyway, and I've added my custom one, which is demo, and you can see there it's verified that it occurs at five past 8:00 in the morning, five past midday, five past 4:00 PM and five past 8:00 PM.
When you configure this, you use 24-hour format. We've created our schedule and you can see it verified there.
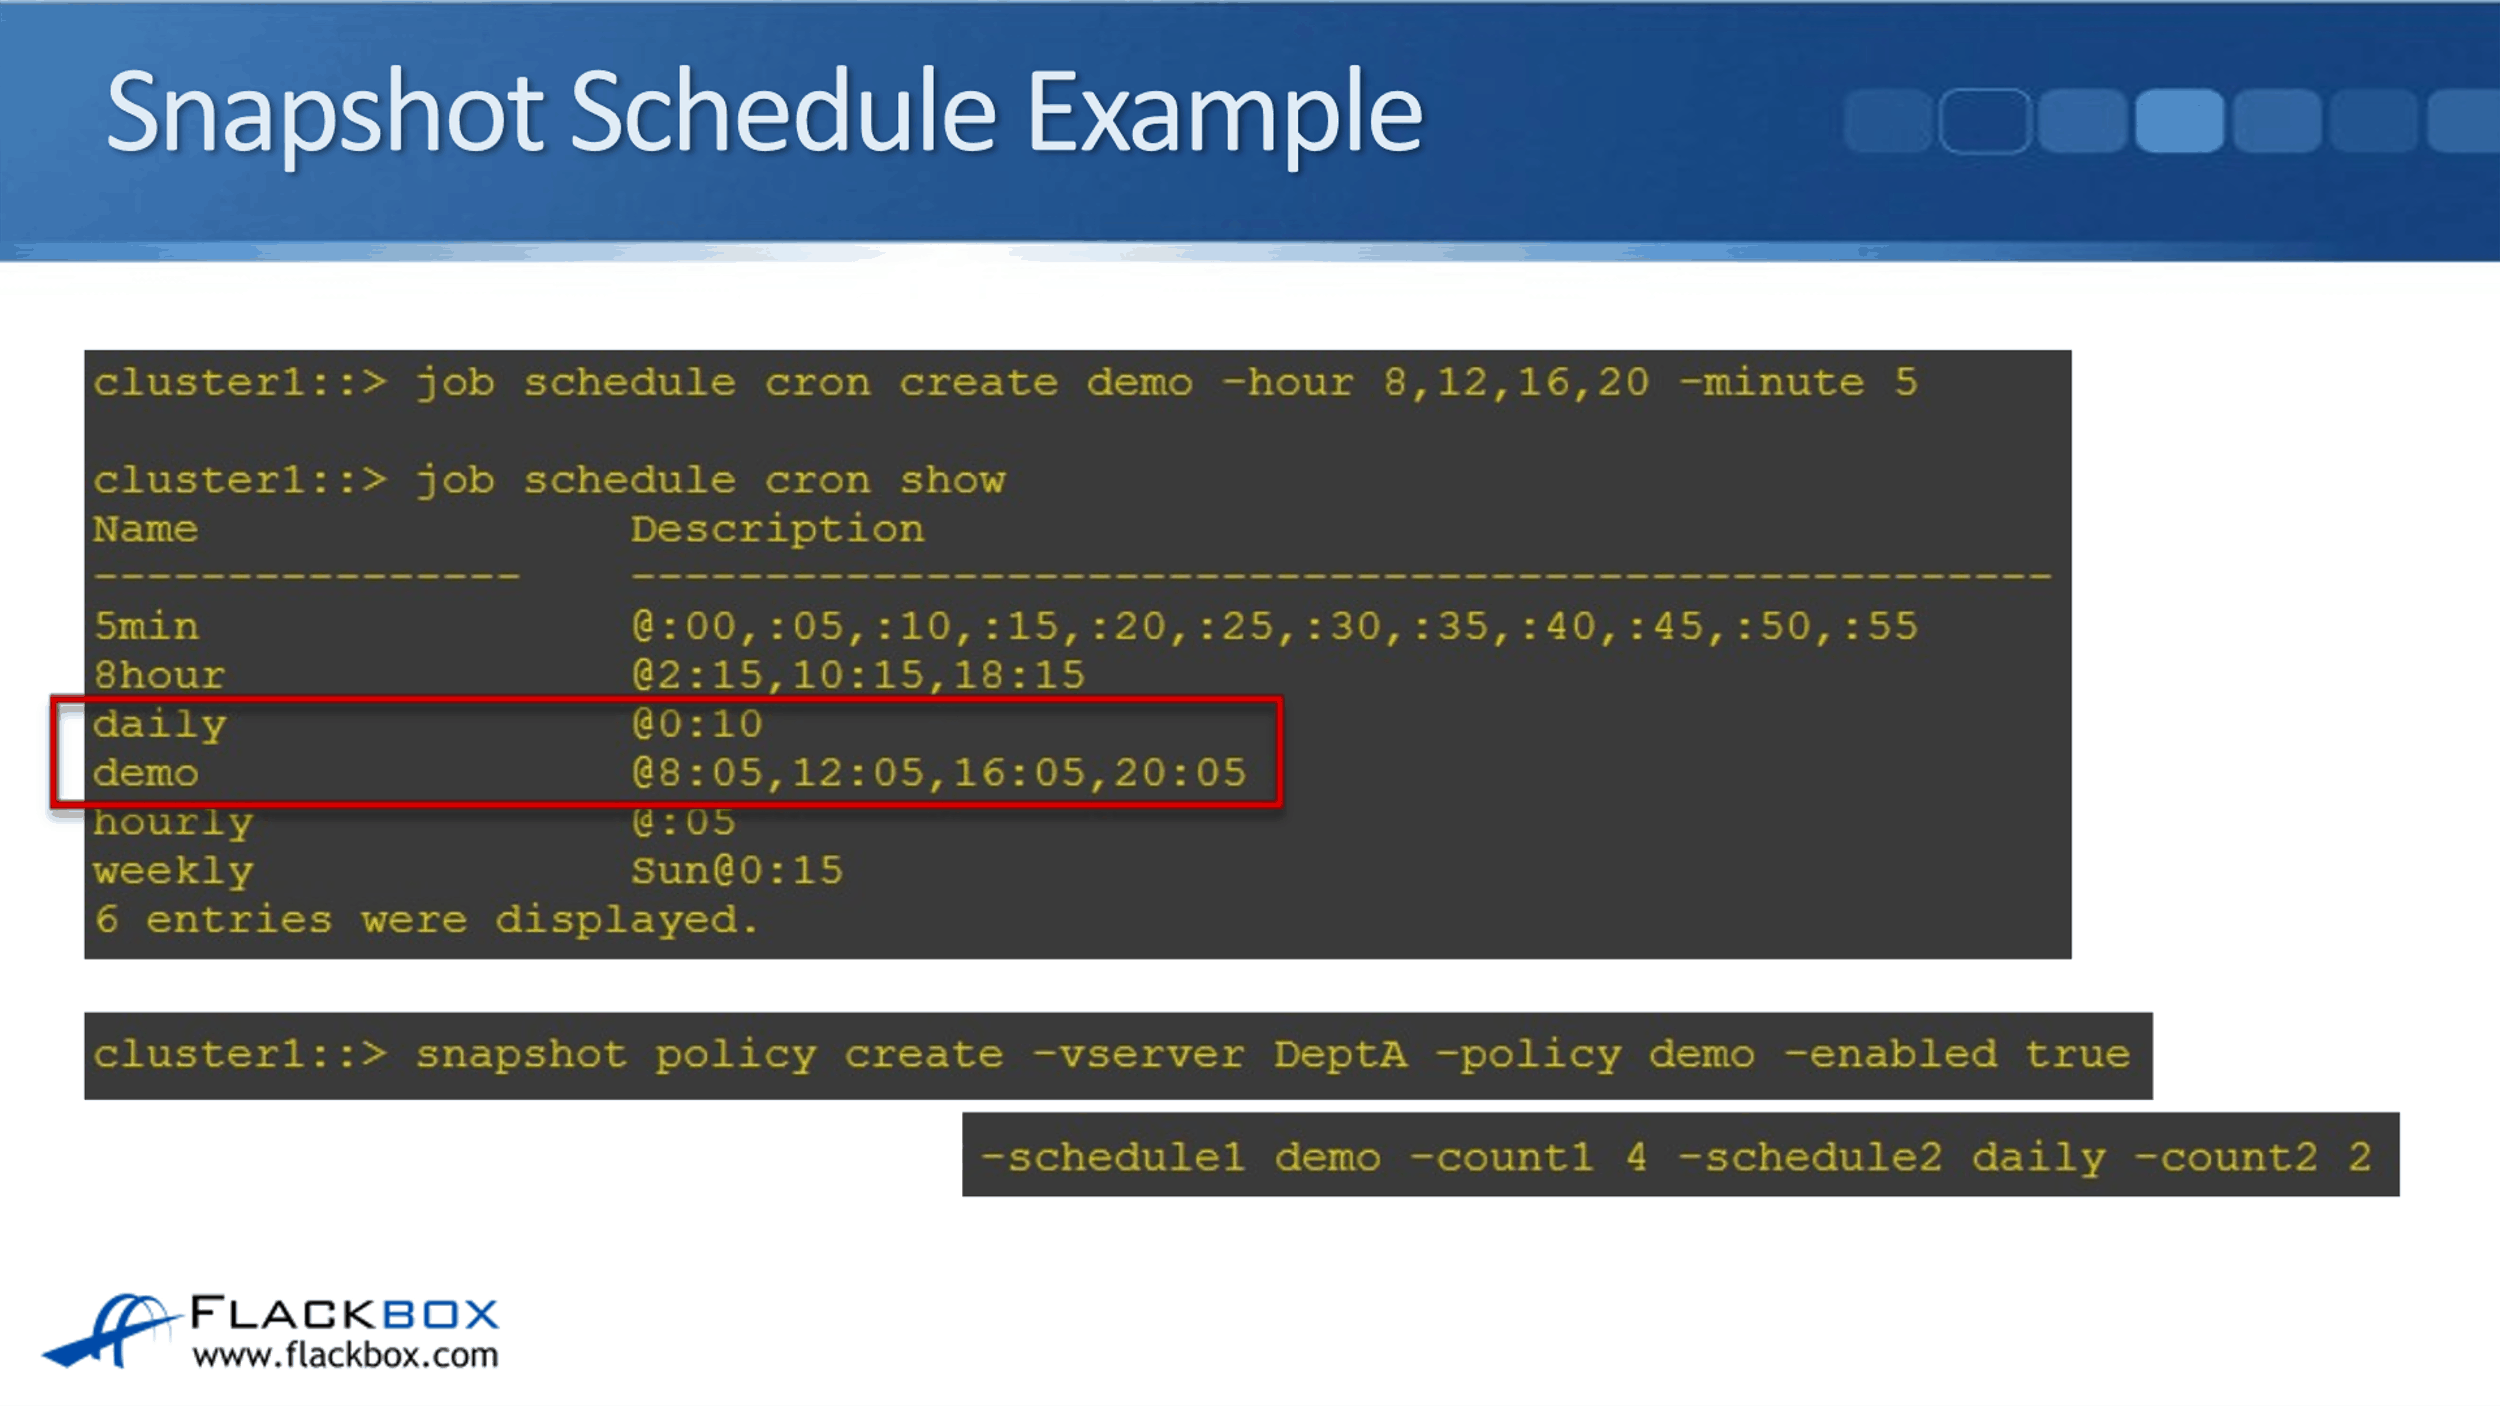
The next step, let's actually create a policy from this. To do that, I've said:
snapshot policy create -vserver DeptA -policy demo -enabled true -schedule1 demo -count1 4 -schedule2 daily -count2 2
This works at Vserver level, so here I've said it's for Vserver Department A. Then give the policy a name, I've named my policy, demo. I called my schedule, demo. Here I'm also calling my policy, demo, as well. It's fine, you can name them both the same, it doesn't cause a conflict.
I also have to say, -enabled true, and then I say schedule1 is demo and count1 4. So, count1 and schedule1 are tied together and this is seeing that it is going to take a snapshot occurring to the demo schedule, that is at five past 8:00 in the morning, five past 12:00, five past 4:00 PM, and five past 8:00 PM. It's going to keep the most recent four copies of those.
Then, I've said, schedule2 daily and count2 2. Again, schedule2 and count2 are tied together. This is seeing, to take snapshots occurring to the daily schedule and keep the most recent two of those. It's going to take snapshots at five past 8:00, five past 12:00, five past 4:00, and five past 8:00 PM.
It's also going to take snapshots every day at 10 minutes past midnight, every day, and will keep the most recent two copies of those.
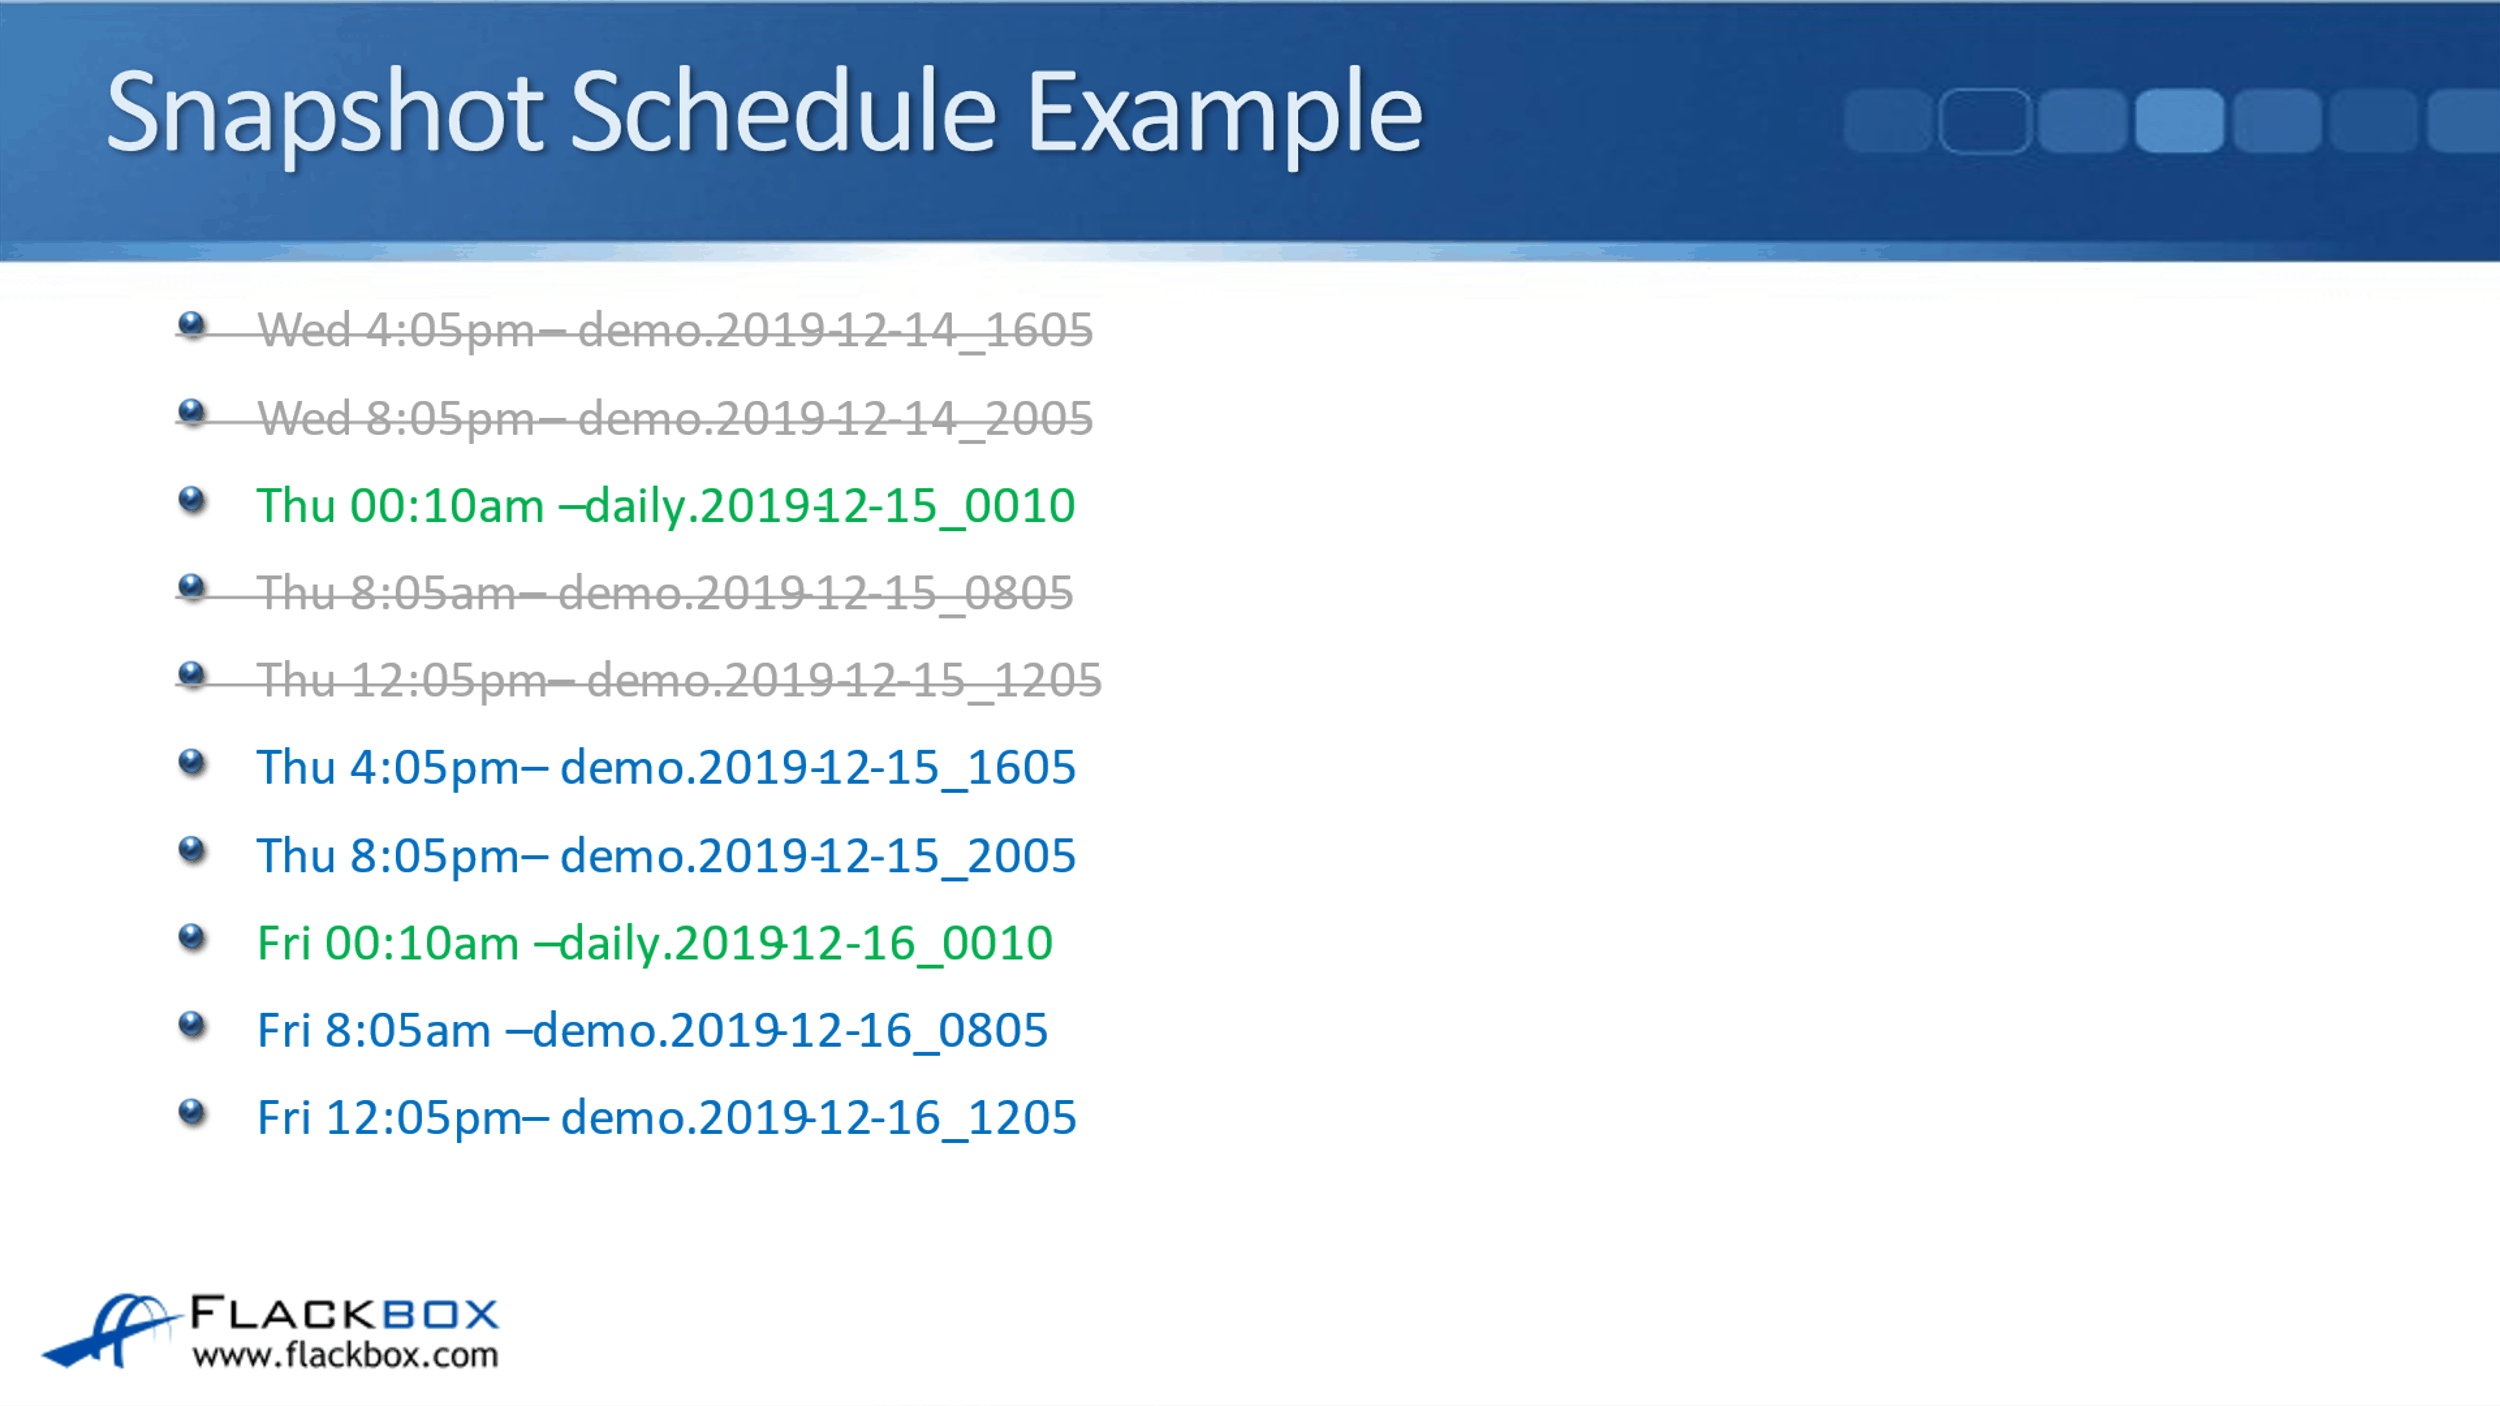
Let's have a walk through and see exactly what is going to happen here. This example is using this snapshot policy here. Right now, we've created the schedule, we've created the policy, we would also have to apply this policy to a volume as well, so don't forget to apply it to your volume as well if you are configuring this.
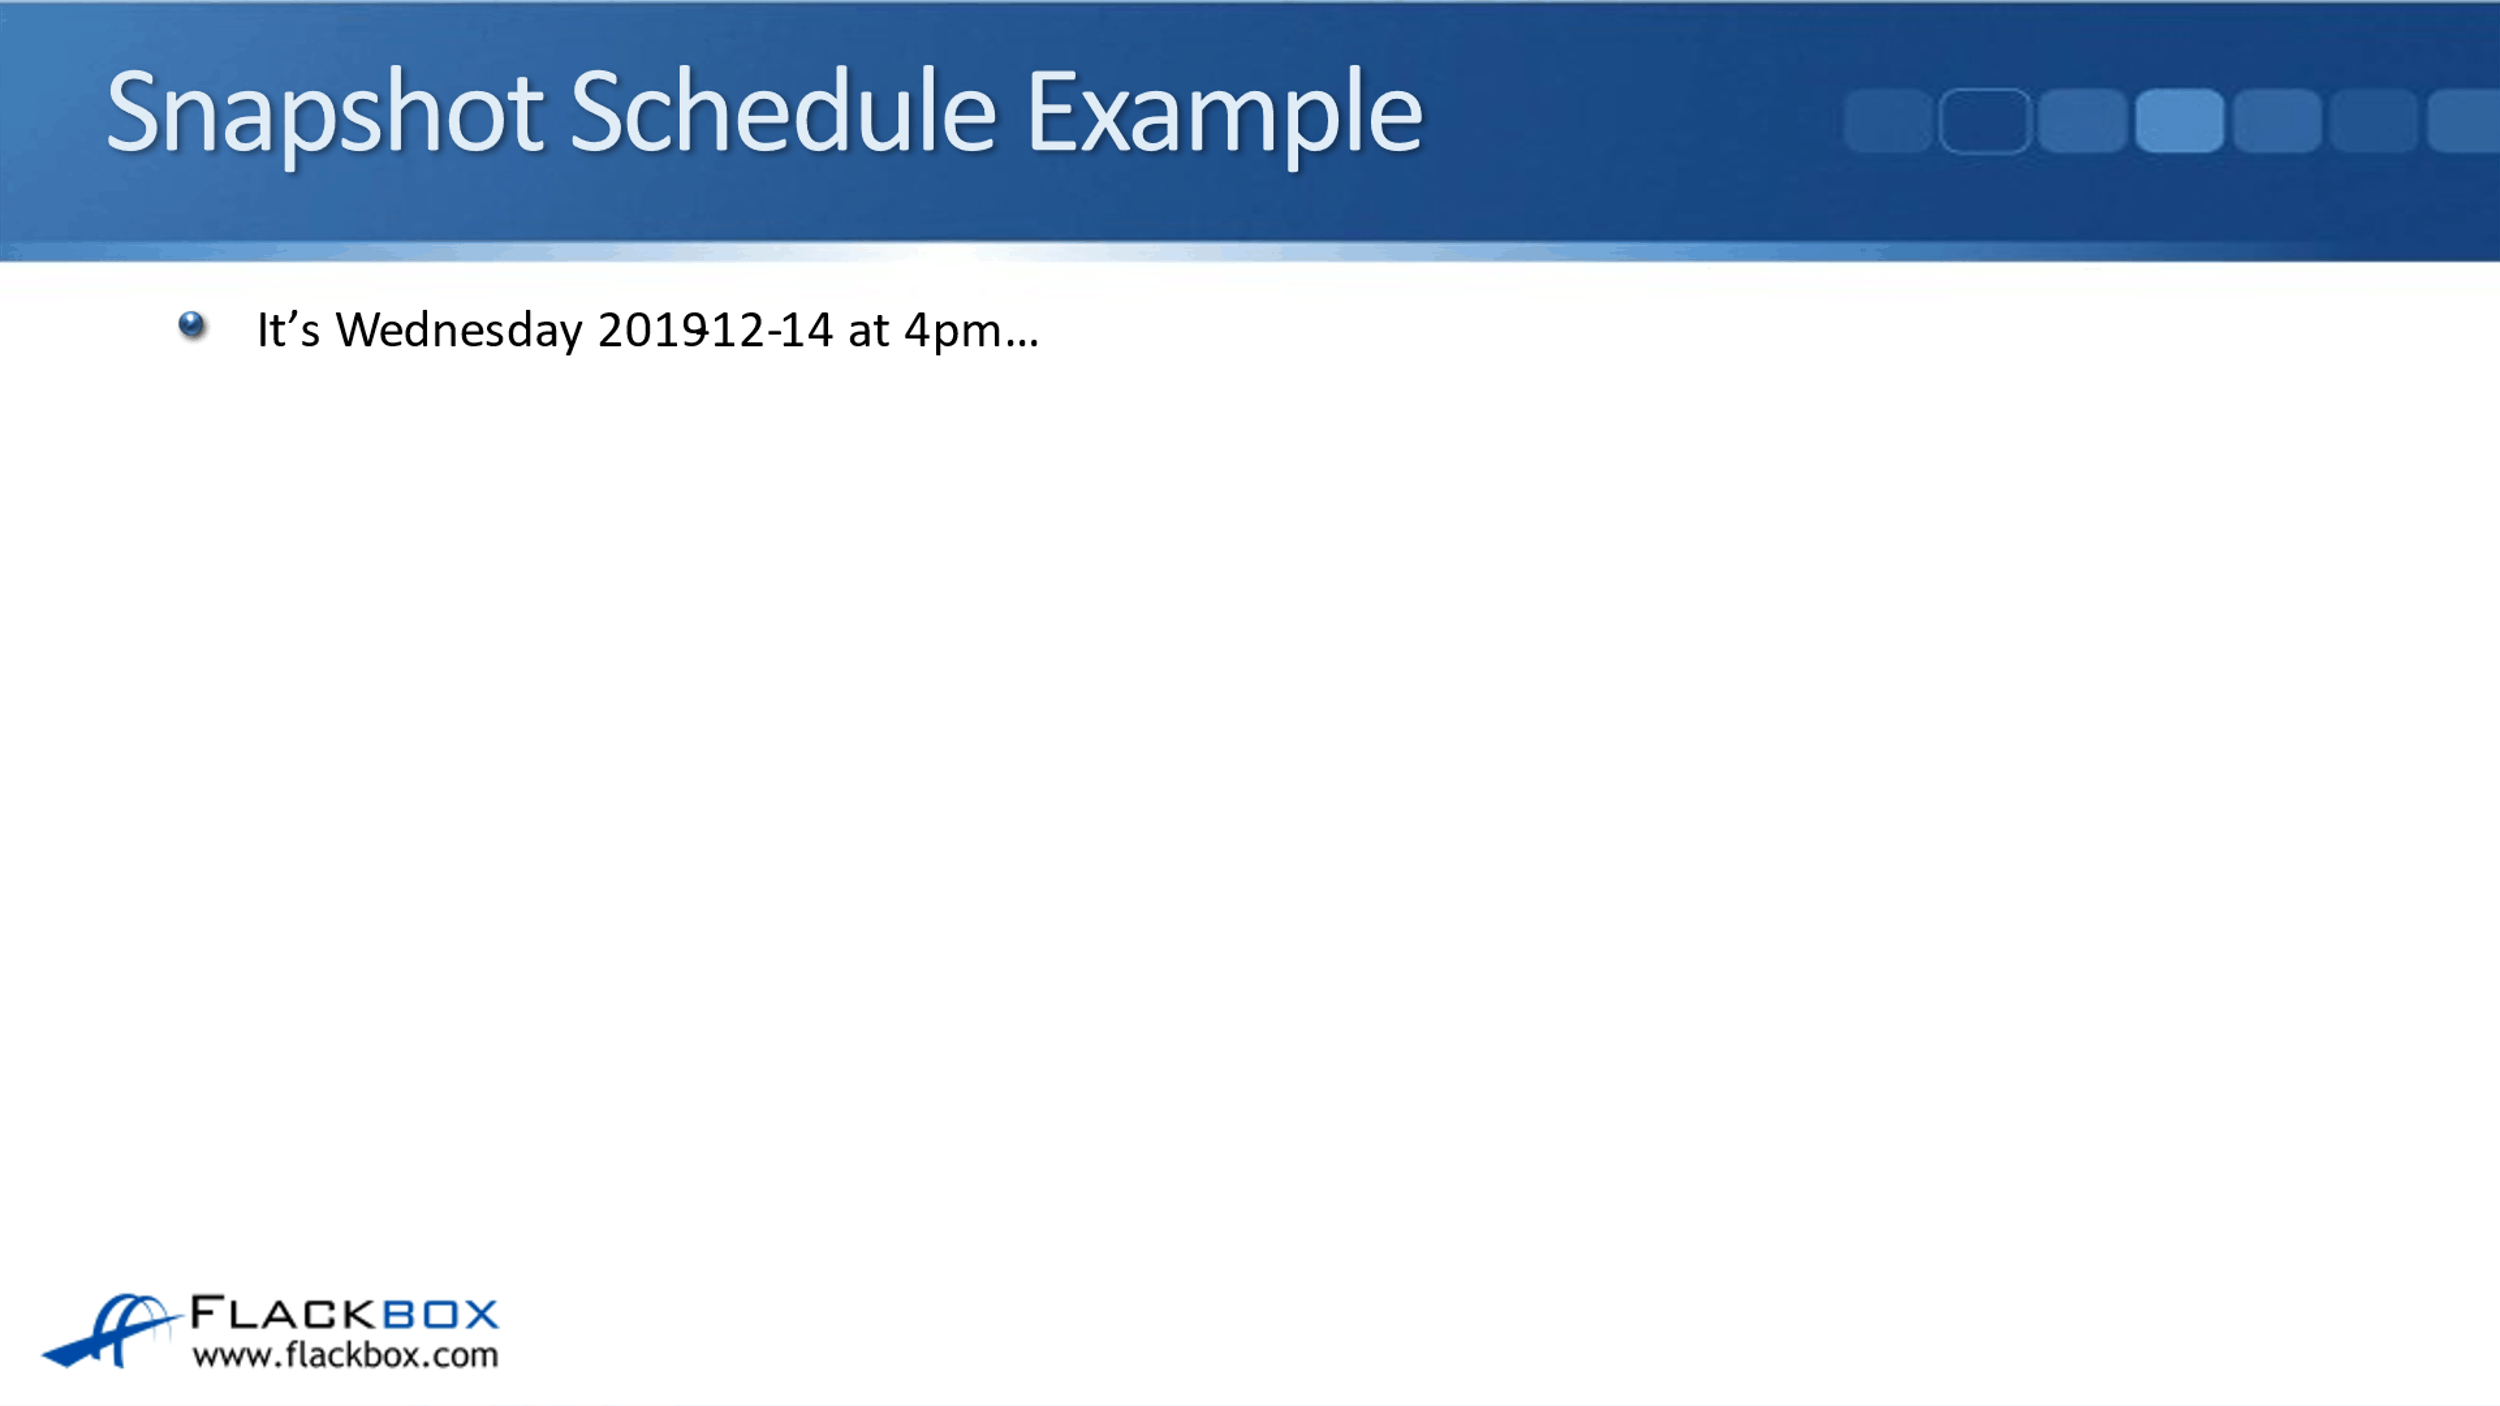
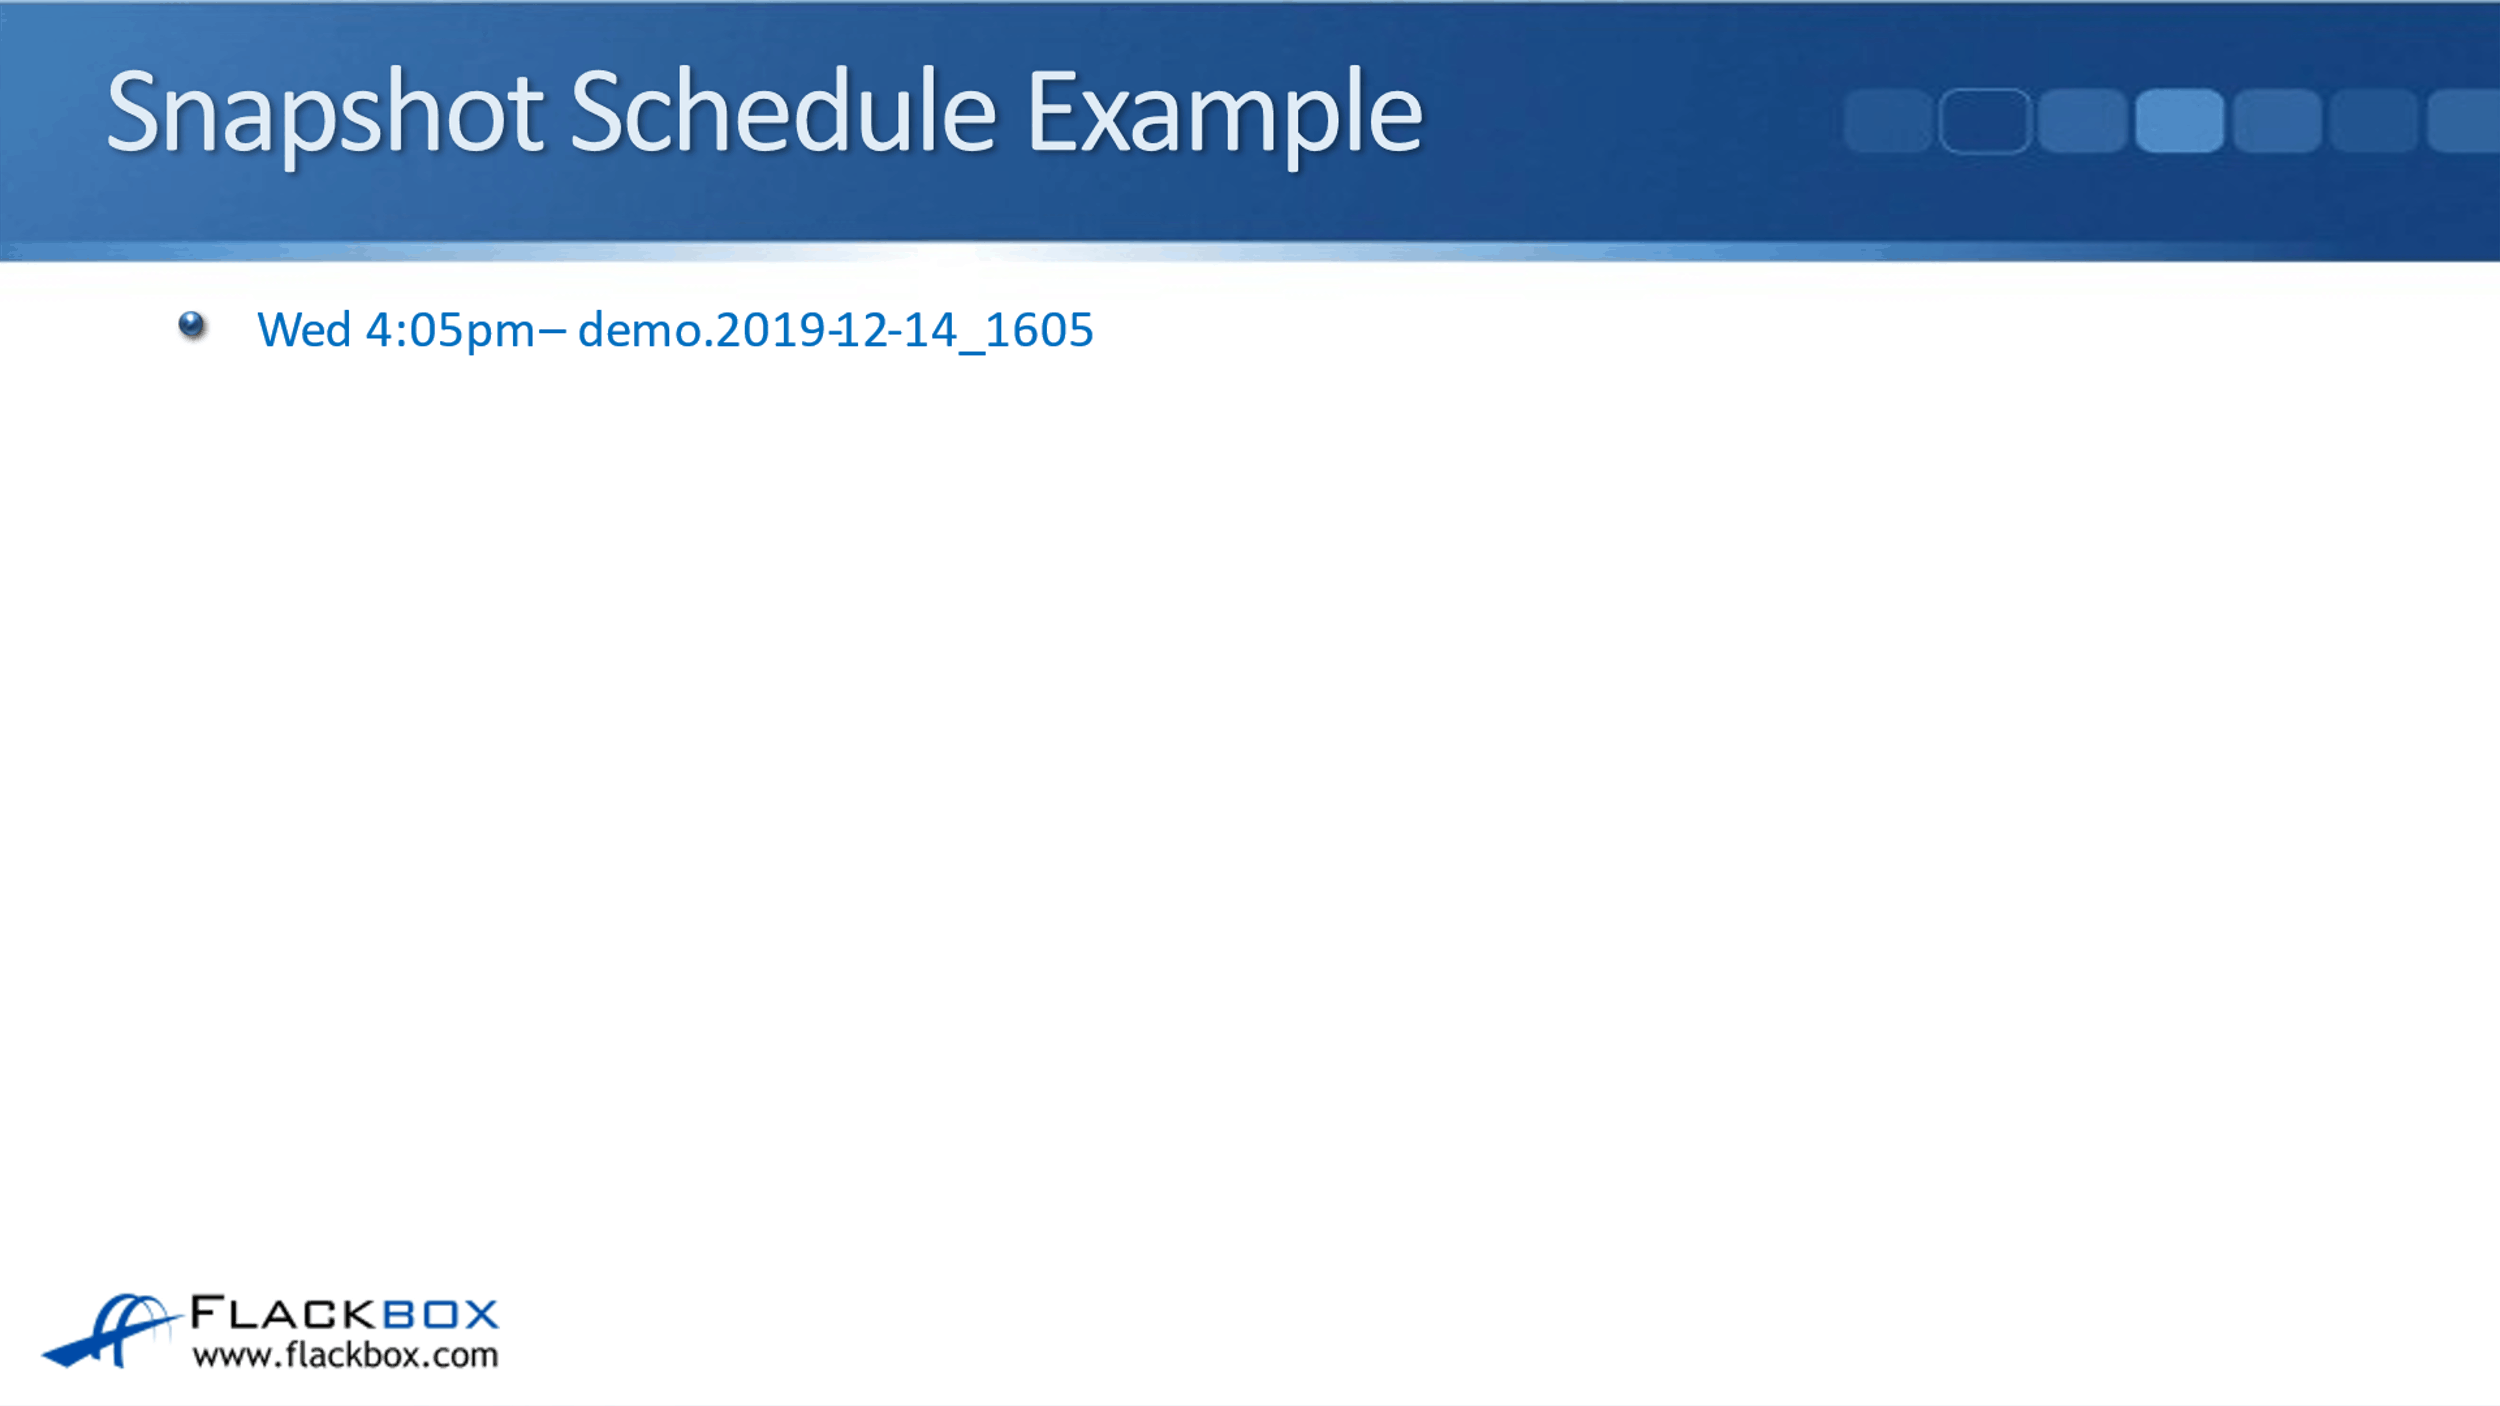
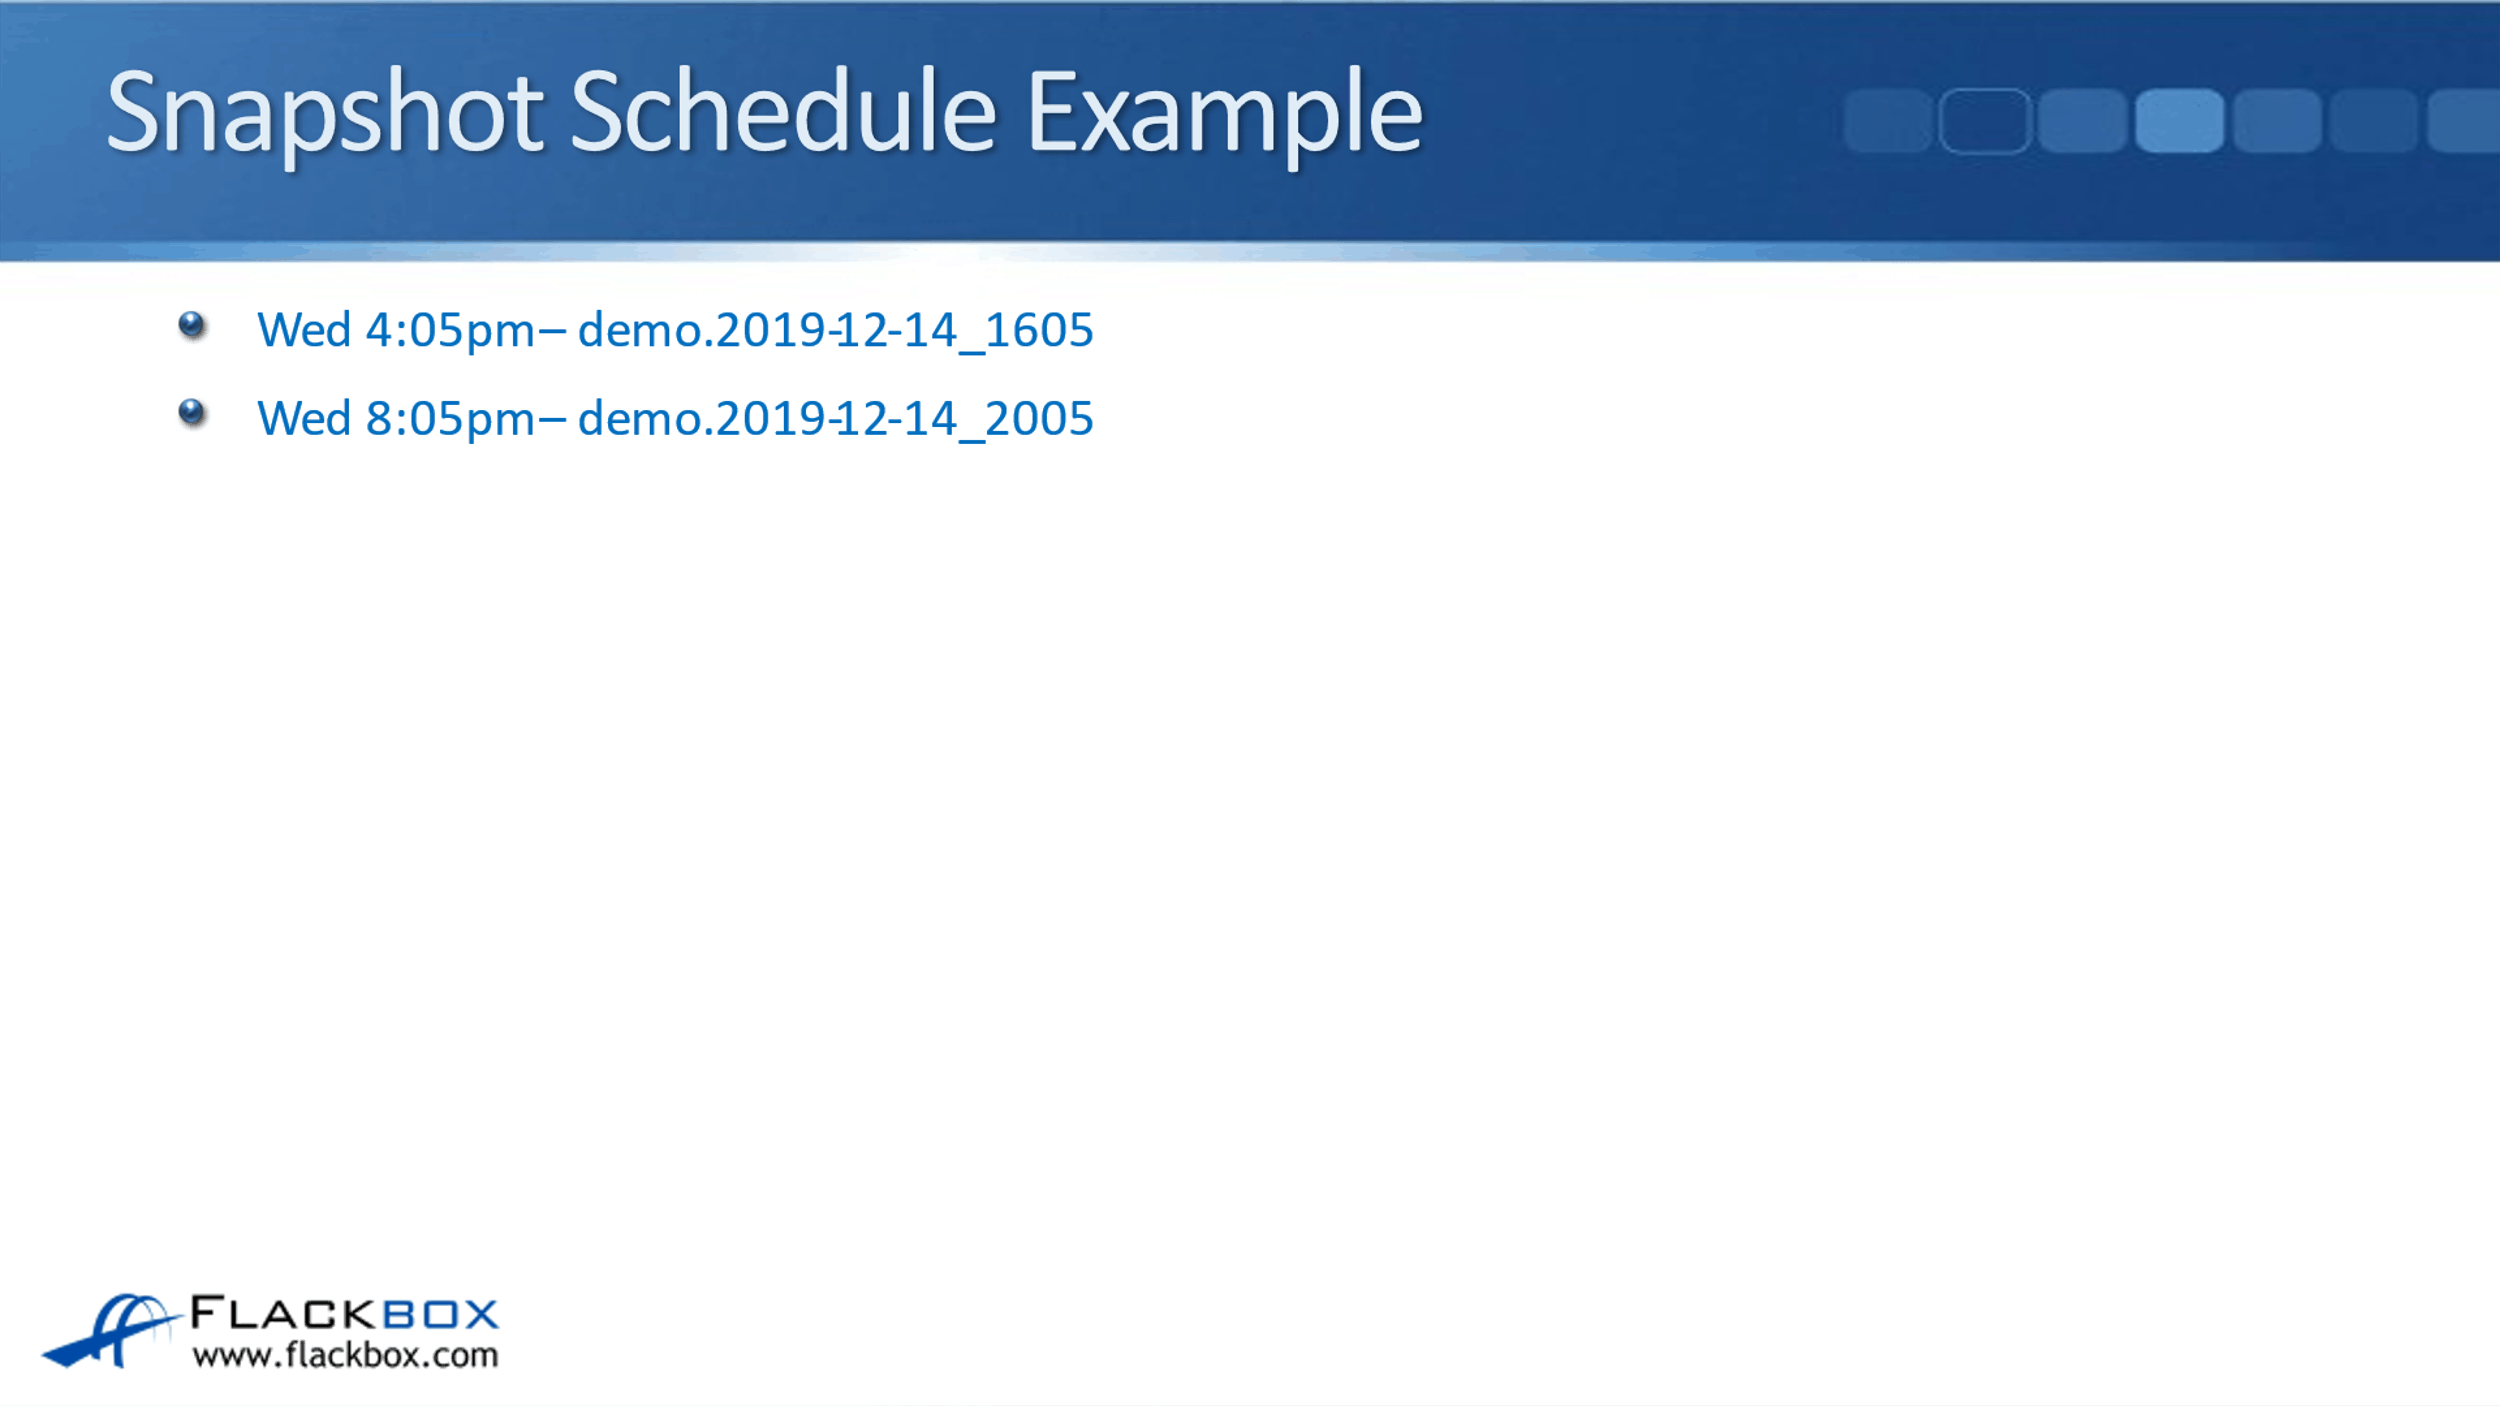
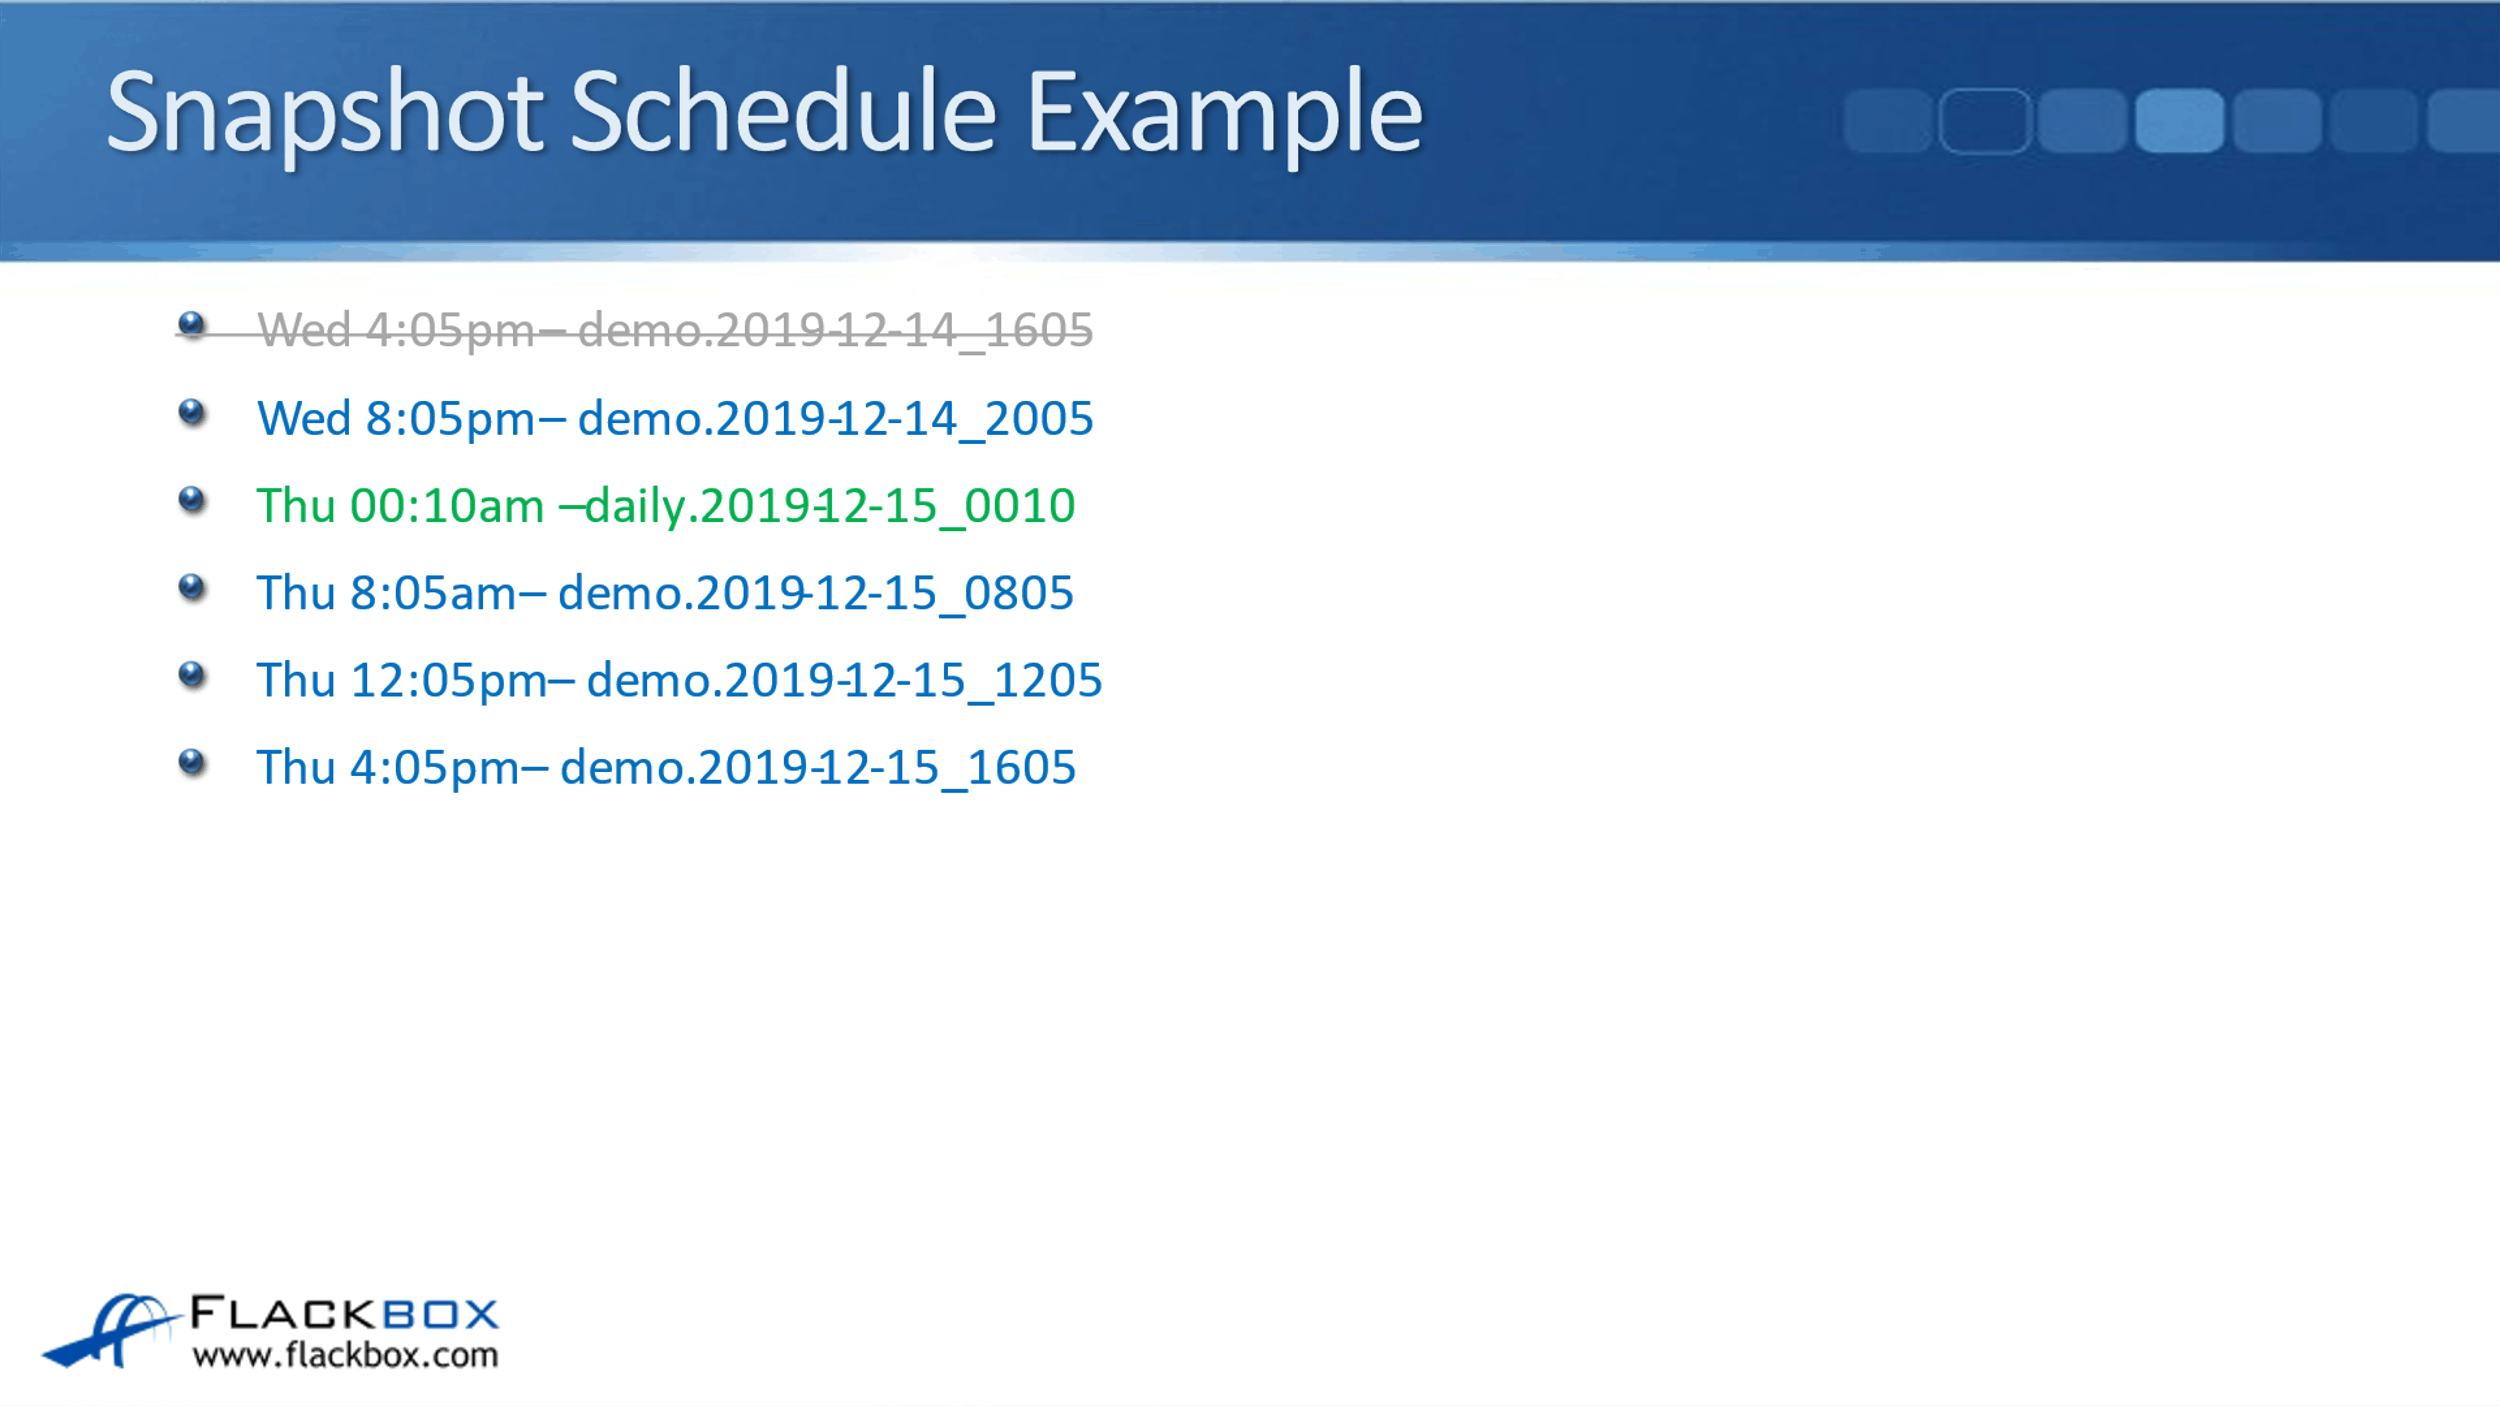
Another example, it's Wednesday on the 14th of December, 2019. This is using USD format and it's 4:00 PM. You saw on our schedule with the first snapshot, it's going to take place at five past 4:00. And the name of the snapshot is going to be the name of the policy, which was demo.
You can see that it’s demo and then the timestamp. The name of this snapshot is demo.2019-12-14_1605. We take that snapshot then.
The next snapshot was scheduled to take place at five past 8:00, so we'll take another demo snapshot then.
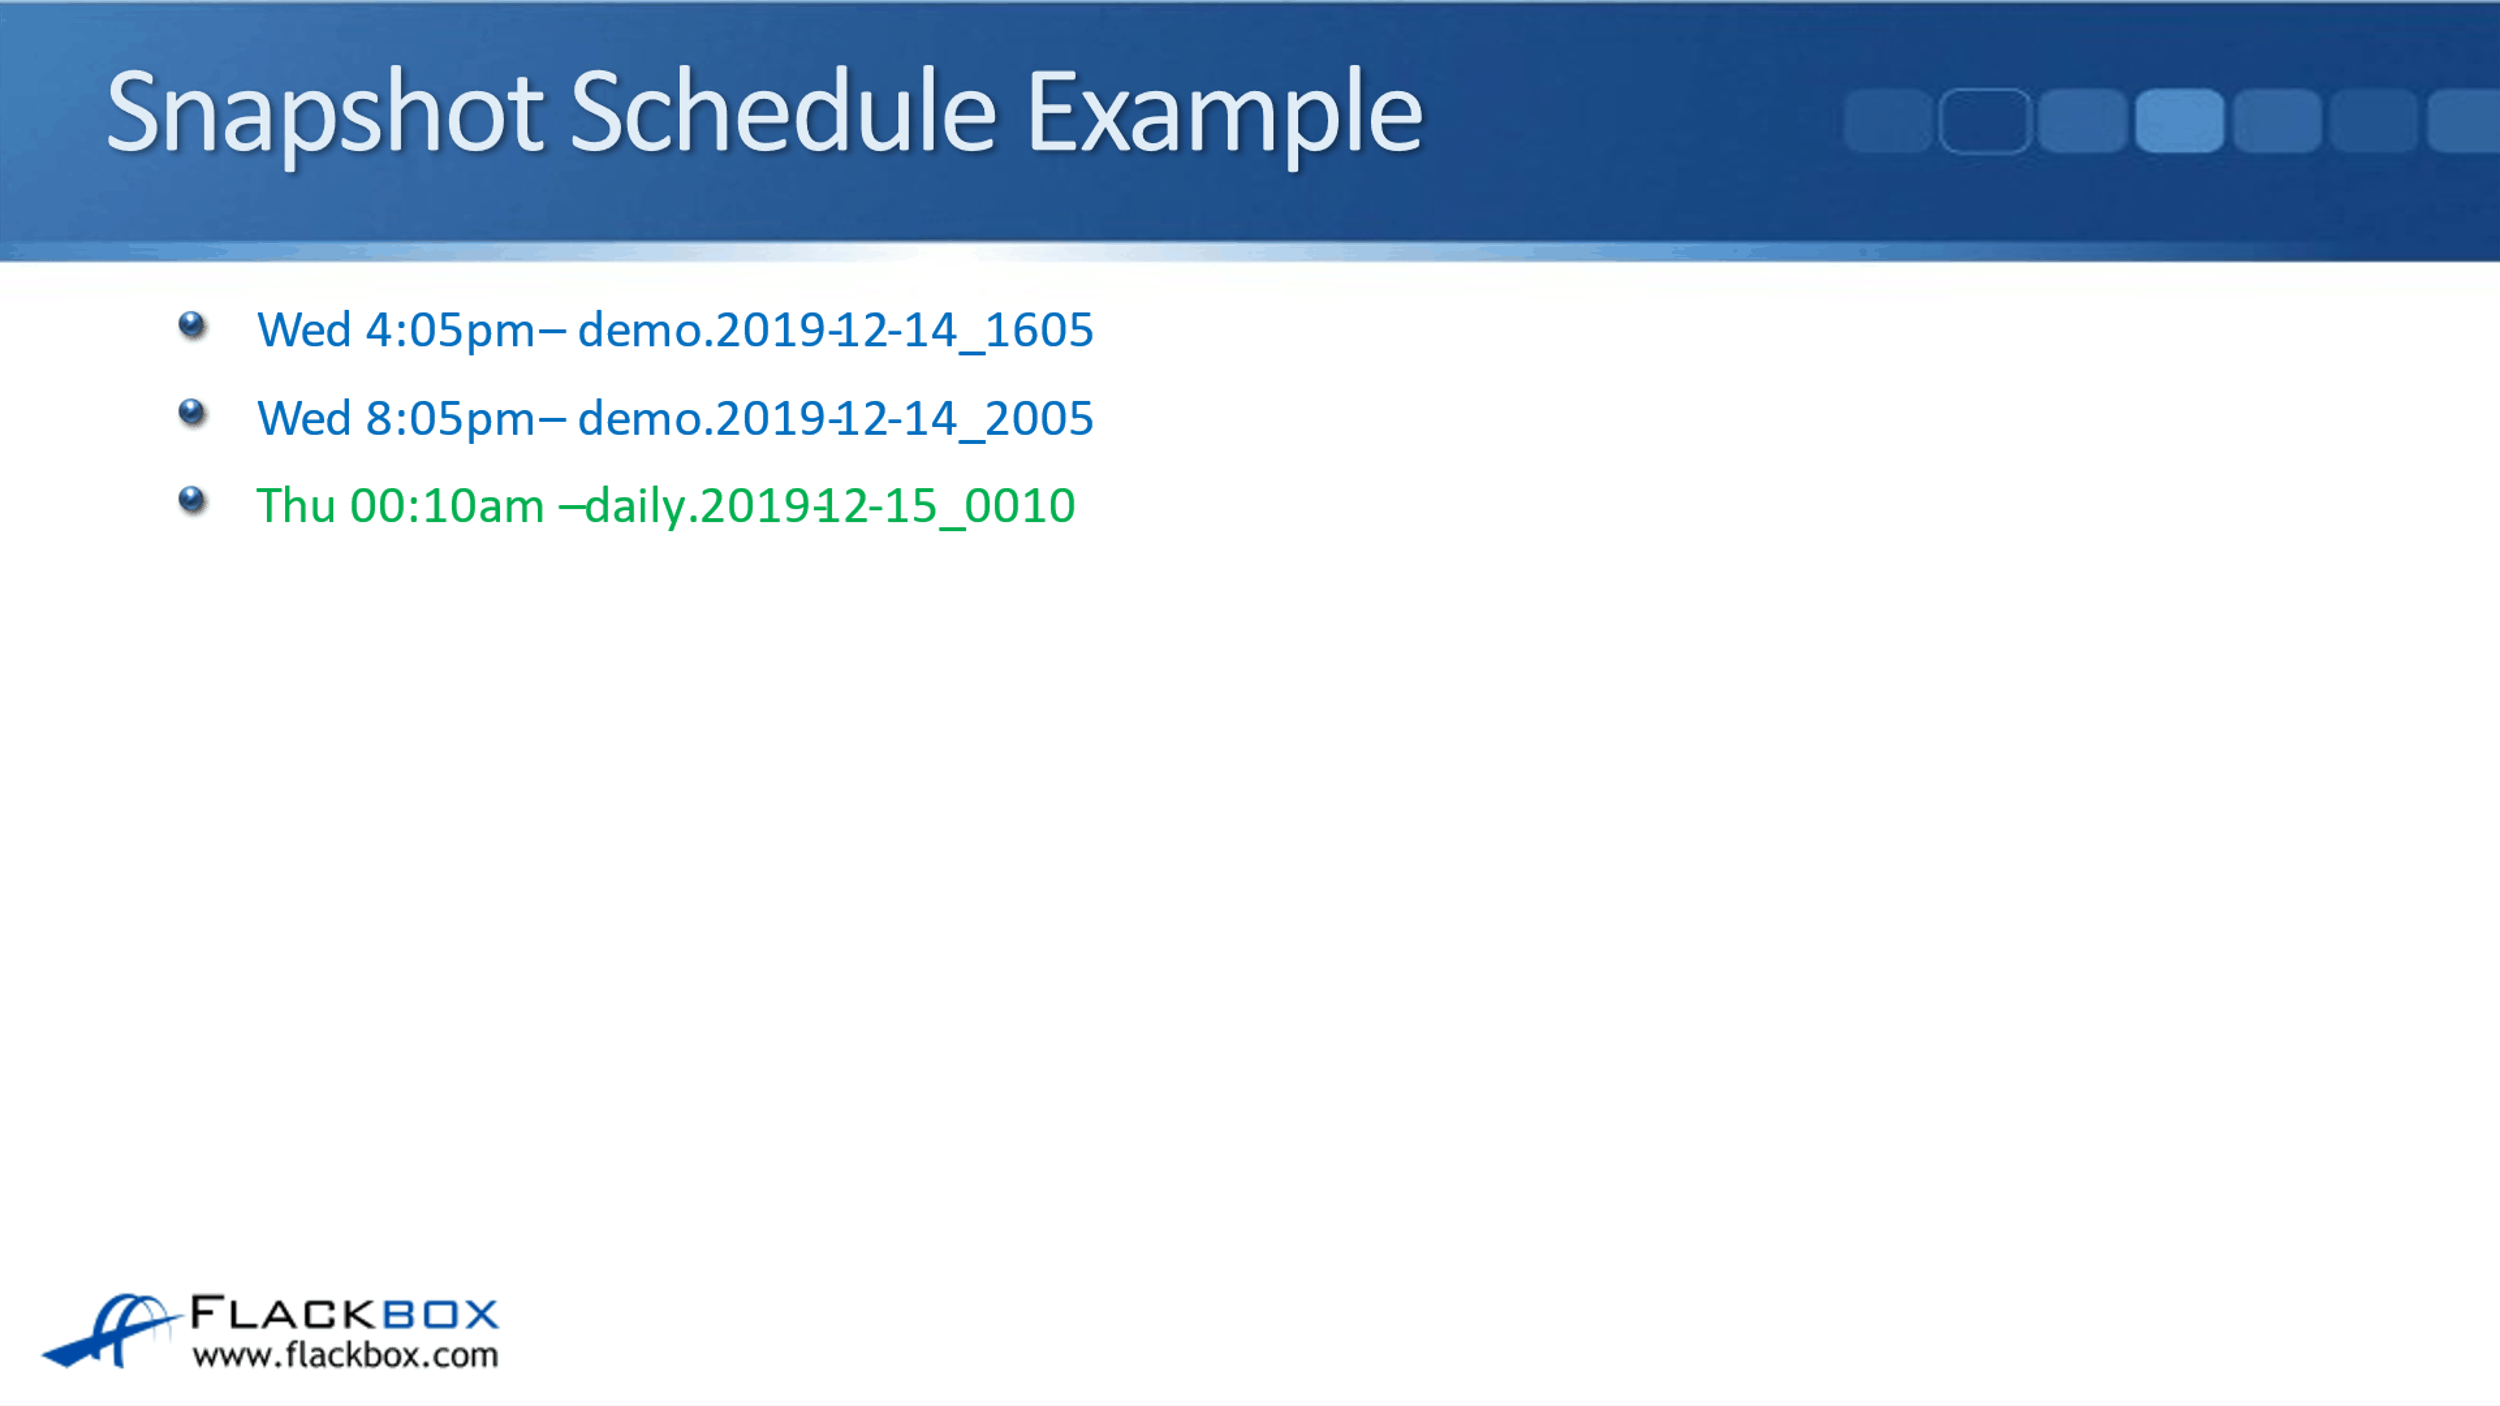
Then the next one that occurs is our daily snapshot at 10 past midnight, this is on Wednesday night or Thursday at 10 past midnight now. At that time, we'll take the daily snapshot which is prefixed with daily.
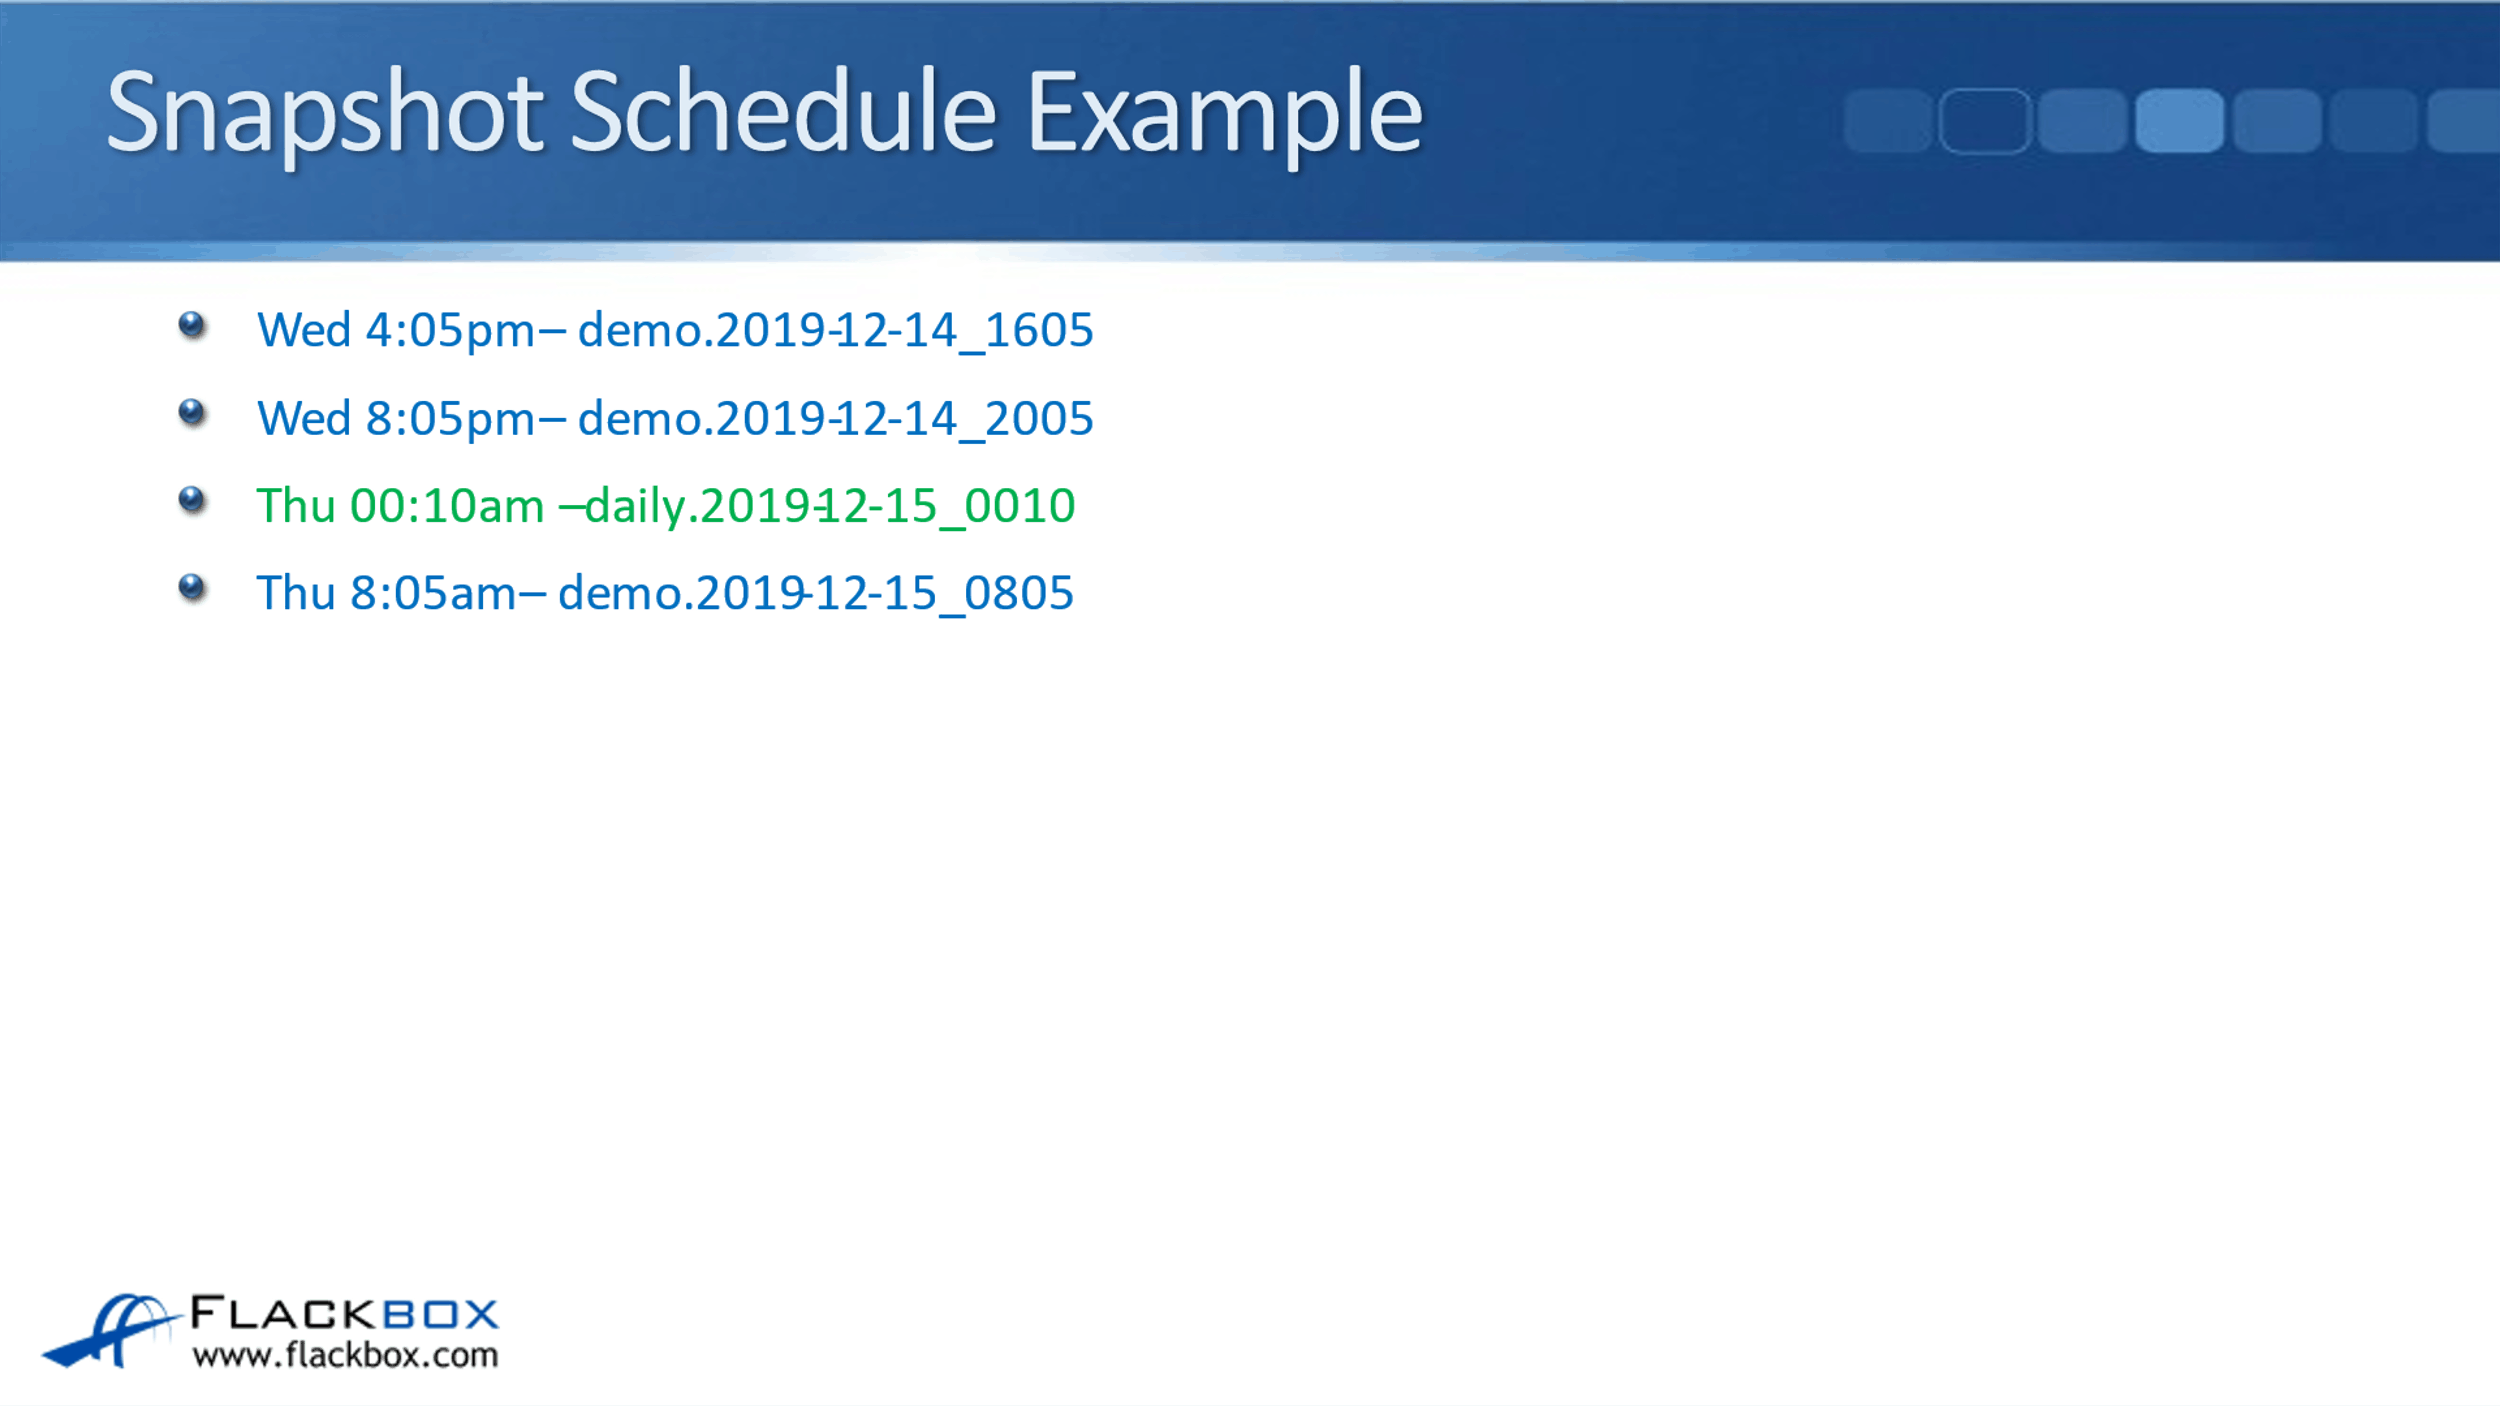
The next snapshot occurs on Thursday morning at five past 8:00.
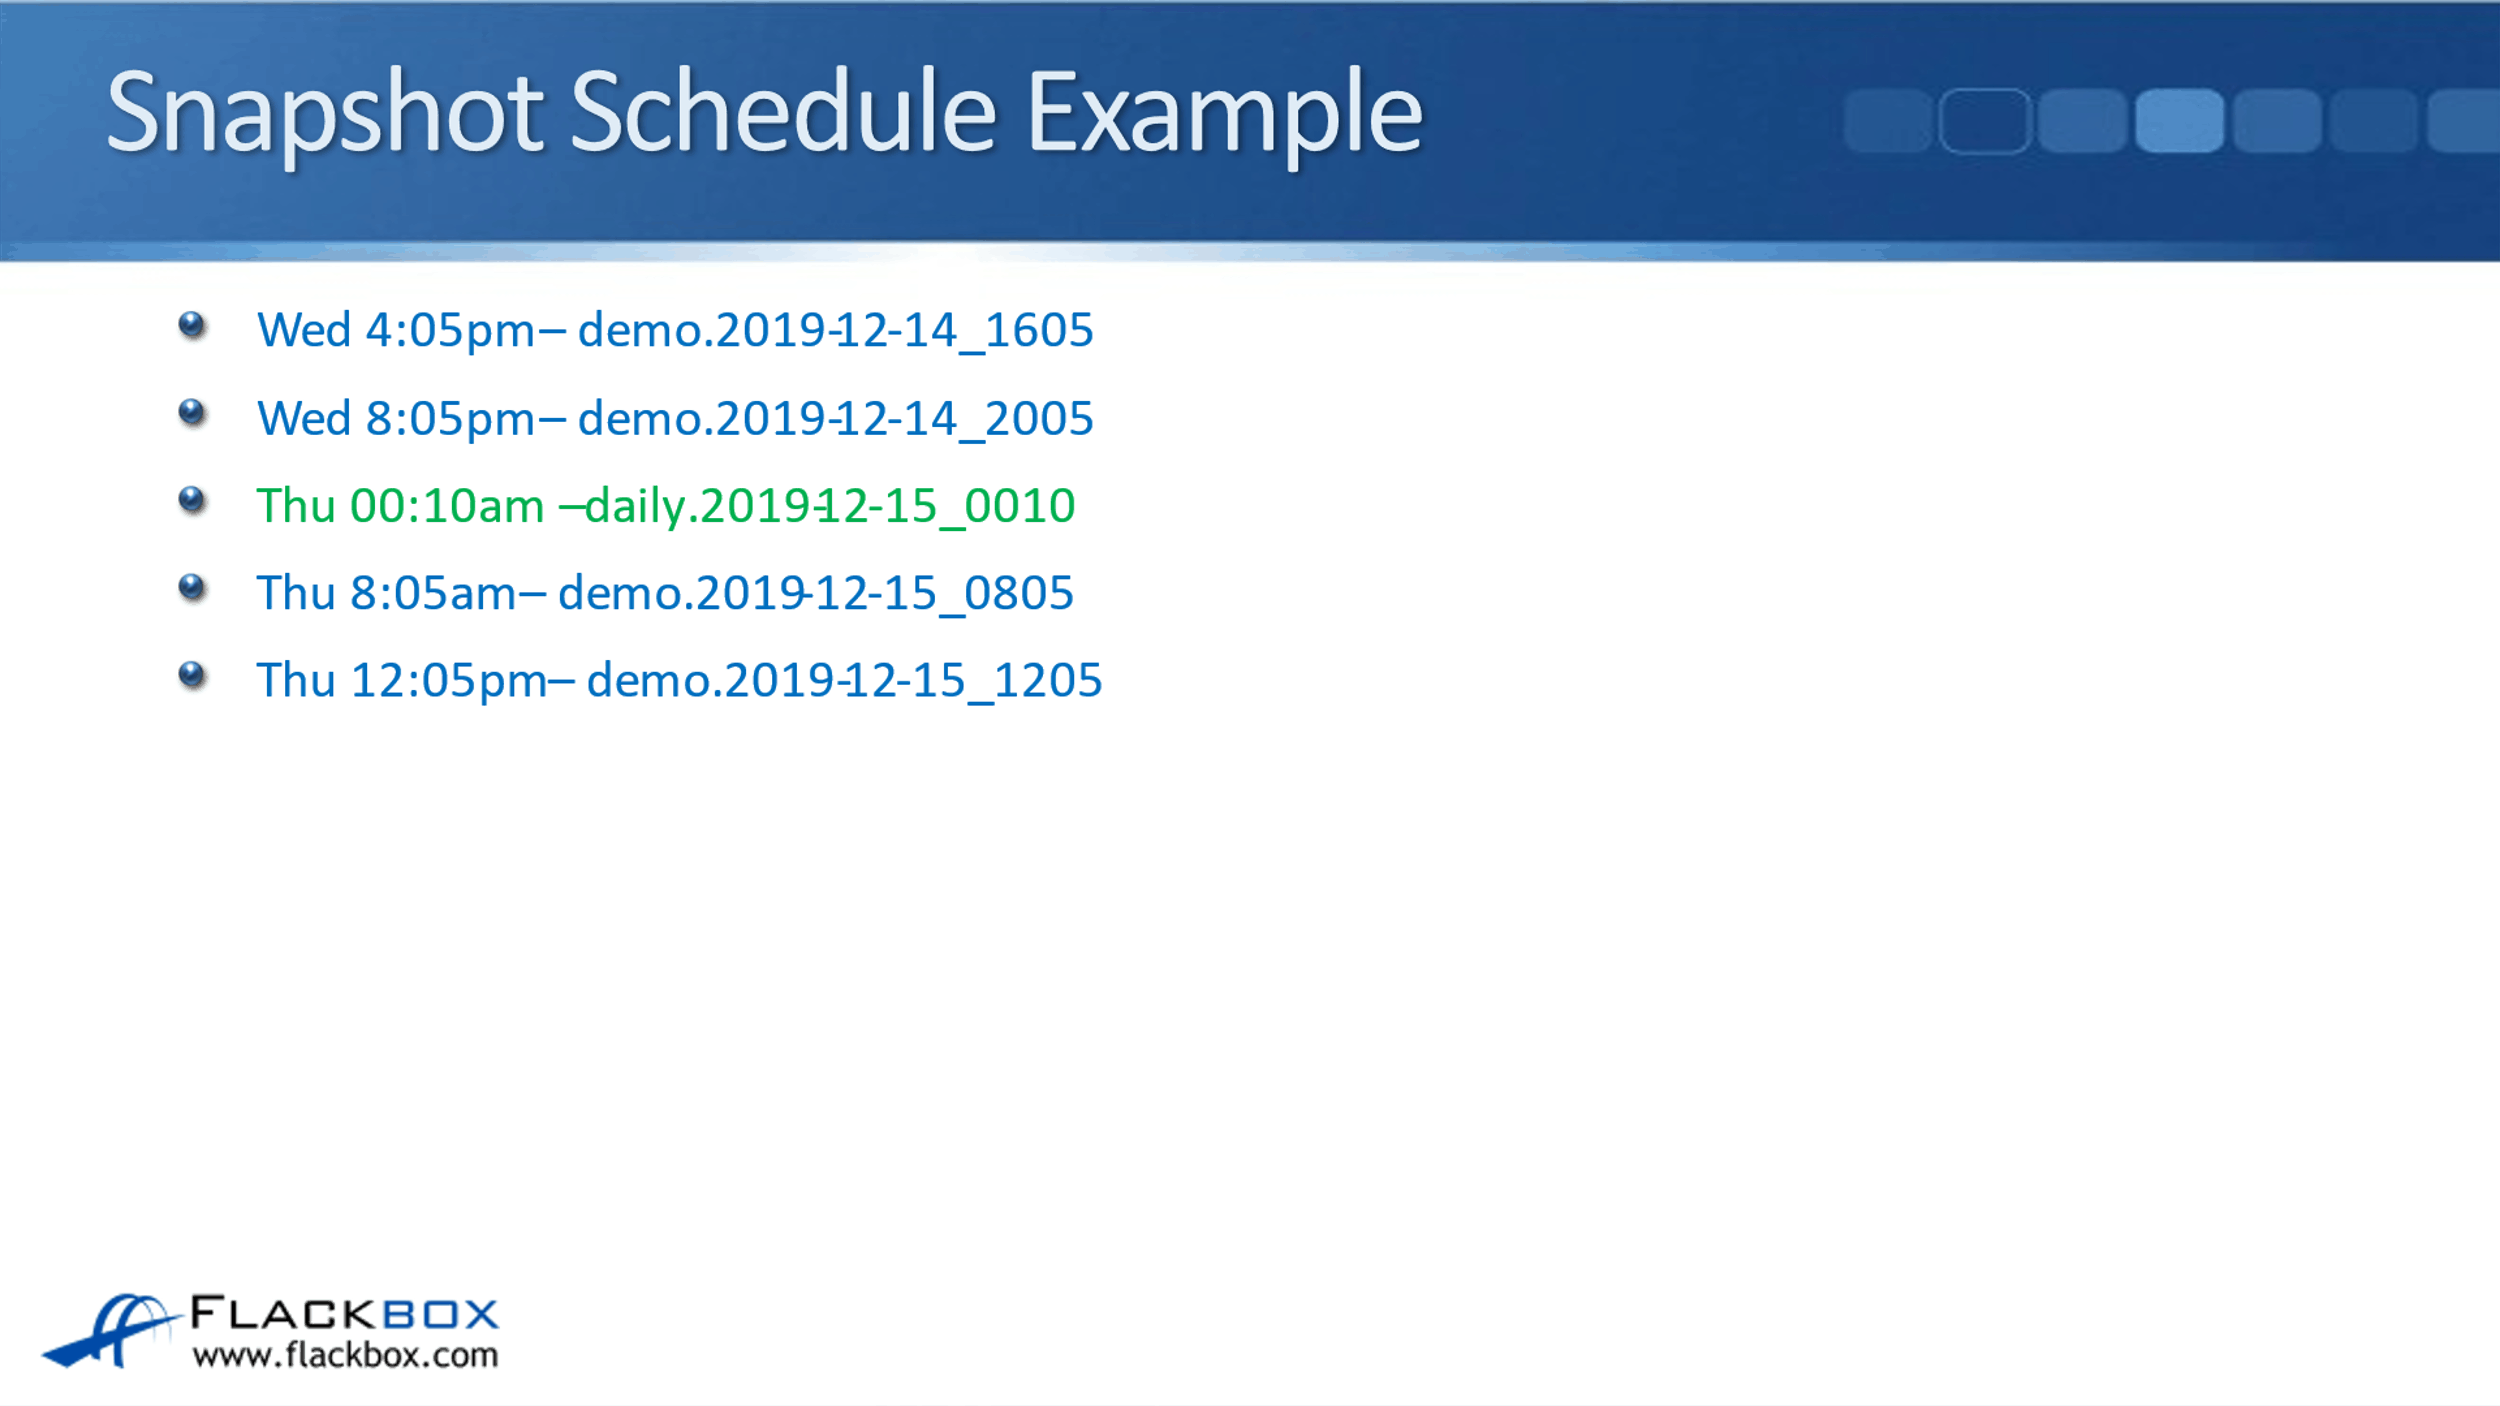
The next one is on Thursday at five past midday. Remember, we were going to retain the four most recent demo snapshots where we've got four demo snapshots now.
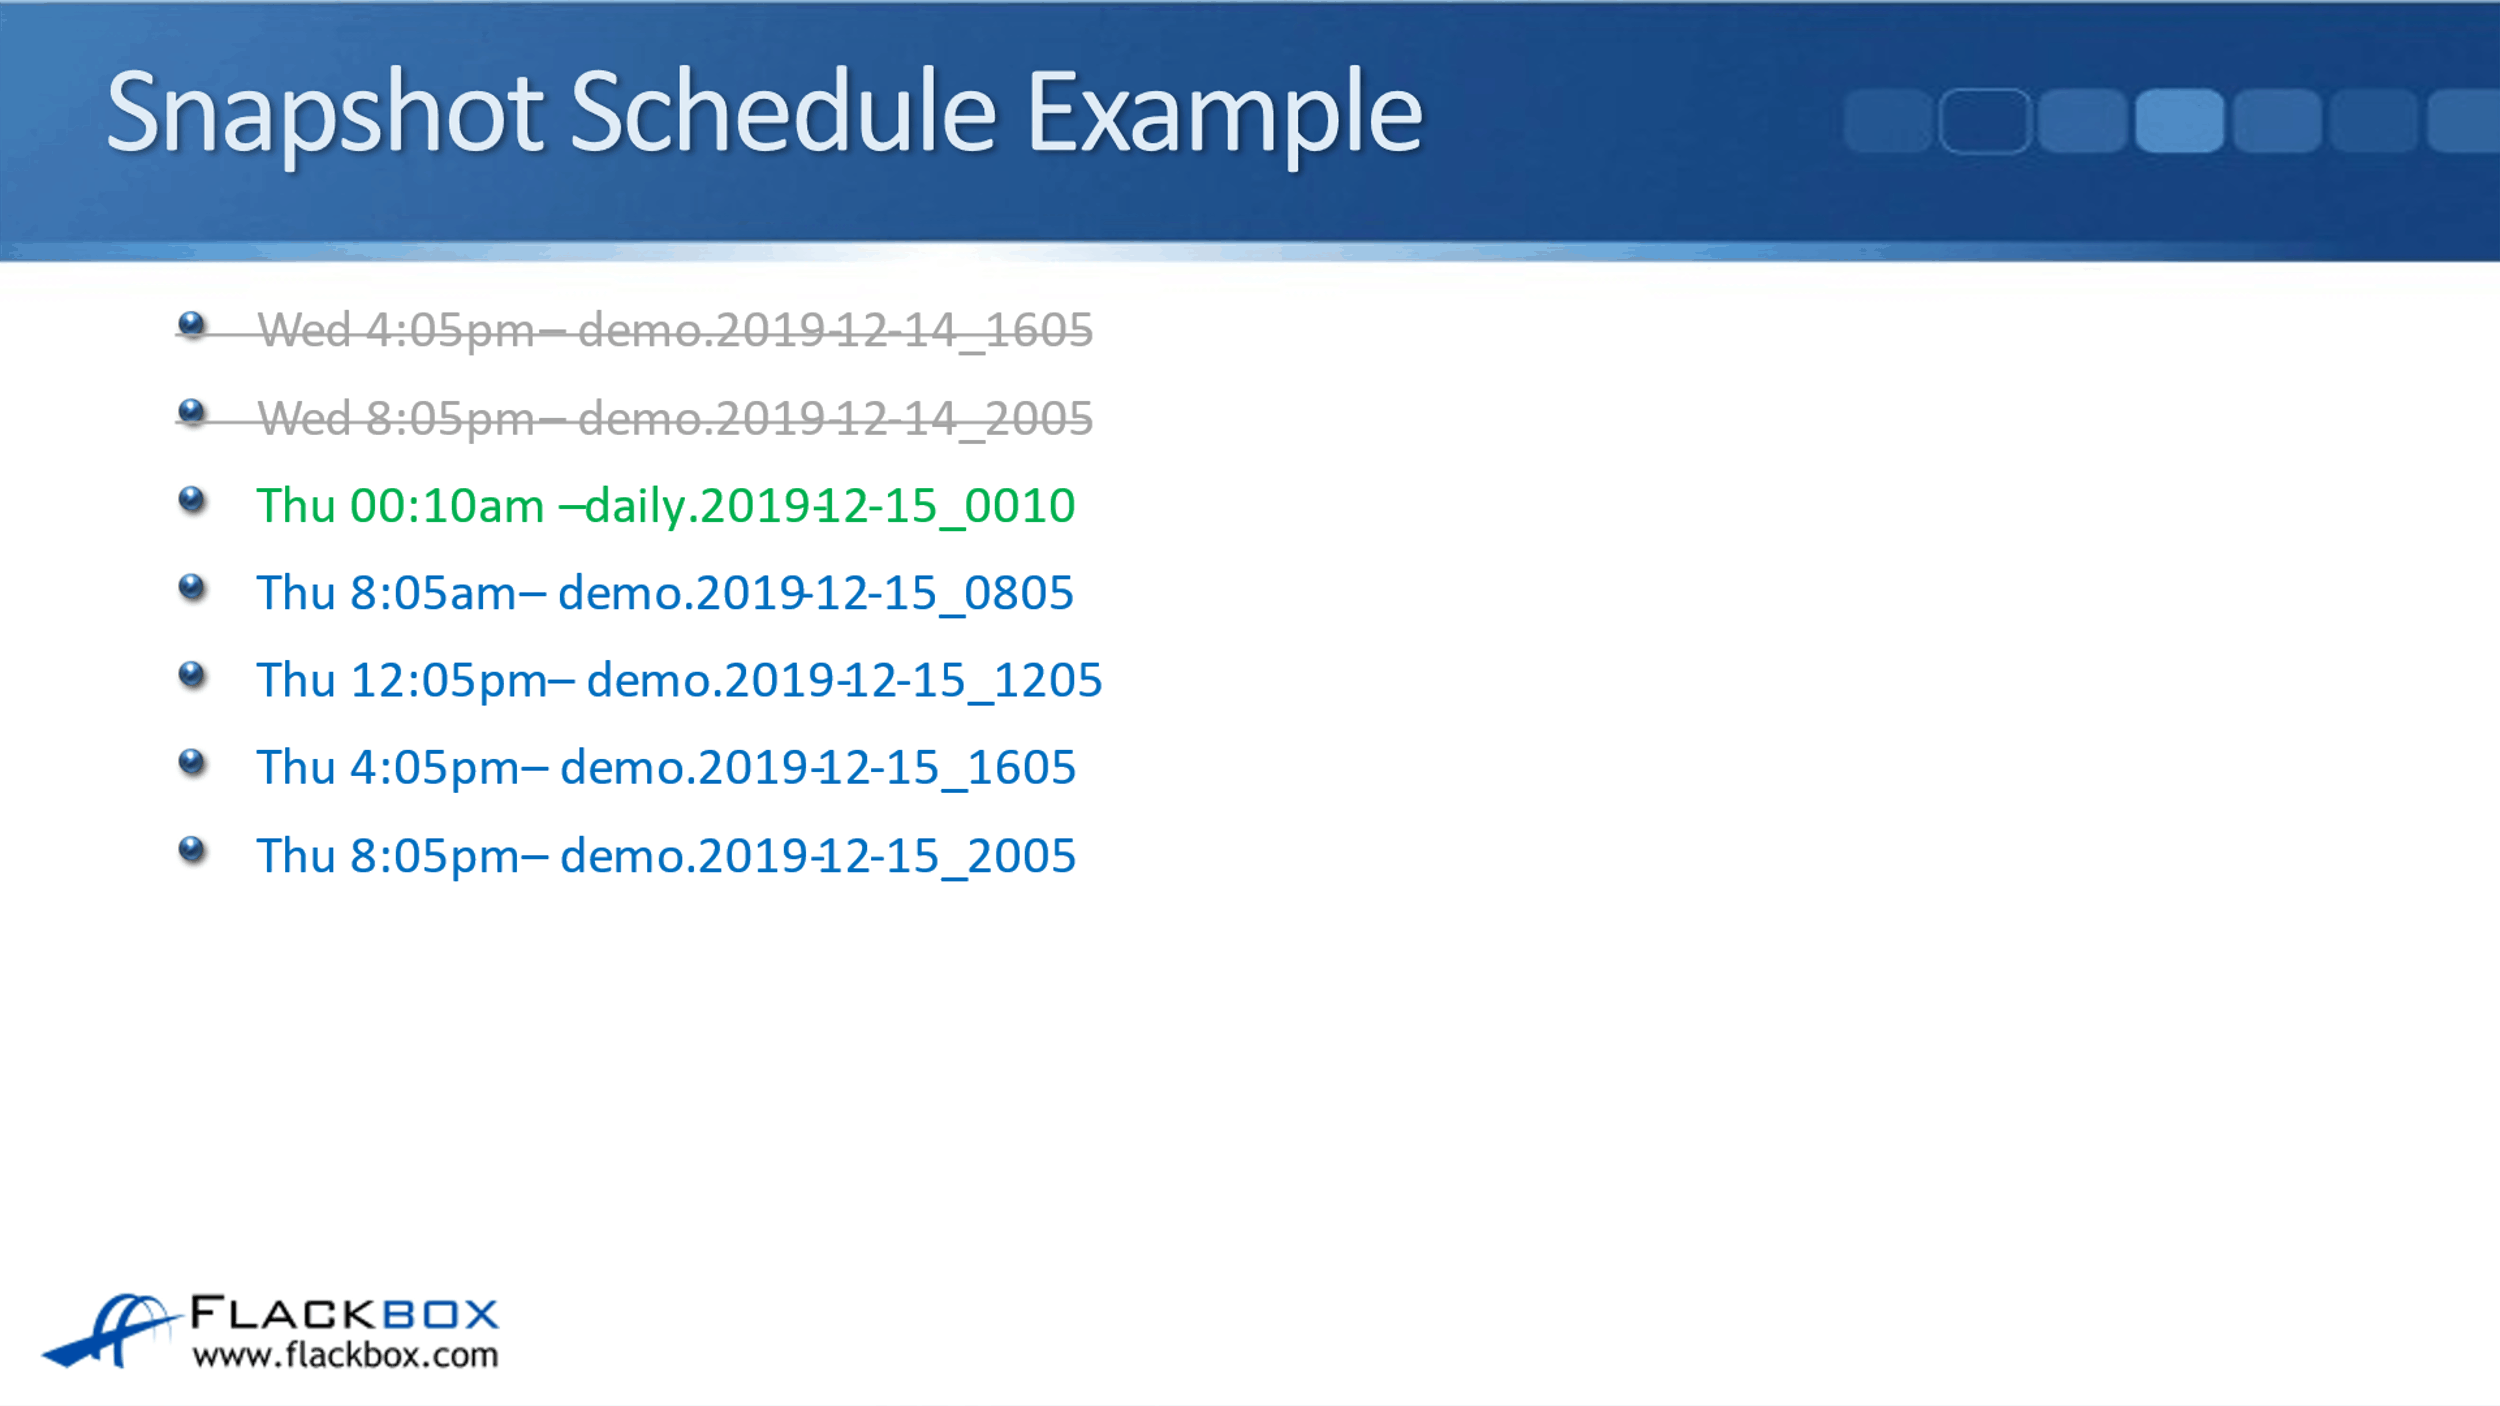
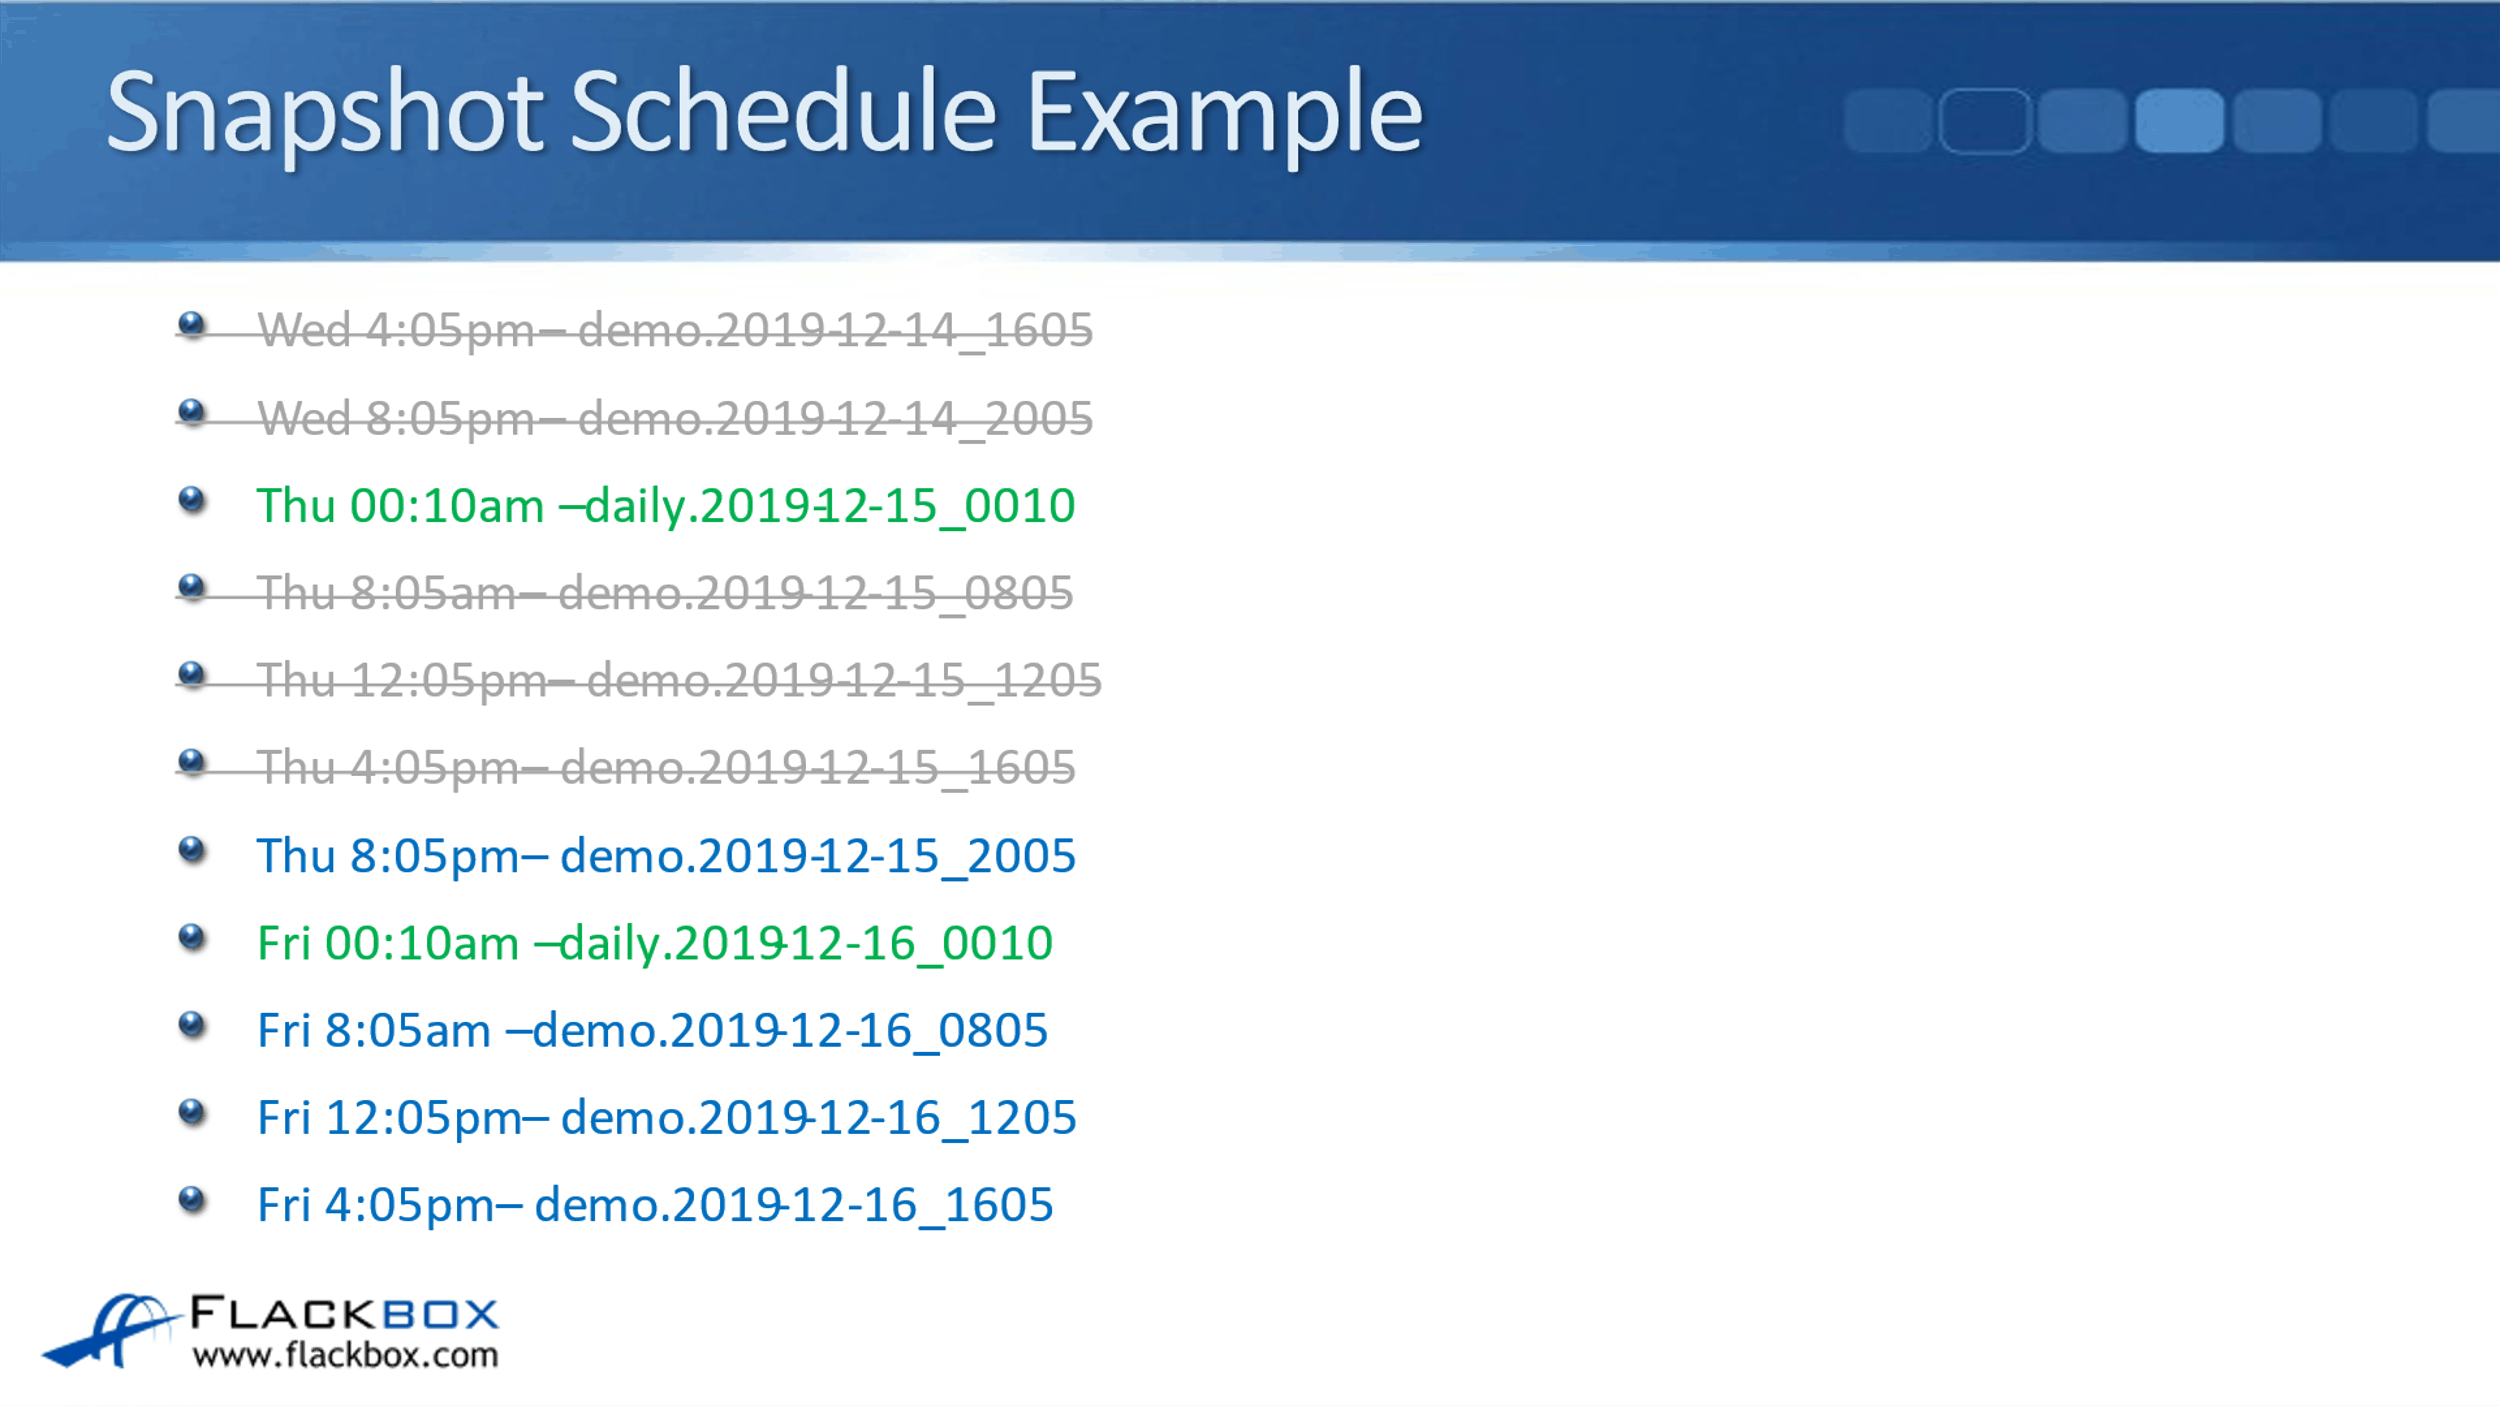
The next time we take a snapshot is at five past 4:00 on Thursday. Because we always retain the four most recent ones, when we take that snapshot, we delete the oldest one. We've now still got four most recent demo snapshots.
Then we take another one at five past 8:00. When we take the demo snapshot at five past 8:00, again, we delete the oldest one. We're detaining the four most recent.
We then take another snapshot, the daily snapshot at 10 past midnight. At this point, we've got two dailies and we were going to retain two dailies. The next time we take a daily, we will delete the oldest daily.
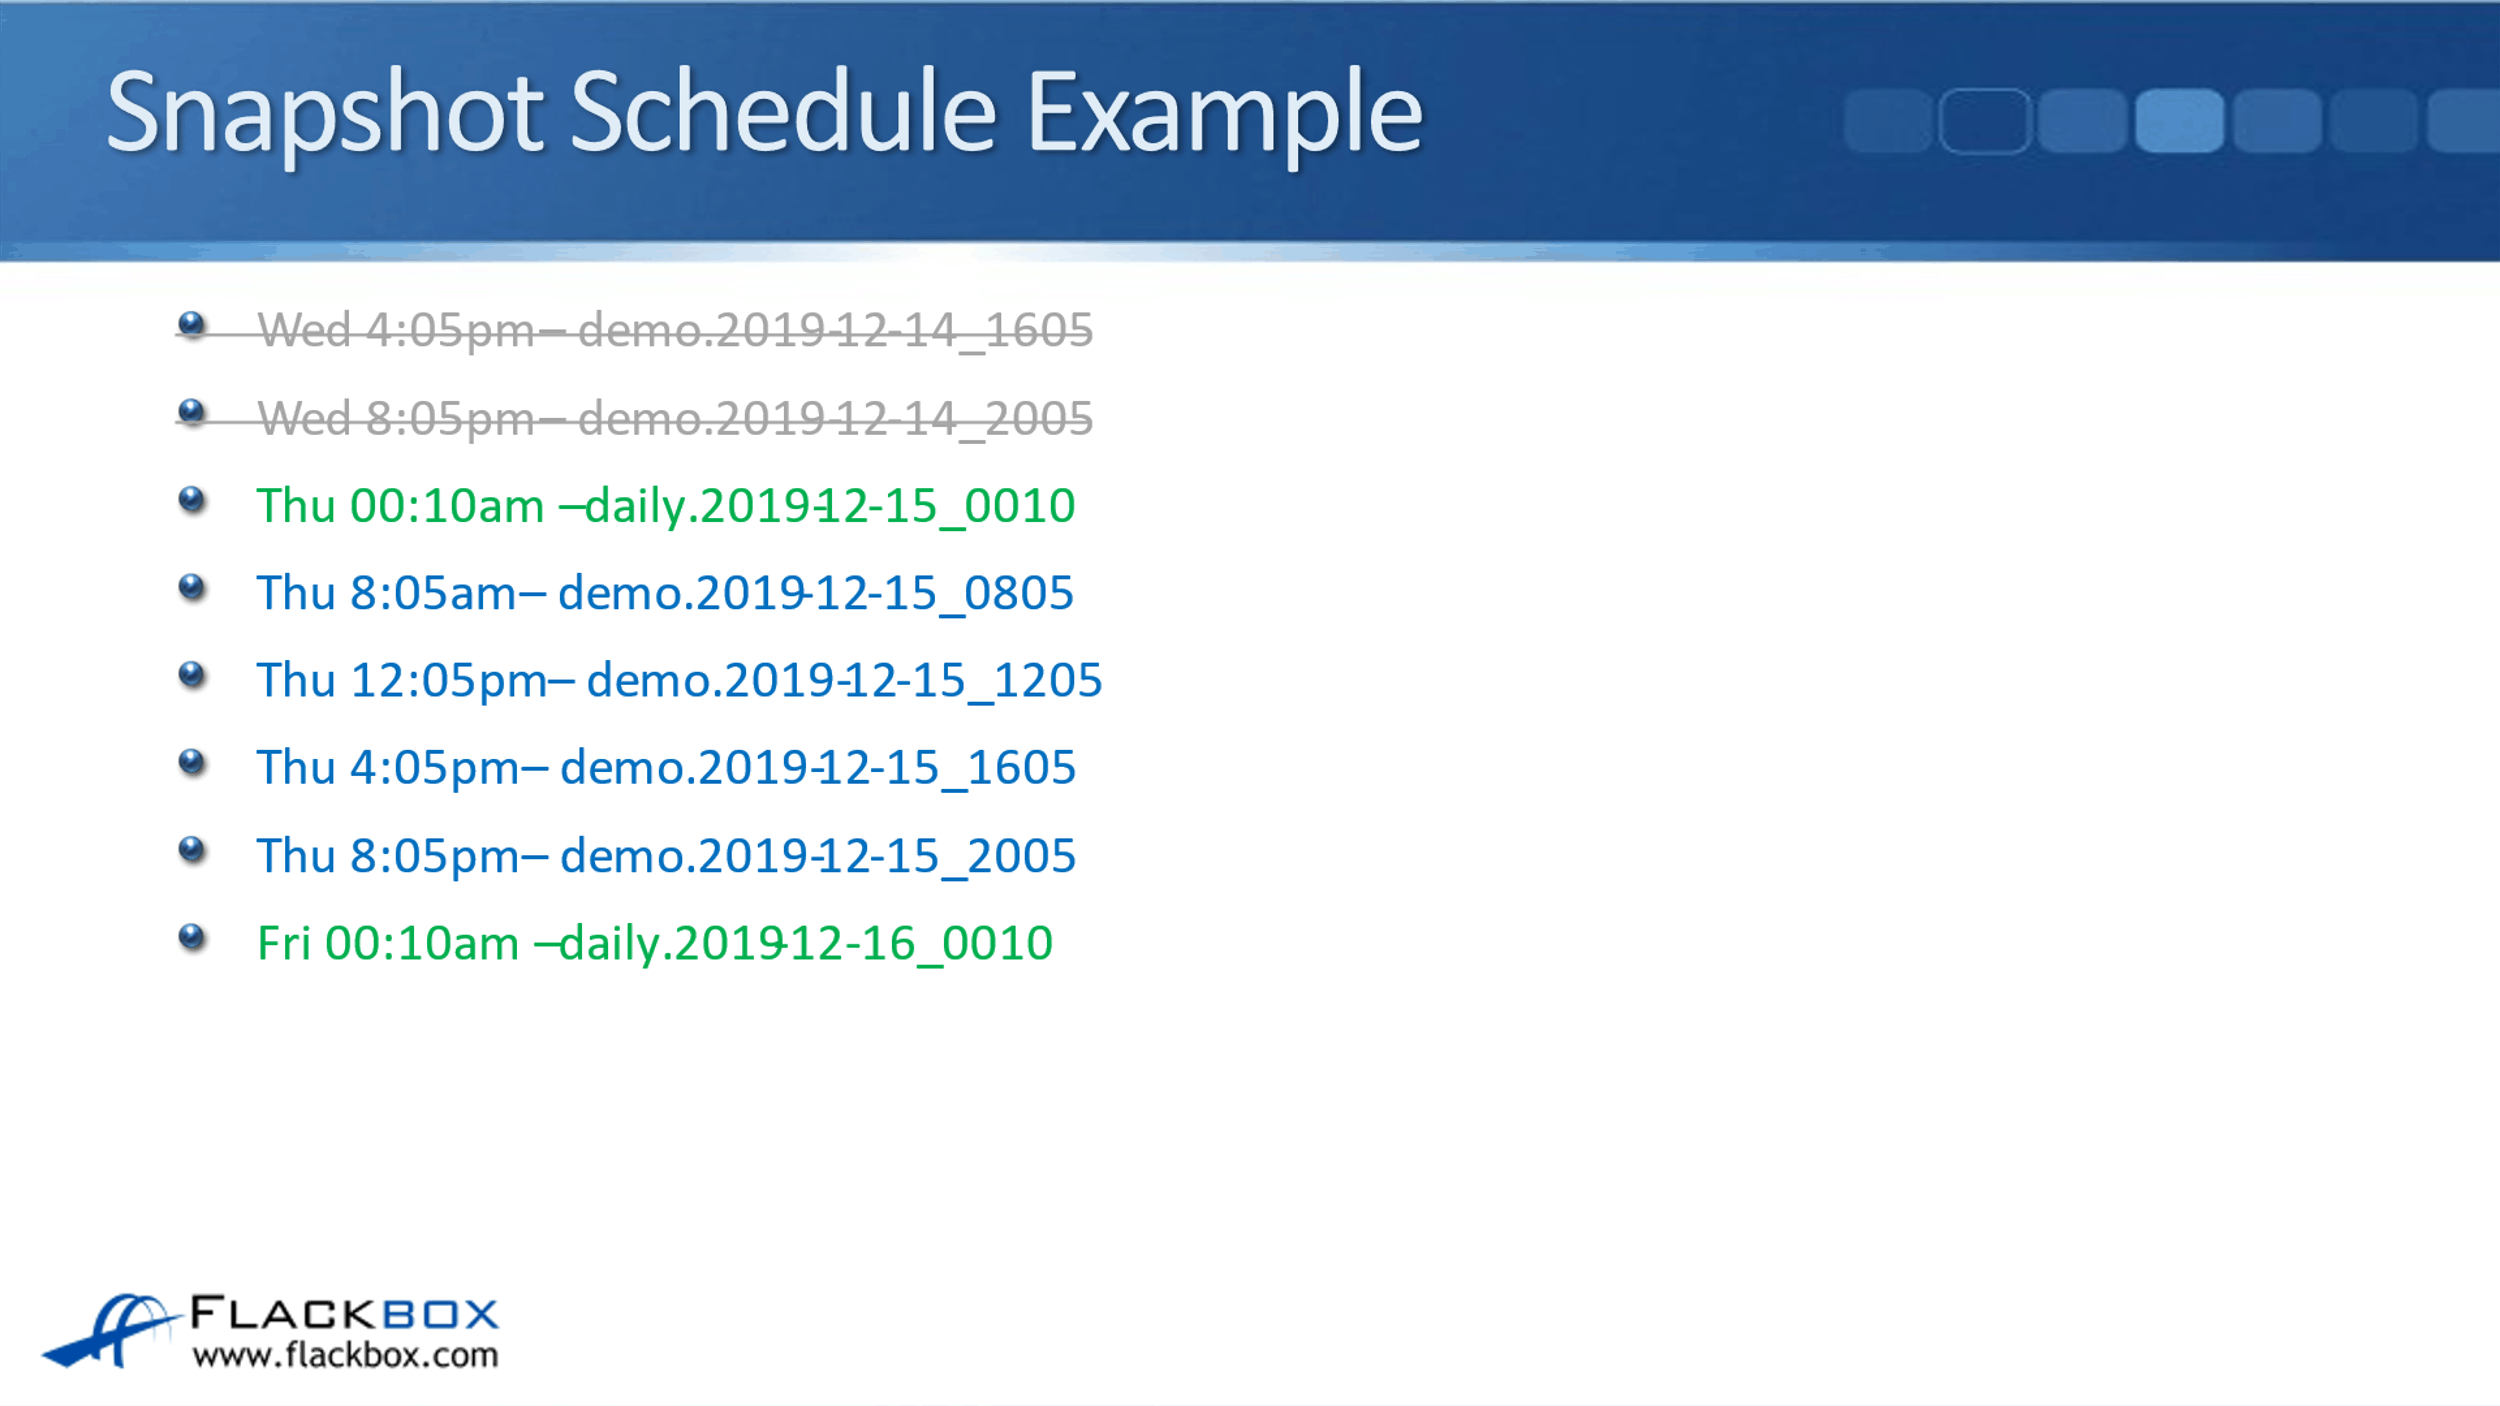
Then we take another snapshot, a demo at five past 8:00 on Friday morning. Delete the oldest demo snapshot.
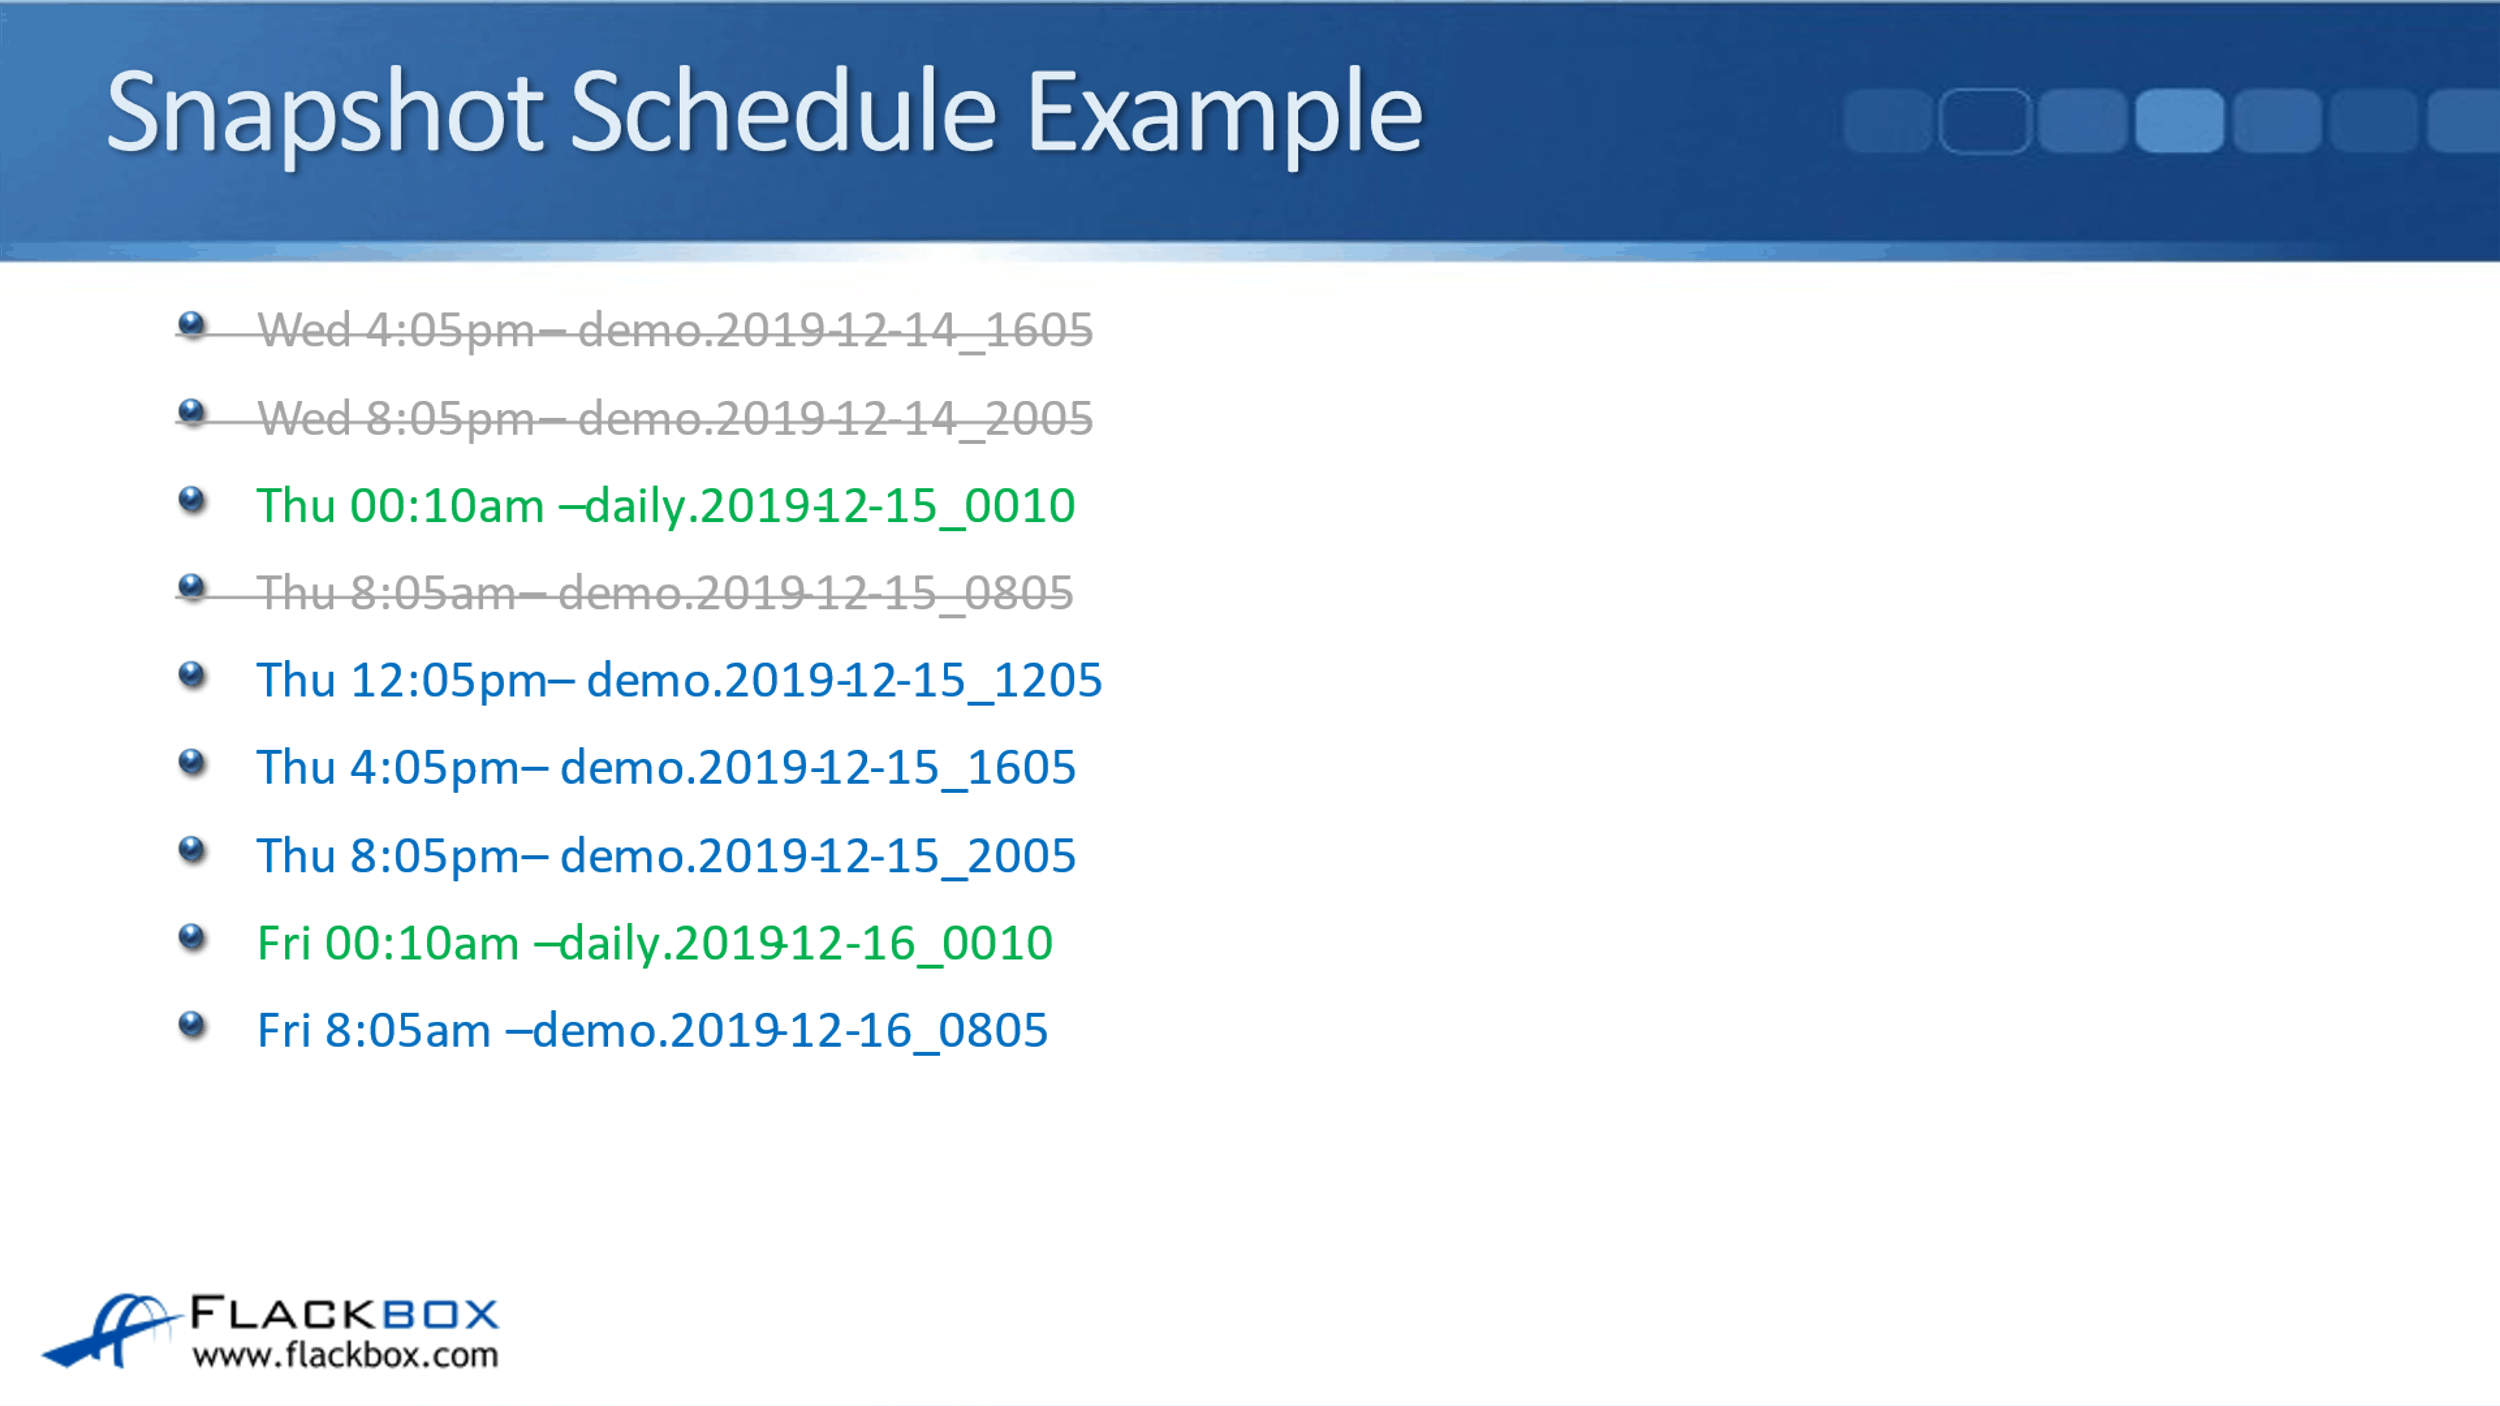
We take another snapshot at five past 12:00, again, delete the oldest one. We're always retaining four demo snapshots.
At five past 4:00, and delete the oldest one.
At five past 8:00, and delete the oldest one.
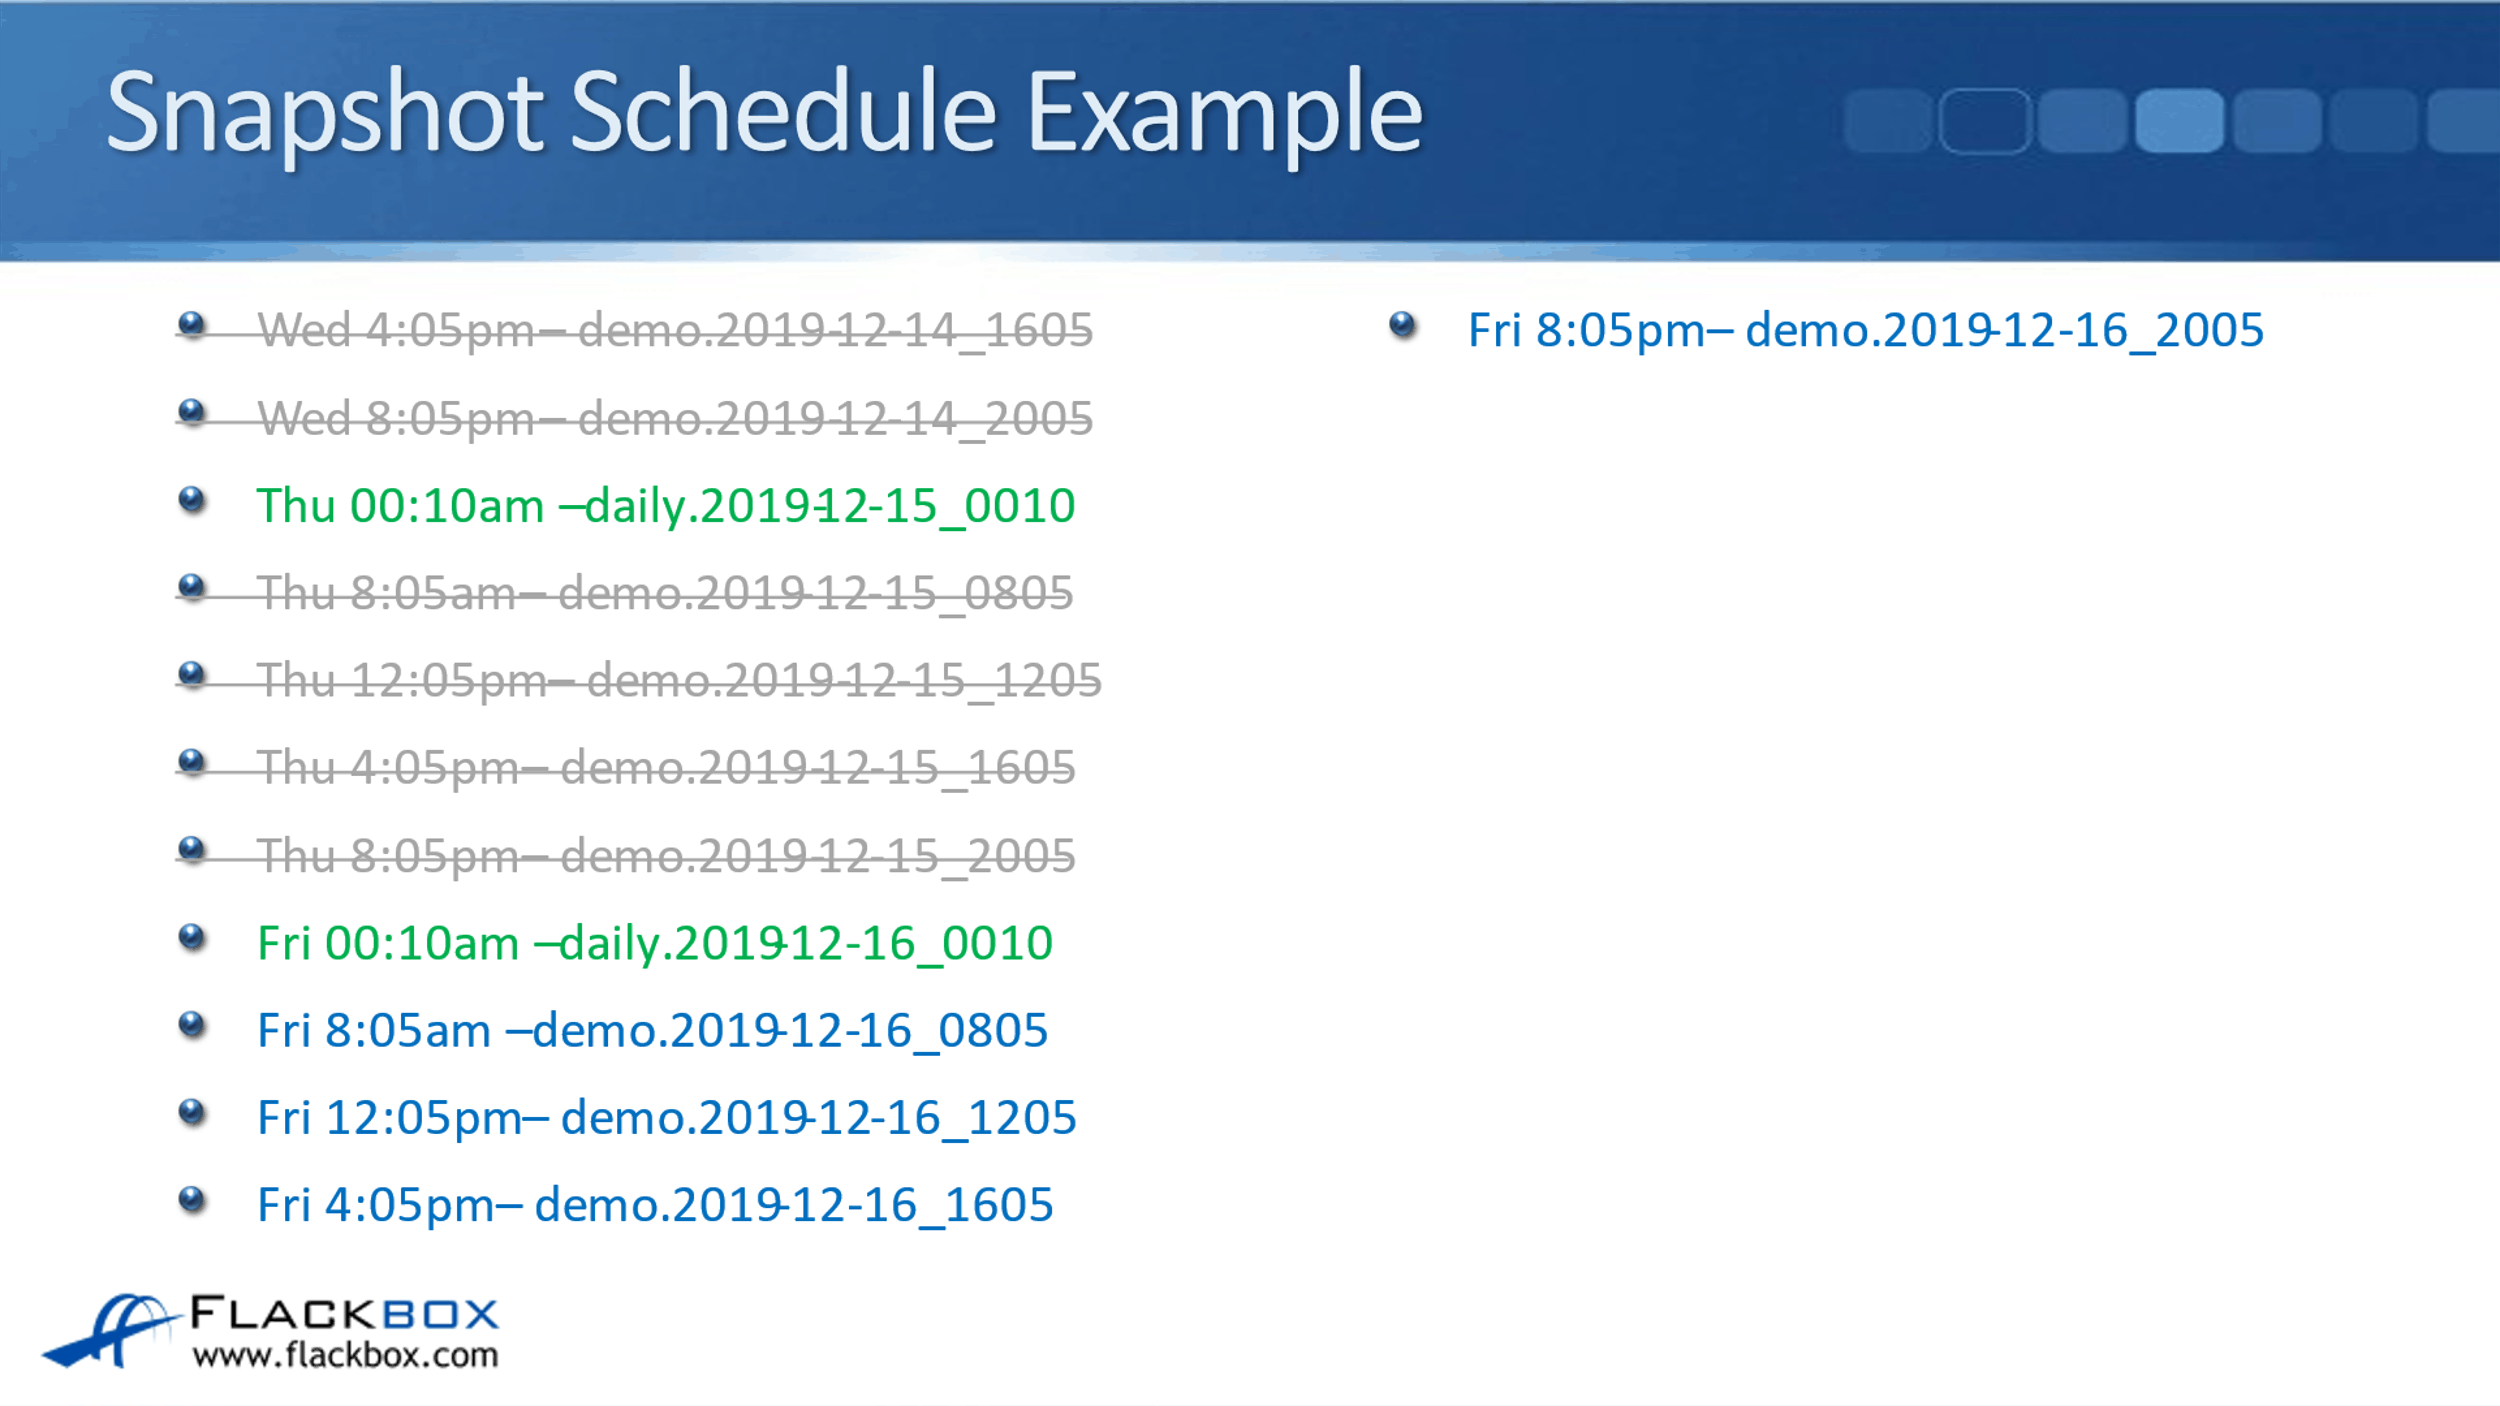
Then, we have our daily on Saturday at 10 past midnight, and we delete the oldest daily because we're retaining the two most recent dailies.
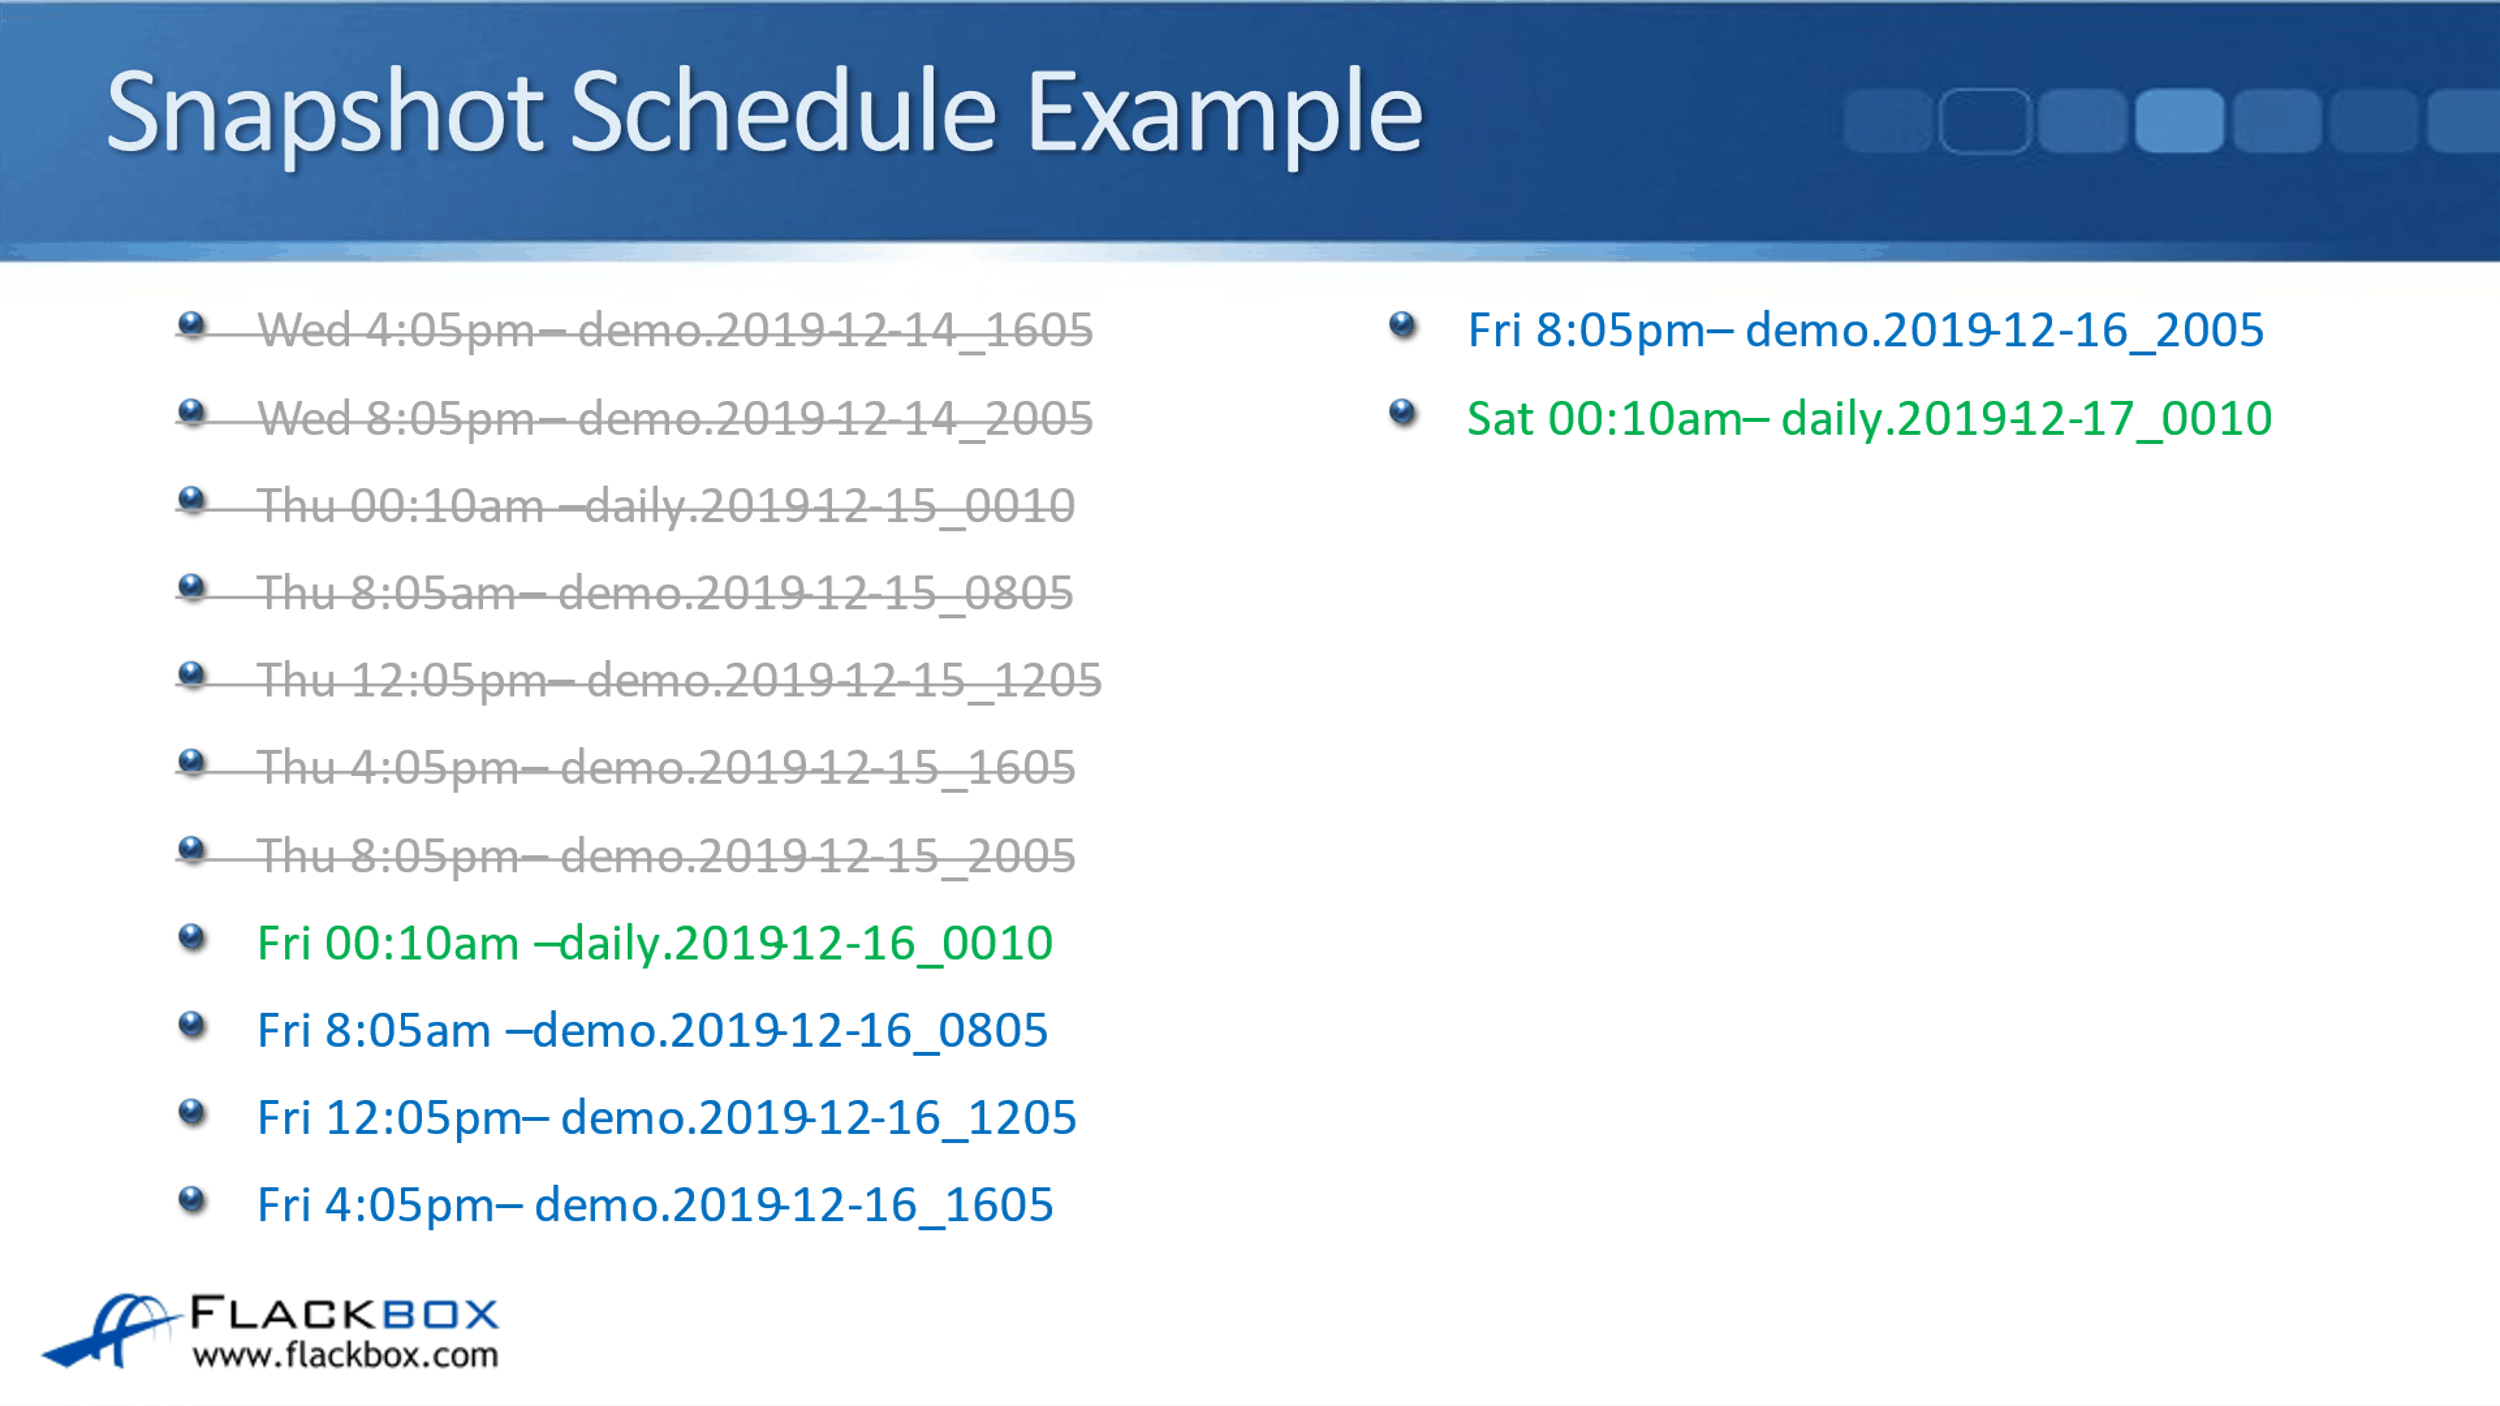
The next snapshot would be on Saturday morning at five past 8:00. Again, we will delete the oldest demo snapshot then.
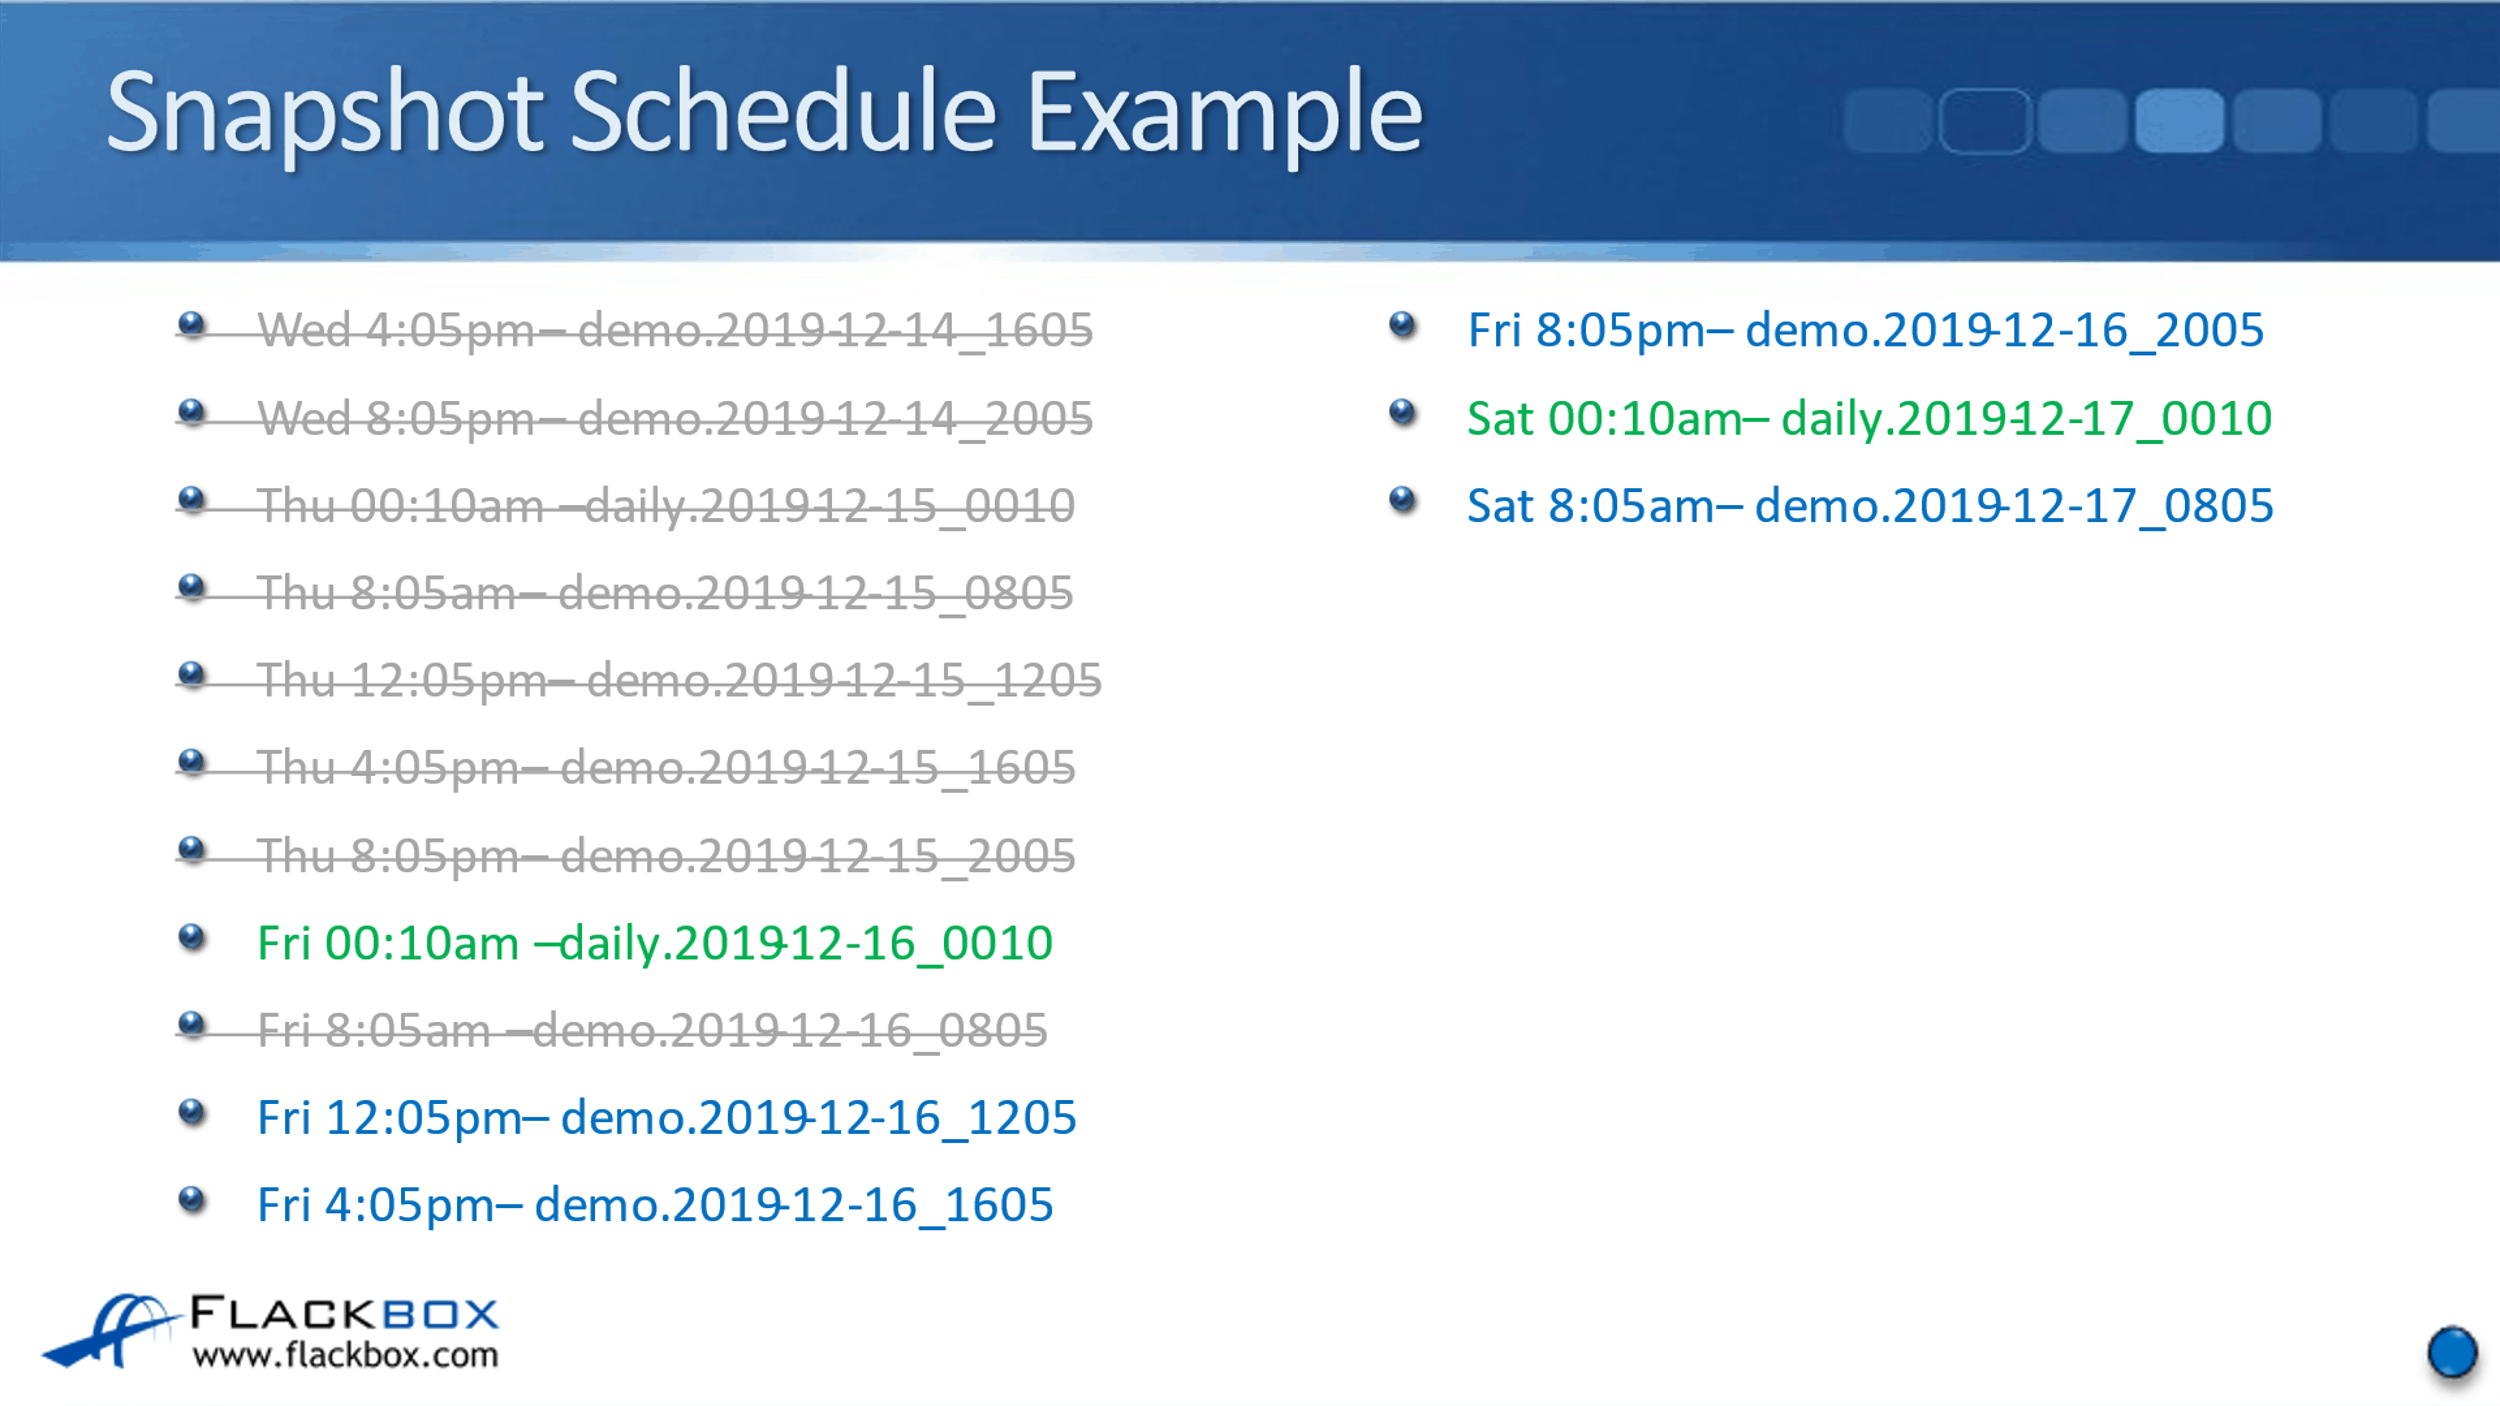
You can see that after we've gone through a full rotation, we've got four demos and two dailies. We're always going to end up still keeping the six most recent snapshots. We're always going to have the four most recent demos and the four most recent dailies.
Whenever we take a new one, we delete the oldest one. You can see that because we always have the six most recent, the amount of space that the snapshots are going to take up is going to stay pretty much the same over time.
Now, it will fluctuate a little bit depending on how much the Earth is changing and the volume over the particular days and weeks, but it will remain relatively constant.
Additional Resources
Creating a Snapshot Job Schedule: https://docs.netapp.com/us-en/ontap/data-protection/create-snapshot-job-schedule-task.html
Creation of Snapshot Copy Schedules: https://library.netapp.com/ecmdocs/ECMP1635994/html/GUID-8D7D39E4-AC1D-4C7A-8DE4-6DF8B88618DB.html
Changing the Snapshot Copy Schedule: https://library.netapp.com/ecmdocs/ECMP1635994/html/GUID-8DBA7A5E-5270-49B8-BA45-E60C3C6ED88F.html
Libby Teofilo

Text by Libby Teofilo, Technical Writer at www.flackbox.com
Libby’s passion for technology drives her to constantly learn and share her insights. When she’s not immersed in the tech world, she’s either lost in a good book with a cup of coffee or out exploring on her next adventure. Always curious, always inspired.