In this NetApp training tutorial, we will focus on NetApp Load Sharing Mirrors. Load Sharing Mirrors are mirror copies of FlexVol volumes which provide redundancy and load balancing. Scroll down for the video and also text tutorial.
NetApp Load Sharing Mirrors Video Tutorial

Lance Candia

Concise detailed information. Neil is not vague about his explanation. He provides some “what if’s” as well as “for instances” which again take out any ambiguity pertaining to the training. He stays on point, doesn’t go off topic or on a tangent. He keeps it relevant with some historical or legacy information where it makes sense. Overall I would use the word to sum up this training as “impressive”.
The load balancing is for read traffic only. Read requests can go to the mirror copies but write requests always go to the source volume to keep one consistent copy of the data.
I gave an overview of NetApp Load Sharing Mirrors in my earlier SnapMirror Engine tutorial but I’ll cover them in more detail here.
Load Sharing Mirrors are always in the same cluster as the source volume. They provide intra-cluster replication, not inter-cluster.
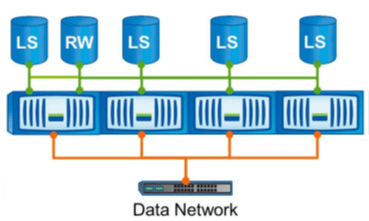
In the diagram below, you’ll see we have a single cluster. We've got the source volume, which is the single read/write copy, and then we've created a Load Sharing Mirror for that source volume on each node in the cluster.
When we create Load Sharing Mirrors for a volume, it’s best practice to create one on every node in the cluster, including on the same node as the source volume. Each mirror copy is created individually.
Read Requests
Load Sharing Mirror volumes are read-only. The source volume is the only read-write copy. When you create the Load Sharing Mirror, it's automatically mounted for you, you don’t need to mount it yourself. The Load Sharing Mirror destination volumes are automatically mounted into the namespace with the same path as the source volume.
Read requests will be serviced by the same node which the client connects to if that node has a Load Sharing Mirror. If it doesn’t, the client will be serviced over the cluster interconnect.
Typically, when we're configuring Load Sharing Mirrors for a volume, we'll create one on every single node. That way, no matter which node the client request comes in on, the read requests will be serviced by that node.
All read requests are always directed to Load Sharing Mirror volumes, not the source volume. Write requests always go to the source volume.
Read requests always go to a Load Sharing Mirror. You should therefore also include a Load Sharing Mirror copy on the same node where the source volume resides. Otherwise, if you only have the source volume on a node, any client read request that came in on that node would be serviced by a different node over the cluster interconnect.
Write Requests
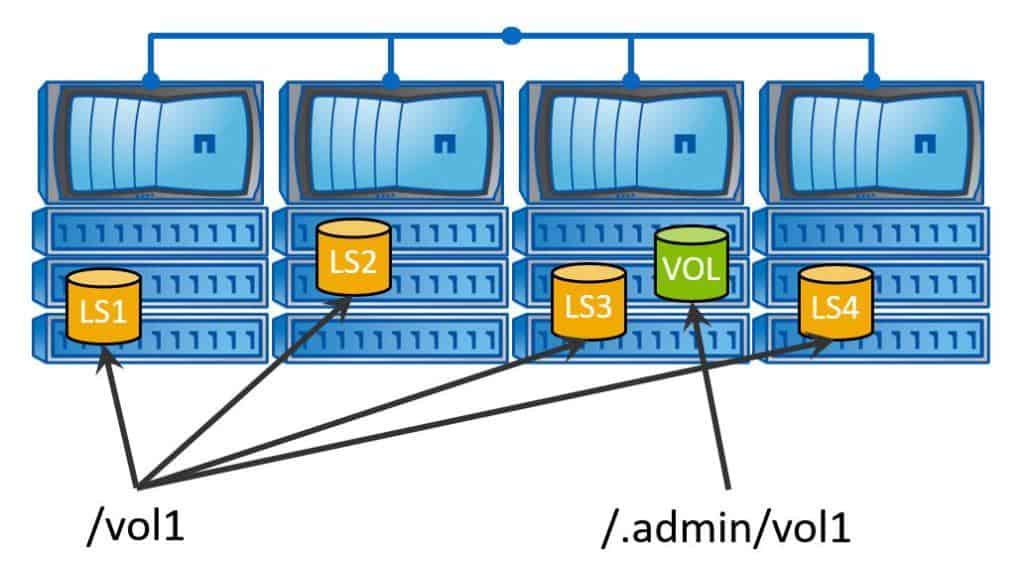
To make write changes, clients must access the source volume by using a special “.admin” path which is automatically generated when you create the Load Sharing Mirror. You give your clients the normal path to gain read-only access to a volume. When they access that volume, they're accessing a read-only copy, which would be a mirror on whichever node they actually hit.
Load Sharing Mirrors are read-only by default. You can make changes to them, but to make changes, you have to map a drive or mount the special admin path.
The diagram below shows all of our read-only mirrors. To mount them in the example, the name of the volume is vol1, so the client maps a drive to the vol1 share as normal.
To access the writable copy, they would have to map a drive to the special “.admin” share. For vol1, it would be ‘/.admin/vol1’. You do not need to create this special admin path. It's created for you when you create the Load Sharing Mirror.
The default access for Load Sharing Mirror volumes is read-only, so they’re only suitable for data which does not typically require any changes. Any infrequent changes to the data will usually only come from only a few select people. Give those people the information about the “.admin” path. Everybody else can connect to the normal path and get read-only access.
Protocol Support
Load Sharing Mirrors have full support for CIFs and NFSv3 protocols only. They do not support NFSv4 or SAN protocol clients. NFSv4 clients are compatible with Load Sharing Mirror volumes, but they will always be directed to the source volume for both reads and writes rather than load balanced to the mirror copies for the reads. SAN protocols are not compatible, so do not configure Load Sharing Mirrors for volumes that host LUNs.
Redundancy
Due to the fact that Load Sharing Mirrors are automatically mounted into the namespace with the same path as the source volume, they provide redundancy with no administrator intervention. If the source volume becomes temporarily unavailable, read access to the volume will still be provided through the Load Sharing Mirror volumes without you having to do anything additional.
Changes to the data will not be possible, however, until the source volume comes back online because it's the only writable copy. If the source volume is permanently unavailable, you can promote one of the Load Sharing Mirror volumes to be the new writable source copy.
SnapMirror Promote
To do this, we use the “snapmirror promote” command. This performs a failover from the original source volume to one of our destination read-only mirror volumes. The promote command is specific to Load Sharing Mirrors. Data Protection Mirrors and SnapVault do not use this command.
When the promote command is run, the new source volume will assume the identity and start the mirror relationships of the old (original) source volume. After you do this, the Load Sharing Mirror application will carry on as before, using the new source volume. You won't need to re-create the replication configuration again.
Any previous client write access will be redirected from the original source volume to the promoted destination volume before the original source volume is destroyed. If the original source volume is still physically in the cluster when you are promoting another volume, it will be destroyed when you run the ‘snapmirror promote’ command.
Use Cases
Load Sharing Mirrors are useful for frequently read but infrequently updated data such as shared binary files or static websites. They use asynchronous replication, so they're not suitable for data that is frequently changed.
Client read requests can access out of date data between replications. We obviously don't want that happening, so we don't want the volume being subjected to a lot of changes.
Also, to be able to make changes, your users have to be coming in on that special ‘admin’ path. Normally, we're not going to be giving that access to many users therefore we're not going to be having many changes.
You can use Load Sharing Mirrors on volumes that have a mix of both NFSv3 and NFSv4 clients. Load Sharing Mirrors are compatible with NFSv4 clients, but those clients will always use the source volume, not the mirrors. Don't configure Load Sharing Mirrors on volumes that have NFSv4 clients only, as you'll only be wasting disk space. The mirrors would never be used.
SVM Root Volumes
Configuring Load Sharing Mirrors for your SVM root volumes is a best practice and officially recommended. If the root volume of a SVM is unavailable, NAS clients can't access the namespace and therefore cannot access any data in the SVM. They won't be able to access any of its volumes if an SVM’s root volume goes down.
For this reason, it's a best practice to create a Load Sharing Mirror for the root volume on each node in the cluster to give you good redundancy. This ensures the namespace remains available in the event of a node outage or a failover.
You should not store user data in the root volume of an SVM. We're going to have Load Sharing Mirrors configured there, which are for read-only data, so we don't want any changes happening in the root volume. It should only be used for junction paths to the other volumes in the SVM, not for any user data.
Store your user data in your normal volumes, which are mounted underneath the SVM root volume. SAN client connections such as Fibre Channel, FCoE, or iSCSI do not depend on the SVM root volume, so they're incompatibility with load sharing volumes is not a problem.
A one-hour replication schedule is recommended for your SVM root volumes.
Configuration
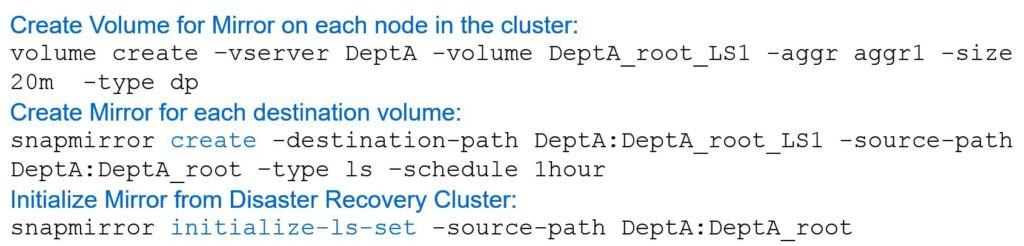
The first thing that we have to do is create our destination mirror volumes. We do this with a standard “volume create” command as shown in the example below (VServer “DeptA”). The name of the volume we’re creating is “DeptA_Root_LS1”, so we’re going to be creating mirrors for the root volumes of an SVM. The SVM is Department A in this example.
We've specified the aggregate “aggr1” and a size of 20 megabytes. Ensure the size of the destination volume is the same as the source volume. We then need to specify the extra parameter type “DP”, which says that this volume is going to be used as a mirror destination. It also makes it a read-only volume.
Notice when we run the “volume create” command that we’ve specified the type as “DP” even though it's an “LS” mirror. When we create the volume, we always specify type “DP” for Load Sharing Mirrors, Data Protection mirrors, and for SnapVault mirrors as well.
Next we use the “snapmirror create” command to configure the replication using the destination path. The format of this is the SVM name, then a colon, and then the volume name.
In the example here, the destination path is “depta:depta_root_LS1”, which is the destination volume that we just created. The source path is “depta:depta_root”, which is the root volume for department A. The type is now “LS”.
When you run the “snapmirror” create command, the type will either be LS, DP, or XDP. We're configuring a Load Sharing Mirror here, so in this case it’s LS.
Finally, specify the schedule. The recommended schedule for our SVM root volumes is 1 hour.
The “volume create” and the “snapmirror create” commands must be run for every single destination volume. It’s recommended you do this for each node. As an example, if we had a 4-node cluster, our volumes would be depta_root_LS1 on node 1, LS2 on node 2, etc.
Once we've run the “snapmirror create” command, the replication is configured but it doesn't actually start yet. We also need to initialize it. The command to do that is “snapmirror initialize ls-set” and then specify the source path. This will kick off the replication for every destination volume for that source volume.
NetApp Load Sharing Mirrors Tutorial Configuration Example
This configuration example is an excerpt from my ‘NetApp ONTAP 9 Complete’ course. Full configuration examples using both the CLI and System Manager GUI are available in the course.
Want to practice this configuration for free on your laptop? Download your free step-by-step guide ‘How to Build a NetApp ONTAP Lab for Free’

- Create a 100 MB volume in the NAS SVM named vol1. Mount it in the namespace directly under the root volume. You can ignore any warning message about the export policy because CIFS (not NFS) will be used for access.
cluster1::> volume create -vserver NAS -volume vol1 -aggregate aggr1_C1N1 -size 100mb -junction-path /vol1
Warning: The export-policy "default" has no rules in it. The volume will therefore be inaccessible over NFS and CIFS protocol.
Do you want to continue? {y|n}: y
[Job 43] Job succeeded: Successful
2. Share the volume using vol1 as the share name.
cluster1::> vserver cifs share create -vserver NAS -share-name vol1 -path /vol1
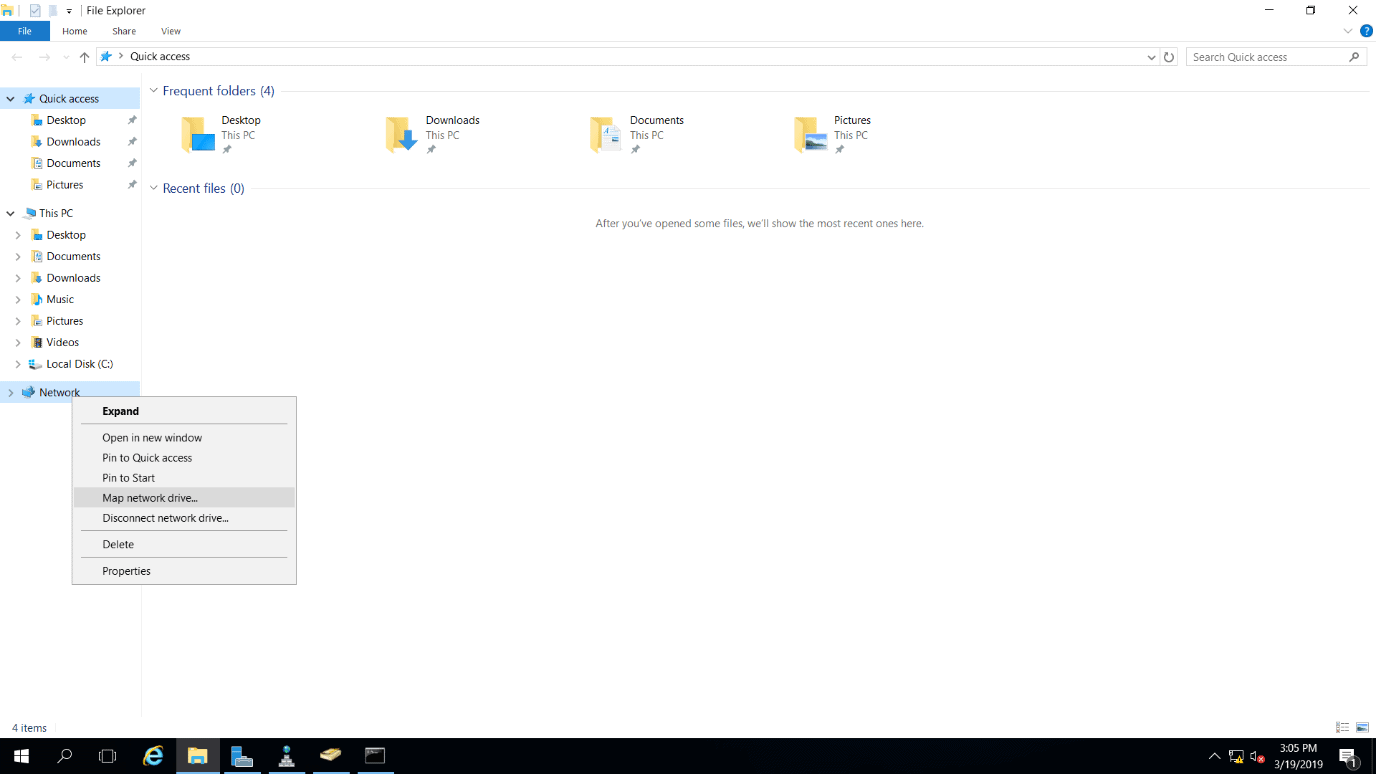
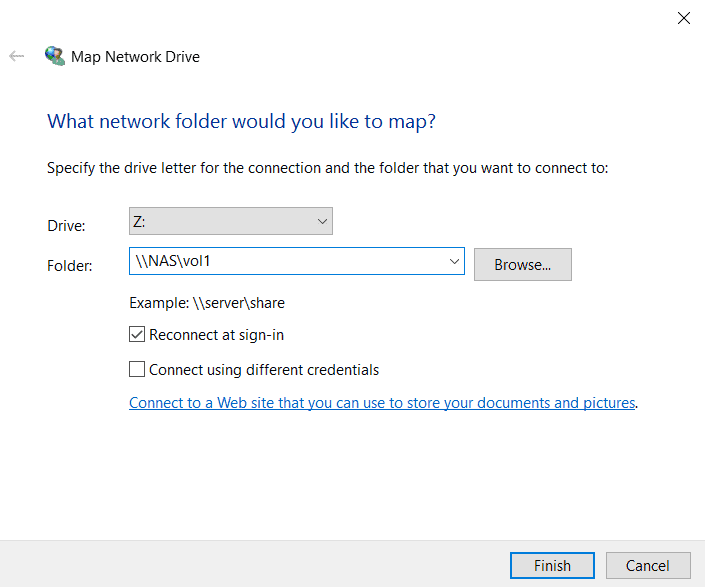
3. Log in to the WinA host as administrator and map a network drive to the vol1 share.
Open Windows File Explorer. Right-click on ‘Network’ and select ‘Map network drive…’


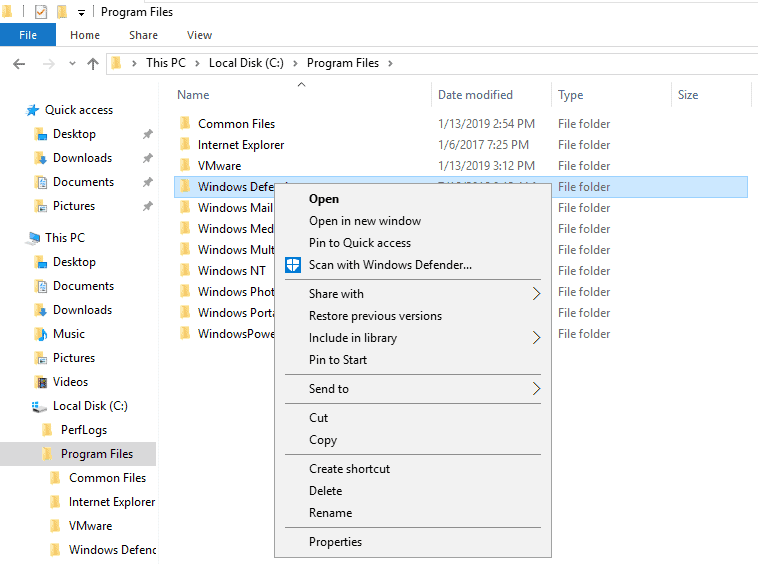
4. Copy and paste the ‘C:\Program Files\Windows Defender’ folder into vol1.
5. Disconnect the mapped network drive to vol1.
6. Take the NAS SVM root volume offline.
cluster1::> volume modify -vserver NAS -volume svm_root -state offline
Warning: Offlining root volume svm_root of Vserver NAS will make all volumes on that Vserver inaccessible.
Do you want to continue? {y|n}: y
Volume modify successful on volume svm_root of Vserver NAS.
7. On the WinA host, map a network drive to the vol1 share again. What happens?
Open Windows File Explorer. Right-click on ‘Network’ and select ‘Map network drive…’

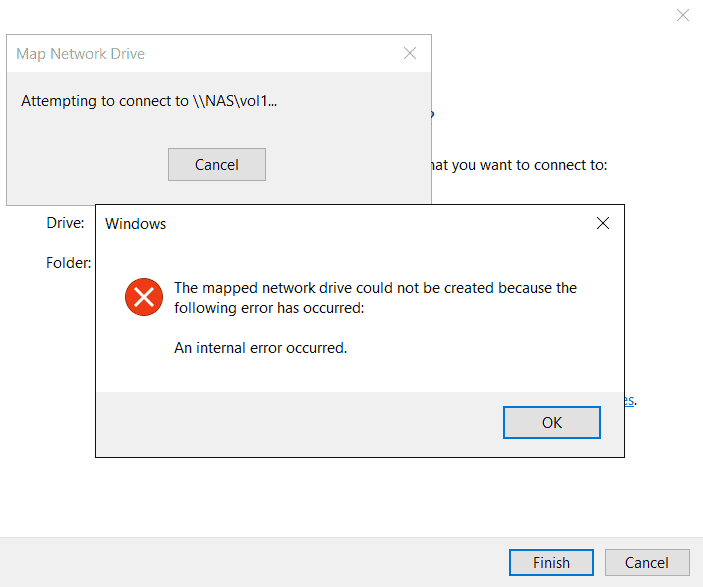
Mapping a network drive to vol1 fails even though vol1 is online because the SVM root volume is unavailable.
8. Bring the NAS SVM root volume back online.
cluster1::> volume modify -vserver NAS -volume svm_root -state online
Volume modify successful on volume svm_root of Vserver NAS.
9. Create load sharing mirrors for the NAS SVM root volume on both nodes of Cluster1. Replicate from the source to the destination volumes every hour.
View the volume information.
cluster1::> volume show
Vserver Volume Aggregate State Type Size Available Used%
--------- ------------ ------------ ---------- ---- ---------- ---------- -----
NAS svm_root aggr1_C1N1 online RW 20MB 18.66MB 1%
cluster1-01
vol0 aggr0_cluster1_01
online RW 1.66GB 1.06GB 32%
cluster1-02
vol0 aggr0_cluster1_02
online RW 807.3MB 267.3MB 65%
3 entries were displayed.
The NAS SVM root volume is named svm_root, is 20MB in size and is located on aggr1_C1N1.
View the aggregate information.
cluster1::> storage aggregate show
Aggregate Size Available Used% State #Vols Nodes RAID Status
--------- -------- --------- ----- ------- ------ ---------------- ------------
aggr0_cluster1_01
1.67GB 644KB 99% online 1 cluster1-01 raid_dp,
normal
aggr0_cluster1_02
855MB 42.12MB 95% online 1 cluster1-02 raid_dp,
normal
aggr1_C1N1 2.64GB 2.61GB 1% online 2 cluster1-01 raid_dp,
normal
aggr1_C1N2 2.50GB 2.50GB 0% online 0 cluster1-02 raid_dp,
mirrored,
normal
aggr2_C1N1 2.64GB 2.64GB 0% online 0 cluster1-01 raid_dp,
normal
5 entries were displayed.
Available aggregates for the load sharing mirrors are aggr1_C1N1 and aggr2_C1N1 on node 1, and aggr1_C1N2 on node 2.
Create Data Protection volumes the same size as the source volume on both nodes. Use aggr2_C1N1 on node 1 to provide some extra redundancy because the source volume is on aggr1_C1N1.
cluster1::> volume create -vserver NAS -volume svm_root_m1 -aggregate aggr2_C1N1 -size 20m -type dp
[Job 55] Job succeeded: Successful
cluster1::> volume create -vserver NAS -volume svm_root_m2 -aggregate aggr1_C1N2 -size 20m -type dp
[Job 56] Job succeeded: Successful
Verify there is a system hourly cron schedule.
cluster1::> job schedule cron show
Cluster Name Description
------------- ----------- -----------------------------------------------------
cluster1
5min @:00,:05,:10,:15,:20,:25,:30,:35,:40,:45,:50,:55
8hour @2:15,10:15,18:15
daily @0:10
hourly @:05
monthly 1@0:20
pg-15-minutely
@:10,:25,:40,:55
pg-6-hourly @3:03,9:03,15:03,21:03
pg-daily @0:10
pg-hourly @:07
pg-remote-15-minutely
@:00,:15,:30,:45
pg-remote-6-hourly
@3:08,9:08,15:08,21:08
pg-remote-daily
@0:15
pg-remote-hourly
@:12
pg-remote-weekly
Sun@0:20
pg-weekly Sun@0:15
weekly Sun@0:15
16 entries were displayed.
Create the SnapMirror relationships for the load sharing mirrors, using the hourly schedule.
cluster1::> snapmirror create -source-path NAS:svm_root -destination-path NAS:svm_root_m1 -type LS -schedule hourly
[Job 57] Job succeeded: SnapMirror: done
cluster1::> snapmirror create -source-path NAS:svm_root -destination-path NAS:svm_root_m2 -type LS -schedule hourly
[Job 59] Job succeeded: SnapMirror: done
Initialize the mirrors to start replication. Initializing from the source volume following initial setup replicates to all destination volumes in one command.
cluster1::> snapmirror initialize-ls-set -source-path NAS:svm_root
[Job 60] Job is queued: snapmirror initialize-ls-set for source "cluster1://NAS/svm_root".
10. Verify the status of the SnapMirror relationships.
If you enter the command fast enough you will see the transfer in progress.
cluster1::> snapmirror show
Progress
Source Destination Mirror Relationship Total Last
Path Type Path State Status Progress Healthy Updated
----------- ---- ------------ ------- -------------- --------- ------- --------
cluster1://NAS/svm_root
LS cluster1://NAS/svm_root_m1
Snapmirrored
Transferring 188KB false -
cluster1://NAS/svm_root_m2
Snapmirrored
Transferring 188KB false -
2 entries were displayed.
After the transfer has completed the status should show Healthy true.
cluster1::> snapmirror show
Progress
Source Destination Mirror Relationship Total Last
Path Type Path State Status Progress Healthy Updated
----------- ---- ------------ ------- -------------- --------- ------- --------
cluster1://NAS/svm_root
LS cluster1://NAS/svm_root_m1
Snapmirrored
Idle - true -
cluster1://NAS/svm_root_m2
Snapmirrored
Idle - true -
2 entries were displayed.
11. View detailed information about the first load sharing mirror.
cluster1::> snapmirror show -source-path NAS:svm_root -destination-path NAS:svm_root_m1 -instance
Source Path: cluster1://NAS/svm_root
Destination Path: cluster1://NAS/svm_root_m1
Relationship Type: LS
Relationship Group Type: -
SnapMirror Schedule: hourly
SnapMirror Policy Type: -
SnapMirror Policy: -
Tries Limit: 8
Throttle (KB/sec): unlimited
Mirror State: Snapmirrored
Relationship Status: Idle
File Restore File Count: -
File Restore File List: -
Transfer Snapshot: -
Snapshot Progress: -
Total Progress: -
Network Compression Ratio: -
Snapshot Checkpoint: -
Newest Snapshot: snapmirror.dbdbf221-22b4-11e9-996b-000c296f941d_3_2156825618.2019-07-06_115200
Newest Snapshot Timestamp: 07/06 11:52:00
Exported Snapshot: snapmirror.dbdbf221-22b4-11e9-996b-000c296f941d_3_2156825618.2019-07-06_115200
Exported Snapshot Timestamp: 07/06 11:52:00
Healthy: true
Unhealthy Reason: -
Destination Volume Node: -
Relationship ID: -
Current Operation ID: -
Transfer Type: -
Transfer Error: -
Current Throttle: -
Current Transfer Priority: -
Last Transfer Type: -
Last Transfer Error: -
Last Transfer Size: -
Last Transfer Network Compression Ratio: -
Last Transfer Duration: -
Last Transfer From: -
Last Transfer End Timestamp: -
Progress Last Updated: -
Relationship Capability: Pre 8.2
Lag Time: -
Identity Preserve Vserver DR: -
Volume MSIDs Preserved: -
Is Auto Expand Enabled: -
Number of Successful Updates: -
Number of Failed Updates: -
< output truncated >
12. Perform a manual update of the load sharing mirrors.
cluster1::> snapmirror update-ls-set -source-path NAS:svm_root
[Job 61] Job is queued: snapmirror update-ls-set for source "cluster1://NAS/svm_root".
13. Take the NAS SVM root volume offline again.
cluster1::> volume modify -vserver NAS -volume svm_root -state offline
Warning: Offlining root volume svm_root of Vserver NAS will make all volumes on that Vserver inaccessible.
Do you want to continue? {y|n}: y
Volume modify successful on volume svm_root of Vserver NAS.
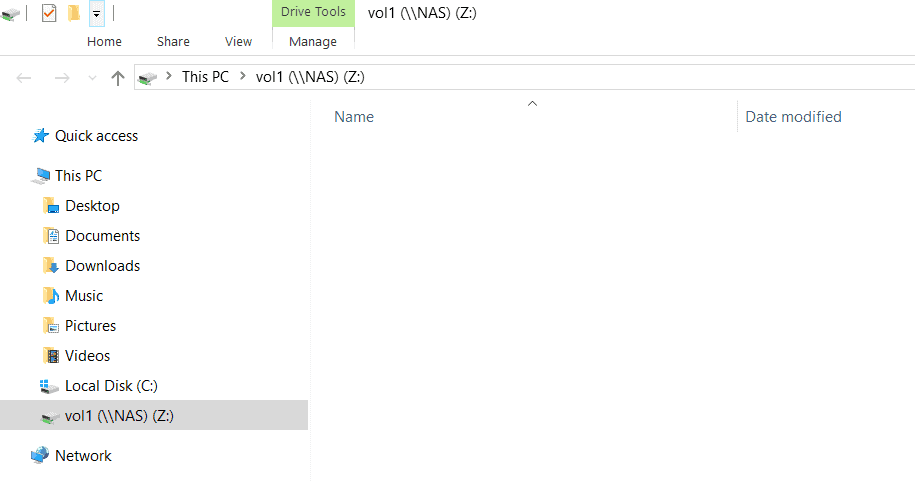
14. The SVM root volume is offline, will the WinA client be able to map a network drive to vol1? Verify this.
Load sharing mirrors are available so the client will be able to map a network drive to vol1.
Open Windows File Explorer. Right-click on ‘Network’ and select ‘Map network drive…’

15. Bring the NAS SVM root volume back online.
cluster1::*> volume modify -vserver NAS -volume svm_root -state online
Volume modify successful on volume svm_root of Vserver NAS.
16. View the volumes in the NAS SVM.
cluster1::> volume show -vserver NAS
Vserver Volume Aggregate State Type Size Available Used%
--------- ------------ ------------ ---------- ---- ---------- ---------- -----
NAS svm_root aggr1_C1N1 online RW 20MB 18.50MB 2%
NAS svm_root_m1 aggr2_C1N1 online LS 20MB 18.55MB 2%
NAS svm_root_m2 aggr1_C1N2 online LS 20MB 18.55MB 2%
NAS vol1 aggr1_C1N1 online RW 100MB 29.93MB 68%
4 entries were displayed.
17. Assume the original NAS SVM root volume is damaged. Promote svm_root_m1 to be the new source volume.
cluster1::> snapmirror promote -destination-path NAS:svm_root_m1
Warning: Promote will delete the read-write volume cluster1://NAS/svm_root and replace it with cluster1://NAS/svm_root_m1.
Do you want to continue? {y|n}: y
[Job 89] Job succeeded: SnapMirror: done
18. What changes do you expect to see in the volumes in the NAS SVM? Verify this.
The original svm_root volume will be removed and replaced with svm_root_m1 as the new read-write source SVM root volume.
cluster1::> volume show -vserver NAS
Vserver Volume Aggregate State Type Size Available Used%
--------- ------------ ------------ ---------- ---- ---------- ---------- -----
NAS svm_root_m1 aggr2_C1N1 online RW 20MB 18.40MB 3%
NAS svm_root_m2 aggr1_C1N2 online LS 20MB 18.55MB 2%
NAS vol1 aggr1_C1N1 online RW 100MB 29.93MB 68%
3 entries were displayed.
19. Rename the new source SVM root volume with the same name as the original - svm_root.
cluster1::> volume rename -vserver NAS -volume svm_root_m1 -newname svm_root
[Job 90] Job succeeded: Successful
cluster1::> volume show -vserver NAS
Vserver Volume Aggregate State Type Size Available Used%
--------- ------------ ------------ ---------- ---- ---------- ---------- -----
NAS svm_root aggr2_C1N1 online RW 20MB 18.39MB 3%
NAS svm_root_m2 aggr1_C1N2 online LS 20MB 18.55MB 2%
NAS vol1 aggr1_C1N1 online RW 100MB 29.93MB 68%
3 entries were displayed.
20. Create a new load sharing mirror on node 1.
The new SVM root volume is on aggr2_C1N1. Create the load sharing mirror on aggr1_C1N1 to provide additional redundancy.
cluster1::> volume create -vserver NAS -volume svm_root_m1 -aggregate aggr1_C1N1 -size 20m -type dp
cluster1::> volume show -vserver NAS
Vserver Volume Aggregate State Type Size Available Used%
--------- ------------ ------------ ---------- ---- ---------- ---------- -----
NAS svm_root aggr2_C1N1 online RW 20MB 18.39MB 3%
NAS svm_root_m1 aggr1_C1N1 online DP 20MB 19.80MB 0%
NAS svm_root_m2 aggr1_C1N2 online LS 20MB 18.55MB 2%
NAS vol1 aggr1_C1N1 online RW 100MB 29.93MB 68%
4 entries were displayed.
Create the load sharing mirror relationship.
cluster1::> snapmirror create -source-path NAS:svm_root -destination-path NAS:svm_root_m1 -type LS -schedule hourly
[Job 93] Job succeeded: SnapMirror: done
Initialize the new load sharing mirror relationship. When a new mirror is added to a load sharing mirror set it must be initialized individually.
cluster1::> snapmirror initialize -destination-path NAS:svm_root_m1
[Job 95] Job is queued: snapmirror initialize of destination "cluster1://NAS/svm_root_m1".
Perform a manual update of the load sharing mirrors.
cluster1::> snapmirror update-ls-set -source-path NAS:svm_root
[Job 96] Job is queued: snapmirror update-ls-set for source "cluster1://NAS/svm_root".
21. Verify the NAS SVM has the expected volumes and the status of the SnapMirror relationships is healthy.
cluster1::> volume show -vserver NAS
Vserver Volume Aggregate State Type Size Available Used%
--------- ------------ ------------ ---------- ---- ---------- ---------- -----
NAS svm_root aggr2_C1N1 online RW 20MB 18.42MB 3%
NAS svm_root_m1 aggr1_C1N1 online LS 20MB 18.46MB 2%
NAS svm_root_m2 aggr1_C1N2 online LS 20MB 18.46MB 2%
NAS vol1 aggr1_C1N1 online RW 100MB 29.93MB 68%
4 entries were displayed.
cluster1::> snapmirror show
Progress
Source Destination Mirror Relationship Total Last
Path Type Path State Status Progress Healthy Updated
----------- ---- ------------ ------- -------------- --------- ------- --------
cluster1://NAS/svm_root
LS cluster1://NAS/svm_root_m2
Snapmirrored
Idle - true -
cluster1://NAS/svm_root_m1
Snapmirrored
Idle - true -
Additional Resources
Using a Load Sharing Mirror to Balance Loads from NetApp
Click Here to get my 'NetApp ONTAP 9 Storage Complete' training course.

Text by Alex Papas, Technical Writer at www.flackbox.com
Alex has been working with Data Center technologies for over 20 years. Currently he is the Network Lead for Costa, one of the largest agricultural companies in Australia. When he’s not knee deep in technology you can find Alex performing with his band 2am