In this NetApp tutorial, you’ll learn about virtualization with VMware vSphere. I’ll explain the different components and how storage and networking work. Scroll down for the video and also the text tutorial.
NetApp Introduction to VMware vSphere Video Tutorial

William Mark

One of the best courses I’ve taken. Neil is clear and highly knowledgeable. He explains complex Netapp concepts and breaks them down into digestible easy to understand chunks. I’ve taken NetApp Boot camps that are too fast paced but this is perfect.
Before Virtualization
The first thing to explain is why VMware exists. So let’s have a look at the way that things worked before virtualization did exist. So looking here, this is the situation I had in the first company I worked for as an IT Administrator.
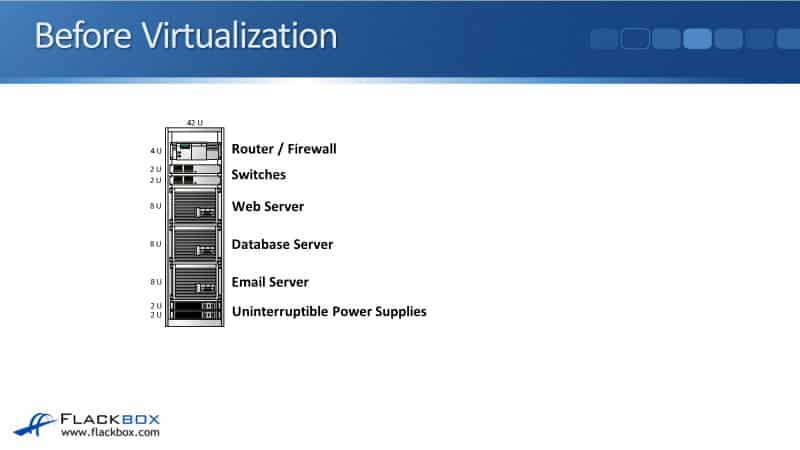
We were just a small company, and down in the server room, we had a physical rack of equipment there. In that rack, we had an email server. We also had a database server and a web server. So each of those servers was running on separate pieces of hardware.
Also, in that same rack, we had Uninterruptible Power Supplies to ensure that the servers stayed online. We also had switches to connect to the other devices in the network, and we had a router and firewall to keep us safe and give us a connection out to the Internet.
If you look at the servers in that rack, that blue box you see there represents one of the servers. Each physical server would have the physical components there, such as the CPU, the processor, the RAM memory, and the Network Interface Card (NIC).
On top of the hardware resources in that box, we had the Operating System (OS), such as Windows or Linux. On top of that, we would have the application. In that first box, there is the email server. We would have the same thing for the database server as well, and again, the same thing for the web server.
If you looked at the utilization on those servers, meaning how busy the CPU, the RAM, and the network card were, they’d be running at about 15% utilization. There are actually loads of spare performance capacity left on those servers. So it’s not efficient that you’re paying for three separate physical servers, but they’re each running at only 15% of their possible performance.
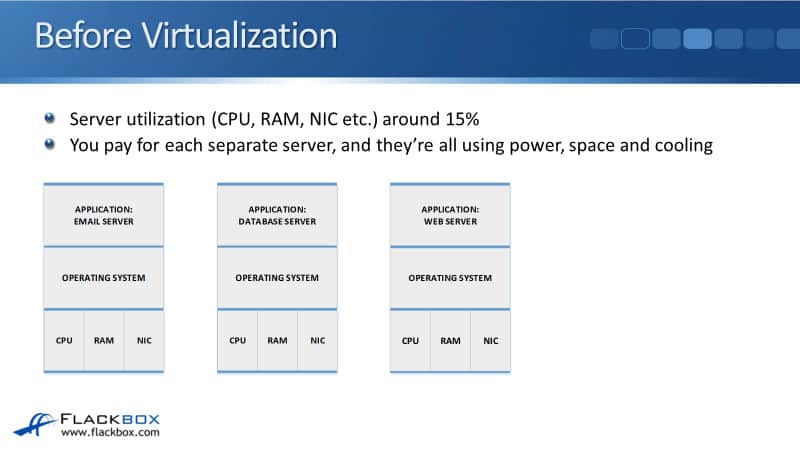
You’re paying for each separate server, and they’re all using power, space, and cooling. However, you’ve got a load of additional performance available there that you’ve paid for that you’re not utilizing. So it’s not very efficient.
You could do to get higher utilization on your server by running all the applications on one physical box. So here I’ve just got the one physical server with the hardware components at the bottom and then the Operating System.
Then, I could run my email server, database server, and web server applications all on that same server. However, putting multiple applications on the same server is a terrible practice because if you have a problem with any of those applications, they’re all going to be affected.
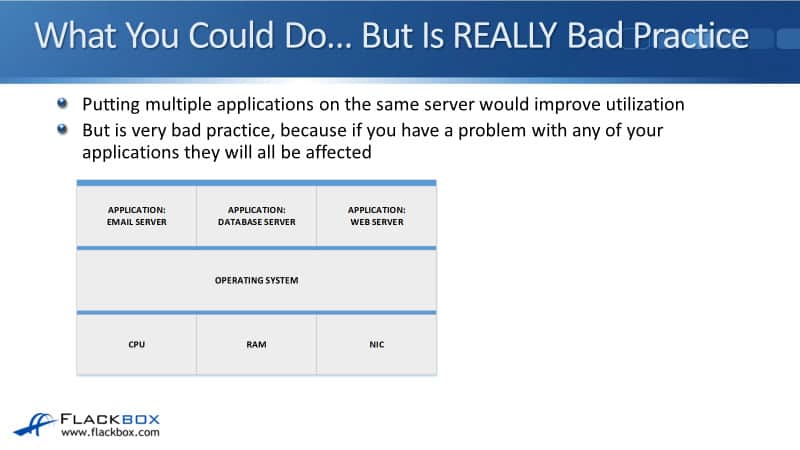
For example, let’s say there was a problem with the email server, and it caused the Operating System to crash. That will crash all three servers, not just the email server. The server applications are not designed to be run with other applications.
So if we did do this, we would get our utilization up to something more like 45%. It would be more cost-efficient, but this is a terrible idea. It’s very bad practice to do that.
Server Virtualization
So this is where server virtualization from companies like VMware comes in. With the virtualization, I’ve got a single physical server here, represented by the blue box. So I’ve got the hardware components down at the bottom, the CPU, the RAM, and the NIC again. Now, we install hypervisor software onto that physical server.
The hypervisor will act as the Operating System, and its other job is to control access to the virtual machines. So with our virtual machines, we’ve got Virtual Machine 1, which has a Windows Operating System, and we’ve got our email server application there. That’s our first virtual machine.
Running on the same physical box, we’ve got Virtual Machine 2, which is running on Windows again, and that is our database server. We’ve also got a third virtual machine on here. Let’s say this one is running on Linux, and that is running our web server.
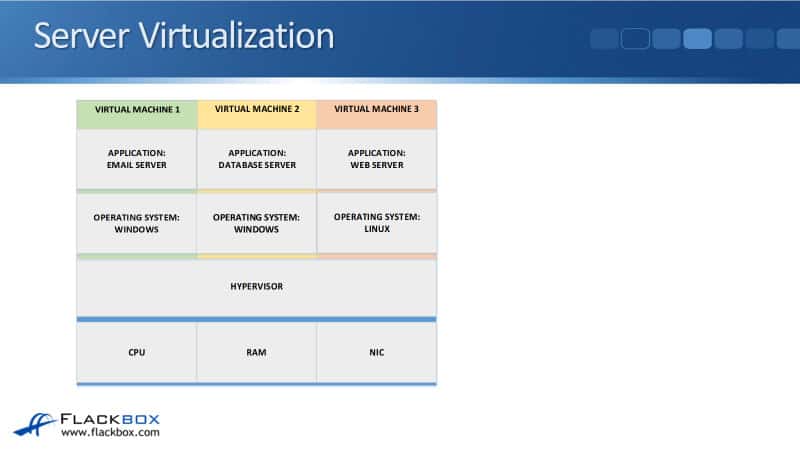
So now we’ve got the same thing that we wanted to do a minute ago, we’ve got all three applications running under one physical box, but they’re each running in their own separate virtual machine. They each are completely separate from each other.
Virtual Machine 1 thinks that it is running on its own dedicated hardware. Virtual Machine 2 also thinks that it’s running on its own dedicated hardware as well. They don’t know that they are virtual machines.
You can see that each separate virtual machine is a separate instance. Each got its own Operating System. So if we have a problem with the email server and that crashes its underlying Windows Operating System, it’s only going to crash Virtual Machine 1. Virtual Machine 2 and Virtual Machine 3 will keep running just fine.
So with virtualization, it does allow us to run multiple applications on the same underlying physical box. We can get much better utilization of our hardware, it’s much more cost-efficient, but we’re doing it now in a safe and efficient way.
Type 1 Hypervisors (Bare Metal)
So looking at that first example there, that was a type 1 hypervisor. There’s type 1, and there’s also a type 2 hypervisor. Type 1 hypervisors run directly on the system hardware. The hypervisor is running directly on top of the underlying hardware.
It acts as the Operating System on that physical box and controls the virtual machines. It controls their access to the underlying physical resources. So a type 1 hypervisor is installed directly onto the hardware.
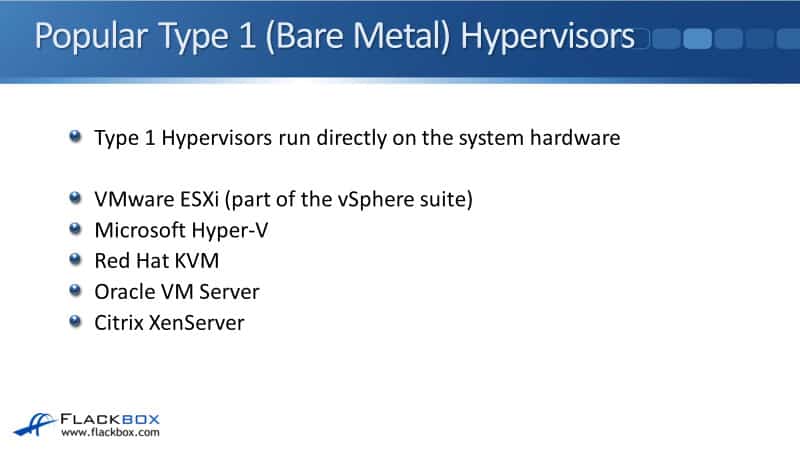
Some examples of popular type one hypervisors are VMware ESXi, the software installed onto the hardware, and VMware ESXi is part of the vSphere suite. Other popular type 1 hypervisors are Microsoft Hyper-V, Red Hat KVM, Oracle VM Server, and Citrix XenServer.
Type 2 Hypervisor
Let’s look at the difference in how a type 2 hypervisor works. Here, we’ve got a physical machine again. We’ve got the hardware resources down at the bottom, the CPU, the RAM, the NIC, etc.
Rather than installing a hypervisor directly onto the hardware, with a type 2 hypervisor, we’re running a normal desktop Operating System on here. So this would be Windows 10, for example, running on here. On top of there, we’ve got our normal applications.
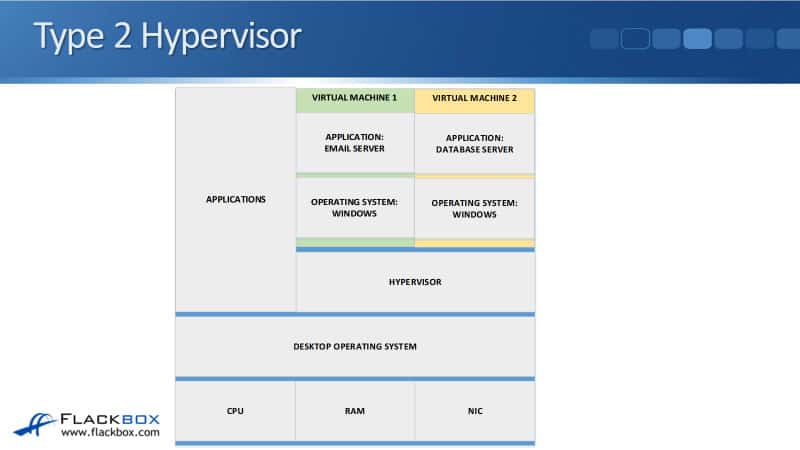
So that’s what I’m doing on the laptop that I’m recording this video on. I’ve got a type 2 hypervisor running on here. My laptop has Windows 10 installed on it as normal, just like you see in the picture here. Then, I have Windows 10 and my normal applications like Microsoft Word and my email application, etc. Also, on the same laptop, I’ve installed a hypervisor there.
Now, this is a type 2 hypervisor, and I can have virtual machines running in there. For example, I’ve got Virtual Machine 1, which runs an email server, and Virtual Machine 2, which runs a database server.
So the difference with our type 2 hypervisor is it’s got a normal Operating System on top of the hardware. Then, the hypervisor is installed on software on top of your normal Operating System.
Some examples of popular type 2 hypervisors are VMware Workstation, VMware Player, and VMware Fusion, which is used on Mac, VirtualBox, QEMU, and Parallels.
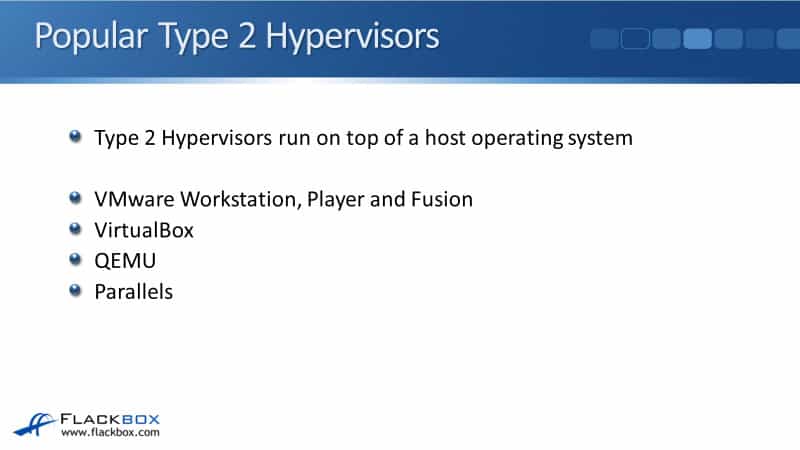
Let’s have a look at a type 2 hypervisor. As I said, I’m running one on my laptop here. You can see that I’ve got VMware Workstation running on here. This is my normal laptop, and I’ve got my normal applications running on here.
This is what I use for my normal day-to-day tasks, but I can also run virtual machines here. I’m running on Windows 10, but if I want to do some testing with Linux, you can see here that I’m running Linux as a virtual machine inside VMware Workstation.
So what your type 2 hypervisors are commonly used for is a personal hypervisor. So if you’re working in a job role where you have to do testing with different Operating Systems or applications or demonstrations with them, it’s really useful for that.
Type 1 vs Type 2 Hypervisor
A type 1 hypervisor is installed directly on top of the hardware, and you have the virtual machines on there. With a type 2 hypervisor, you’ve got your normal desktop Operating System like Windows 10 and the hypervisor is installed on top of there.
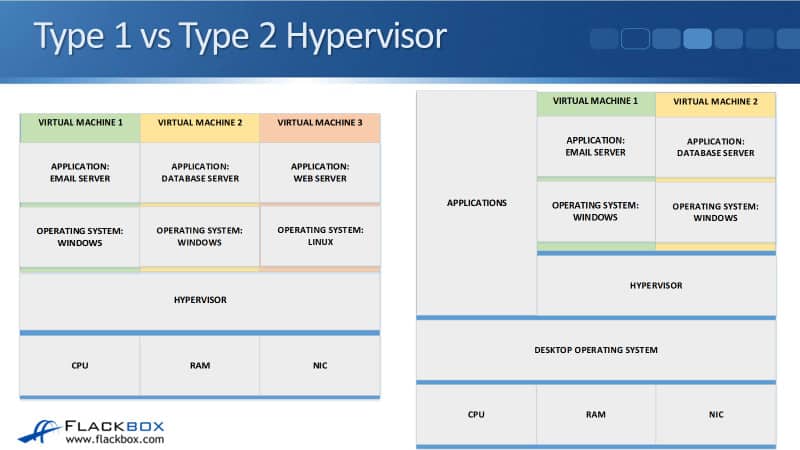
So as I said, type 2 is commonly used where you’ve got your normal laptop, you want to be able to use it as a normal laptop, but you want to have virtual machines on there as well. It is less efficient than a type 1 hypervisor because you’ve got the external layer in there of the desktop Operating System.
Type 1 hypervisors are more efficient. You’ll get better performance with these, and they’ve also got additional features. Type 1 hypervisors are used in a data center for enterprise-class servers.
So say at your work, if you’ve got an email server and a database server running there that’s being used for servicing all of your staff. That’s going to be running in the data center as a type 1 hypervisor. But if you want your own personal hypervisor for doing demos, that’s going to be a type 2 hypervisor running on your own laptop.
Virtual Machine Files
When you create a virtual machine, the hypervisor software creates a set of files for that virtual machine, and I’m talking about VMware here. So these are the files that are created when you create a virtual machine in VMware.
The first one will end in the file extension of .vmx and store the virtual machine settings. Things like how much RAM memory is allocated for that particular virtual machine, how much CPU resources it will get, etc., are all stored in the .vmx file, which you can read as a text file.
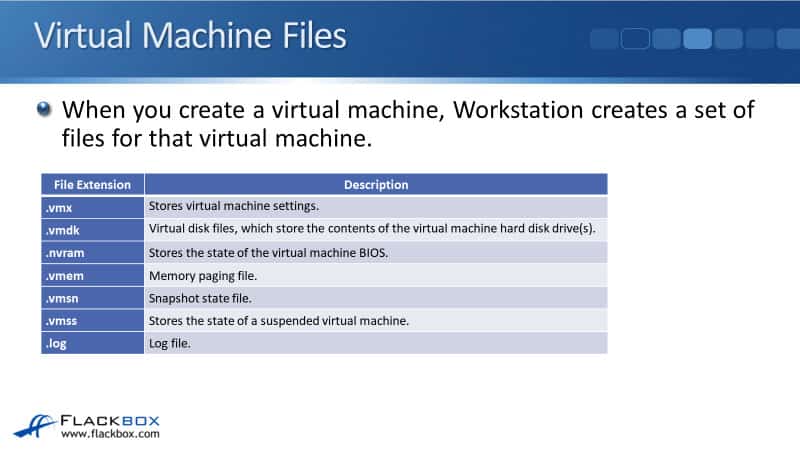
So maybe you’ve got your first virtual machine, perhaps it needs to have 8 GB worth of RAM, and then your second virtual machine needs to have 16 GB of RAM. Well, those are going to be different settings. Each virtual machine is going to have its own set of these files.
Virtual Machine 1 would have its .vmx file, and it specifies that it gets 8 GB of RAM. Virtual Machine 2 will have its own separate .vmx file, which specifies that it gets 16 GB of RAM.
Next, we’ve got the .vmdk file, which is the virtual disk file. It stores the contents of the virtual machine’s hard drives. So if you’ve got a Windows virtual machine running, for example, that virtual machine will have a C drive, which is its virtual hard drive, and the file that that information is stored in is a .vmdk file.
The next one is .nvram, which stores the virtual machine’s BIOS state. We’ve got a .vmem file, which is the memory paging file. A .vmsn file, which is a snapshot state file, you can also take snapshots in VMware.
Snapshot is a point-in-time copy of the virtual machine. This is useful for testing if you want to roll back to a certain point, and you can take a snapshot and then do some changes and then roll back to that snapshot later on.
Also, you can suspend a virtual machine as well. So rather than powering it all the way down and then powering it all the way back up again, you can just suspend the state of that virtual machine. If you do that, that information will be stored in a .vmss file. The last one is we’ve also got .log files as well.
vSphere Datastores
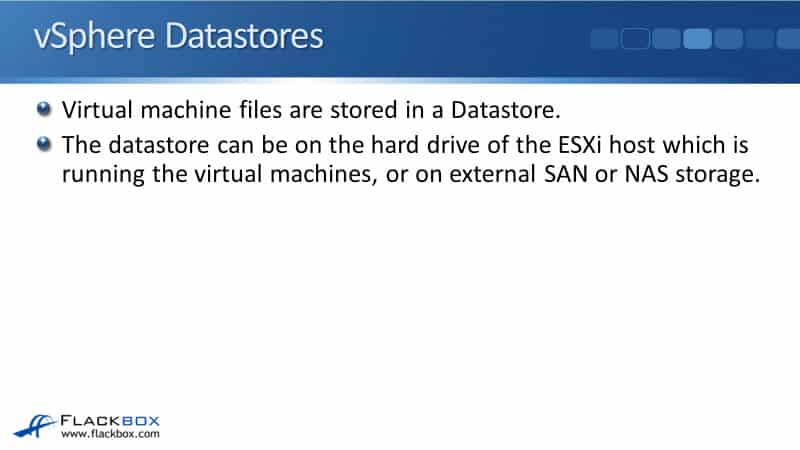
We’ve got those files that make up the virtual machine, and they will have to be stored somewhere. In VMware terminology, the virtual machine’s files are stored in a datastore. So you’re going to have a datastore, which will be on your disks. On there, you will have a folder for each virtual machine.
Each virtual machine’s folder is going to have its virtual machine files. The datastore can be on the hard drive of the ESXi host, which is running the virtual machines, or it can be on external SAN or NAS storage.
Local Datastores
Looking at local datastores first, so here I’ve got an ESXi host. I’ve got my underlying physical resources down at the bottom here. The hypervisor I’m running now is VMware ESXi, and I’ve got a couple of virtual machines running on that host.
So you see that in there, we’ve got the physical hard drive, which is in that ESXi server. When you install ESXi on there, it will be configured as a local datastore.
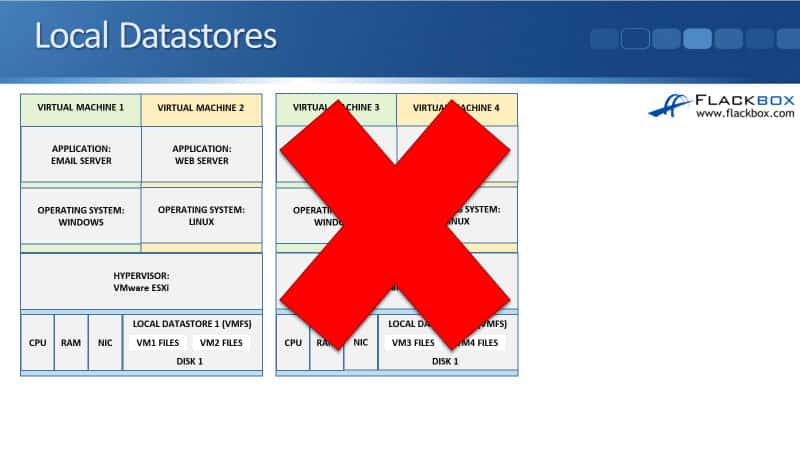
Disk 1 is configured as Local Datastore 1. The file system used by VMware is VMFS, the Virtual Machine File System. In that local datastore, we’re going to have a folder which is going to be where our Virtual Machine 1 files are stored, and we’re going to have another folder, and our Virtual Machine 2 files are going to be stored there.
Now, in an enterprise environment, you’re not going just to have one ESXi host. You’re going to have multiple hosts. So you can see here that we’ve got Host 1, which is running Virtual Machines 1 and 2, and it’s got the files for Virtual Machines 1 and 2 in its local datastore.
We’ve also got ESXi 2, the second host, running Virtual Machines 3 and 4. The files for Virtual Machines 3 and 4 are in the second ESXi host’s datastore.
Now looking at this, you might have noticed a potential problem here. When we have the files saved like that, each EXI host becomes a single point of failure. So if we lose ESXi 2, we’ve also lost access to the virtual machine files.
We’re not going to be able to run those virtual machines until we recover that physical server. So another way that we can store the files which get around that problem is by using external datastores.
External Datastores
Looking at the picture below, I have got my first ESXi host, which runs Virtual Machines 1 and 2, and I’ve got my second ESXi host, which runs Virtual Machines 3 and 4. Rather than storing the files on the local disk and the local datastore, now I’ve got an external SAN or NAS storage system.
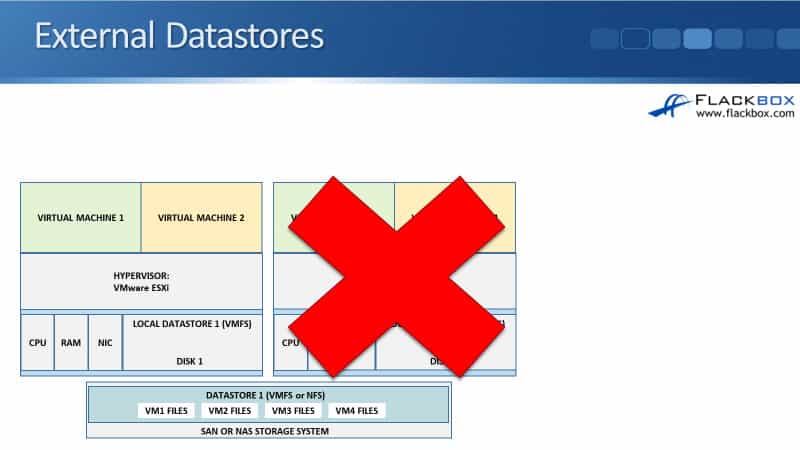
On that storage system, I’m going to provision storage for my ESXi hosts. So that’s my external datastore. For the ESXi hosts to access that storage, it can either use a SAN protocol, which would be Fibre Channel or at iSCSI or FGOE.
If you’re using a SAN protocol for the hosts to access the storage, then it’s going to be formatted again with the VMFS file system, the same as if we were using the local datastore. You can also use NFS for the client access to the storage system as well.
So we’ve done that, we have got our external storage system. We’ve configured a datastore on there for our VMware hosts, and now they can save the virtual machine files onto that datastore.
Now, notice that Virtual Machines 1 and 2 are running on our first host, and Virtual Machines 3 and 4 are running on our second host. All of the files can be saved into the same datastore. So with VMFS, it allows multiple hosts to access the same datastore at the same time. Host 1 and host 2 are both accessing the same datastore simultaneously. No problems with doing that.
The benefit that we get now is that if we lose our second host, the same as in the earlier example, we can still run Virtual Machines 3 and 4 because we haven’t lost access to the files. The files are on our external storage system. The external NAS or SAN storage system will have multiple levels of redundancy built into that, so it’s highly unlikely that the storage system will go down.
The host could go down. If that happens, the virtual machine files are still available on the storage system. Now, obviously, the storage system cannot run the virtual machines. We need an ESXi host to do that because it will use its CPU, RAM, NIC, etc.
So what we do is if ESXi host 2 goes down, we just start up our Virtual Machines 3 and 4 on to our first host, and we’re back up and running again.
You can automate the way that this is going to happen. So with VMware, it’s got a feature called DRS and vMotion. You can configure it so that if a host goes down, the virtual machines running on that host will be automatically started on a different available host. That is with the high availability feature.
Now, with the high availability feature, if our second host did blow up, it’s going to take a few minutes before the virtual machines are available again because we’re going to have to be booted up on this first host, but we can also use the fault tolerance feature.
With fault tolerance, we run a second copy as a backup copy on a different host. If our primary host fails, it will automatically cut over to the secondary host because the virtual machine’s standby copy was already running there, ready to go. Therefore, you’re going to have no outage at all. Any clients accessing the services on that virtual machine will not notice any type of outage.
Let’s say that we wanted to do planned maintenance on the second host, so we want to take that second host down to do some hardware maintenance there. We can use the vMotion feature in VMware to move virtual machines over to a different host. When you use the vMotion feature, it copies the contents of memory from the original host source to the destination host.
Let’s say the ESXi Host 2 was still up and running, and we want to move Virtual Machines 3 and 4 over to the first host. These are running virtual machines, so they’ve got contents and RAM memory here. With vMotion, it copies the contents of memory over to ESXi 1, and it moves the virtual machines over there.
We can then take that second host down to do the maintenance there. When we use that vMotion feature, it does not create any type of outage at all. The virtual machines will carry on running, and any clients using the services there will not notice any outage.
VMware VSAN
VMware VSAN clusters the ESXi host’s local disks together to form a virtual SAN storage pool. You can get those functions, such as vMotion, without actually having external SAN or NAS storage. Just with your ESXi hosts and using their local disks, you can cluster them together to form a virtual SAN, and your virtual machine files will be saved there.
The way it works is that you’re going to have your files duplicated across multiple hosts so that they don’t have a single point of failure. Also, that does give you those advanced features such as vMotion.
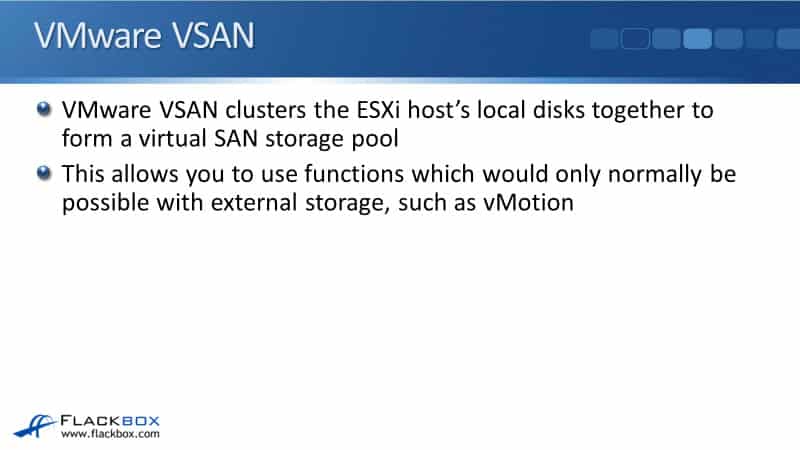
To summarize, you can use the local datastores, or you can use external SAN or NAS storage, which gives you the advanced features, or you can use VMware VSAN. Most deployments are going to be using a bit of a mix between local datastores and also external storage.
VMware vSphere
The next thing I wanted to tell you about is some terminology about VMware. VMware vSphere is a software suite. The main components are the ESXi hosts, which are the physical servers that are running the virtual machines, and the other component is the vCenter server, which has centralized management of our entire environment.
The vCenter server manages all of the ESXi hosts and the virtual machines there. From that one point of management, you can see all your hosts, see all the virtual machines, create new virtual machines, configure with storage, vMotion your virtual machines around, etc. That’s all done from the vCenter server.
The vCenter server typically runs as a virtual machine itself. So you can see here that we’ve got an ESXi host in our environment, and the vCenter server is actually running as a virtual machine on one of our ESXi hosts.
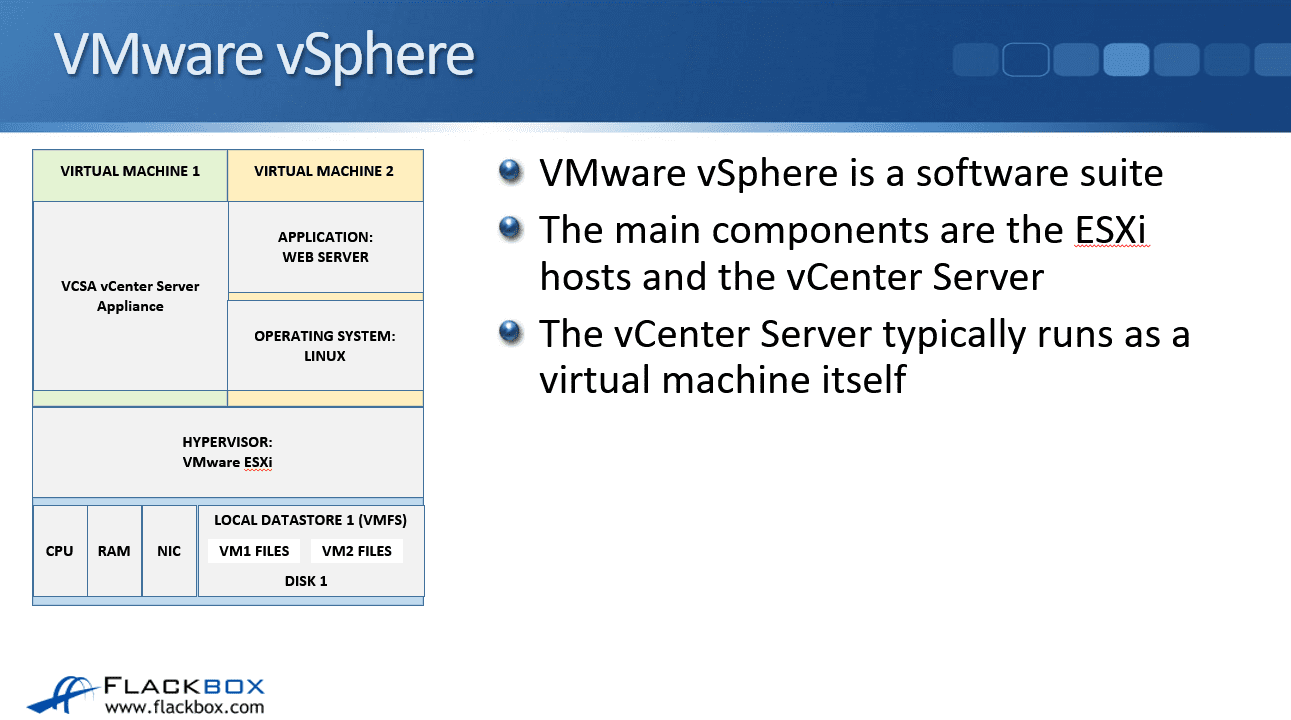
The software that is going to be installed is ESXi. It is going to be installed onto your physical servers, and you’re also going to install the software of the vCenter server as a virtual machine. However, you can’t install VMware vSphere.
VMware vSphere is not a piece of the software. That’s actually just the name of the solution from VMware. So VMware vSphere is the software suite. It contains the actual software packages of the ESXi and the vCenter server.
Traditional Networking
The last thing to tell you about is how the networking works in VMware. Looking at traditional networking first, you can see here that I’ve got a web server and an email server. This is with the old traditional way of doing it, where these are running on separate physical boxes.
My web server has got IP address 10.10.10.10.10. My email server is in a different IP subnet of 10.10.20.10. So I’ve got them segregated in different IP subnets.
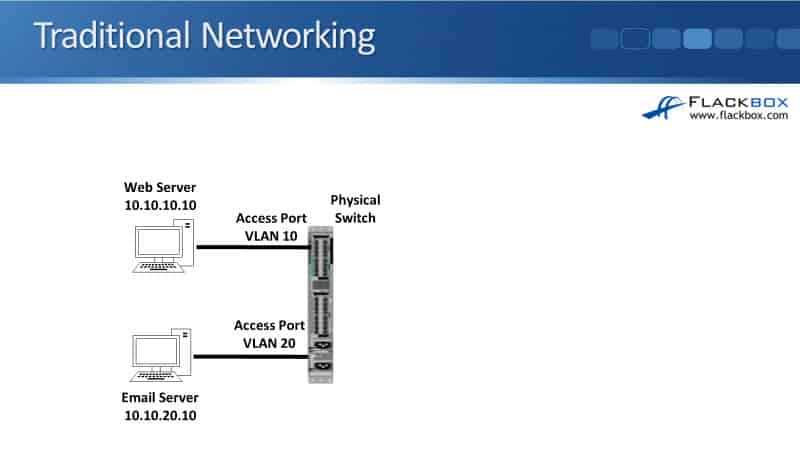
I’m also going to segregate them into different VLANs as well. So my web server is in VLAN 10. My email server is in VLAN 20. The way that I configure that is on the physical switch that they’re attached to. The servers themselves don’t actually know anything about VLANs. The VLANs are completely configured on the switch.
I also configure access ports in the switch. The port connected to my web server is configured as an access port in VLAN 10. The port connected to my email server is configured as an access port in VLAN 20.
An access port just means that there’s only one VLAN running on that port. By doing that, I’ve got them separated into different IP subnets and different VLANs as well. That gives me the best performance and security.
VMware Networking
When we move that over into a VMware environment, I need to be able to have them in the different IP subnets and the different VLANs, again, for the performance and the security. So how am I going to do that?
If we look at the physical switch, if this was configured as an access port, I could put it in access port VLAN 10, and that would work for my web server, but it wouldn’t work for my email server.
Or if I put it in 20, that would work for the email server, but it wouldn’t work for the web server. I need to support VLANs 10 and 20 here and everything needs to understand that the web server is in VLAN 10 and that the email server is in VLAN 20. So how is that going to work?
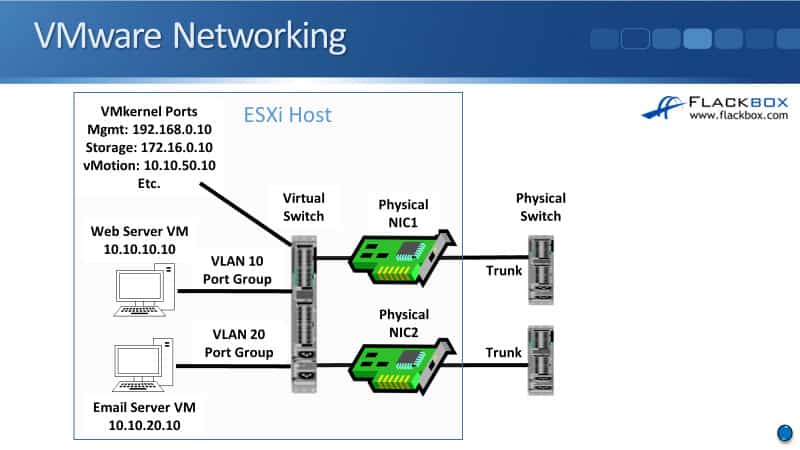
Well, the way that it does work is we’ve got a virtual switch on the ESXi host, which is running in software. The physical switch is an actual physical switch. This virtual switch is just running in software inside VMware. Also, these are not physical servers. These are virtual machines that are running in my ESXi host.
My virtual machines running in software are connected to my virtual switch, which is also running in software. I’ve got my physical network interface cards and the host which are connected to my physical switches.
Then on the physical switches, I configure them as trunk parts, and they’re going to be carrying traffic for VLAN 10 and also for VLAN 20 down to the ESXi host. Whenever traffic is sent there for VLAN 10, it’s tagged as VLAN 10, and whenever traffic is sent down for VLAN 20, it is tagged as VLAN 20. So unlike our normal physical servers, our ESXi hosts are VLAN aware.
Then on the virtual switch, I configure port groups. So I configure a port group for VLAN 10. I’ve also got a port group for VLAN 20. When I configure my web server virtual machine, I associate it with the VLAN 10 port group.
When I configure my email server virtual machine, it is associated with the VLAN 20 port group. If I had multiple web servers, they would all be in the VLAN 10 port group. Multiple email servers would all be in the VLAN 20 port group.
All traffic coming to and from the web servers is tagged as VLAN 10, and all traffic coming to and from the email servers is tagged as VLAN 20. That allows me to maintain my separation with the different IP subnets and the different VLANs, even when I’ve got multiple virtual machines running on the same underlying physical server.
So that’s how it works for my virtual machines. It uses port groups that are associated with a particular VLAN. But I don’t just have the traffic coming to and from the virtual machines. I’ve also got traffic to and from the actual ESXi host itself.
For example, I’m going to have management traffic. My vCenter server needs to be able to connect to the ESXi host over the network to be able to manage them. So my ESXi host is going to need to have a management IP address. So that is configured on a VM kernel port.
For traffic to and from the virtual machines, I use port groups. For traffic going to and from the ESXi host itself, I use VM kernel ports for that. So I’m going to have a VM kernel port for management, which will have an IP address on there.
My ESXi host will also need to connect to the storage as well. I’m using external storage, so I will have a VM kernel port for that.
For vMotioning my virtual machines, if I want to move a virtual machine from one host to another and I need to copy the memory contents over the network, that’s also going to need connectivity. I’m going to have a VM kernel port for vMotion. There are a few other things that you’re going to have VM kernel ports for as well.
Additional Resources
Provision SAN Storage for VMware Datastores: https://docs.netapp.com/us-en/ontap/task_san_provision_vmware.html
How to Set up NetApp NFS and VMware vSphere Datastores: A Quick Guide: https://vmiss.net/netapp-nfs-vmware-datastores/
Virtual Storage Console for VMware vSphere Overview: https://library.netapp.com/ecmdocs/ECMP1392339/html/GUID-328AEB84-3256-42EF-BEA1-5D1D3C6F537F.html
Libby Teofilo

Text by Libby Teofilo, Technical Writer at www.flackbox.com
Libby’s passion for technology drives her to constantly learn and share her insights. When she’s not immersed in the tech world, she’s either lost in a good book with a cup of coffee or out exploring on her next adventure. Always curious, always inspired.