In this NetApp tutorial, you’ll learn how NetApp VSC, the Virtual Storage Console, can be used to configure the recommended best practice settings on your VMware ESXi hosts and virtual machines. Scroll down for the video and also text tutorials.
NetApp ESXi Host, NFS VAAI, and Guest OS Settings Video Tutorial

Charles Lawton

Just completed NetApp Storage training! I found the instructor Neil Anderson to be amazing. He’s extremely competent, has spent time in the industry, and knows the platform very well. He colors the materials with some real world examples, which is always helpful to understand the differences between doing something in the lab and doing it in the real world.
I manage several NetApp arrays, and found myself going to the real platform to see how we’ve implemented the concepts presented here. Very happy I picked up this course!
ESXi Host Settings
NetApp Technical Report TR-4597, VMware vSphere with ONTAP, has an appendix that lists the recommended ESXi host settings. These are the best settings to use when you’re using ONTAP storage. You can set them manually, use vSphere Host Profiles on your ESXi host, or automate it with VSC.
Configuring them manually would be a very manual and tedious process, so not recommended. You could also configure it manually on one host and then create a vSphere host profile so you could use that to push your settings to your other hosts. It's not quite as manual as doing it individually on each one, but it’s still not very convenient.
By far, the easiest and most convenient method is to use VSC to automate it. You can push those settings down to your ESXi host with just a couple of mouse clicks.
The other good thing is that VSC will continuously monitor those hosts, so if the settings get changed on one of them by accident somehow, it will alert you to that, and then you can fix the problem by pushing the settings back down again.
Let’s look at the actual settings in that TR document first, which comes as a PDF you can download from the NetApp website. It gives you different settings for configuring ONTAP storage with VMware. It is recommended that you read this document.
At the end of the file, there’s Appendix B, the recommended host settings. You could set these manually in VMware, but doing that would be pretty tedious. It’s much easier to use VSC to do it. After those settings have been set, VSC will continuously monitor your hosts and report any which become out of compliance.
NetApp estimate that 75% of configuration problems when using VMware with ONTAP storage would be avoided if you did use the recommended host settings. So it’s highly recommended that you do this. It’s going to save you a lot of problems and a lot of troubleshooting.
With the configuration, open the vSphere client, go to the Menu, then Virtual Storage Console, which will land on the overview page by default. On the overview page, click the second tab, Traditional Dashboard.
Down at the bottom right, you’ll see how many ESXi hosts you’ve got, and it will tell you any which do not have the recommended settings. You can see it split into three settings: the NFS settings, the Multi-Path IO settings, and also the Adapter settings.
If you’re not using the recommended settings, if you’ve just got the default settings on there, you can click the link to edit the ESXi host settings, and then it will show you the not compliant host/s from the red exclamation mark. You would want to fix all your hosts, so select them and click on Next.
You’ll have a checkbox to fix the NFS settings, a checkbox to fix the SAN adapter settings, and a checkbox to fix the MPIO settings. You can tick all of those, click on Next, and click on Finish. VSC is now going to push the recommended settings to the ESXi host. It is as easy as that.
Then, click the Refresh button to update the host settings. You'll see green ticks for all hosts. If any of them get out of compliance later because another administrator changes the settings and brings them out of compliance, it will be reported. By far, it’s the easiest, most convenient way to ensure that your hosts are set with the recommended best practice settings.
NetApp NFS Plug-in for VAAI
The NetApp NFS plugin for VMware vStorage APIs for Array Integration (VAAI) is a software plugin for your ESXi host which enables the offloading of certain tasks from the hosts to the storage system. It aids performance and efficiency, and it’s downloaded and installed separately from the UVA. The UVA is what you use to install VSC.
The UVA file does not include the VAAI plugin, so you download that separately. It is installed in VSC and then deployed to the ESXi host. The reason it’s the NFS plugin for VAAI is that VAAI is built-in for SAN protocols, so you don’t need to install any additional plugin. For NFS, you do.
VAAI Features
Now, we’ll see what will actually be offloaded. The first one is copy offload for VM clones. Using a VM clone reduces the copy time, traffic, and CPU utilization on the ESXi host because the clone and copy take place directly on the storage system. It doesn’t have to come down and back through the ESXi host.
Native Snapshot copies for linked clones enable the creation of ONTAP FlexClone snapshot copies for linked clones rather than VMware snapshots. The ONTAP snapshots are better and more efficient. You want to be using them.
Now, notice that this is just for linked clones. It does not support the offload of normal snapshots from VMware to ONTAP. That is supported with vVols, but it’s not supported with traditional datastores.
Lastly, space reservation enables the creation of thick virtual disk files on NFS for your VMDK files. If you don’t have VAAI, they will always be thin provisioned. You can reserve space for the file at the time of creation.
The first thing to do for the configuration is to check that VAAI is supported on the cluster. On VSC, go to Storage Systems, which will discover the cluster/s. If you expand that out, you can see the NFS VAAI is supported. It could be supported but not actually enabled.
To enable it, the first thing to do is to download the software. To go to the software downloads page on the NetApp website, go to mysupport.netapp.com and log in. Then go to Downloads, then Software, and that will bring you to the plugin page.
Scroll down, and download the NetApp NFS plugin for the VMware VAAI plugin. Actually, I find it easier if I search for ‘VAAI’. Select the ESXi platform, and click on Go! Wait for the page to load, and the available versions will be listed.
Check the latest version, click on View & Download. Scroll to the bottom of the page and Continue. You can also download the supporting documentation on that previous page, scroll to the bottom again, and accept the License Agreement.
There are two available bundles, and I prefer to download the offline bundle. Click the ‘installation package’ for the offline bundle, and download that. Then go into Windows File Explorer and go to the Downloads folder. You can see it there and extract it. Then, when extracted, go into the vib20 folder and the plugin folder. There’s the VIB file there that you want to install.
Now, when you install it in VSC, it checks that the file has got the correct file name, so you need to rename it first. If you install it, go to VSC and click on Settings. Click on the NFS VAAI tools. By default, it’s not installed. It does not come built-in with VSC, so you need to add it here.
Click on the Change link, and then browse to where you downloaded that extracted file, which is in the Downloads folder, and then vib20, and in the NetApp NAS plugin, and then double click on that VIB file there.
Try to upload it without renaming, and it’s going to fail. It would tell you that the name should be NetAppNasPlugin.vib. It is actually the correct file, but VSC also checks the file name. So you need to rename that VIB file to the name that VSC was expecting.
Now, you can go back again, browse, double-click the same file with the correct name, and then upload it. It will take a few seconds to see that the existing version is now populated. The hosts are still unavailable, so click the Refresh button, and the hosts should appear.
You can now select the hosts and click on Install, which will install the VAAI plugin on the ESXi host. After installing, you need to reboot the hosts in a virtual environment.
In the real world, you will use the vMotion to move any virtual machines running on those hosts to a different host. You could then reboot the host while it wasn’t running any virtual machines. Then you could move the virtual machines back later.
Now, wait for the installation to complete. Once it’s successfully installed, reboot the ESXi hosts. In a VSC virtual machine, it’s not configured to auto start. So start the virtual machine as well. After the hosts are up, you can log back into the vSphere client again.
On the Host and Clusters page, expand the ESXi host, click on the VSC virtual machine, and then click on the green arrow to power that up. Leave that for about 15 minutes to ensure all the services are correctly started.
Now, everything’s back up and running again. To check that VAAI is installed correctly on the hosts, go into the command line on the hosts. You need to SSH the command line. That’s disabled by default, so you need to click on the host and then go to Configure.
Go to Services and click on SSH. Start the SSH service. Open up PuTTY and SSH to the host. Log in as root, and enter the password. Then the command to enter here is ‘esxcli software vib list | more’. In the output, you can see that the NetAppNasPlugin, which was version 1.1.2-3, is installed.
You also want to go into Menu, then VSC, and then click on Storage Systems. When you’ve rebooted VSC, you would want to click on Rediscover All to discover the storage again. You can expand the cluster, which shows that VAAI is enabled for NFS on the NAS SVM. So that is how to enable VAAI.
Guest OS Scripts
The last thing that I want to show you is the guest OS scripts. There are recommended settings for virtual machines, whether we’re running Windows or Linux. That comes as scripts, which you can run inside those virtual machines. Scripts that set the recommended SCSI I/O timeouts for the virtual machine guest operating systems are available.
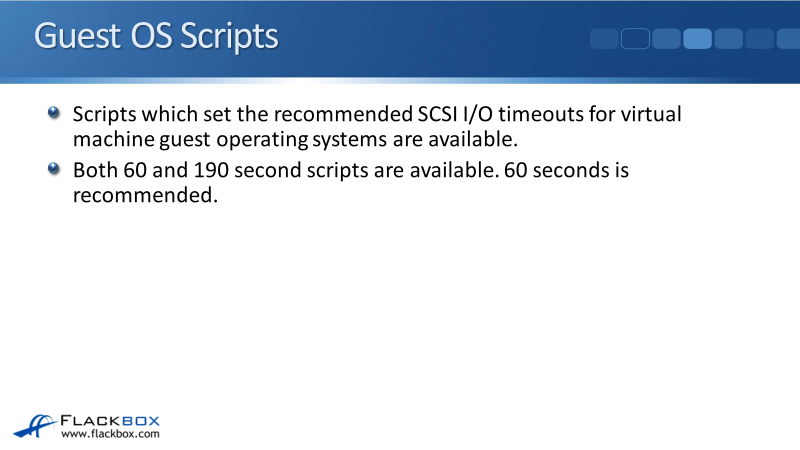
Both 60 and 190-second scripts are available. The 60-second script is recommended. The 190-second might be more suitable in your environment if you require a longer timeout.
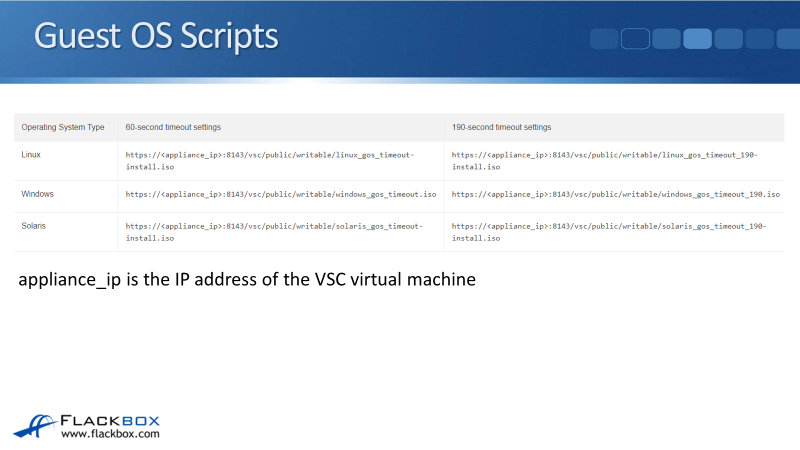
The scripts are available on the links below. You can open the links in your browser. It’s https://, and then the IP address of VSC. Remember when you installed VSC, you put an IP address on there. So it’s the IP address of VSC, not the vCenter Server and the rest of the path.
For Windows, hit Enter, and then you can download the ISO file. Download the ISO file and copy it onto the Windows virtual machine. Then run that script, and it will update the registry settings in Windows with the recommended settings for when we’re using ONTAP storage.
The best practice is to do the host settings in your virtual machines, but at a minimum, you want to have VMware tools installed there.
Additional Resources
Install the NFS VAAI Plug-in: https://docs.netapp.com/us-en/ontap-tools-vmware-vsphere-98/deploy/task_install_the_nfs_vaai_plug_in.html
VMware vSphere with ONTAP Best Practices: NetApp Solutions: https://docs.netapp.com/us-en/netapp-solutions/pdfs/sidebar/VMware_vSphere_with_ONTAP_Best_Practices.pdf
Install and Configure: NetApp NFS Plug-in for VMware VAAI: https://docs.netapp.com/us-en/nfs-plugin-vmware-vaai/pdfs/sidebar/Install_and_configure.pdf
Libby Teofilo

Text by Libby Teofilo, Technical Writer at www.flackbox.com
Libby’s passion for technology drives her to constantly learn and share her insights. When she’s not immersed in the tech world, she’s either lost in a good book with a cup of coffee or out exploring on her next adventure. Always curious, always inspired.