In this NetApp training tutorial, I will cover the hardware characteristics of the various NetApp disk shelf models and how to carry out the system cabling. Scroll down for the video and also text tutorial.
NetApp Disk Shelf Models and Cabling Video Tutorial

Rodney Banipal

I am happy to say that I have passed the NetApp NCDA exam. Your video course was very informative to understand how NetApp works. I have practiced a lot in my lab and that led me to get a NetApp job. Without your course I would not be here so a big thank you goes to you. I could not have done it without your course.
NetApp Disk Shelf Models - SAS
The four NetApp disk shelf models that are currently available are the DS224C, DS2246, DS212C, DS4246, DS4486 and DS460C. The models ending in a 'C' are new shelves which support the 16TB SSD drives compatible with ONTAP 9. The DS4243 went end of sale fairly recently. The current models are Serial Attached SCSI (SAS) disk shelves, with the controller connected to the shelf through a SAS port and cable.
NetApp Disk Shelf Models - Fibre Channel
NetApp used to offer Fibre Channel disk shelves, meaning the controller is connected to the shelf through a Fibre Channel port and cable. These included the DS14mk2 and DS14mk4. The Fibre Channel disk shelves have been end of sale for some time now.
NetApp Disk Types and Shelf Compatibility
NetApp offer three main types of disk to fit into the shelves: SSD Solid State Drives, SAS HDD Hard Disk Drives, and SATA HDD.
All three types of disks (not just SAS) fit into the SAS disk shelves - there's no such thing as an ‘SSD disk shelf’ or a ‘SATA disk shelf’. To check which disk can go in which shelf, see the NetApp disk shelf product page for a quick check of compatibility. I give a tour of the page in the video and show how to find the information. You can also use Hardware Universe for more details.
Of the three drive types, SSD drives offer the best performance but they've got the highest cost per GB of storage. SSDs are supported in all shelves except the DS4486. When NetApp refer to a ‘Full’ (also sometimes called ‘pure’) SSD shelf it means that it contains only SSD drives, ‘mixed’ means that there is a combination of SSD and SAS or SATA HDD drives for Flash Pool.
SATA drives are listed as ‘high capacity drives’ on the NetApp website. They offer the lowest performance but have the lowest cost per GB. They are supported in the DS212C, DS4246, DS4248 and DS460C.
SAS drives are listed as ‘high performance drives’, they offer a balance between performance and cost per GB. They are only supported in the DS2246 and DS224C.
NetApp Disk Shelf Model Numbers
We can glean some information about the shelf from the model number.
The DS stands for ‘Disk Shelf’, naturally. The first digit is the size of the shelf in rack units. The DS224C, DS2246 and DS212C are two rack units, and the DS4246, DS4486 and DS460C are four rack units in size.
The next two digits in the model number are how many drives are supported per shelf. The DS212C fits 12 drives, the DS4486 can take 48 drives per shelf, the DS224C, DS2246 and DS4246 all take 24 drives per shelf, and the DS460C can take 60 drives.
The last digit tells us the bus speed of the IO Modules. Each shelf is fitted with two IO Modules for connectivity to controllers - one for each controller in an HA pair. The DS2246, DS4246 and DS4486 all run at 6GBps, the DS212C, DS224C and DS460C runs at 12GBps (the 'C' is 12 in hexadecimal).
Alternate Control Path (ACP)
As well as being connected with SAS cables to SAS ports on the controller, the disk shelves are connected with Ethernet cables for an Alternate Control Path (ACP). ACP provides separate paths for the data plane (the actual data being written to and read from the disks) and the control plane (control messages from the controller to the shelf). This provides additional stability and troubleshooting capabilities. ACP is optional (the SAS cables can be used for both control and data plane traffic) but highly recommended.
Physical Characteristics
Let’s take a look at the disk shelves; the picture below shows a two rack unit, the DS2246. It takes up to twenty four disks which are fitted vertically.

NetApp DS2246 Disk Shelf
The four rack units are the DS4246, DS4486 and DS4243. The disks are arranged horizontally in the shelf.

4U Disk Shelf – DS 4246, DS4486, DS4243
The LED display on the left shows the shelf ID indicator. You can have up to ten shelves in a stack. For the numbering, the first stack should start at zero, the next stack starts at ten and then twenty and so on. Remove the panel on the left for access to set the shelf ID.
Looking at the back of a DS2246, we’ve got redundant power supplies down at the bottom and our IO Modules at the top. The IO module has two Ethernet ports for the Alternate Control Path (ACP) connection and two SAS ports. We have two IO modules to give us connectivity to both controllers for high availability.
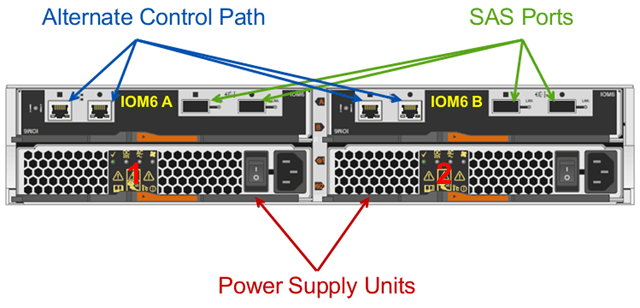
DS2246 Rear View
The back of the 4U disk shelf is very similar, we’ve got two IO Modules again with the same number of ports. They are arranged top and bottom in the shelf and we have four slots for power supplies.
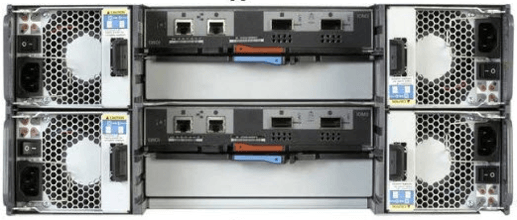
4U Disk Shelf Rear View
Cabling
Cabling is explained and diagrammed very clearly in the SAS Disk Shelves Universal SAS and ACP Cabling Guide.
The example below is for a high availability pair of two controllers, with two quad-port SAS HBAs and two stacks of disk shelves. When we do the cabling it’s split up into different stages to simplify it.
The first thing we do is daisy chain cables between the SAS ports. Notice that for both the ACP and the SAS ports are labelled with a square and a circle on the shelves. On the top shelf in the stack, the circle SAS port is connected to the square SAS port on the shelf below. Then we daisy chain like that going circle-square circle-square all the way down to the bottom of the stack. We do that for both IO Modules on both stacks.
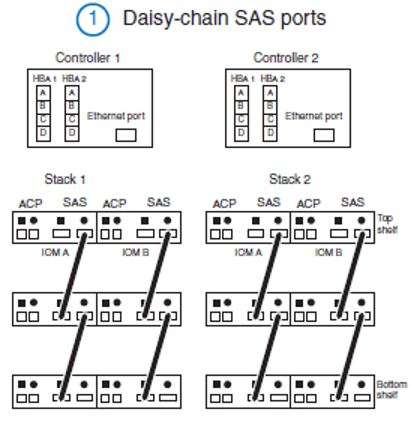
NetApp Disk Shelf Cabling Stage 1
Next we’re ready to cable our controllers to our stacks, as shown in part 2 in the diagram. A spare port in the first SAS HBA on Controller 1 gets connected to the top square SAS port in IO Module A on Stack 1. Then a spare port in the second SAS HBA on Controller 1 gets connected to the top square SAS port in IO Module A on Stack 2. Similarly on Controller 2 we connect a spare port in the first SAS HBA to the top square SAS port in IO Module A on Stack 1. Then a spare port in the second SAS HBA on Controller 2 gets connected to the top square SAS port in IO Module B on Stack 2.
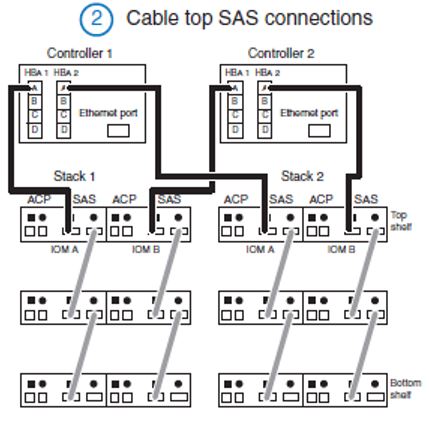
NetApp Disk Shelf Cabling Stage 2
Next up we cable the bottom SAS connections, this is what gives us MultiPath High Availability (MPHA). If we lose any of the ports, cables or the shelves in the stack the controllers can still get to all of the other shelves.
This is shown in part 3 of the diagram. A spare port in the first SAS HBA on Controller 1 gets connected to the bottom circle SAS port in IO Module B on Stack 2. Then a spare port in the second SAS HBA on Controller 1 gets connected to the bottom circle SAS port in IO Module B on Stack 1. Similarly on Controller 2 we connect a spare port in the first SAS HBA to the bottom circle SAS port in IO Module A on Stack 2. Then a spare port in the second SAS HBA on Controller 2 gets connected to the bottom circle SAS port in IO Module A on Stack 1.
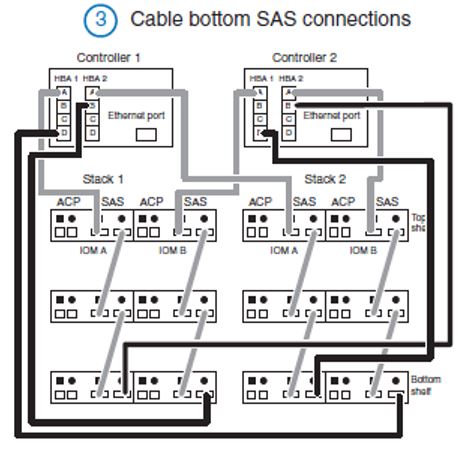
NetApp Disk Shelf Cabling Stage 3
Once we’ve done we’ve completed the SAS cabling, all we have left to do is our ACP connections.
The ACP uses a single Ethernet port on both controllers. The port on Controller 1 is connected to the top circle ACP port in IO Module A in Stack 1. Then we daisy chain like that going circle-square circle-square all the way down to the bottom of the stack. The bottom circle Ethernet port on IO Module A in Stack 1 is connected to the top square port in IO Module B in the same stack. We daisy chain like that going circle-square circle-square all the way down to the bottom of the stack again for IOM B. We then connect the bottom circle ACP port in IO Module B in Stack 1 to the top square ACP port in IO Module A in Stack 2, and daisy chain connections through IO Module A and IO Module B again. Finally, the bottom circle ACP port in IO Module B in Stack 2 is connected to an Ethernet in Controller 2. (Phew!)
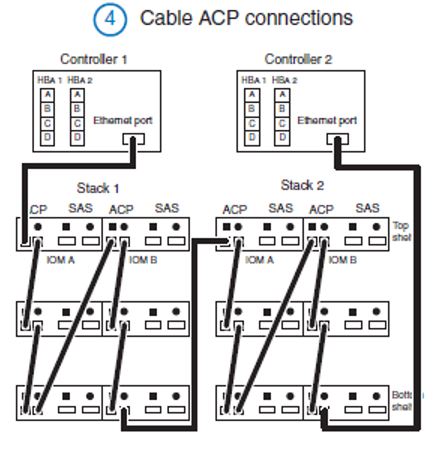
NetApp Disk Shelf Cabling Stage 4
Cabling Instructions
As usual the NetApp documentation is really good. To find instructions for your particular configuration, log into the NetApp support website and go to the A to Z index:
https://mysupport.netapp.com/documentation/productsatoz/index.html
Under ‘F’ in the index you’ll find the Setup and Installation Guides for the different models of FAS controller. They’re very concise four page long guides which show how to do the initial physical setup of the system including the network connections as well as the disk shelves.
There’s also an excellent free Universal AFF and FAS Installation course by NetApp.
Other Resources
DS2246 Disk Shelf Installation and Setup
DS4243, DS2246, DS4486, and DS4246 Disk Shelf Installation and Service Guide
The Zerowait video library has some great videos on disk shelf field maintenance
Click Here to get my 'NetApp ONTAP 9 Storage Complete' training course.