In this Cisco CCNA training tutorial, you’ll learn how to advertise routes in BGP (including the differences in the way the “network” statement is used and the “null route” trick). Scroll down for the video and also text tutorial.
This is the 4th in a series of BGP tutorials.
Part 1: Why We Need BGP
Part 2: BGP Routing and Path Selection for Service Providers
Part 3: Configuring BGP Neighbors on Cisco Routers
Advertising BGP Routes on Cisco Routers Video Tutorial

Makhu Padmanabhi

I have subscribed to >30 best seller courses on various areas of IT/Software and Neil is by far the BEST instructor of all. His response rate to questions is unbeatable, answers are always to the maximum depth with lot of real-world examples. Networking is one of the toughest areas of IT and Neil makes it sound very easy because of his expertise in subject and friendly teaching habits. Do not even think twice for signing up to any of his courses, worth the money.
The Network Command Works Differently for BGP than It Does for IGPs.
The “network” command works differently for BGP than it does for IGPs (RIP OSPF, EIGRP and ISIS). In IGPs, the “network” command means:
- Enable the routing protocol (start sending out and listening for multicast hellos to discover peer routers and form adjacencies with them) on all interfaces that have an IP address that falls within the specified range in the network command, and
- Advertise the network prefixes configured on those interfaces to all adjacent routers.
RIP works a little differently from the other IGPs in that it does not form adjacencies with other RIP routers on the same subnet (it just sends out the advertisements), but other than that the operation is the same.
Let's work through an example:
An OSPF router has interface GigabitEthernet0/0 with IP address 10.0.0.1/24 and interface GigabitEthernet 0/1 with IP address 10.0.1.1/24.
Under the OSPF routing process we enter the command:
network 10.0.0.0 0.255.255.255 area 0
10.0.0.1/24 and 10.0.1.1/24 both fall under the 10.0.0.0/8 we used in the network statement, so OSPF will be enabled on both interfaces and the router will attempt to form adjacencies on both of them. The 10.0.0.1/24 and 10.0.1.1/24 networks will be advertised to all adjacent OSPF routers. 10.0.0.0/8 will NOT be advertised, even though it was used in the network command.
The way the network command works is not intuitive but very important to understand.
In BPG the “network” command actually does have the more intuitive meaning of just 'advertise this network.’ There is no 'enabling BGP on an interface'. BGP uses targeted unicast TCP sessions to form peers based on your “neighbor” statements, it does not use multicast Hellos. So, the network command does not mean 'turn on BGP on an interface.' BGP doesn't work at the interface level. A network statement simply means 'advertise this network.'
BGP Network Command Example
Right now, we have all our BGP neighbors configured, but we are not actually advertising any networks. If we enter “show ip bgp summary”, we'll see that BGP is working and everything is up, but we're not advertising any IP addresses anywhere. To get our router to advertise, we need to use the “network” command.

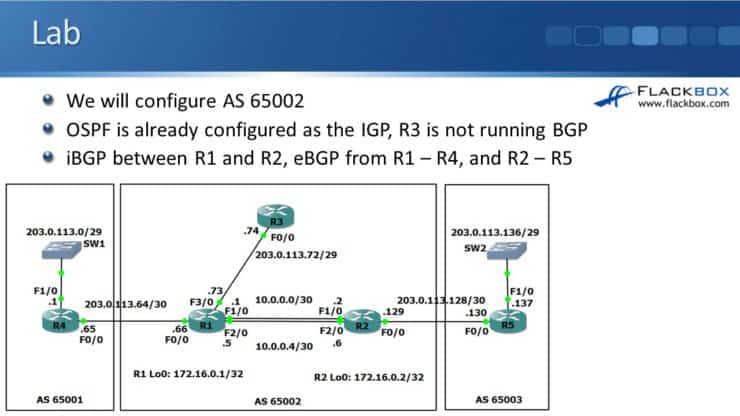
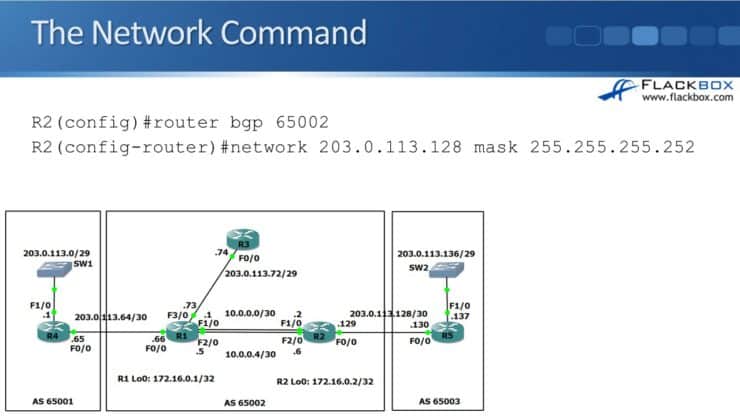
To configure R1, we want to advertise the 203.0.113.64 network, which is going to R4, and also the 203.0.113.72 network, which is going towards R3. R1 is connected to both of those, and we want everywhere in our topology to know about those networks. This is configured under global BGP, so we enter “router BGP 65002”. Then “network 203.0.113.64” followed by “mask 255 255 255.252”, which is a /30 subnet going to R4. Then we enter “network 203.0.113.72 mask 255.255.255.248”, which is the /29 network going to R3.
You Must Include the Word ‘Mask’ in BGP Network Statements
Notice the 'mask' keyword in the middle of the command. It is very easy to forget to include this. Static routes look quite similar - we add 'IP route', then the prefix, then the mask, then where we were going to send the traffic. For example:
ip route 192.168.10.0 255.255.255.0 10.0.0.2
We don’t include the keyword 'mask' in the middle with static routes. However, the “network” command will fail in BGP if you forget to include it. If you enter a “network” statement in BGP and you get an error message, most likely it is because you forgot to include 'mask' in the middle of the command.
So we entered the network commands on R1. We also need to advertise the 203.0.113.128 network on R2. When we enter network statements, those networks will be advertised to all of the BGP peers. Then those BGP peers will advertise it to their peers as well. This is how we propagate the networks everywhere, so everywhere knows how to route to everywhere else.
The Route in the Network Statement Will Only Be Advertised by BGP If There Is An Exact Match in the Routing Table
The route in the network statement will only be advertised by BGP if there is an exact match in the routing table. For example, say you have a router with these IP addresses on its different interfaces:
203.0.113.1/30
203.0.113.5/30
203.0.113.9/30 etc. on multiple more interfaces.
Unlike with an IGP, you cannot just advertise all of them in BGP in one go by entering “network 203.0.113.0 mask 255.255.255.0”.
The networks on the router interfaces are all in its routing table as individual routes with a /30 mask. There is no route to 203.0.113.0/24 in the routing table.
Whenever you configure a network statement for BGP, there must be an exact match (network and subnet mask) for that network statement in your routing table or BGP will ignore the command. It will not give you an error message - it will just ignore the command and not advertise the route.
So in our example, we would have to add separate network statements for each of the router interfaces:
network 203.0.113.0 mask 255.255.255.252
network 203.0.113.0 mask 255.255.255.252
network 203.0.113.0 mask 255.255.255.252
etc. for the rest of the interfaces.
If we did want to advertise those networks with a single command rather than configuring them individually, we can do a little trick to get 203.0.113.0/24 into the routing table. The way we do that is by configuring a static route going to null0.
The BGP Null Route Trick
A null route means 'drop this traffic.' One reason to use a null route is for security, but you can also use it for this trick for BGP.
Here's the configuration we use for our example:
ip route 203.0.113.0 255.255.255.0 null0
router bgp 65002
network 203.0.113.0 mask 255.255.255.252
The first time people see this, they always think "wait I don't want to do that, it's going to drop all of my traffic going to those networks!” But it won't actually drop the traffic. Let see why by looking at the routing table...
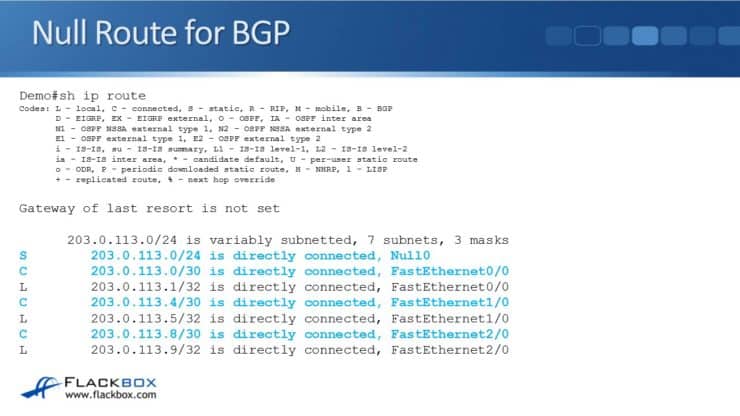
We have the /30 networks configured on our interfaces and we've also entered the static route with the /24 mask going to Null0. If we look in the routing table, we've still got the routes on the directly connected interfaces and we've got the static route with the “Null0” there as well because they are not exactly the same.
Now what's going happen is this: Say that traffic comes into this router with a destination address of 203.0.113.1. That would match our connected route (203.0.113.0/30), and it would also match our static route (203.0.113.0/24). /30 is a more specific route than the /24, it's a longer match, so the traffic will be sent out the /30 interface. Traffic is not going to get dropped.
Using the null0 route gets the summary of the addresses that match your BGP network statement into the routing table. Once you've done this you can enter the network statement for 203.0.113.0/24 in BGP, and BGP will advertise that network.
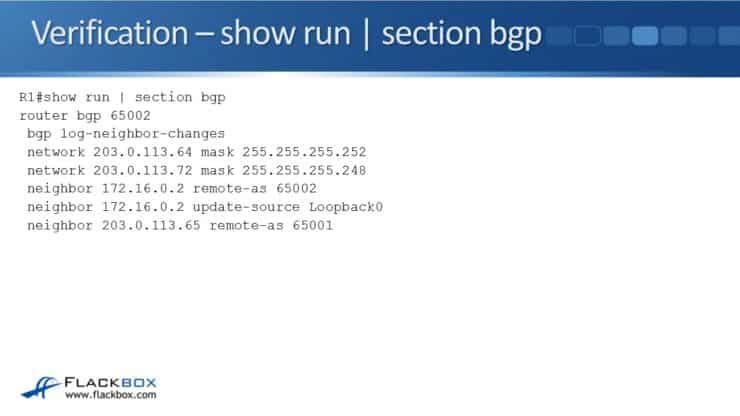
Once we have everything configured, to see all of our BGP commands in one place we can enter “show run | section bgp”. This is shown for R1 in the screenshot above.
“bgp log-neighbor-changes” is a default command. Whenever a BGP neighbor goes up or down it will be logged.
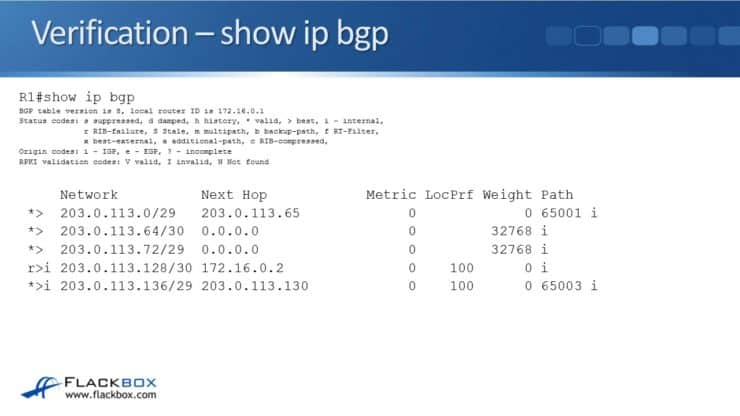
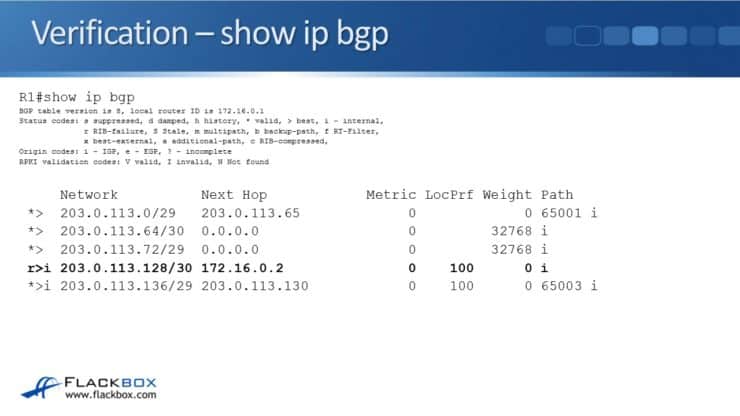
Once everything is configured, we want to make sure that we are sending out and receiving routes from BGP. The command for that is simply 'show ip bgp' with no keywords at the end of the command. In this example, we can see we have 5 different routes that are in BGP.
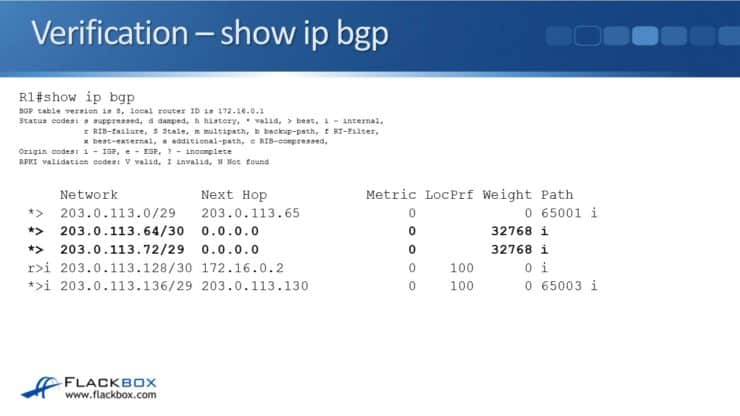
Let's go through these different routes... For 203.0.113.64 and 203.0.113.72, we see the next hop is 0.0.0.0. This means that the router is advertising them itself. There's a network statement on this router for those two networks.
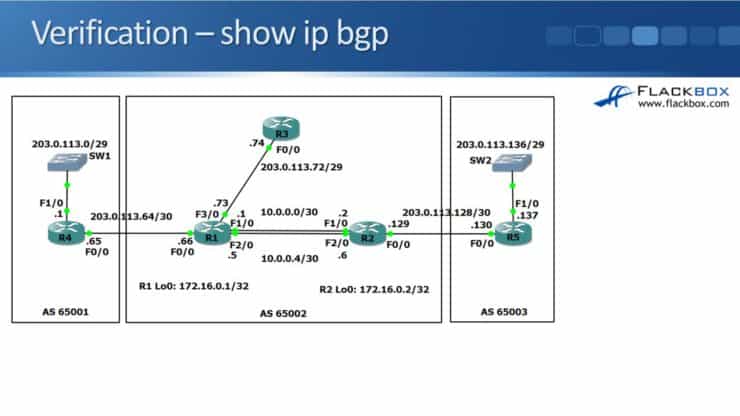
203.0.113.64 and 203.0.113.72 are on R1. You can see that 203.0.113.72 is the direct link going to R3 and 203.0.113.64 is the direct link going to R4 that was configured as network statements in BGP.
Next, we have the route to 203.0.113.128 with the next hop of 172.16.0.2. That is the link going from R2 to R5. On BGP in R2, we configured the network statement for that link. It's also being advertised on R2 in the OSPF route as well, so R1 already knew about it. The OSPF route will go into the routing tables on other routers as OSPF has a better Administrative Distance than BGP.
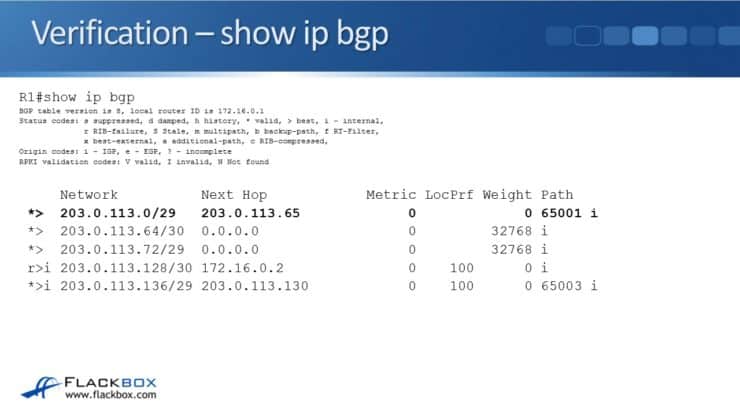
Then we have 203.0.113.0, with the next hop of 203.0.113.65. That is the route that was advertised from R4. R1 learns that it can get to 203.0.113.0 via R4.
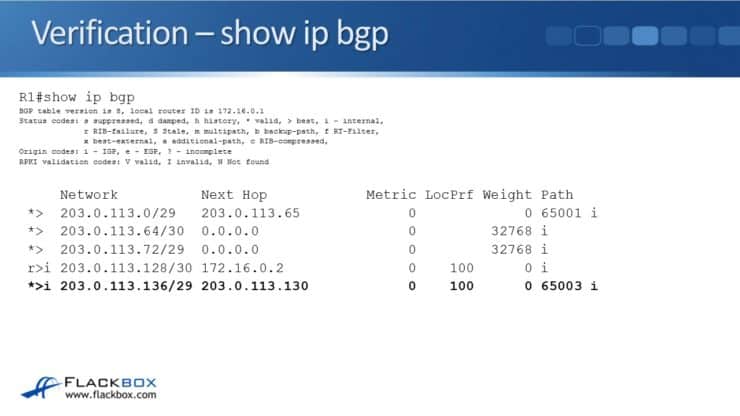
And lastly, we have 203.0.113.136 with the next hop of 203.0.113.130. That was the route that was advertised from R5 to R2, so it has a next hop of 203.0.113.130. R2 then passes that information on to R1 as well.
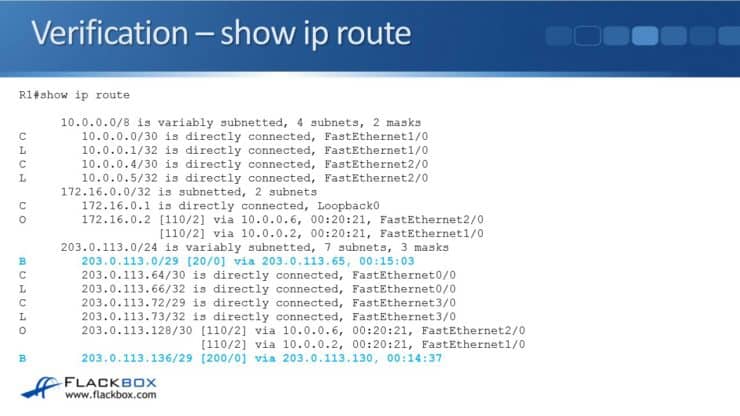
If we now enter “show ip route” on R1 we can see that we have routes to all networks. For all routes in the same AS, they're either connected or learned from OSPF. For the two external networks behind R4 and behind R5, we can see that routes have been learned from BGP and they have been inserted into the routing table.
Additional Resources
Troubleshooting When BGP Routes Are Not Advertised from Cisco
How to Advertise Networks in BGP
Text by John Rallison. Need your audio transcriptions or other work edited into stellar written English? Visit johnrallison.com