In this NetApp tutorial, you’ll learn about ONTAP licensing. I’ll explain how the licensing works, the available different license types, and show you how to configure it in both the System Manager GUI and the command line. Scroll down for the video and also the text tutorial.
NetApp Licensing Video Tutorial
Charles Lawton

Just completed NetApp Storage training! I found the instructor Neil Anderson to be amazing. He’s extremely competent, has spent time in the industry, and knows the platform very well. He colors the materials with some real world examples, which is always helpful to understand the differences between doing something in the lab and doing it in the real world.
I manage several NetApp arrays, and found myself going to the real platform to see how we’ve implemented the concepts presented here. Very happy I picked up this course!
Software Licenses
On the slide here, you can see the different licenses that come bundled with the system and the other licenses that you have to get separately. With the current version of ONTAP and the current models of controllers, you can see all of these features and software up at the top are included with the ONTAP software.
You do not have to license these separately, so I won’t bore you by reading them all out. Instead, you can see this yourself.
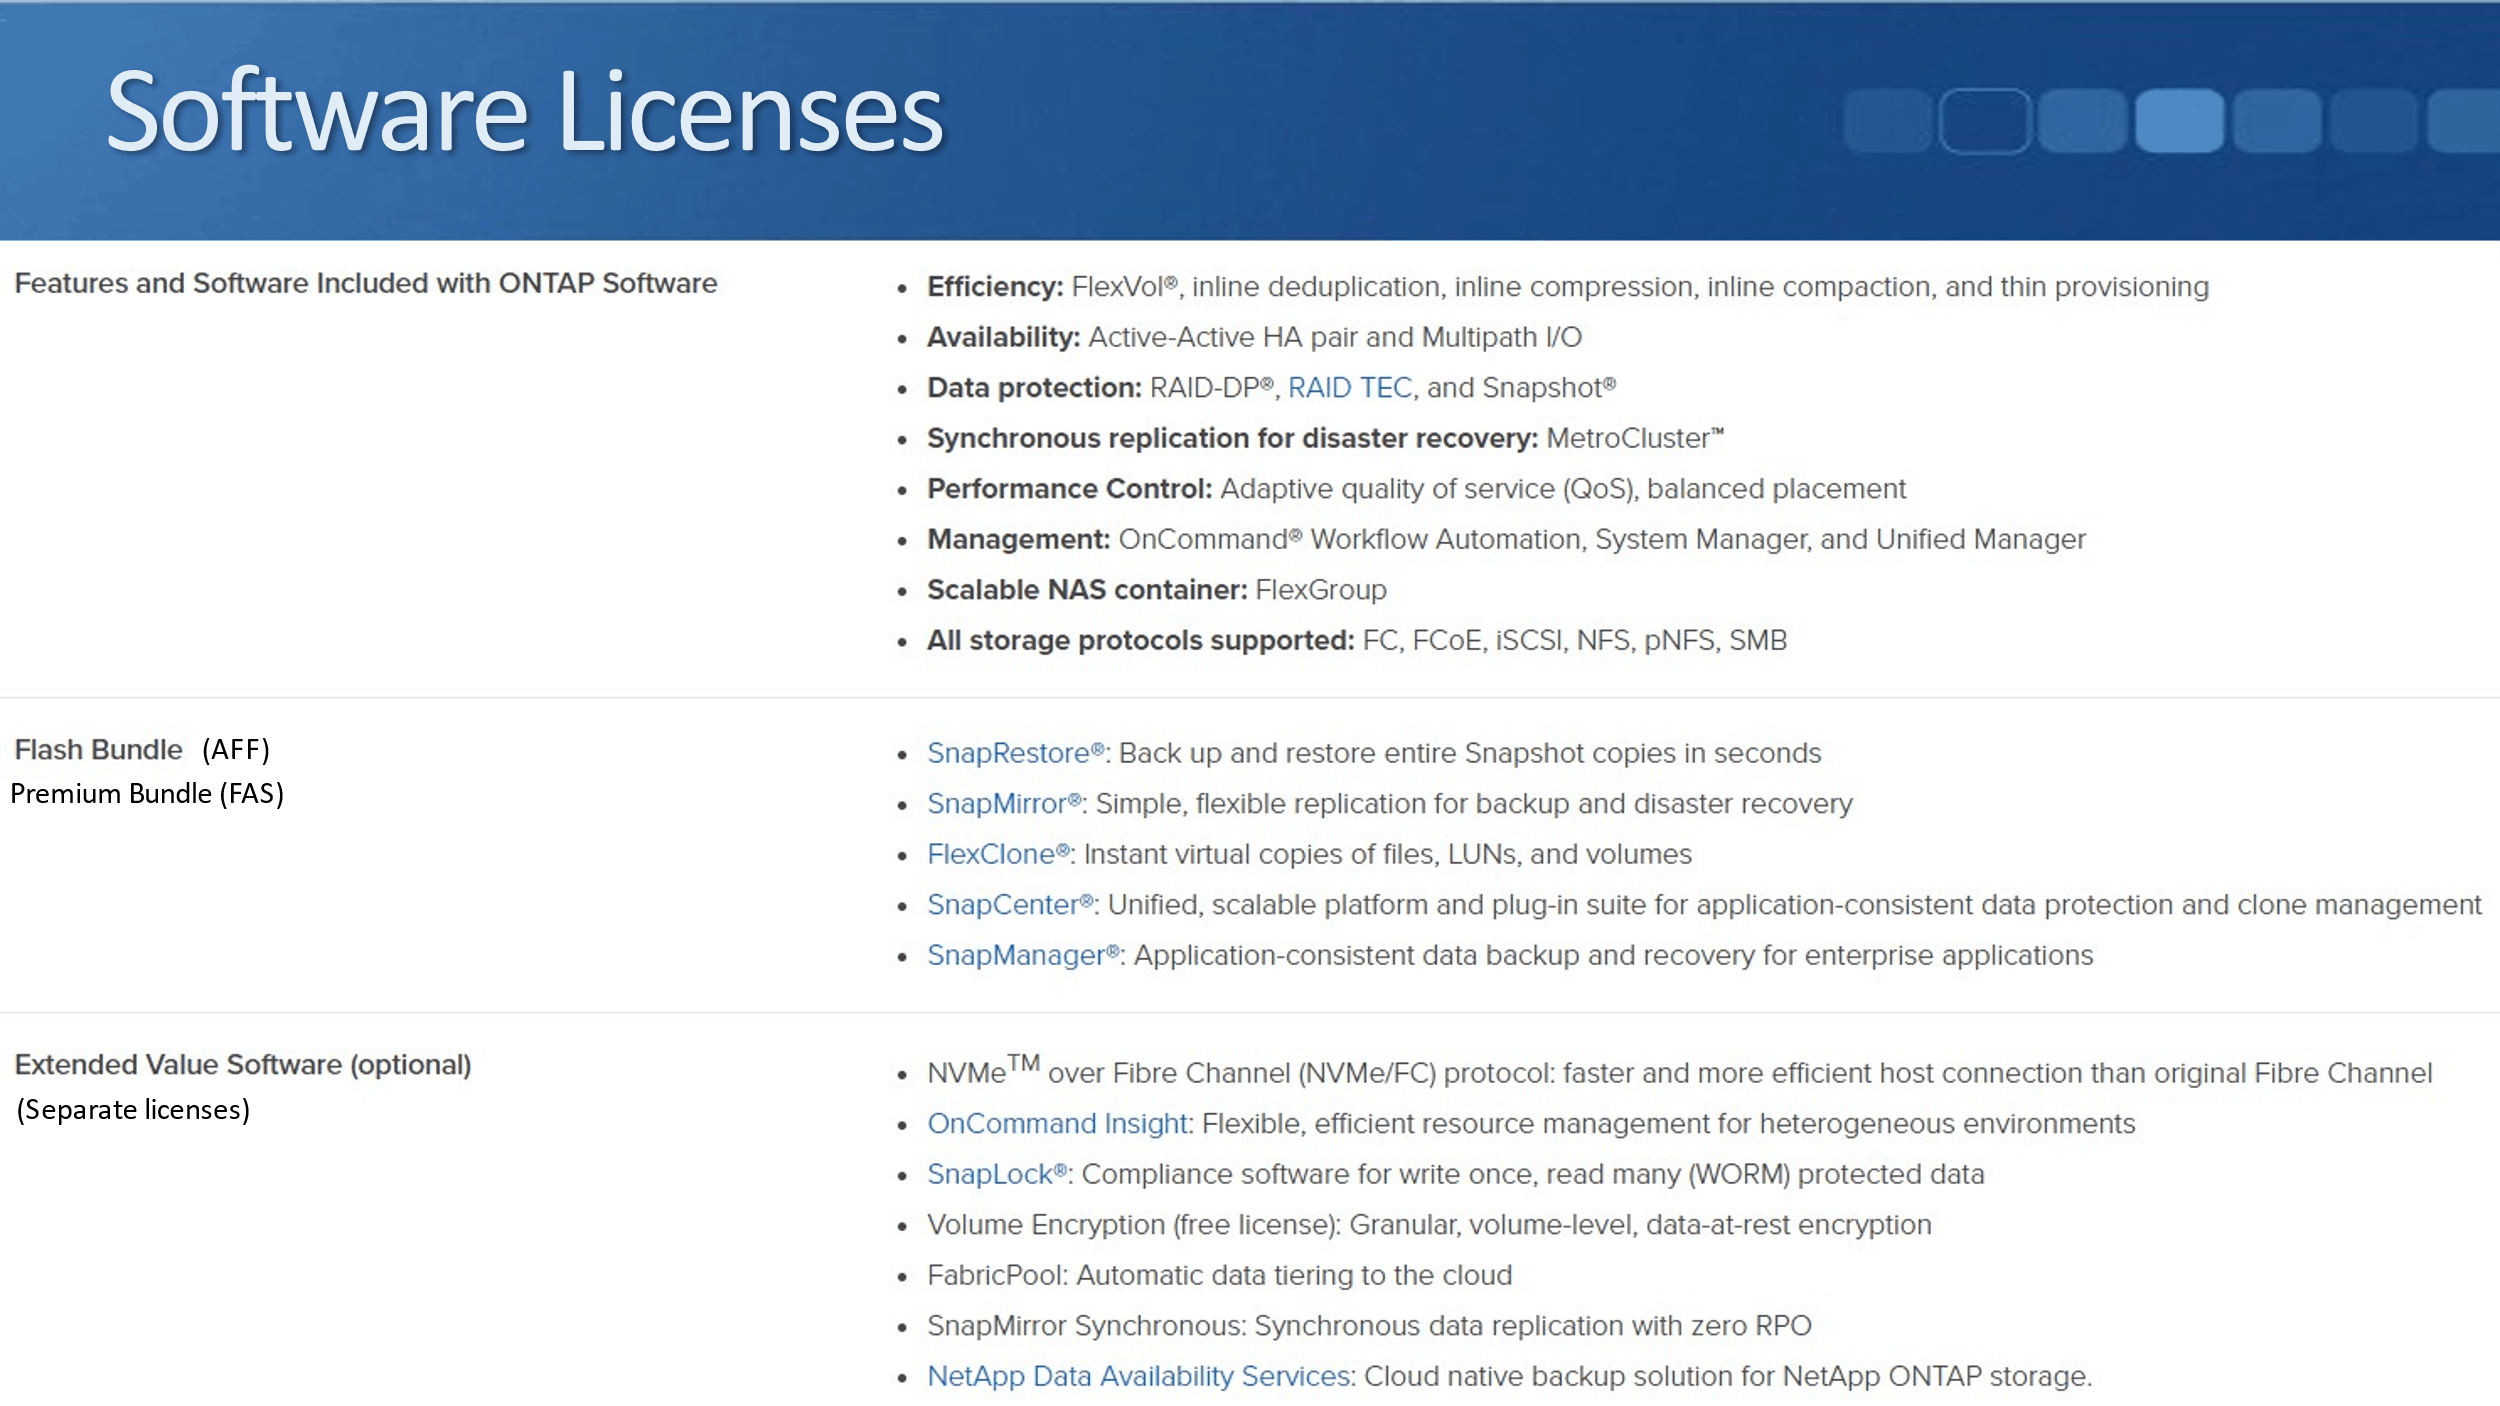
Then in the middle section here, there’s a couple of bundles which are licenses that you have to purchase separately. If you’re on an AFF system, this is known as a Flash Bundle. If you’re on a FAS system, it’s known as a Premium Bundle.
So you buy this as a bundle, and then that gives you a license for SnapRestore, SnapMirror, FlexClone, SnapCenter, and SnapManager.
Finally, there are other features that you have to license separately. They’re enlisted down here at the bottom. Again, I’m not going to bore you by reading out the entire list of everything. You can see this for yourself.
Where you find it on the NetApp website, let me show you that. I’ll just go to the NetApp website to find the current information, go to Products, and then choose either the AFF or the FAS here.
I’ll go to the AFF page, and then when this opens, I’m going to click on Software. Then, scroll down a little bit further, and there you go. That’s the Software Features. That’s exactly what I was just showing you on the slide.
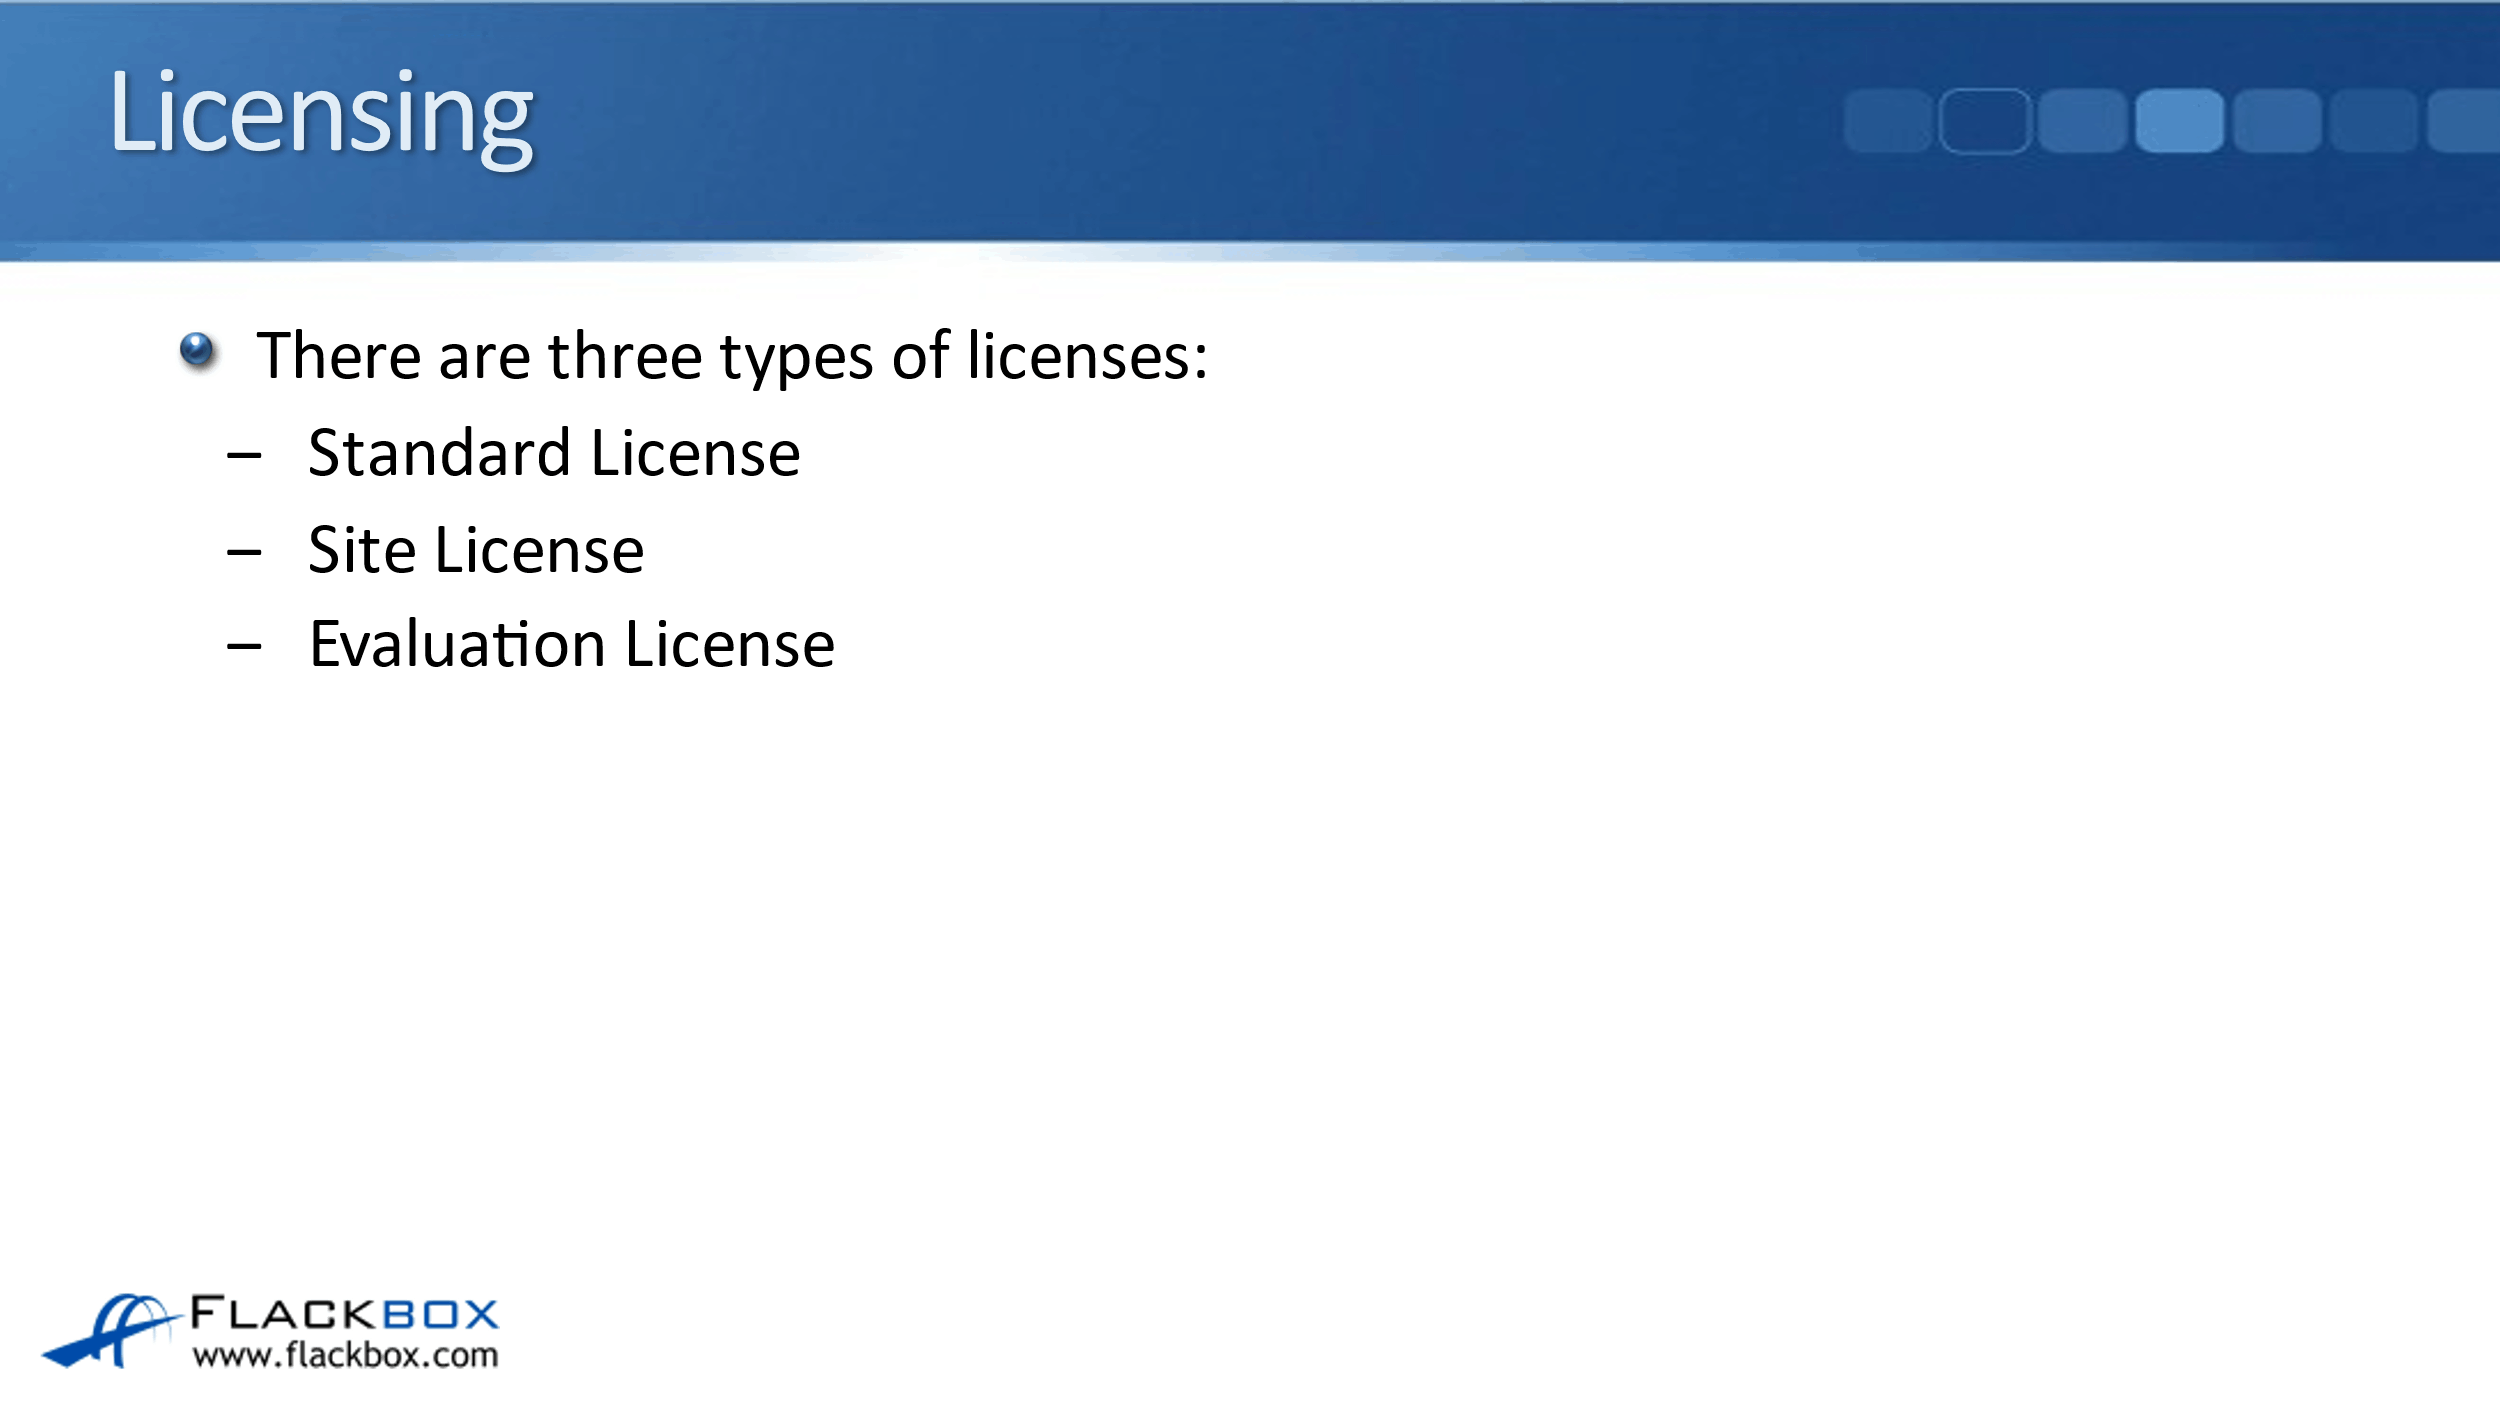
Licensing
There are three types of licenses available. First, there’s the standard license, which is also known as the node-locked license. When we’re talking about licensing in general, we’re going to be using the standard licenses. These are by far the most commonly used. Another couple of types available are the site license and the evaluation license.
Standard License
Let’s talk about the differences between them. So, the first one was the standard license. As I said, it is also known as a node-locked license. It’s known as a node-locked license because you need a license on every node in your cluster, and that license is tied to the serial number of the node.
So when you get this feature, when you purchase the license, you have to tell NetApp what the serial number is, and they’ll generate a license for you, which is tied to that particular serial number. It just prevents people from using the licenses on other systems that they weren’t intended for.
If a node leaves a cluster, it takes the license with it because it is tied to its particular serial number. The feature will be available as long as at least one node in the cluster has the license.
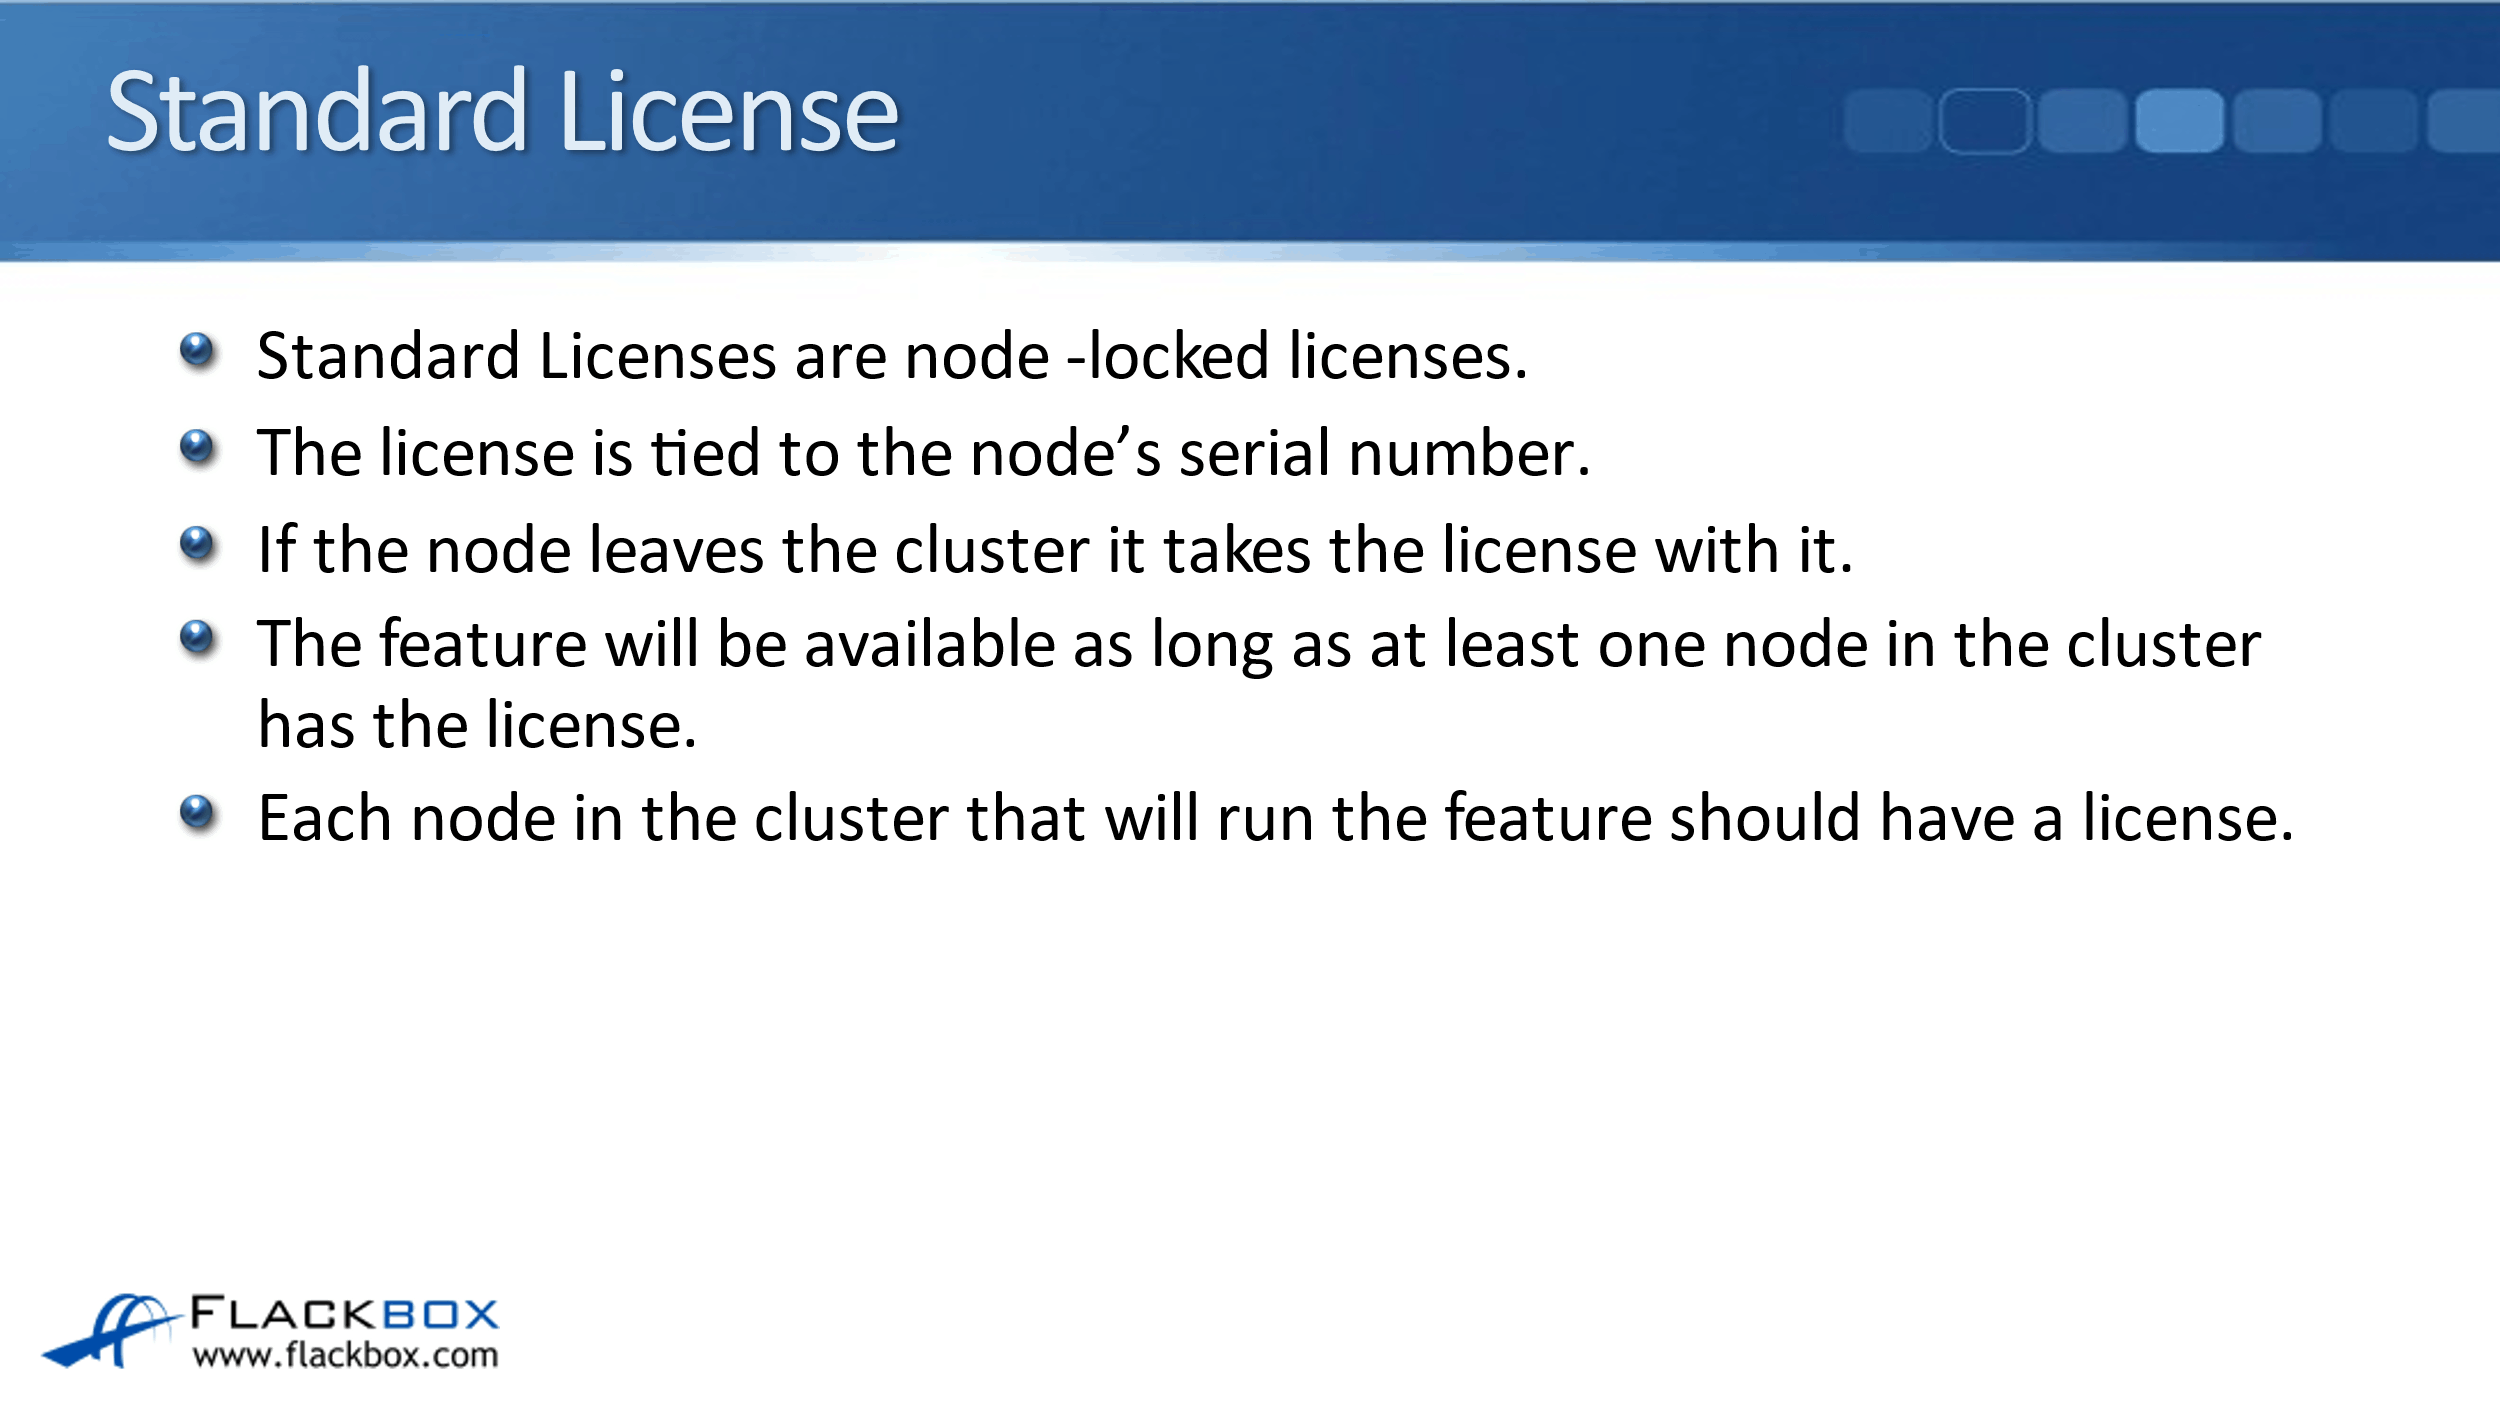
For example, let’s say that you are going to license SnapMirror, and you’ve got eight nodes in your cluster. Well, as soon as you add a license for any node in that cluster, then the feature will be available throughout the entire cluster.
So that will work, but to remain legal, to remain in compliance, you need to license it for every single node in the cluster, not just for one. So it will work as soon as you license one, but you need to license all the nodes in the cluster.
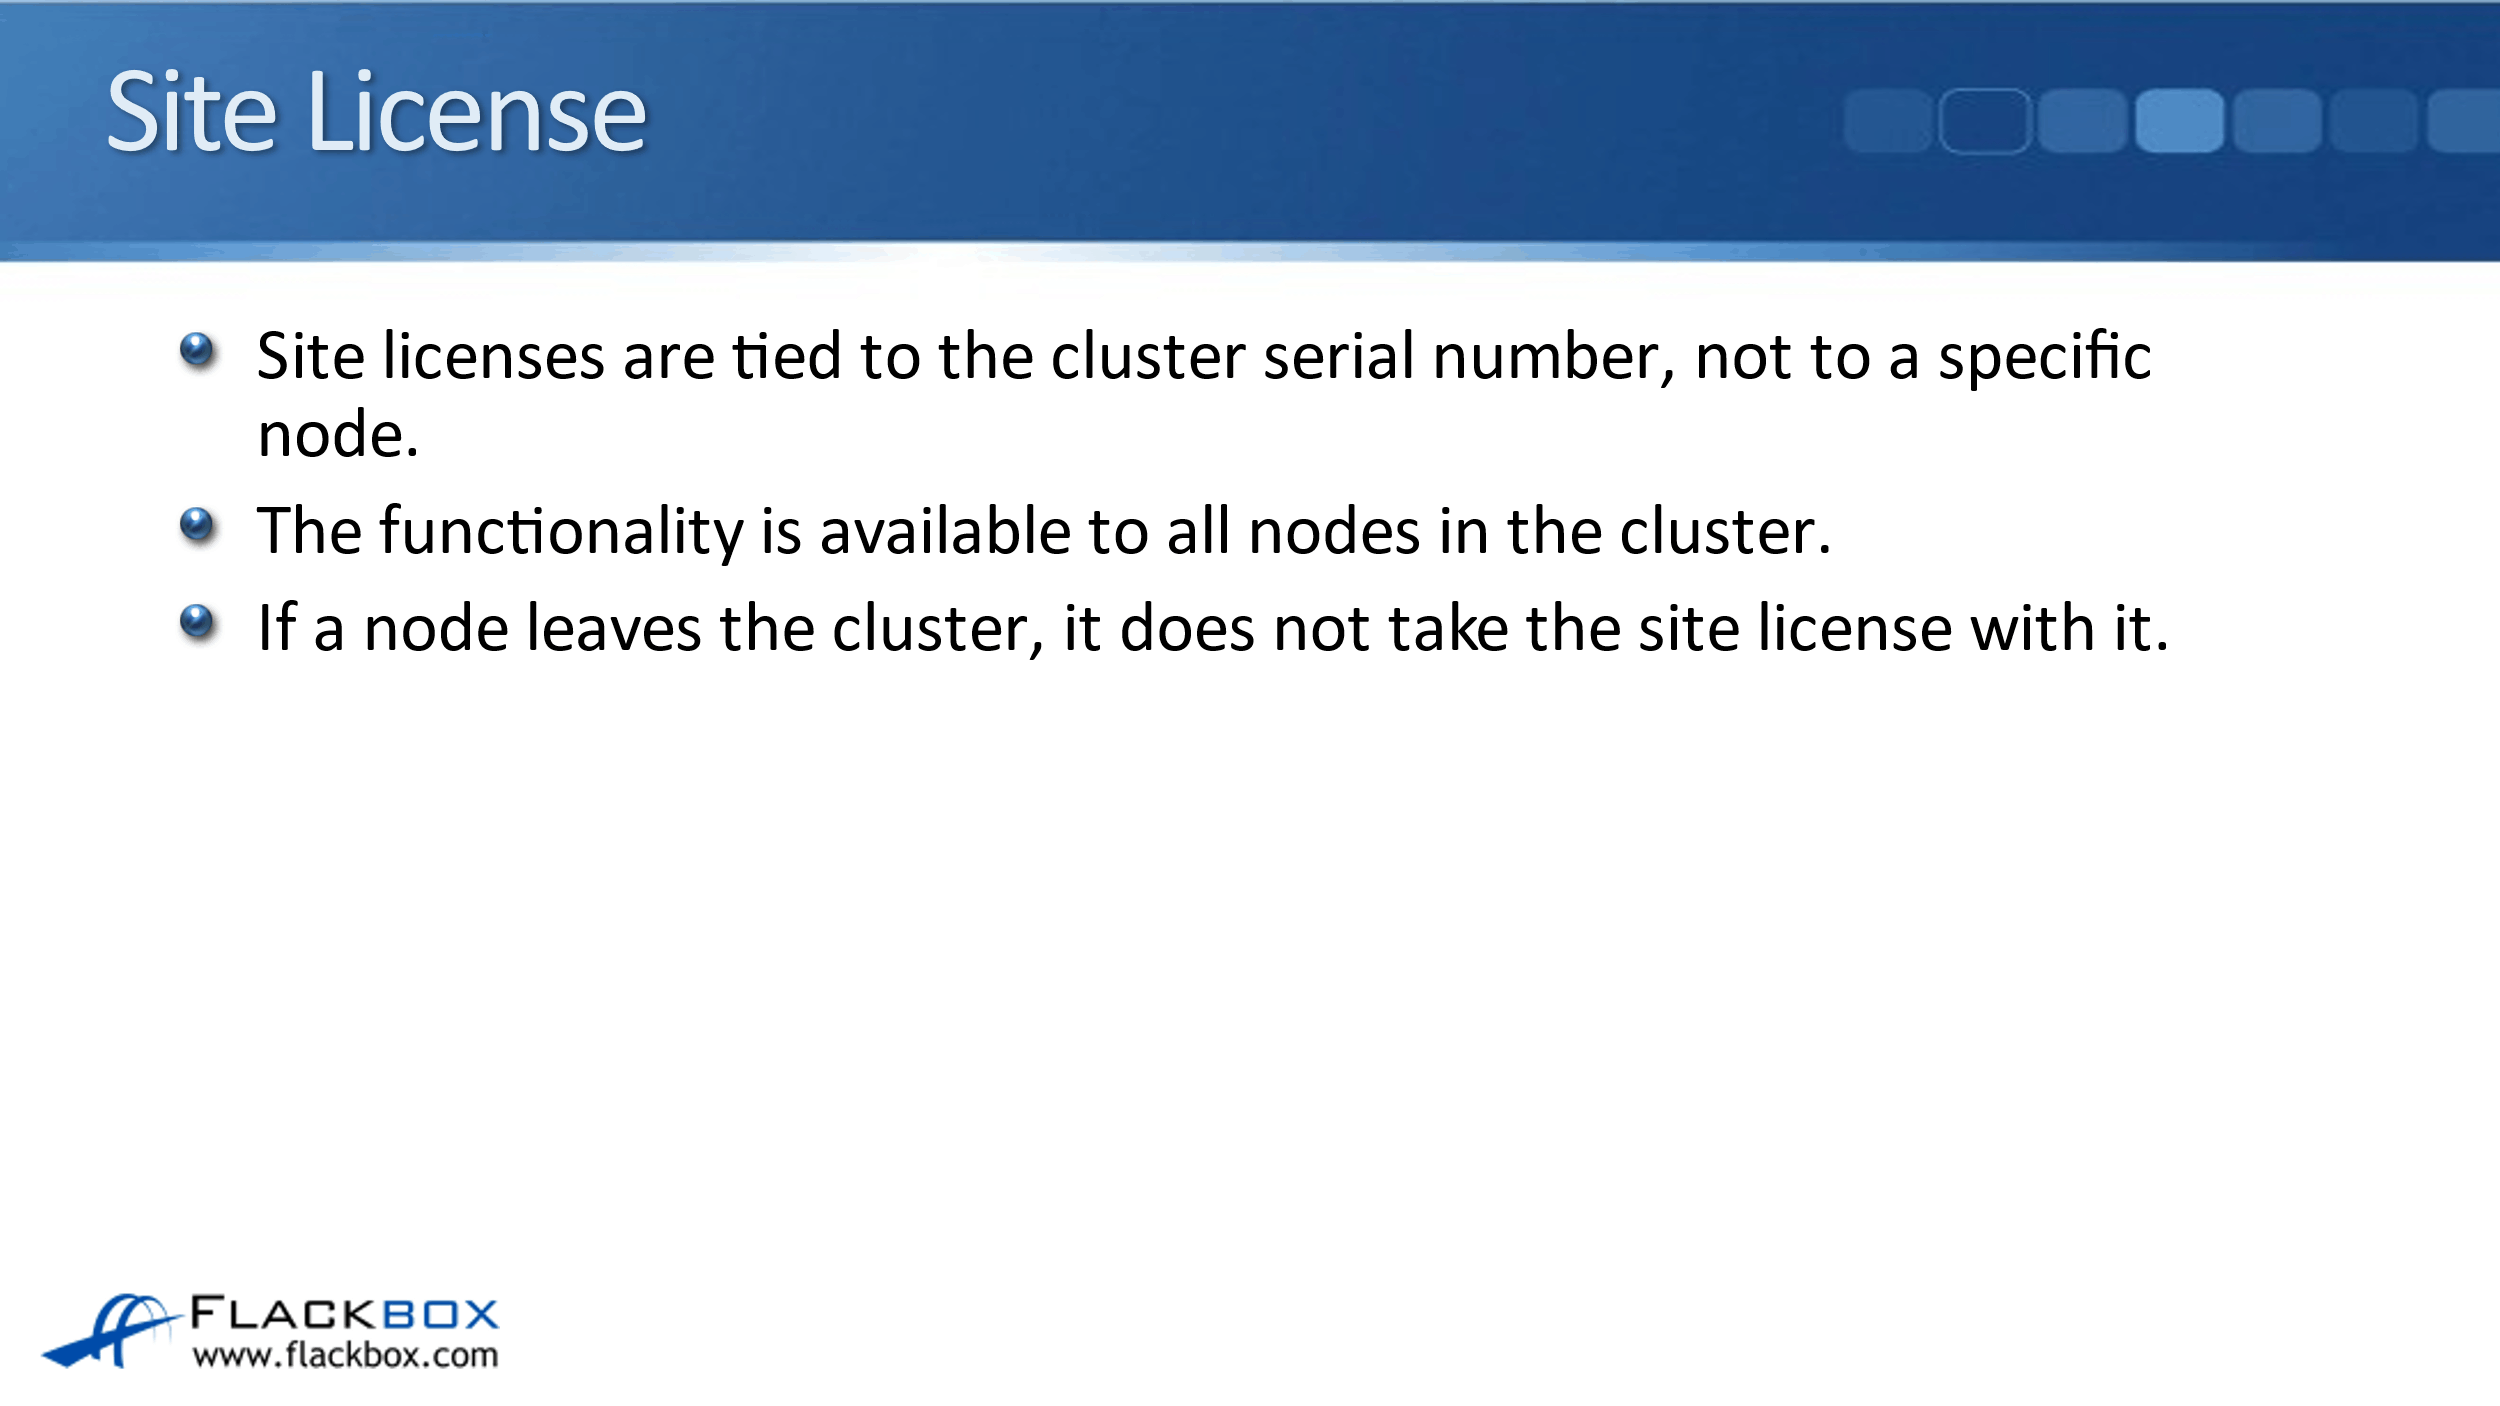
Site License
The next type is the site license. This is tied to the cluster rather than a node serial number. The functionality is available to all nodes in the cluster, so your licensing at the cluster level. If a node leaves the cluster, it does not take the site license with it because this is a cluster-level license, not commonly used.
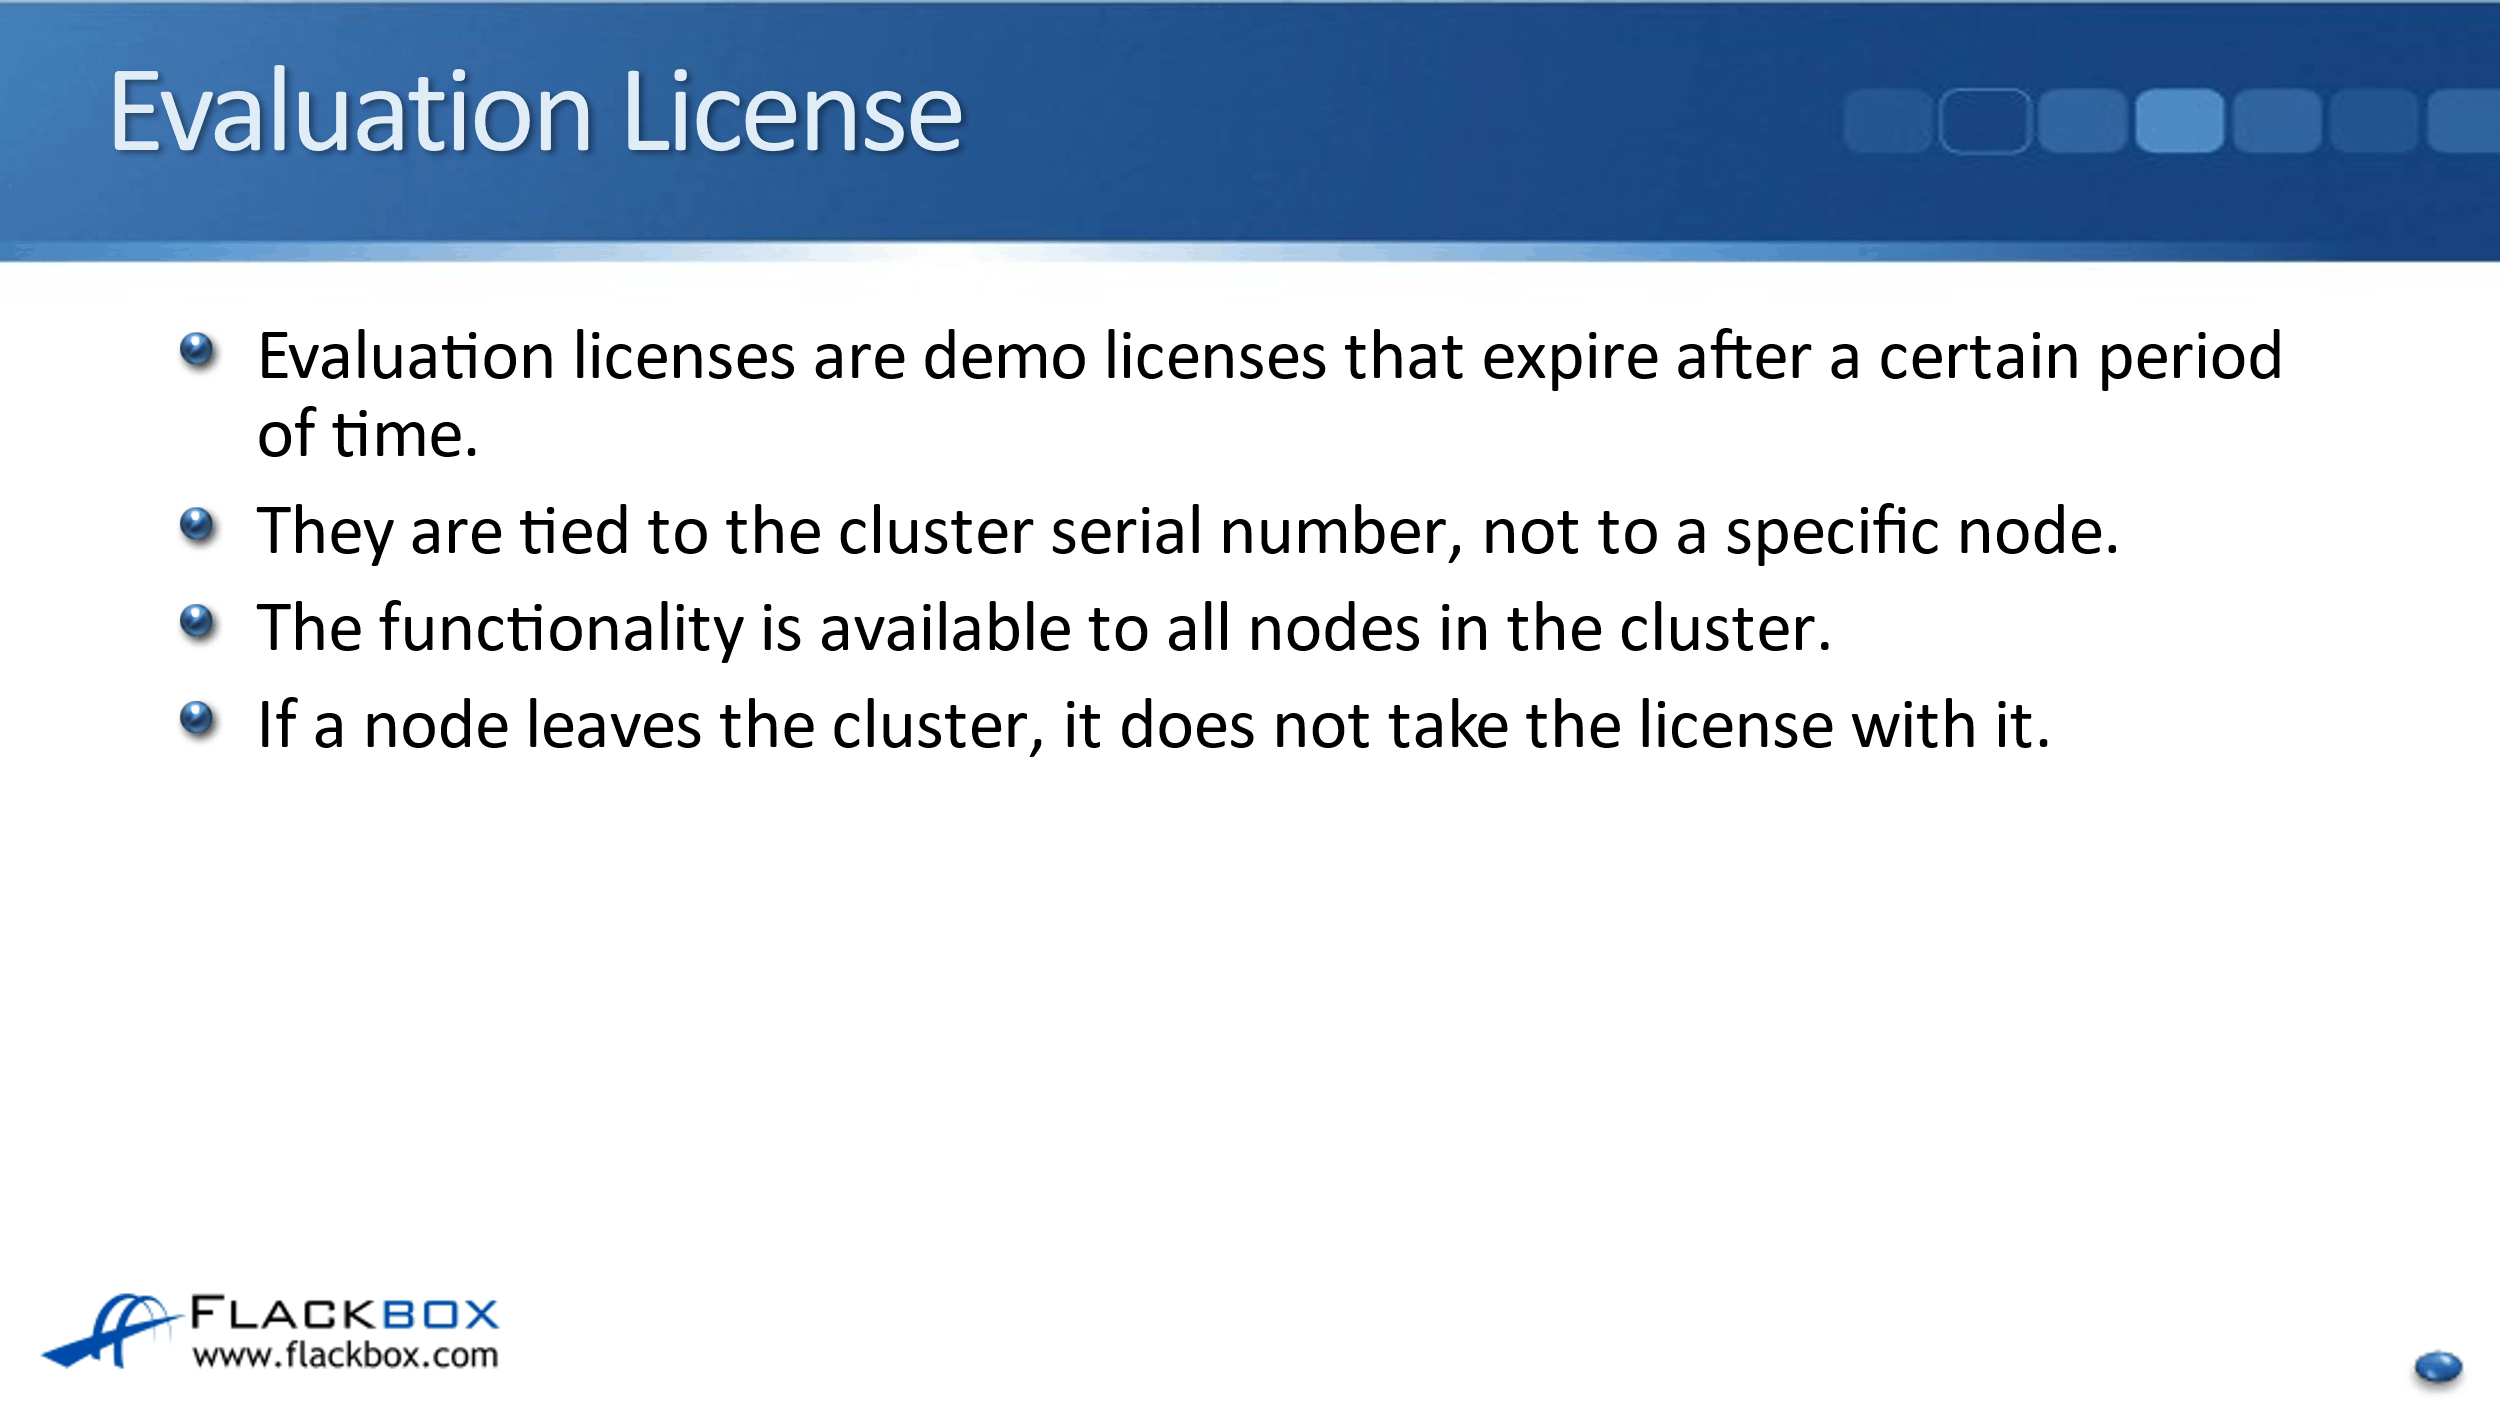
Evaluation License
The last type of license is the evaluation license, which has got a pretty self-explanatory name. This is if you’re evaluating a particular feature before you actually purchase it. So they’re demo licenses, and these expire after a certain period of time.
Just like the site licenses, these are also tied to the cluster serial number rather than to a specific node. The functionality is available to all nodes in the cluster. If a node leaves the cluster, it doesn’t take the license with it.
So, those are the three types. Normally, you’ll be using the standard node-locked license. Let’s have a look at how to configure licensing in the lab. I’ll show you on the command line first. I’ll open up PuTTy, and I’m going to go to the cluster management address on Cluster 1.
I’ll log in as admin ad my password, when I get prompted, is flackbox1. The main directory for licensing is conveniently called license. So I will type in license. That takes me to the system license directory. I’ll hit the question mark to see the available commands, and we’ll walk through these.
So the first one is add, to add a license. So let’s do that, I’ve got Notepad open here. I’m working on a simulator, this has got the list of the licenses for the simulator. I am working in VMware Workstation, not ESXi. So this is important when you are working with a simulator, do not use these licenses here for the ESX build because the ESX build uses a different serial number.
They’re not going to work when you’re running the simulator in VMware Workstation. So I’m going to scroll down a bit further to the non-ESX build, and I’ll just pick a license here. Let’s go for NFS. I will highlight that and copy it, and then go back to PuTTy. Add and right-click to paste that license in, hit enter, and it tells me that the license for package NFS was installed successfully.
Let’s look at some of these other commands now to check it. So I can use show to view my licenses. In there, I can see I’ve got my cluster base license, which is added by default now anyway. Also, there is my NFS license for this particular serial number.
So, right now, if I try to configure NFS on my cluster, it would work because I’ve got it licensed on at least one node in the cluster. But I’m not legal right now. I’m not compliant. I also need to license it on my other node as well. We can check that if I go entitlement-risk show.
I can see that for NFS, the entitlement risk is medium because I need to acquire a node-locked license, and it shows me that node 1-02 is currently not licensed. So it’s only licensed on node 1. It also lists all my other features here as well. If I scroll down, I would see that they are not licensed.
Let’s go back up to the main license folder. Again, hit the question mark to see our other available commands. I can also do a show-status as well, which will give me quite similar information. This shows me the different licenses that are available and wherever they’re licensed or not.
I can see right now that the NFS is partially installed because the license is missing on cluster 1-02. So, let’s fix that. I will go back to the Notepad file again with the licenses in it, and get the license for my second node for NFS, copy that, go back to PuTTy and say add and paste in that license.
I can see that it was installed successfully. And if I now hit my up arrow to get show-status again, I’ll see that NFS is no longer partially installed. It is now valid. And if I do the entitlement-risk show, I’ll also see there now that the entitlement risk is just low now, and I don’t have any nodes without a node-locked license.
Let’s have a look and see what other commands were available in the license directory. So, capacity is a deprecated command. We don’t use that anymore. Clean-up, what this is for is say if you did have any evaluation licenses that were installed that are now past their expiry date. If you do a clean-up, that will remove them from the system.
Delete is self-explanatory, that will delete a license. You saw entitlement-risk already. You saw show as well. I think let’s do a show anyway, to see what’s in here. So, this again lists all of your licenses that have been added.
Show-aggregates and update-leases. What this is for is if you’re using ONTAP Select, it uses capacity-based licensing. Meaning, depending on how much space you want in the cluster, you have to pay more for that. So, it’s not valid for our FAS and AFF systems. But for ONTAP Select, this would show you how much capacity is being used and whether you’re compliant with your license or not.
Status is deprecated. That’s basically just the old way of doing the show status command. That was all the different commands in the license directory. You’ve seen how to view what is currently licensed, how to add licenses, and also how to see information about whether you’re compliant or not. So, that was at the command line.
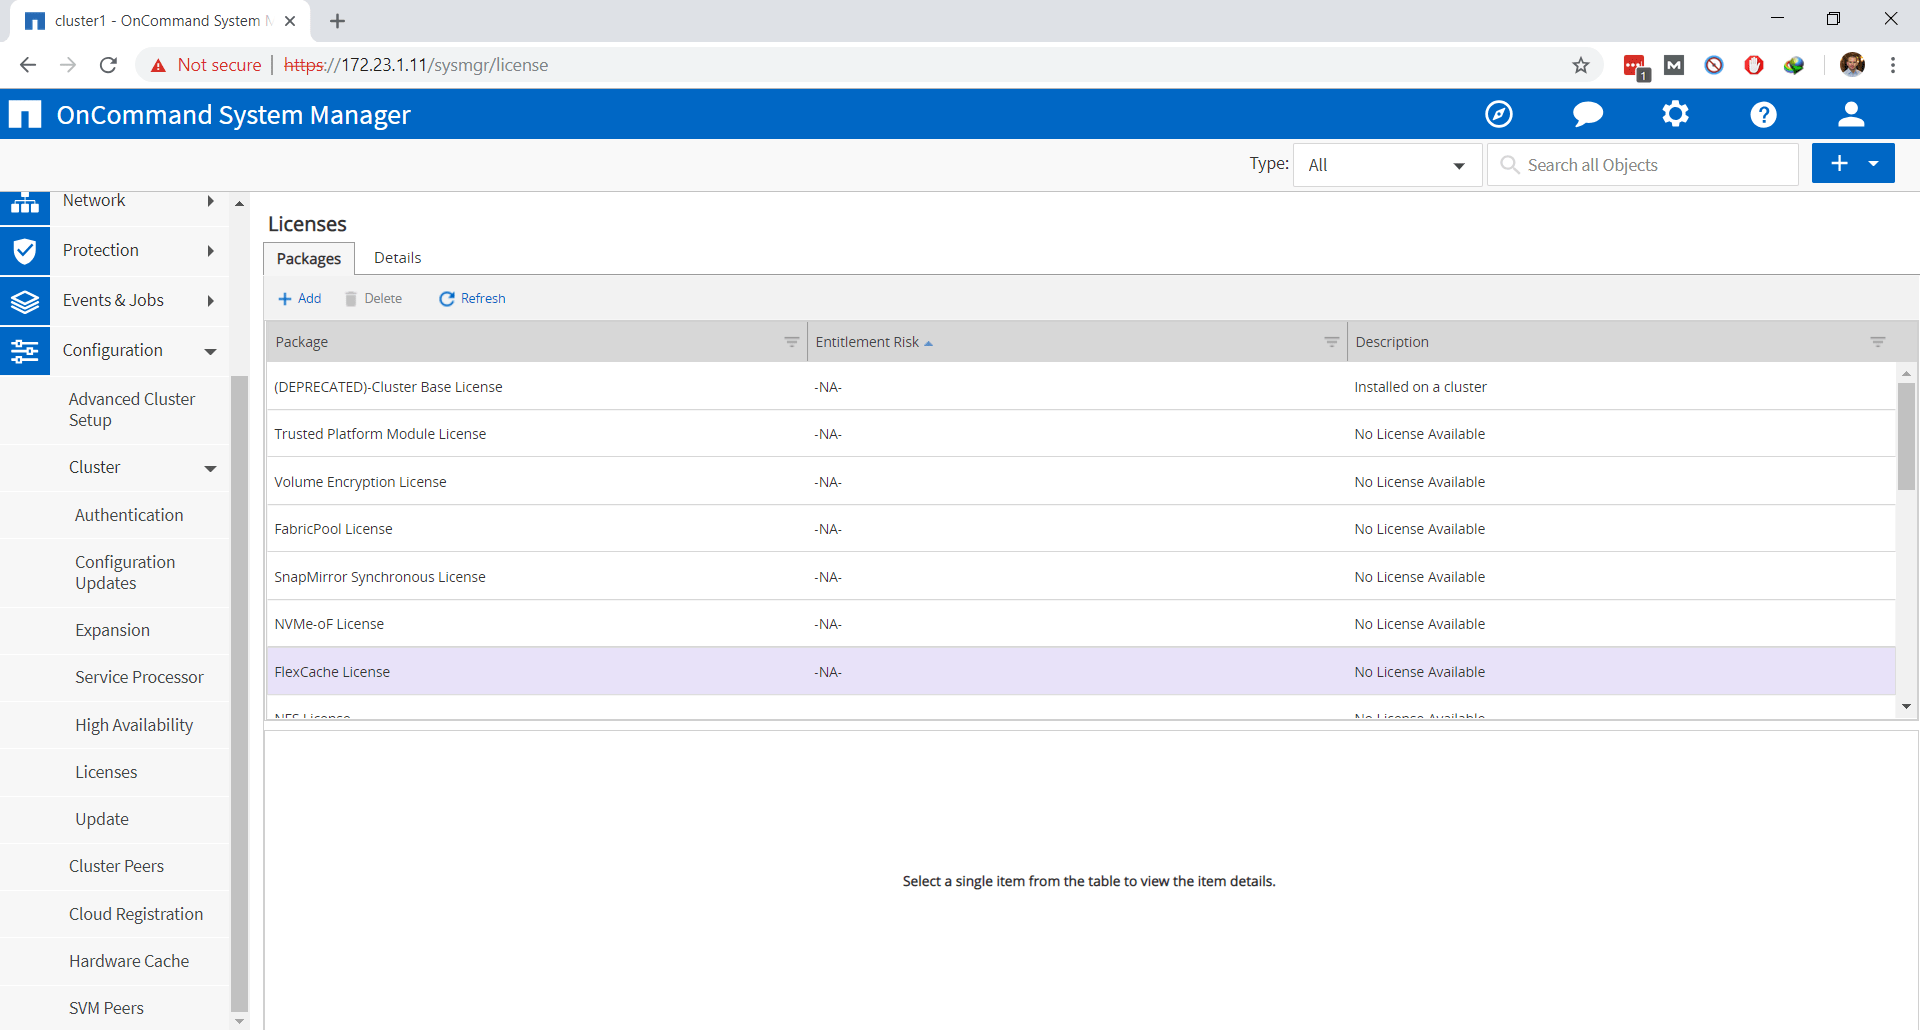
Finally, let’s do this in System Manager as well. So, I will go back to my browser, and I’ve got the login page for System Manager open here. I will enter my username and password and then Sign In. Here, I need to go to Configuration in the menu on the left and then expand Cluster, and then I can click on Licenses.
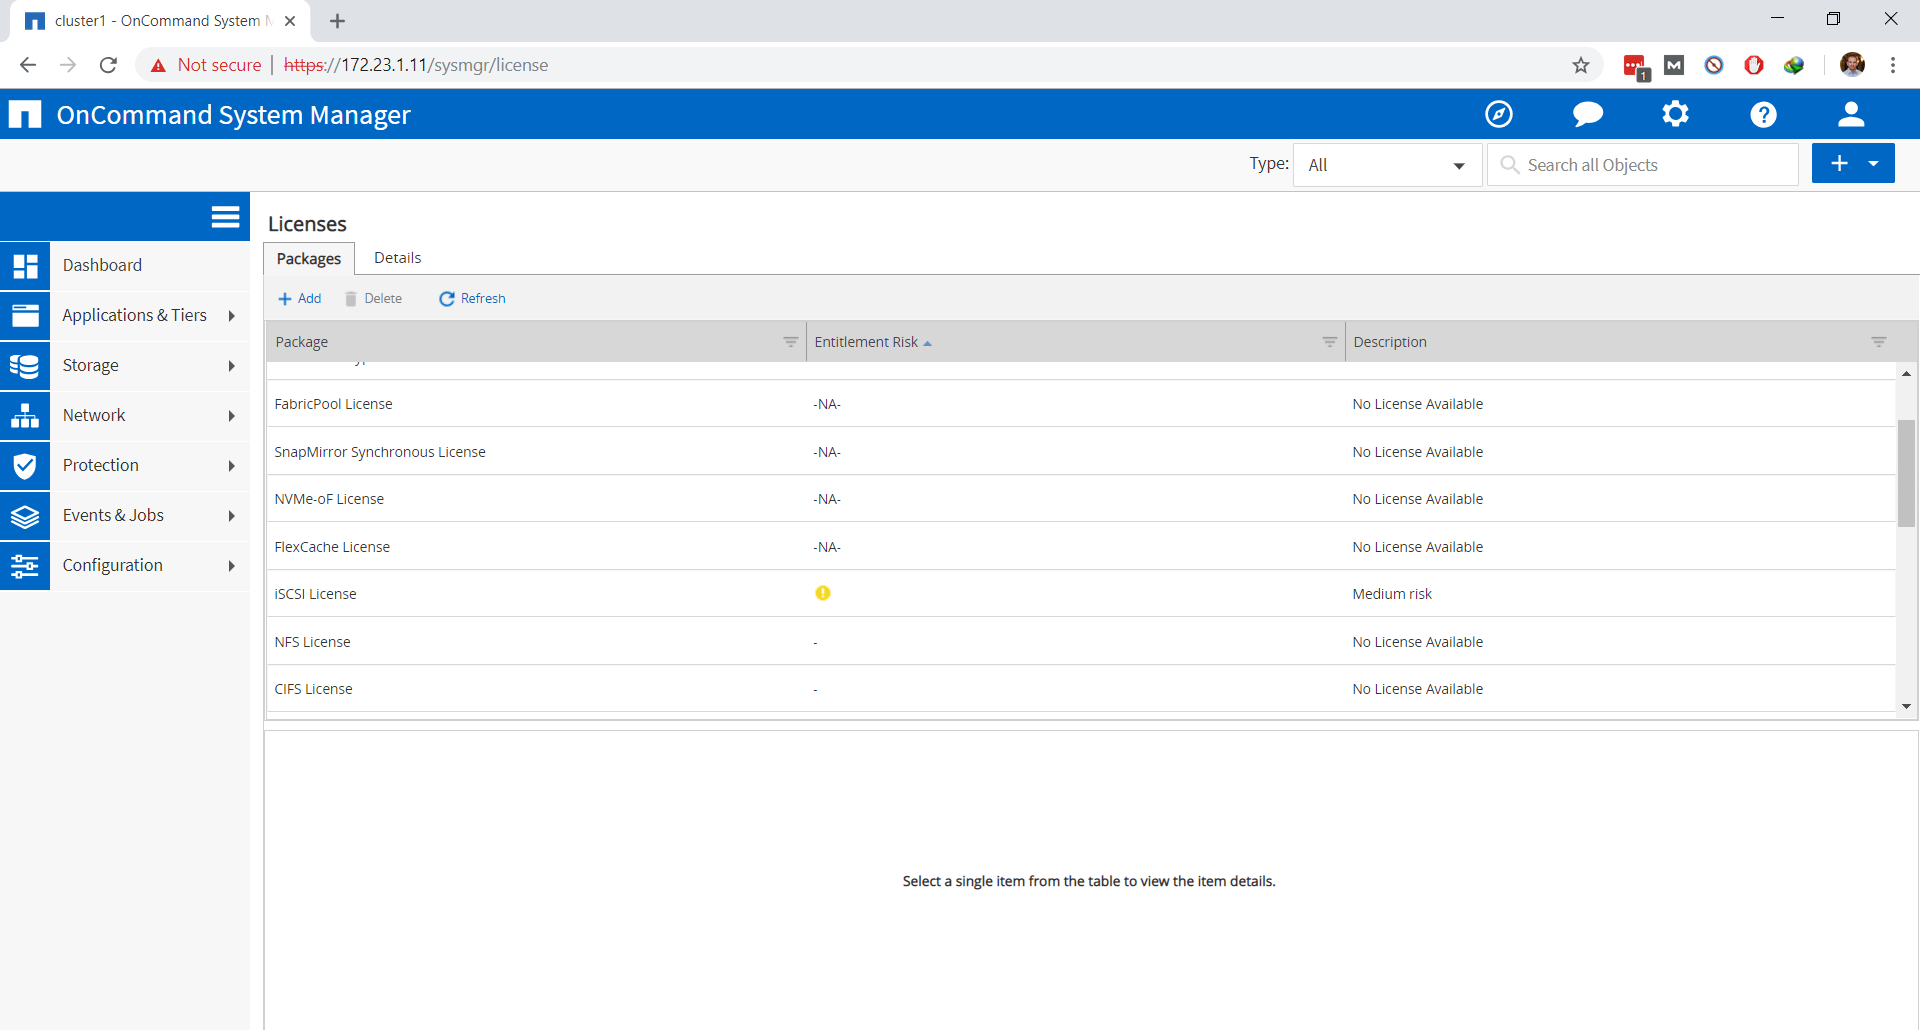
So, you’ll see here that NFS is already licensed because I just did that at the command line. I can see all of my other available licenses here, and I can see the status of all those. I can see that none of the other ones are licensed.
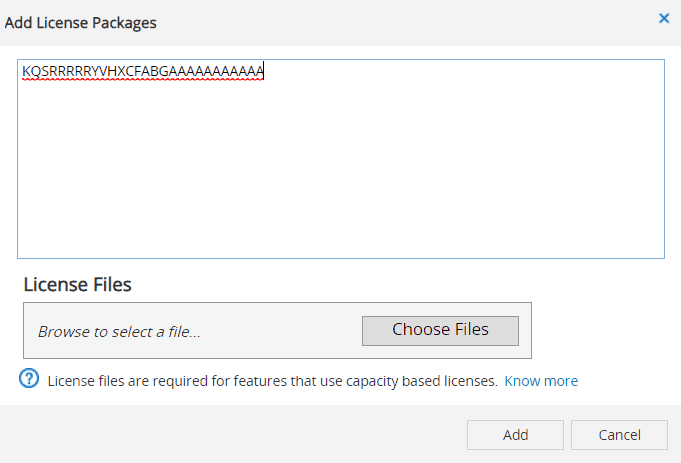
Let’s add a license in the GUI as well. So, I will click on Add. And then I’ll open up my Notepad file with my licenses again. And in here, let’s add iSCSI. So, I will copy the iSCSI license for my first node and then go back to System Manager and paste that in. Notice in here that I can add multiple licenses by comma separating them.
So I’ve pasted in the first license. I’ll enter a comma and a space and then go back to Notepad and get the iSCSI license for the second node and copy that. I could also copy all my other licenses while I was here as well. But I’m just going to license iSCSI for now while I’m doing this demo.
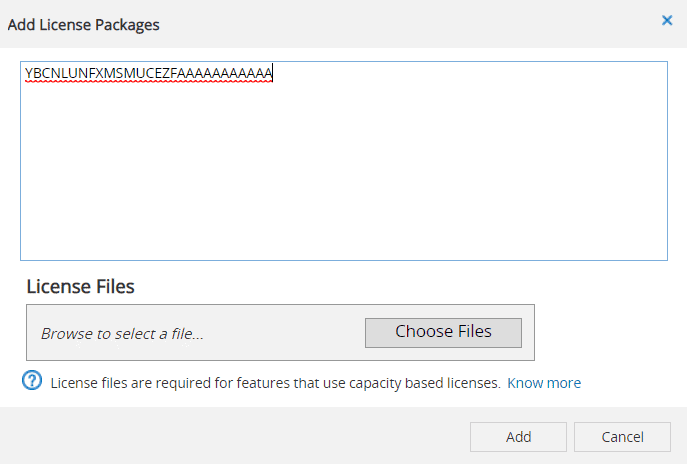
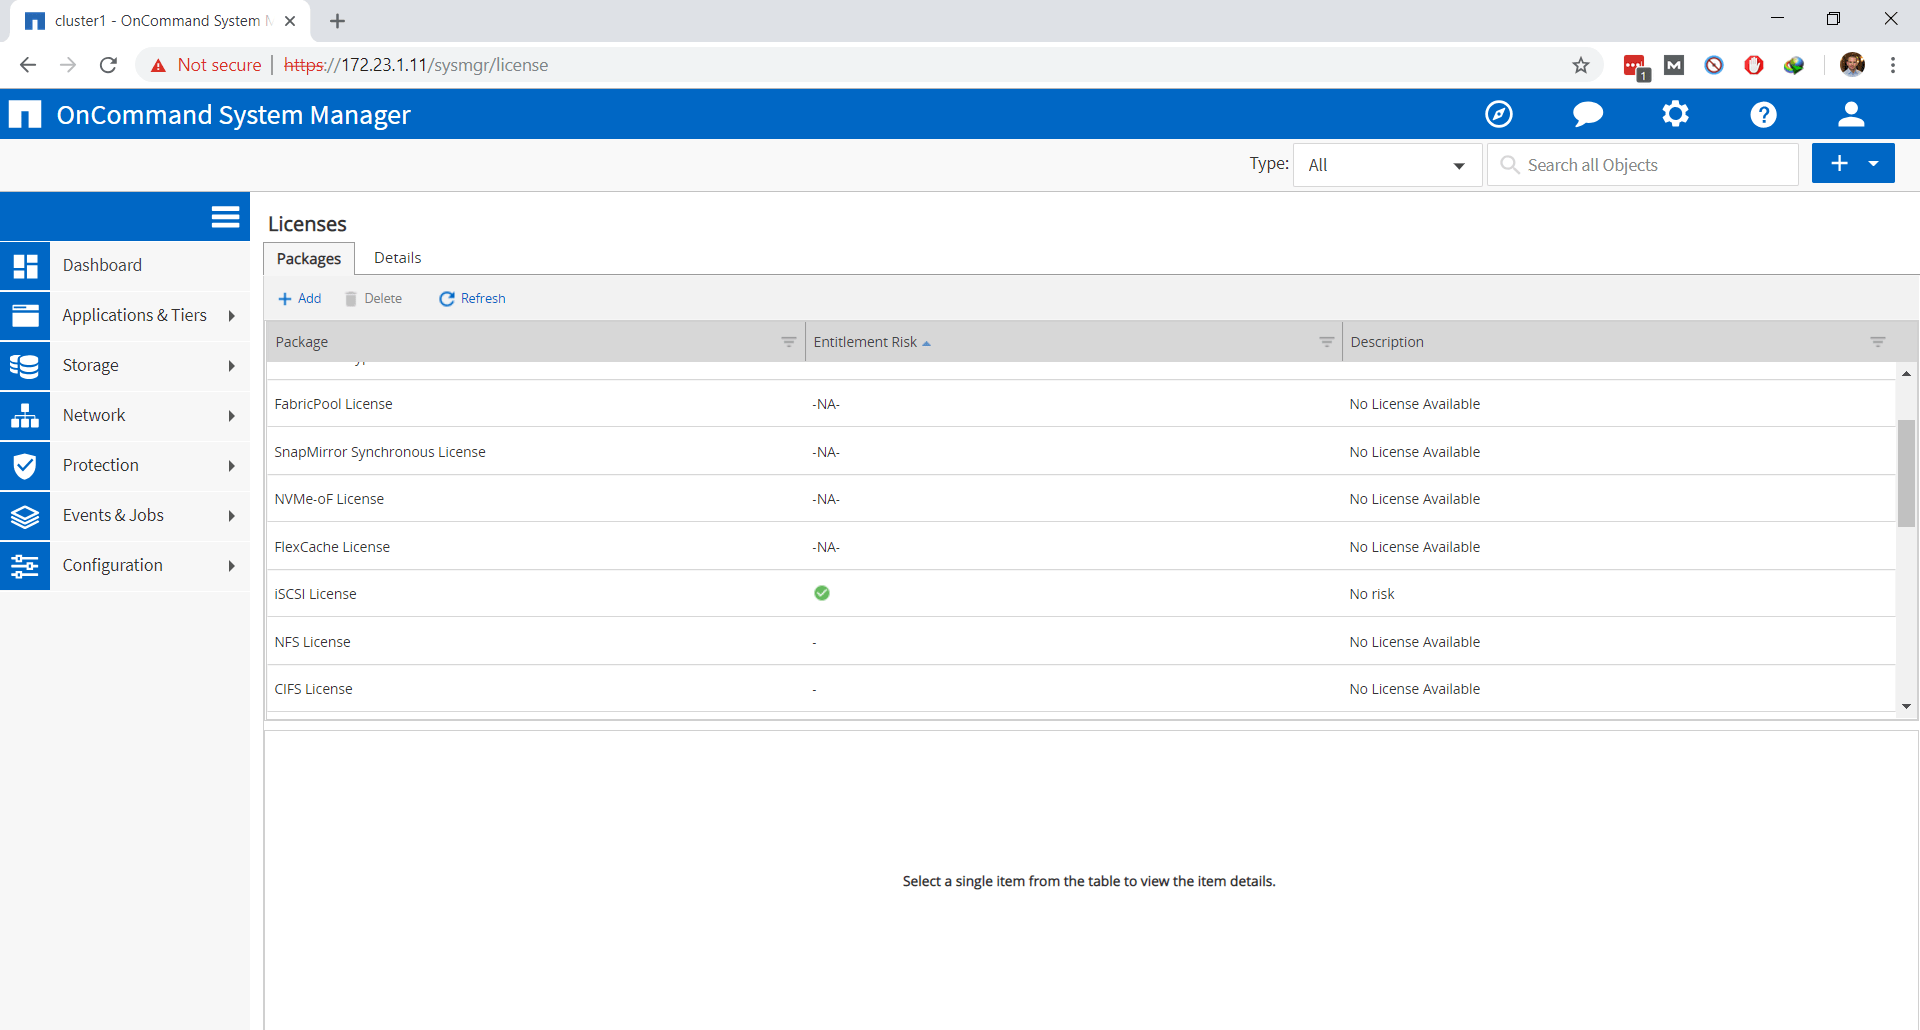
I’ll go back to System Manager, paste in the license for the second node and then click on Add. And I can see that the node-locked license for iSCSI is going to be licensed for both of my nodes now. If I scroll down a little, there I can see I’ve got the green check-mark for iSCSI.
I could also delete licenses from here if I wanted to. So I could select one, and then I could click on Delete here. Also, notice that if you click on one of your licenses in the bottom part of the window, it will update with further information about that. You can see your nodes, your serial number on there, and whether the feature is licensed or not. You can also see whether it’s being used in the previous week.
Obviously, iSCSI hasn’t because I’ve only just licensed it. So, I’m not seeing anything for usage in the last week. We can also click on the Details tab here as well. On there, it will list everything that I’ve gotten licensed on my cluster, and expiration date, etc.
NetApp Licensing Configuration Example
This configuration example is an excerpt from my ‘NetApp ONTAP 9 Complete’ course. Full configuration examples using both the CLI and System Manager GUI are available in the course.
Want to practice this configuration for free on your laptop? Download your free step-by-step guide ‘How to Build a NetApp ONTAP Lab for Free’
1. Open the ‘CMode_licenses_9.5.txt’ file you downloaded from the NetApp website to see the license codes to use with the simulator.
2. Add the iSCSI license for the C1N1 node only.
Open the ‘Configuration > Cluster > Licenses’ menu then click the ‘Add’ button.
Add the iSCSI license for the non-ESX build (not the ESX build, it has a different serial number and will not work) for the first node.
3. View the installed licenses to check it was added correctly.
4. Is the cluster compliant for iSCSI licensing now? Check this.
We can see the cluster is not compliant from the yellow warning symbol in the ‘Entitlement Risk’ column and the Medium Risk Description.
5. Ensure the cluster is compliant for iSCSI licensing.
Add the iSCSI license for the 2nd node.
Additional Resources
License Types and Licensed Method: https://docs.netapp.com/us-en/ontap/system-admin/license-types-licensed-method-concept.html
Managing Licenses: https://library.netapp.com/ecmdocs/ECMP1155684/html/GUID-1961CF41-8492-444C-9D10-8CACB1DC36DB.html
License Requirements: https://library.netapp.com/ecmdocs/ECMP1316376/html/GUID-24D1B830-E214-4D00-A0FD-2DFB623CA733.html
Libby Teofilo

Text by Libby Teofilo, Technical Writer at www.flackbox.com
Libby’s passion for technology drives her to constantly learn and share her insights. When she’s not immersed in the tech world, she’s either lost in a good book with a cup of coffee or out exploring on her next adventure. Always curious, always inspired.