In this NetApp tutorial, you’ll learn about the ONTAP boot-up process and we’ll have a quick lab demo where I’ll show you the system booting up. Scroll down for the video and also text tutorial.
NetApp The Bootup Process Video Tutorial
Harkirat Singh

I studied for around 30 hours before clearing the exam.
I was able to get all my doubts cleared. I always go through your training videos for NetApp whenever i want to clear my doubts again and again and to revise concepts in a short span of time.
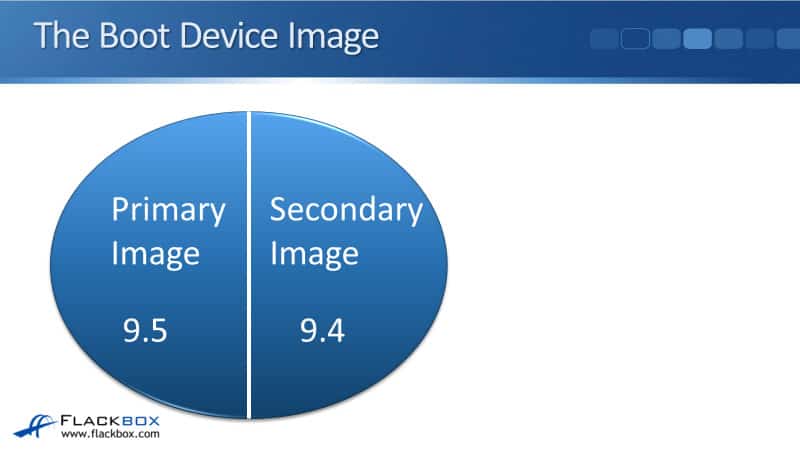
The Boot Device Image
Before we talk about the different steps that each node goes through as it boots up, I want to tell you about the boot device image. It is the actual ONTAP operating system software that is stored on compact flash on each node and that is what the system boots up from. The compact flash is actually divided into two different partitions and each partition has got its own version of the system image on there.
In the example below, let's say that we've just bought a new system and it's got 9.4 installed, so ONTAP 9.4 is going to be on both partitions in compact flash and the system is going to boot up from the primary image by default.

The reason that there are two different partitions is to help in case we have any issues when we do an upgrade of the system. Now, let's say that we upgrade that system from ONTAP 9.4 to ONTAP 9.5. When you do that the primary image is upgraded to version 9.5, the secondary image still stays on version 9.4.
When you do the upgrade, ONTAP is actually running in software already, we just boot-up from the compact flash when we're doing the initial boot-up. When the system is already up, compact flash is not being touched so when we do the upgrade, we can upgrade that primary image from 9.4 to 9.5.
During the upgrade, the last thing that happens is the node will be rebooted. When it reboots it boots from the primary image so it comes up now with the new 9.5 version of the operating system.
The reason that we've got two separate images on the two different partitions is that if after you did the upgrade you tried to reboot the system and it wasn't responsive, which gives you an easy way to roll back to version 9.4.
Rather than having to completely blast the system out and re-install everything again, what you can do is do a reboot and break into the boot-up process. You can boot from the secondary image rather than the primary image. That will get you back on the working version of 9.4 and then you can fix your problem from there. It's very unlikely that that would happen but it gives you an easy way of roll-back if you do have issues when you're doing an update.
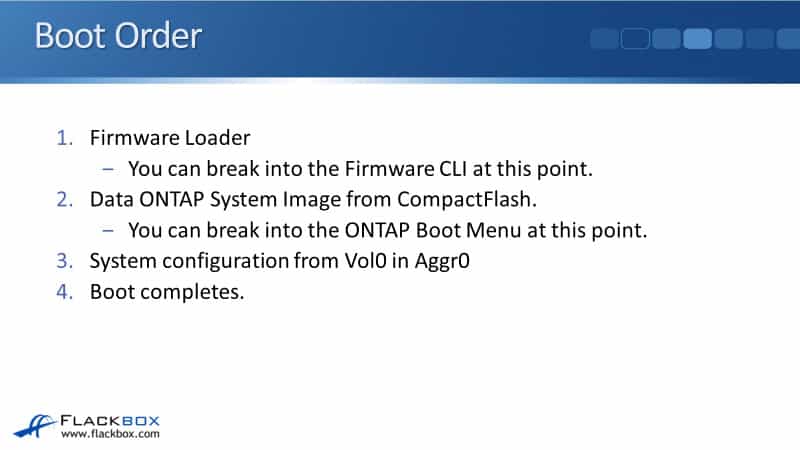
Boot Order
The first thing that happens when you boot the system up is the firmware loader, so the system loads the firmware. You can break into the firmware command line interface at that point.
The next thing that happens is that the Data ONTAP System image from compact flash will load. This is the actual ONTAP operating system and at that point, you can break into the ONTAP boot menu.
Then, the next thing is the system configuration so the configuration that you made will load from disk, from Vol0 in Aggr0, and finally, the boot completes. This process happens on each node as you boot up each node.
The first point here, the firmware loader, so a reason you would break in there would be the problem we talked about earlier. If you were having problems booting up from the primary image you could break into the firmware loader and from there you could boot-up from the secondary image. That obviously happens before ONTAP is loading so that's why you would do that at the firmware loader prompt.
After that, the ONTAP System image will start booting up and, if you're watching on the command line as the system is booting, at that point you can hit control C to get into the boot menu. Finally, your configuration gets added from Vol0 in Aggr0.
In the lab, I've got VMware open here and my node is powered off right now. I'll click to play the virtual machine. This will take a few seconds to start loading. Then almost immediately, I'm going to be given the prompt to hit enter to boot immediately or any other key for command prompt. This is where I can break into the firmware loader. Let's hit the space bar here, it's anything other than enter, and I see that I get the prompt now which is V loader.
I can hit the question mark for a list of commands and if I hit the space here, you can see that some of the options I've got in here include, I can boot from the primary image or I can boot from the backup image.
If you did have a problem during the upgrade, you could roll back by booting from the back-up image. What I'm going to do here is I'm just going to enter the boot command, which also carries on booting from the primary image, and that will carry on with the boot-up process.
In a few more seconds here you're going to see that the system gives me another prompt where I can hit control C to break into the boot menu. You can see the prompt now so I will hit control C quick enough to catch this and I see now that the boot menu will be available. Give this another few seconds and then the menu is going to appear.
The different options you've got in here are:
- normal boot
- boot without ETCRC
- change password
- clean configuration and initialize all disks
- maintenance mode boot
- update flash from backup config
- install new software first
- reboot the node
- configure advanced drive partitioning
Now, let's talk about what the different options are available here. The normal boot is just carry on with the boot. You're probably thinking, why is that an option? If I wanted to do a normal boot, why didn't I just not break-in in the first place? I'll tell you the reason why normal boot is there in a second.
Number two is boot without ETCRC. Going back to previous versions when ONTAP was available as both seven mode and as cluster mode. When that happened, the boot menu was the same for both versions. The boot menu has still not actually being updated yet. ETCRC is only relevant to seven mode systems so on a clustered system like modern ONTAP is now, this doesn't actually do anything.
Number three is change your password. What this is for is if the previous administrator has left, you're the administrator now and you don't know what the password is. While that is going on, clients will still be able to access their data because the system is running but you can't make any changes because you don't know the password. You can't get hold of that person anymore to find out your password. In that case, what you can do is reboot the system and you can change the password here.
Now if you're thinking, wait, that's a huge security concern, not so much because you have to actually have access to the console as it boots up to be able to get to this menu. You cannot connect remotely over IP unless you'd configured a terminal server specifically to allay that, and that's one of the reasons that if you do have a terminal server to allow remote access to the boot-up process, you need to make sure that it's secure so that nobody can come in and change your password.
Number four, clean configuration and initialize all disks. That is a factory reset of the system, so let's say that the system was being used by department A, and then department A got a new starter system so you can re-purpose the old one. It would be really inconvenient if you had to go and remove all the old config line by lane. Rather than doing that, you could just do a factory reset.
Number five is a maintenance mode boot. There are some tasks that can only be configured in maintenance mode so these are very low level tasks. In fact, one of the tasks that you used to have to go into maintenance mode to do was configuring advanced drive partitioning. For example, that's one of the things you have to go into maintenance mode for, you can now actually do it straight from the boot menu here to configure ADP.
Then, the next one is the update flash from back-up config. The contents of flash are actually copied over onto the disk and the hard drives in the system. If for some reason that your compact flashes, an issue gets corrupted in some way but you can still get into the boot menu, then you can use this to copy the config back from the disks back onto compact flash again.
Number seven is install new software first. This is a way that you can upgrade the system but it's not the normal way to do upgrades. Normally we'll do upgrades while the system is already booted up, it's less disruptive doing it that way.
Number eight is to reboot the node and finally, number nine is to configure ADP. Now, why normal boot is here as well is that if you do change the administrator password, you come back to the boot menu you again and do a normal boot.
Additional Resources
Managing the storage system by using the boot menu: https://library.netapp.com/ecmdocs/ECMP1155684/html/GUID-B86616AE-D345-4B44-AA56-BBC7ABD44068.html
Ways to boot the storage system: https://library.netapp.com/ecmdocs/ECMP1155684/html/GUID-404E039E-0502-4F92-948F-C61301CCF48A.html
Libby Teofilo

Text by Libby Teofilo, Technical Writer at www.flackbox.com
Libby’s passion for technology drives her to constantly learn and share her insights. When she’s not immersed in the tech world, she’s either lost in a good book with a cup of coffee or out exploring on her next adventure. Always curious, always inspired.