In this Cisco CCNA training tutorial, you’ll learn about static routes. Scroll down for the video and text tutorial.
When a router needs to send traffic to a subnet that it’s not directly connected to, it needs to know how to get there – it must have a matching route in its routing table.
Cisco Static Routes Video Tutorial

Eugene Ochieng

I want to say THANK YOU for the course. It was really helpful in attaining the Cisco CCNA 200-301 certification.
Routes can be added manually by an administrator configuring a static route, or the router can learn them dynamically through a routing protocol. We are going to cover how to add a static route in this tutorial.
In our example below, the router R1 is directly connected to the 10.0.0.0/24, 10.0.1.0.0/24 and 10.0.2.0/24 networks. It can route traffic directly to these networks by configuring the IP addresses.
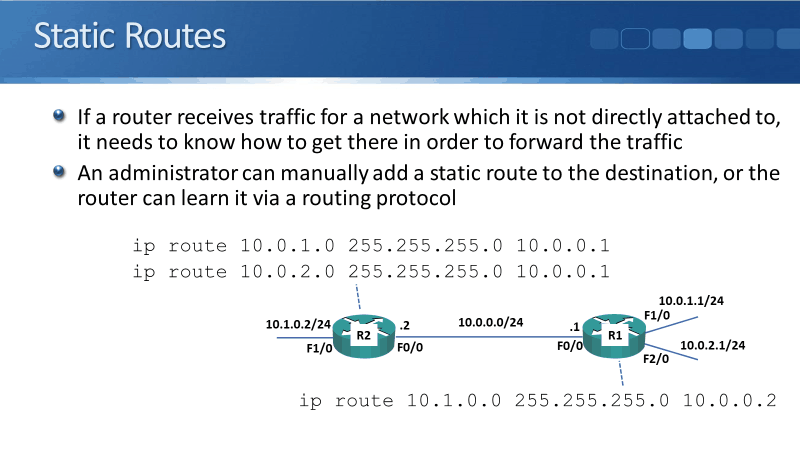
There is another network, 10.1.0.0/24, which is behind the router R2 and R1 doesn't know how to get there yet. Therefore, a static route is needed to be added into the R1 routing table in order to reach the said network.
R2 is directly connected to 10.1.0.0/24 and 10.0.0.0/24 so it can send traffic to them directly as soon as the IP addresses are configured. However, R2 would still need the routes to the networks 10.0.1.0/24 and 10.0.2.0/24 behind router R1.
The command to be used in adding a static route is:
ip route
First, let's look at R1's route to get to the 10.1.0.0/24 network. The command needed to be added to R1 is:
R1(config)#ip route 10.1.0.0 255.255.255.0 10.0.0.2
It is the subnet it needs to get to, its subnet mask, then the next hop IP address that I need to send traffic to. So, for R1 to be able to send traffic to the 10.1.0.0/24 network, it needs to send traffic out of its fast ethernet 0/0 interface and then send it to the 10.0.0.2 interface on router R2.
The R2 would need two routes, a route to 10.0.1.0/24 and to 10.0.2.0/24 networks. The commands are:
R2(config)#ip route 10.0.1.0 255.255.255.0 10.0.0.1
R2(config)#ip route 10.0.2.0 255.255.255.0 10.0.0.1
The next hops are the same, it's the 10.0.0.1 interface on router R1. After the configuration, you'll be able to route traffic between all of the networks in the topology.
Let's take it up a notch and add another router, R3, to the previous topology.

R3 has got routes to 10.1.1.0/24 and to 10.1.0.0/24 networks which are directly connected to it. Right now, it doesn't know how to get to the network 10.0.0.0/24 behind R2, and to the networks 10.0.1.0/24 and 10.0.2.0/24 behind R1.
Routes are needed to be added to reach those networks. First up, R3’s route to get to 10.0.0.0/24 behind R2. The command would be:
R3(config)#ip route 10.0.0.0 255.255.255.0 10.1.0.2
The next hop is 10.1.0.2, which is on router R2. Then, the commands to get to the routes behind R1 would be:
R3(config)#ip route 10.0.1.0 255.255.255.0 10.1.0.2
R3(config)#ip route 10.0.2.0 255.255.255.0 10.1.0.2
The next hop address is 10.1.0.2 which is on router R2. These routes are behind R1, but I don't point the route at R1 because R3 is not directly connected to it.
When I add the target for the route, it has to be reachable on a directly connected interface. So for R3 to be able to get to R1, it needs to send the traffic via R2 which it is directly connected to.
The target for the static route of 10.0.1.0/24 is the 10.0.1.2 address on R2. Same with the 10.0.2.0/24 route.
R2 would also need a route to get to 10.1.1.0/24 network behind R3. The command is:
R2(config)#ip route 10.1.1.0 255.255.255.0 10.1.0.1
The next hop address, 10.1.0.1, is the interface that is directly connected to R3. The commands for R2 to get to the two routes behind R1:
R2(config)#ip route 10.0.1.0 255.255.255.0 10.0.0.1
R2(config)#ip route 10.0.2.0 255.255.255.0 10.0.0.1
The next hop for both of the static routes is the directly reachable link to R1 which is 10.0.0.1.
Finally, we need to add routes on R1 to get to 10.1.1.0/24 and 10.1.0.0/24 networks. Both networks reachable via R1 at 10.0.0.2:
R1(config)#ip route 10.1.0.0 255.255.255.0 10.0.0.2
R1(config)#ip route 10.1.1.0 255.255.255.0 10.0.0.2
Once we've configured all of these routes, we're going to have reachability between all of the different subnets on our network.
Static Routes Configuration Example
This configuration example is taken from my free ‘Cisco CCNA Lab Guide’ which includes over 350 pages of lab exercises and full instructions to set up the lab for free on your laptop.
Click here to download your free Cisco CCNA Lab Guide.


- Configure IP addresses on R2, R3 and R4 according to the Lab Topology diagram. Do not configure the Internet FastEthernet 1/1 interface on R4. Do not configure R5.
R2(config)#int f0/0
R2(config-if)#ip add 10.0.0.2 255.255.255.0
R2(config-if)#no shut
R2(config-if)#int f0/1
R2(config-if)#ip add 10.1.0.2 255.255.255.0
R2(config-if)#no shut
R3(config)#int f0/1
R3(config-if)#ip add 10.1.0.1 255.255.255.0
R3(config-if)#no shut
R3(config-if)#int f0/0
R3(config-if)#ip add 10.1.1.2 255.255.255.0
R3(config-if)#no shut
R4(config)#int f0/0
R4(config-if)#ip add 10.1.1.1 255.255.255.0
R4(config-if)#no shut
R4(config-if)#int f0/1
R4(config-if)#ip add 10.1.2.1 255.255.255.0
R4(config-if)#no shut
R4(config-if)#int f1/0
R4(config-if)#ip add 10.1.3.1 255.255.255.0
R4(config-if)#no shut
2. Verify PC3 can ping its default gateway at 10.1.2.1
C:\>ping 10.1.2.1
Pinging 10.1.2.1 with 32 bytes of data:
Reply from 10.1.2.1: bytes=32 time<1ms TTL=255
Reply from 10.1.2.1: bytes=32 time<1ms TTL=255
Reply from 10.1.2.1: bytes=32 time<1ms TTL=255
Reply from 10.1.2.1: bytes=32 time<1ms TTL=255
Ping statistics for 10.1.2.1:
Packets: Sent = 4, Received = 4, Lost = 0 (0% loss),
Approximate round trip times in milli-seconds:
Minimum = 0ms, Maximum = 0ms, Average = 0ms
3. Configure static routes on R1, R2, R3 and R4 to allow connectivity between all their subnets. Use /24 prefixes for each network.
R1(config)#ip route 10.1.0.0 255.255.255.0 10.0.0.2
R1(config)#ip route 10.1.1.0 255.255.255.0 10.0.0.2
R1(config)#ip route 10.1.2.0 255.255.255.0 10.0.0.2
R1(config)#ip route 10.1.3.0 255.255.255.0 10.0.0.2
R2(config)#ip route 10.0.1.0 255.255.255.0 10.0.0.1
R2(config)#ip route 10.0.2.0 255.255.255.0 10.0.0.1
R2(config)#ip route 10.0.3.0 255.255.255.0 10.0.0.1
R2(config)#ip route 10.1.1.0 255.255.255.0 10.1.0.1
R2(config)#ip route 10.1.2.0 255.255.255.0 10.1.0.1
R2(config)#ip route 10.1.3.0 255.255.255.0 10.1.0.1
R3(config)#ip route 10.0.0.0 255.255.255.0 10.1.0.2
R3(config)#ip route 10.0.1.0 255.255.255.0 10.1.0.2
R3(config)#ip route 10.0.2.0 255.255.255.0 10.1.0.2
R3(config)#ip route 10.0.3.0 255.255.255.0 10.1.0.2
R3(config)#ip route 10.1.2.0 255.255.255.0 10.1.1.1
R3(config)#ip route 10.1.3.0 255.255.255.0 10.1.1.1
R4(config)#ip route 10.1.0.0 255.255.255.0 10.1.1.2
R4(config)#ip route 10.0.0.0 255.255.255.0 10.1.1.2
R4(config)#ip route 10.0.1.0 255.255.255.0 10.1.1.2
R4(config)#ip route 10.0.2.0 255.255.255.0 10.1.1.2
R4(config)#ip route 10.0.3.0 255.255.255.0 10.1.1.2
4. Verify connectivity between PC1, PC2 and PC3.
Ping PC2 and PC3 from PC1.
C:\>ping 10.0.2.10
Pinging 10.0.2.10 with 32 bytes of data:
Reply from 10.0.2.10: bytes=32 time=1ms TTL=127
Reply from 10.0.2.10: bytes=32 time=1ms TTL=127
Reply from 10.0.2.10: bytes=32 time<1ms TTL=127
Reply from 10.0.2.10: bytes=32 time=1ms TTL=127
Ping statistics for 10.0.2.10:
Packets: Sent = 4, Received = 4, Lost = 0 (0% loss),
Approximate round trip times in milli-seconds:
Minimum = 0ms, Maximum = 1ms, Average = 0ms
C:\>ping 10.1.2.10
Pinging 10.1.2.10 with 32 bytes of data:
Reply from 10.1.2.10: bytes=32 time<1ms TTL=124
Reply from 10.1.2.10: bytes=32 time=1ms TTL=124
Reply from 10.1.2.10: bytes=32 time<1ms TTL=124
Reply from 10.1.2.10: bytes=32 time<1ms TTL=124
Ping statistics for 10.1.2.10:
Packets: Sent = 4, Received = 4, Lost = 0 (0% loss),
Approximate round trip times in milli-seconds:
Minimum = 0ms, Maximum = 1ms, Average = 0ms
Ping PC3 from PC2.
C:\>ping 10.1.2.10
Pinging 10.1.2.10 with 32 bytes of data:
Reply from 10.1.2.10: bytes=32 time<1ms TTL=124
Reply from 10.1.2.10: bytes=32 time<1ms TTL=124
Reply from 10.1.2.10: bytes=32 time<1ms TTL=124
Reply from 10.1.2.10: bytes=32 time=3ms TTL=124
Ping statistics for 10.1.2.10:
Packets: Sent = 4, Received = 4, Lost = 0 (0% loss),
Approximate round trip times in milli-seconds:
Minimum = 0ms, Maximum = 3ms, Average = 0ms
Ping verifies two way reachability so we have now verified full connectivity.
5. Verify the path traffic takes from PC1 to PC3.
C:\>tracert 10.1.2.10
Tracing route to 10.1.2.10 over a maximum of 30 hops:
1 0 ms 0 ms 1 ms 10.0.1.1
2 0 ms 1 ms 0 ms 10.0.0.2
3 1 ms 0 ms 0 ms 10.1.0.1
4 1 ms 0 ms 0 ms 10.1.1.1
5 0 ms 0 ms 0 ms 10.1.2.10
Trace complete.
The traffic goes via the path R1 > R2 > R3 > R4
Note that IP return traffic (PC3 to PC1 in this case) does not necessarily have to come back along the same path, although it typically will.
Additional Resources
Cisco Networking Academy's Introduction to Static Routing: https://www.ciscopress.com/articles/article.asp?p=2180209&seqNum=4
Enabling Static Routing: https://www.learncisco.net/courses/icnd-1/ip-routing-technologies/static-routing.html
Chapter: Configuring Static Routing: https://www.cisco.com/c/en/us/td/docs/switches/datacenter/nexus3000/sw/unicast/503_u1_2/nexus3000_unicast_config_gd_503_u1_2/l3_route.html
Libby Teofilo

Text by Libby Teofilo, Technical Writer at www.flackbox.com
Libby’s passion for technology drives her to constantly learn and share her insights. When she’s not immersed in the tech world, she’s either lost in a good book with a cup of coffee or out exploring on her next adventure. Always curious, always inspired.