In this Cisco CCNA tutorial, you’ll learn about basic connectivity troubleshooting. We’ll take a look at the ping and traceroute tools in a bit of depth. Scroll down for the video and also the text tutorials.
Cisco Basic Connectivity Troubleshooting Video Tutorial

Ariyo Oniyelu

It’s so simple to follow and explained in such a way that you have a full understanding – not just cramming stuff. Neil teaches not just to pass the CCNA exam but to make you a thoroughly trained Network Engineer having a solid grasp of the concepts and the technology. Great job!
Ping
Ping uses ICMP, which like TCP, UDP, IP, etc., makes up part of the TCP/IP suite. ICMP stands for the Internet Control Message Protocol, and it's used for testing connectivity. I'm going to do a ping from R1 to the 10.1.0.1 IP address on R3.

R1 will send out an ICMP echo request, using the exit interference as the source IP and wherever I configured it to send to as the destination IP. That will get to R3, all being good on the network, and R3 will then send an ICMP echo reply back to R1.
Ping tests two-way connectivity. It tests that the source can get to the destination and also that the reply can get back from the destination, back to the source again.

Ping Responses
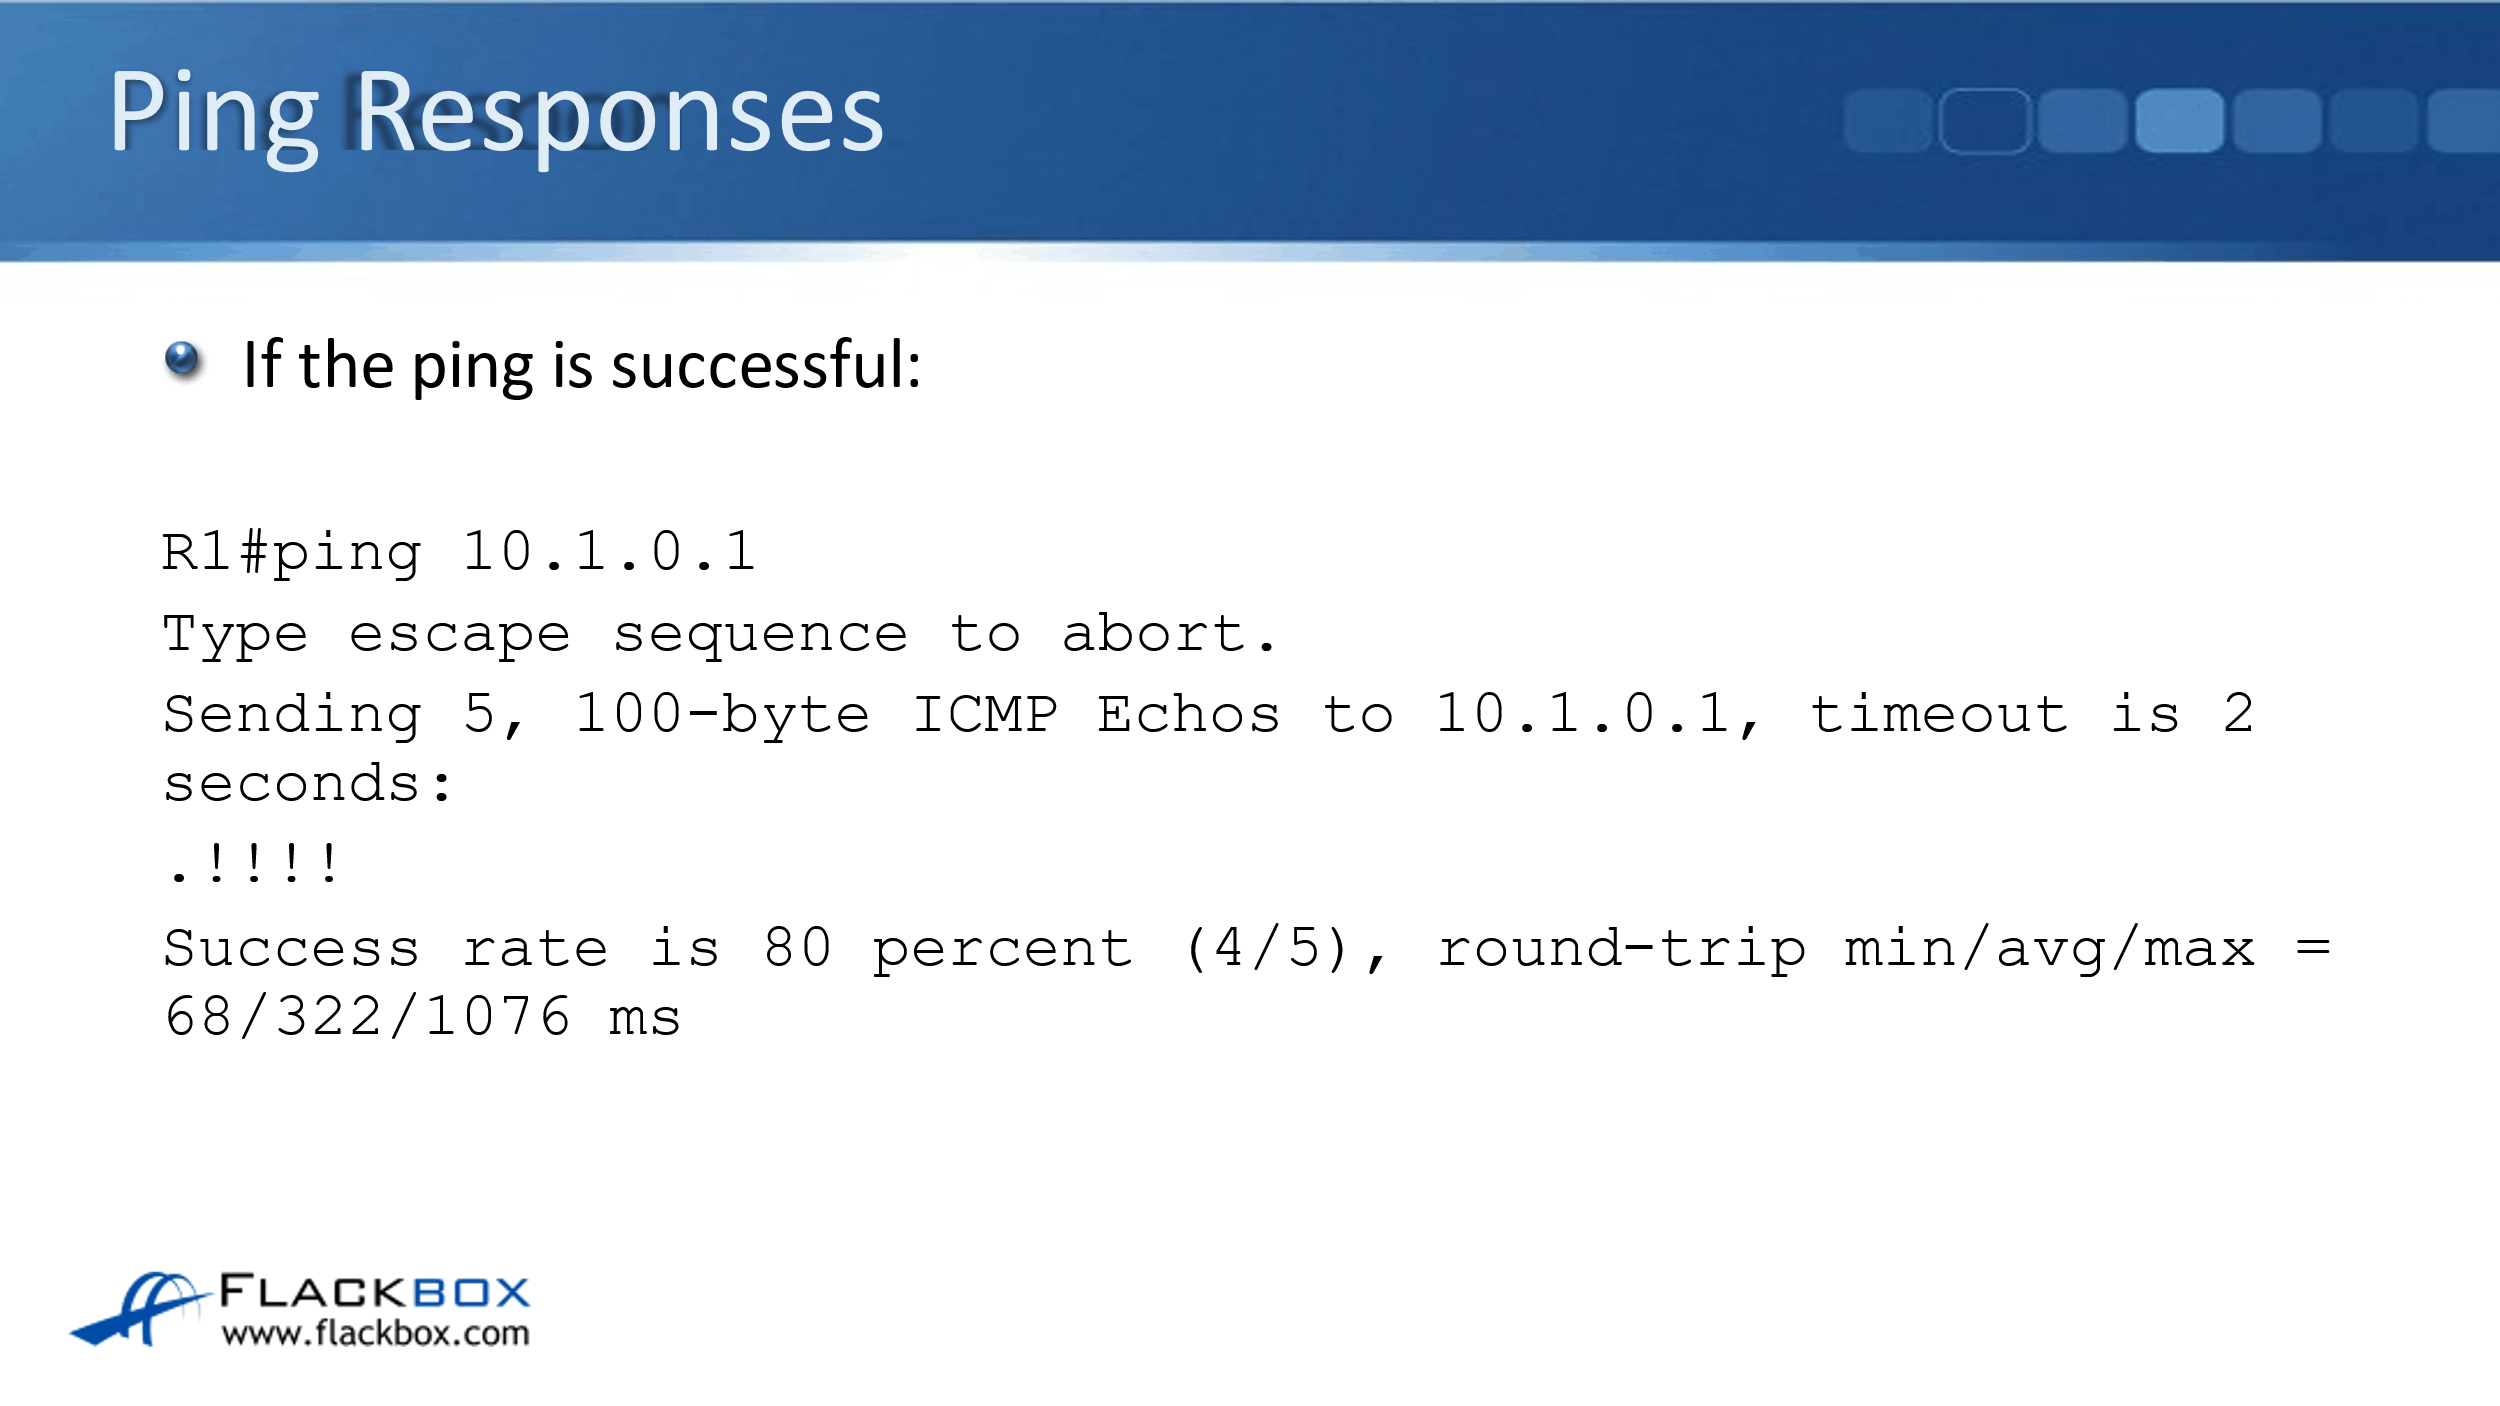
If the ping is successful on a Cisco router, you will see exclamation marks. In the example here, we've got one dot indicating the first ping failed and then four exclamation marks, which says that it succeeded. This is quite normal.
It's quite normal for the first ping to fail if the router is updating its ARP cache at the time. So if we've got a success rate at 80%, four out of five pings are good, that would mean that we do have connectivity.
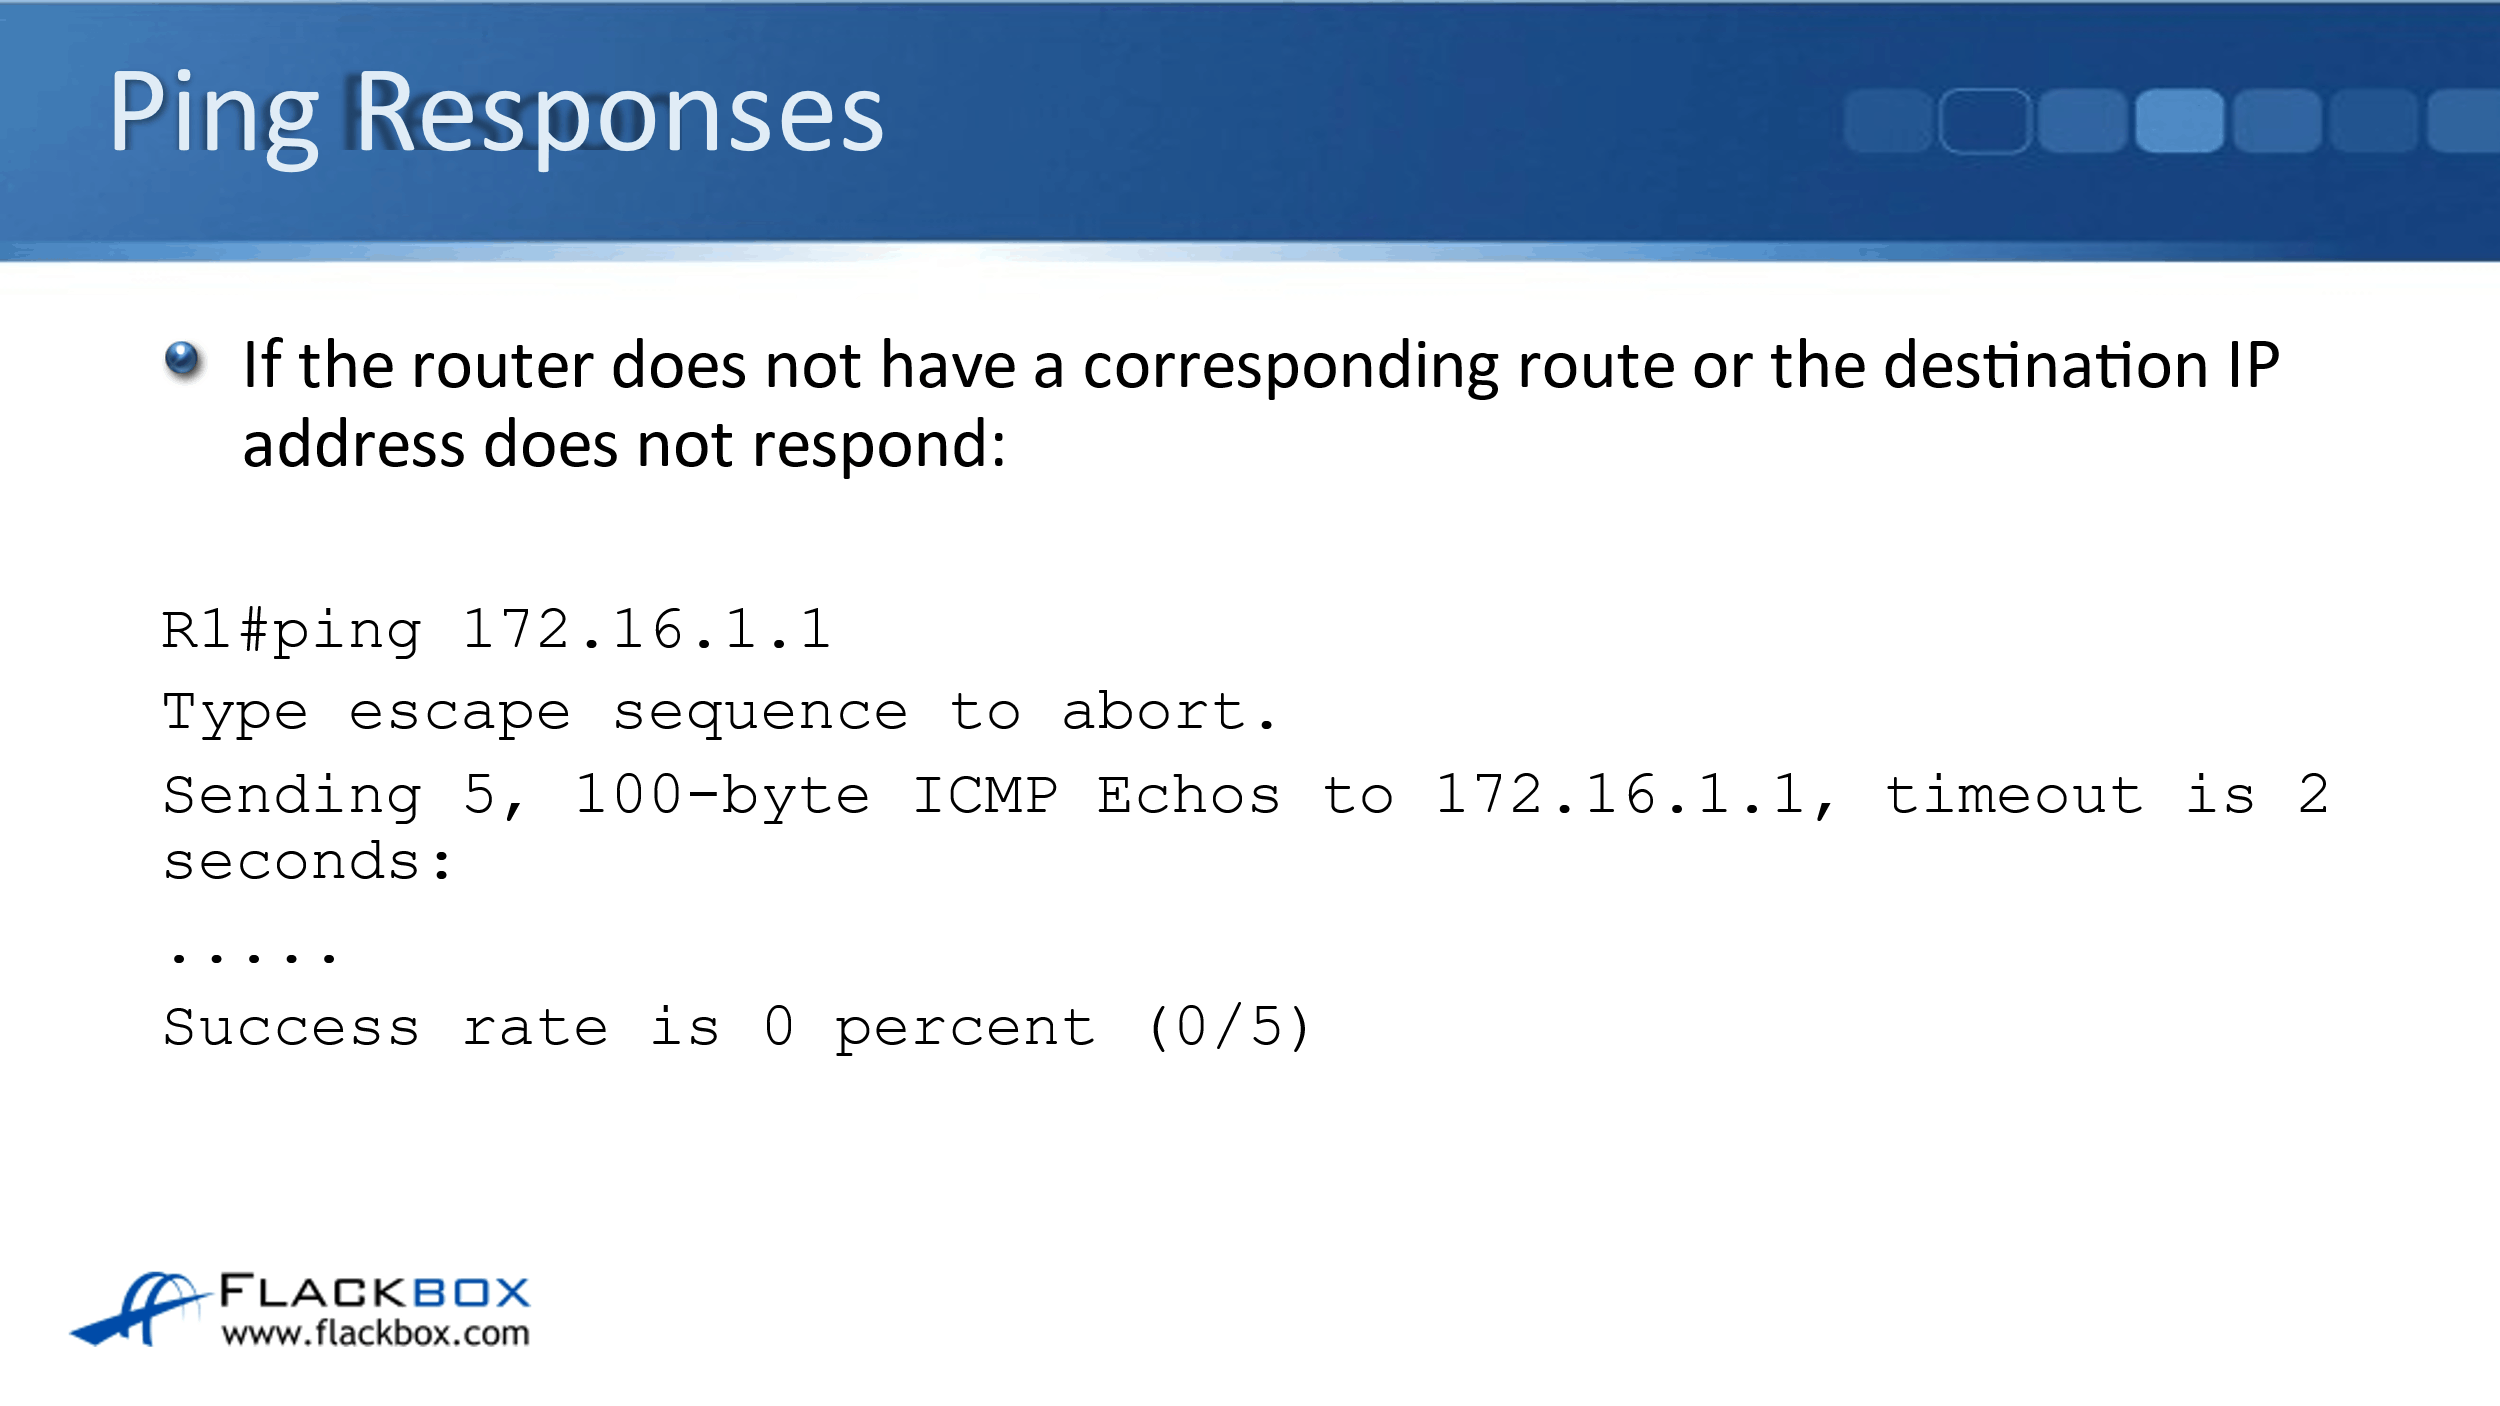
If you see five dots, though, that is bad. That indicates that the ping has failed. So this could be because your router does not have a corresponding route or the destination IP address is not responding.
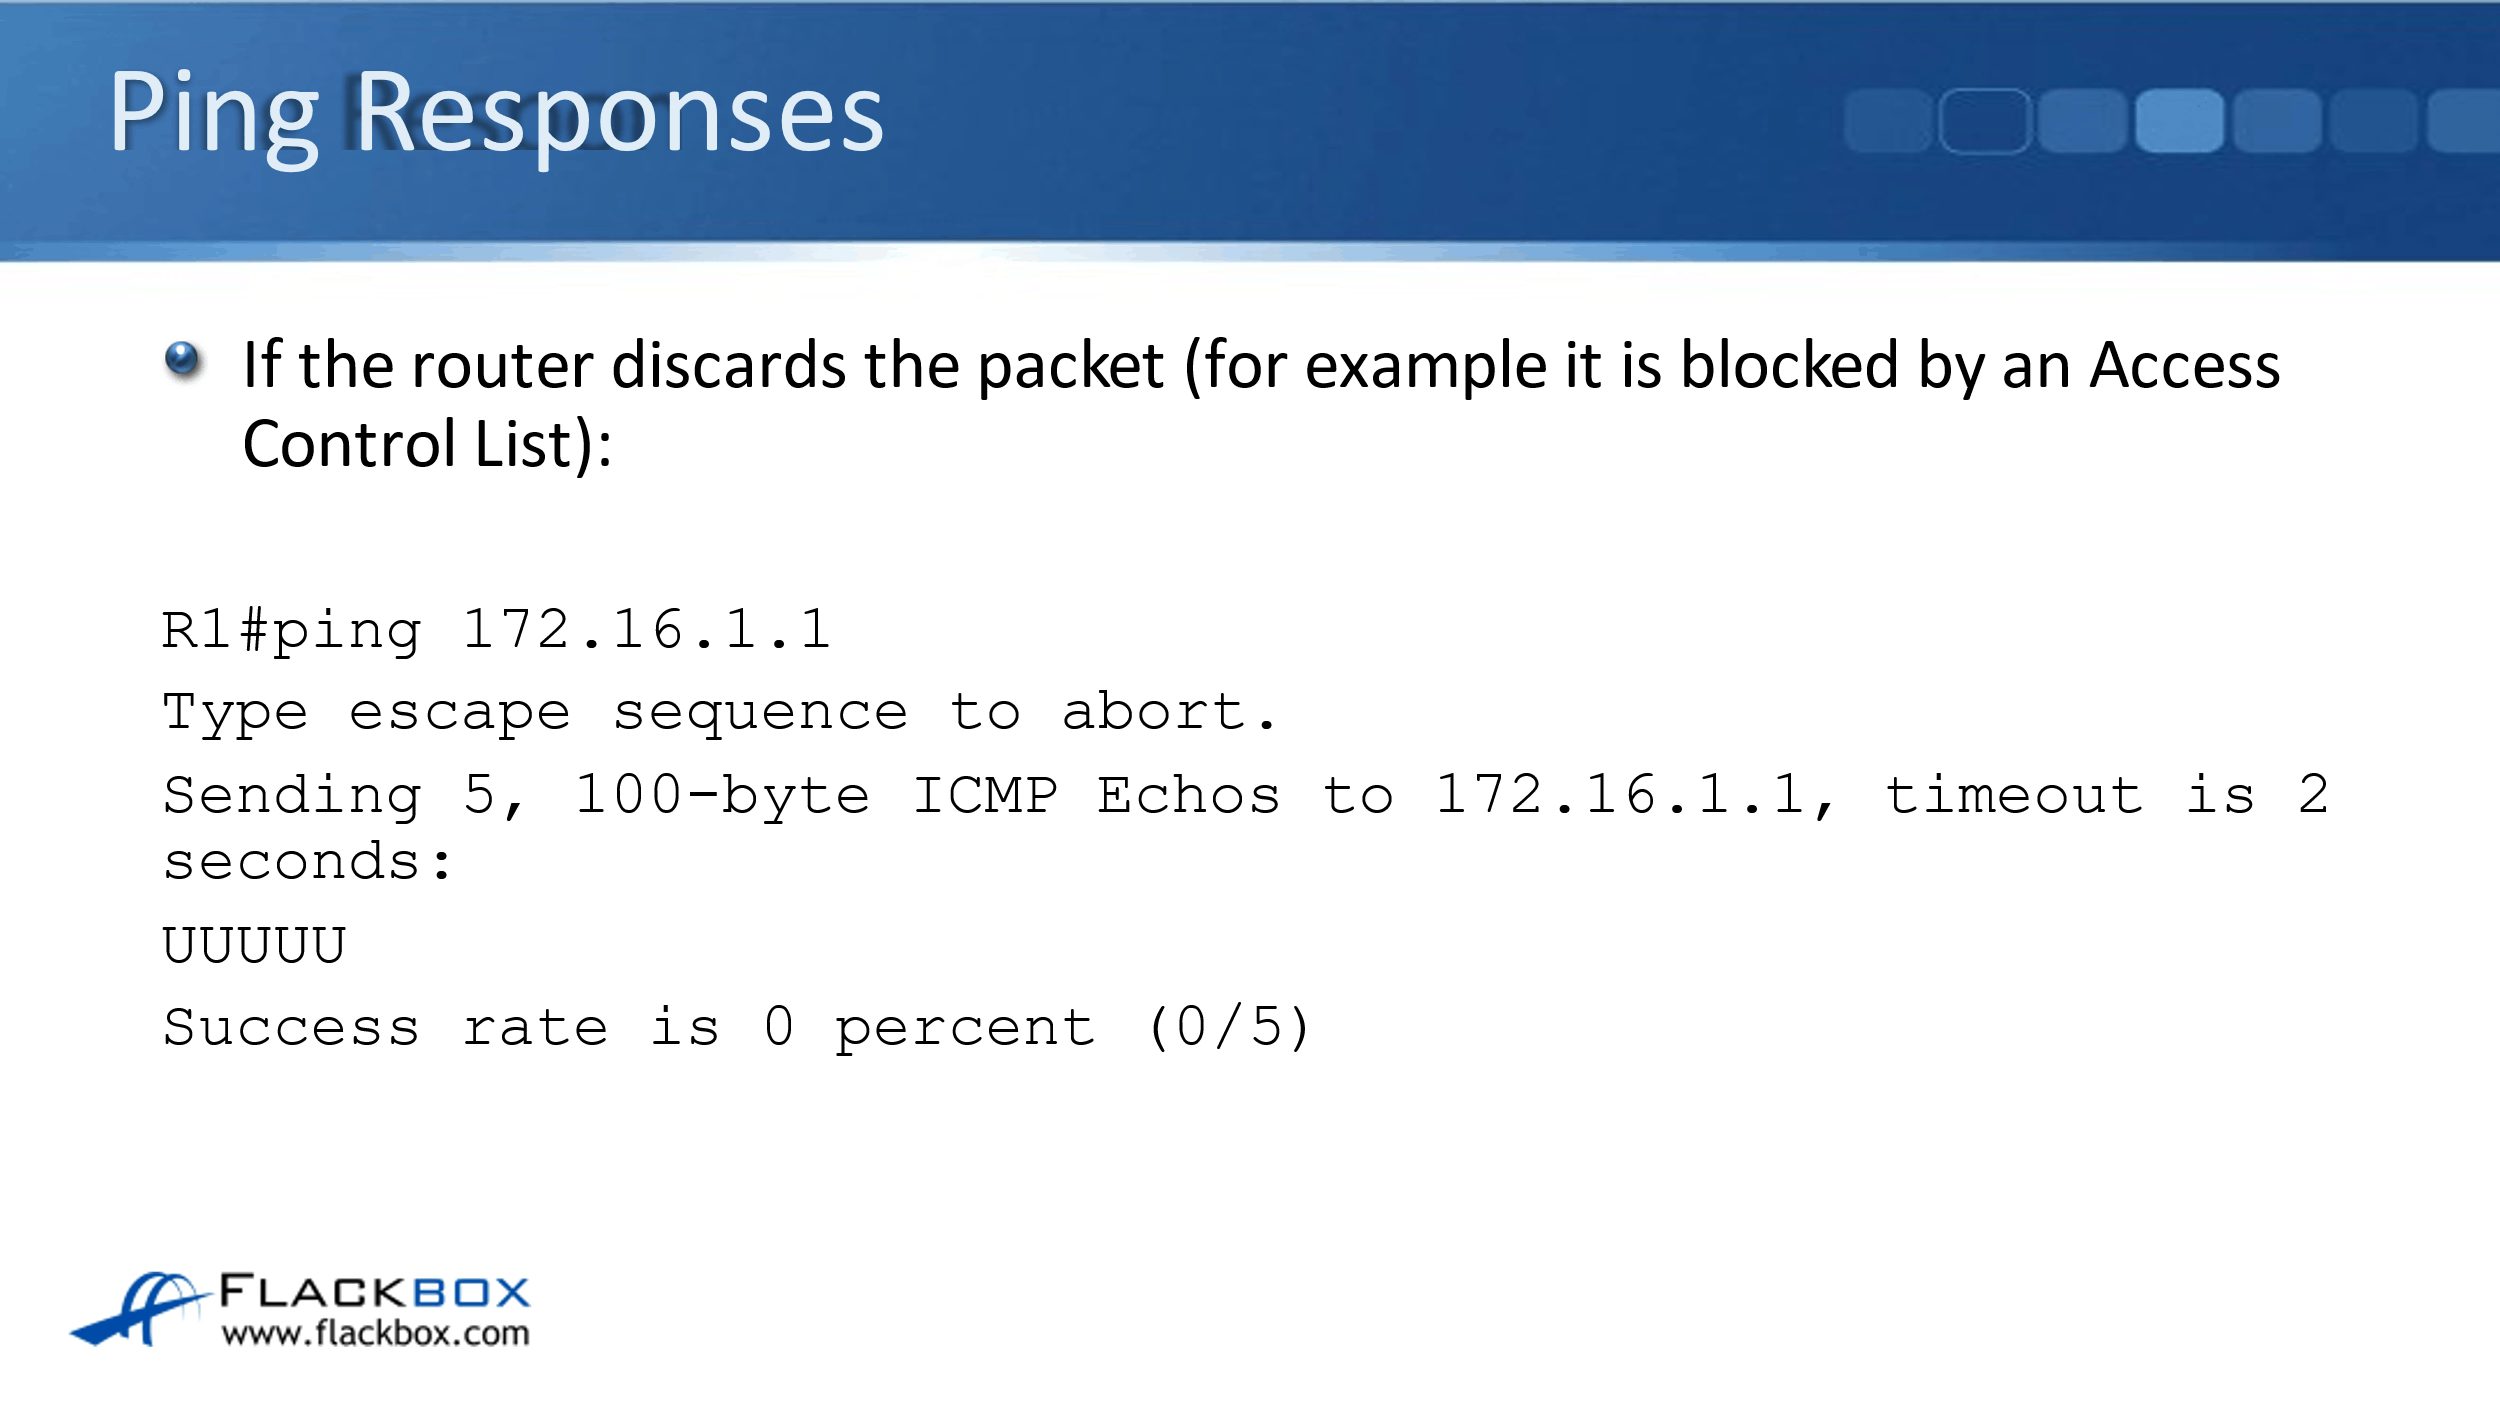
Less common is, you can see U's, which means that it is unreachable, and that happens if the router discards the packet. For example, if it's being blocked by an Access Control List (ACL).
Extended Ping
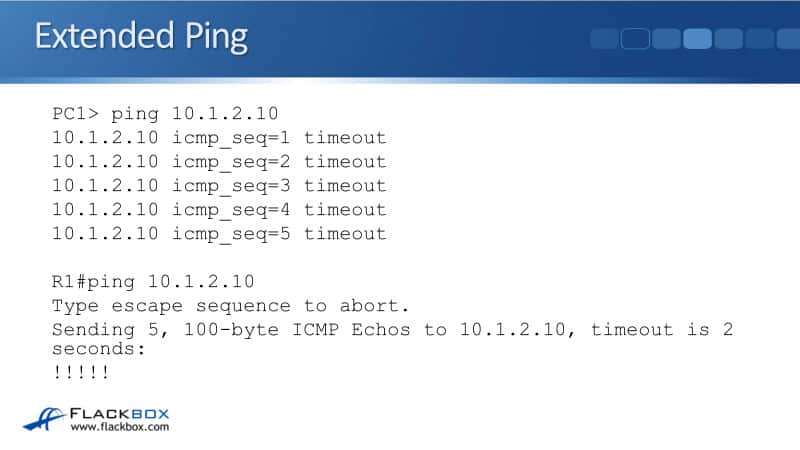
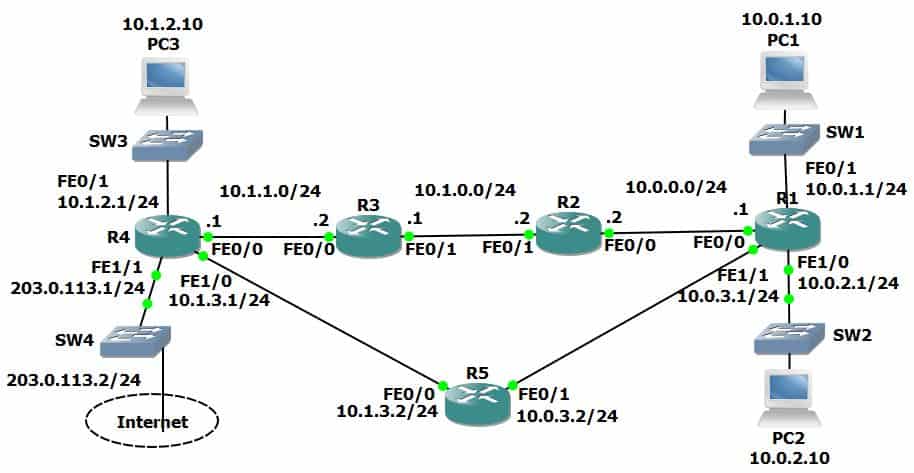
The next thing to tell you is about the via extended ping command. So if you look at the scenario here, a user on PC1, over in the top right here, complains that they can't access PC3.
You go on to R1 to test this, and you ping PC3 at 10.1.2.10, but what's causing the actual issue is that R4 does not have a route back to PC1 at 10.0.1.10. But in our scenario, it does have a route back to R1 at 10.0.0.1.

Whenever you do a ping from a router, whenever you send to any traffic that originates from the router itself, it uses the outgoing interface as the source IP address. So if we go into R1 and ping 10.1.2.10, it will use 10.0.0.1 as the source IP address because that's the IP address and the interface it went out of.
So as long as we've got connectivity from right to left, that will reach PC3. PC3 will send a reply back, and because R4 does have a route to the 10.0.0.0 network, the ping will succeed, and that's going to really confuse you because the user is saying that connectivity isn't working.
What you need to do is actually send the ping from the same subnet as PC1. So you can do it from PC1 itself, but if it's not possible for you to get on PC1, what you need to do is send it from R1, but from a source address of 10.0.1.1, the same subnet that the user is in. The way you do that is with an extended ping.
When we do a ping from PC1, we can see it's failing because we're getting a time out. But then, when we do just a normal ping from R1, it is succeeding because it's coming from the IP address of the exit interface, which R4 does have a path back to.
The way that we need to test it and do this in the real world, if you're ever doing a ping from a router because a user has complained of connectivity issues, do the ping with the source address on the same subnet.
The way that you invoke an extended ping is just enter 'ping' and then hit enter. It will then go through a wizard that will ask you the options you want to set for the ping. So, the first thing it asks is, "Do you want to use IP as the protocol?" That's always going to be a yes. You can just hit enter to accept the default of IP.
You then enter the target IP address. It will then ask you the repeat count, so you can send more than the default of five pings if you want. This can be useful if you've got, say, an intermittent issue, and you want to just keep sending pings to see if it's sometimes going up and down.
In that case, you could set, for example, a repeat count of 1000, and it would keep sending 1000 pings before it stopped.
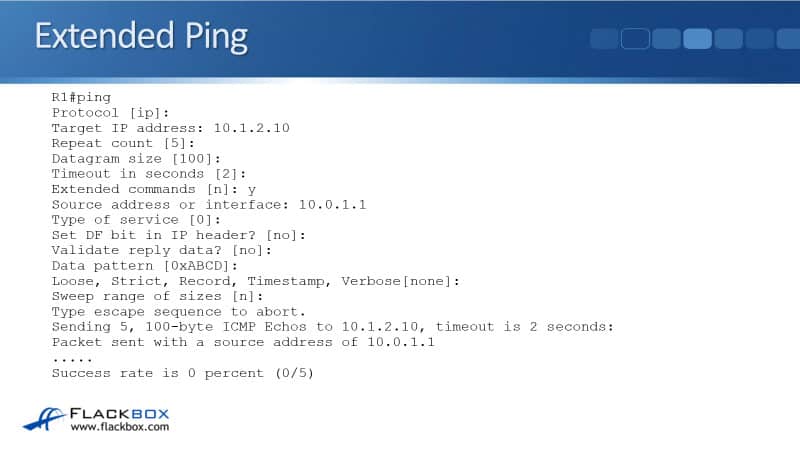
Datagram size is used to troubleshoot a suspected MTU issue. If the MTU, Maximum Transmission Unit, is causing a problem, then you can set the packet to be different sizes to check that. You can also set the timeout. We'll normally just leave the default of two. And then the one we're interested in here is, we want to set the source address.
To get there, you have to say yes, when it asks you, "Do you want to go into the extended commands?" So we say, "Yes" there. The first thing that it'll ask is, "What do you want to use as a source address?"
Then we can say the IP address that the actual client is having the problems in, and then just keep hitting enter to accept the defaults for everything else. Now, we can see that the ping is failing from R1 because the destination does not have a path back to the 10.0.1.1 IP address.
Traceroute
Next up, we have traceroute. Traceroute is very similar to ping, and it's also used for checking connectivity. Traceroute traces the path the traffic is tacking when it's going across the network, and you see here, we've done a traceroute from R1 to R3.

It uses ICMP echo request as well, but the difference between a traceroute and a normal ping is that the traceroute also takes advantage of the TTL field, which is in the IP header. TTL is Time To Live.
The TTL is used as a route loop prevention mechanism. Every time that a router passes a packet on from one interface to another, it decrements the TTL by one.
Let's say we had to loop between R1 and R2, where R1 was sending traffic to R2, and we had an issue where R2 thought it had to send traffic back to R1 again, but what would happen would be the traffic would go from R1 to R2, to R1 to R2, and so on. It would just keep bouncing back and forth.
If we were generating more traffic, that would eventually cause so much traffic on the link, it would congest it, and it would bring our network down. TTL stops that from happening.
Let's say that we sent the packet with a TTL of 15. It would get to R2. It would decrement it by one to 14 and send it back to R1. R1 would reduce it to 13 and send it on again.
Eventually, we would get down to zero, and R2 or R1, whichever one it ended up on, would drop the packet. When it does drop the packet, it sends back a time exceeded message to the sender to let it know that it was dropped because the TTL was exceeded.
What traceroute does is it works like a normal ping, but when we send the first ping, it gets sent with a TTL of one. So that will reach the first hop, which will then drop it, and then send a time exceeded reply.
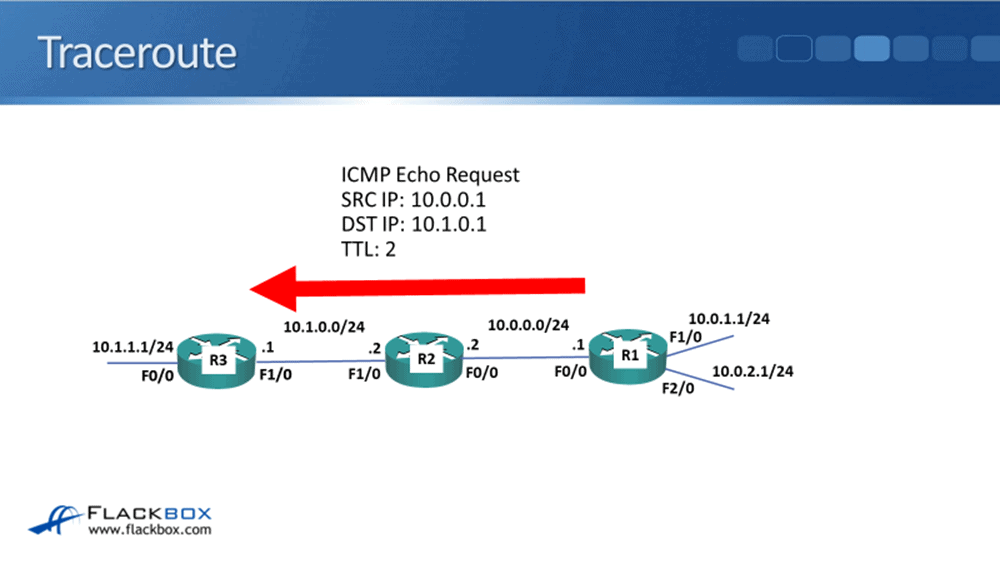
We're doing a traceroute from R1 to the 10.1.0.1 interface, which is on R3, but we send it as a traceroute. So it goes out with a TTL of one, the packet we'll reach R2 because it's the first hop.
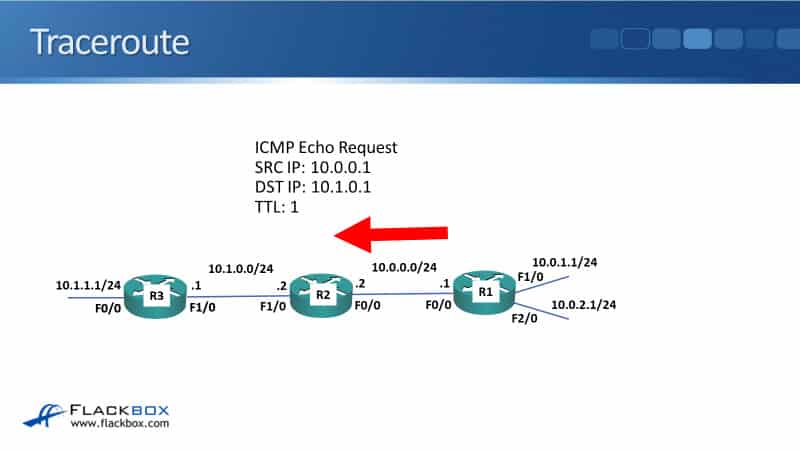
R2 will decrement the TTL by one. It gets to zero, so it drops it, and it will send a time exceeded message back to R1. So R1 learns that R2, its IP address 10.0.0.2, was the first hop.
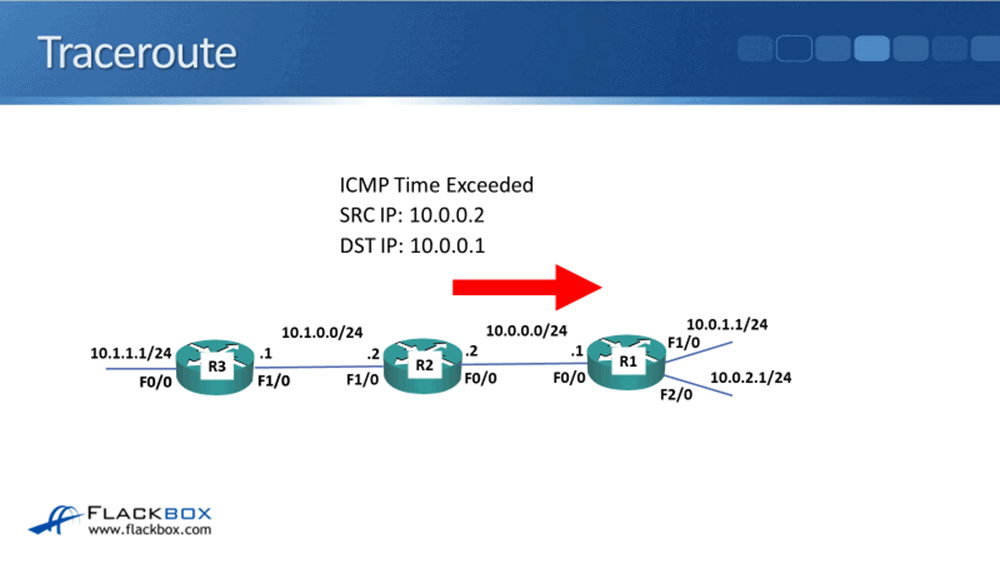
R1 will then send another packet, this time with a TTL of two, which will get as far as the second hop. Our traffic is only going two hops in this example, so that is the final destination.
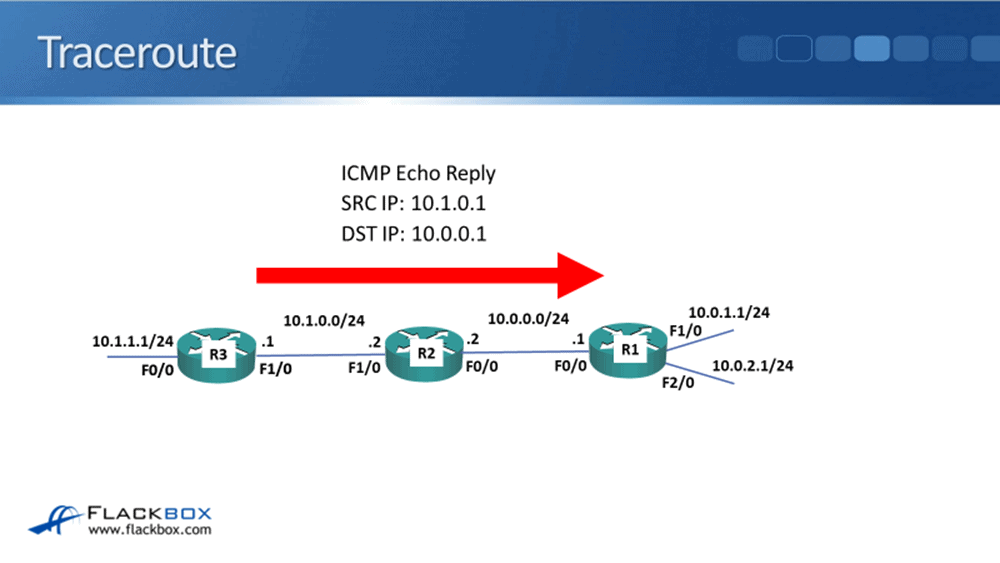
R3 will send back an echo reply, and then the traceroute has been completed. If we were sending something, maybe 10 hops away, then R1 would send the first packet with a TTL of one, then a TTL of two, then a TTL of three, and so on, and by doing that, it's able to map out the path that the traffic is tacking, hop by hop, all the way across to the destination.
Traceroute Responses
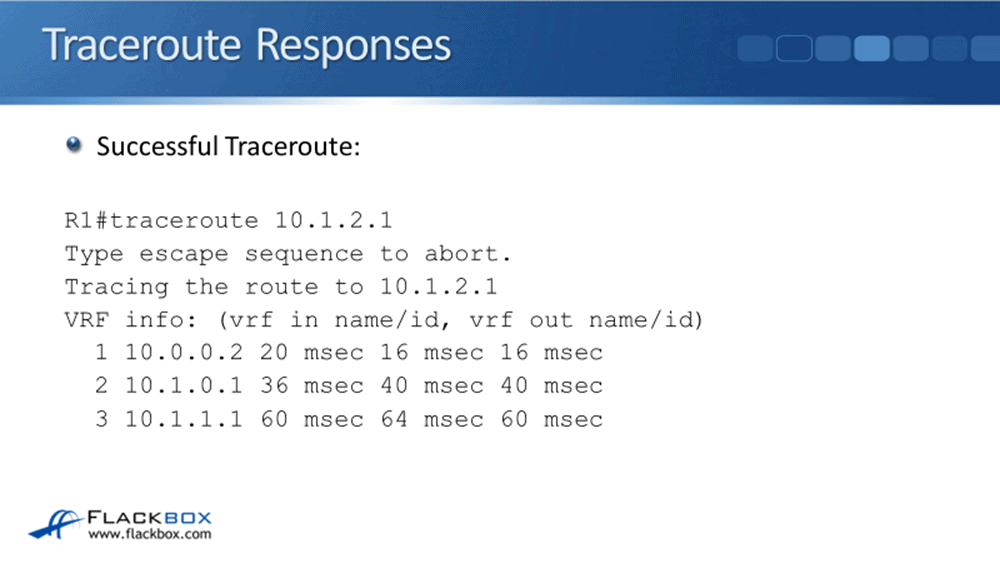
If we have a successful traceroute, the output will look like this. So here we did the traceroute to 10.1.2.1. We see the first hop is 10.0.0.2, the second hop is 10.1.0.1, and then it got to the destination 10.1.1.1.
If a ping succeeds and a traceroute fails, don't worry about it. The traffic is working. Sometimes the last hop will fail on a traceroute. Also, sometimes, firewalls will drop traceroute traffic as well. They will normally do that.
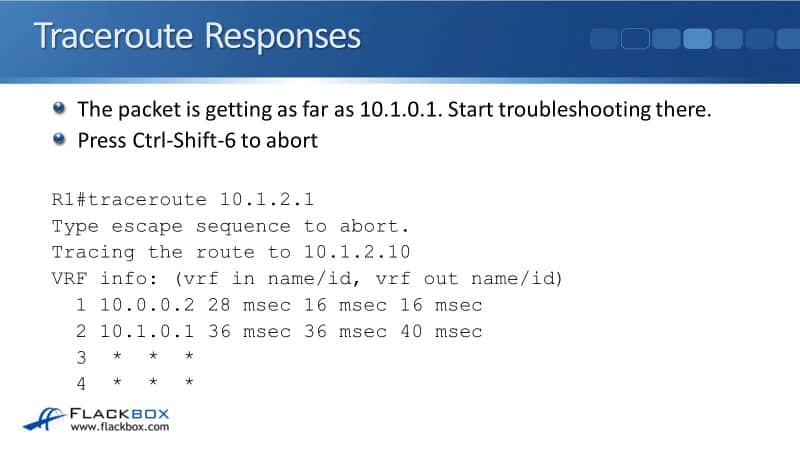
In this example, I can see that the packet is getting as far as 10.1.0.1. It hit the first hop at 10.0.0.2, then it hit the second hop at 10.1.0.1, and it's failing at that point. It's not getting to the final destination of 10.1.2.1. So a scenario where this would happen, let's say that we ping 10.1.2.1 and the ping fails.
The next thing to do is to do a traceroute to 10.1.2.1 to see how far the packet is getting. If the packet is getting far as the router at 10.1.0.1, and then it's failing there, then it's highly likely that the issue is on that router 10.1.0.1.
So we would then go into the command line on that router, do a ‘show ip route’, and it's probably missing the route. If it's not missing the route in the routing table, it's going to be another issue on that router.
This saves us a lot of time of going hop by hop, all the way from the source to the destination, it quickly shows us the most likely place that the problem is. So it's a time-saving technique.
Now, when the traceroute does fail, you can save time, because what will happen is, you'll have to sit there for ages waiting for it to time out, a way that you can abort, break out of the command, is by pressing Ctrl-Shift-6. So hold down the keys, Ctrl-Shift-6, all at the same time, and that will break you if the traceroute command.
Other Tools – Layer 1
Some other tools that we can use for basic connectivity troubleshooting, for our Layer 1 troubleshooting tools, our ‘show ip interface brief’, and ‘show interface’.

Other Tools – Layer 2
Other commands we can use to troubleshoot Layer 2 issues are ‘show arp’ and ‘show mac address-table’ on our switches.

Other Tools – Layer 4
To troubleshoot Layer 4, we can Telnet to the destination IP address and the port number. That will tell us if it's answering on that port or not.

Other Tools – DNS
Finally, for troubleshooting DNS, we can do ‘nslookup’. We can also ping by the FQDN to see if a DNS server is able to resolve that name.

Cisco Basic Connectivity Troubleshooting Configuration Example
This configuration example is taken from my free ‘Cisco CCNA Lab Guide’ which includes over 350 pages of lab exercises and full instructions to set up the lab for free on your laptop.
Click here to download your free Cisco CCNA Lab Guide.
- Use ping to test connectivity from PC1 to PC3.
Connectivity is down.
C:\>ping 10.1.2.10
Pinging 10.1.2.10 with 32 bytes of data:
Request timed out.
Request timed out.
Reply from 10.1.0.1: Destination host unreachable.
Reply from 10.1.0.1: Destination host unreachable.
Ping statistics for 10.1.2.10:
Packets: Sent = 4, Received = 0, Lost = 4 (100% loss)
2. Use traceroute to determine where the problem is likely to be.
Traceroute is making it as far as 10.1.0.1 on R3 so that is a good place to continue troubleshooting.
C:\>tracert 10.1.2.10
Tracing route to 10.1.2.10 over a maximum of 30 hops:
1 0 ms 0 ms 0 ms 10.0.1.1
2 0 ms 0 ms 0 ms 10.0.0.2
3 0 ms 0 ms 0 ms 10.1.0.1
4 1 ms * 1 ms 10.1.0.1
5 * 0 ms
Control-C
^C
3. Determine the issue and fix it to restore connectivity between PC1 and PC3.
The first thing to do is check that R3 has a route to PC3’s network 10.1.2.0/24
R3#sh ip route
Codes: L - local, C - connected, S - static, R - RIP, M - mobile, B - BGP
D - EIGRP, EX - EIGRP external, O - OSPF, IA - OSPF inter area
N1 - OSPF NSSA external type 1, N2 - OSPF NSSA external type 2
E1 - OSPF external type 1, E2 - OSPF external type 2
i - IS-IS, su - IS-IS summary, L1 - IS-IS level-1, L2 - IS-IS level-2
ia - IS-IS inter area, * - candidate default, U - per-user static route
o - ODR, P - periodic downloaded static route, H - NHRP, l - LISP
+ - replicated route, % - next hop override
Gateway of last resort is not set
10.0.0.0/8 is variably subnetted, 9 subnets, 2 masks
S 10.0.0.0/24 [1/0] via 10.1.0.2
S 10.0.1.0/24 [1/0] via 10.1.0.2
S 10.0.2.0/24 [1/0] via 10.1.0.2
S 10.0.3.0/24 [1/0] via 10.1.0.2
C 10.1.0.0/24 is directly connected, FastEthernet0/1
L 10.1.0.1/32 is directly connected, FastEthernet0/1
C 10.1.1.0/24 is directly connected, FastEthernet0/0
L 10.1.1.2/32 is directly connected, FastEthernet0/0
S 10.1.3.0/24 [1/0] via 10.1.1.1
The network is not in the routing table. From the ‘show ip route’ command we can also see that static routes are being used. We need to add a static route for the 10.1.2.0/24 network with R4 as the next hop.
R3(config)#ip route 10.1.2.0 255.255.255.0 10.1.1.1
Lastly, we need to verify connectivity is restored from PC1.
C:\>ping 10.1.2.10
Pinging 10.1.2.10 with 32 bytes of data:
Request timed out.
Request timed out.
Reply from 10.1.2.10: bytes=32 time<1ms TTL=124
Reply from 10.1.2.10: bytes=32 time=1ms TTL=124
Ping statistics for 10.1.2.10:
Packets: Sent = 4, Received = 2, Lost = 2 (50% loss),
Approximate round trip times in milli-seconds:
Minimum = 0ms, Maximum = 1ms, Average = 0ms
Additional Resources
Ping Explained: https://study-ccna.com/ping/
Using the Extended ping and Extended traceroute Commands: https://www.cisco.com/c/en/us/support/docs/ip/routing-information-protocol-rip/13730-ext-ping-trace.html
Traceroute Command: https://study-ccna.com/traceroute-command/
Libby Teofilo

Text by Libby Teofilo, Technical Writer at www.flackbox.com
Libby’s passion for technology drives her to constantly learn and share her insights. When she’s not immersed in the tech world, she’s either lost in a good book with a cup of coffee or out exploring on her next adventure. Always curious, always inspired.