This is the second tutorial in my ‘Practical Introduction to Cloud Computing’ course. Click here to enrol in the complete course for free!
In this second cloud training tutorial, I’m going to talk about server virtualization, using technologies such as VMware, Microsoft Hyper-V, Red Hat KVM and Citrix Xen, which is one of the main enablers of Cloud Computing.
Server virtualization has been around a lot longer than Cloud Computing though. It allows for resource pooling where multiple customers share the same underlying server hardware. Scroll down for the video and also text tutorial.
Server Virtualization Simplified – Video Tutorial

Before Server Virtualization – Traditional Rack Setup
Let’s look at what we had before server virtualization first. The example below is from one of the first companies I worked for, my real first job in IT way back in the ’90s. I was working for a fairly small company and we were looking after our own servers in a server room. We had a rack to put the equipment in and we had a few servers in there. We had an email server, which was running Microsoft Exchange, a database server that was running Microsoft SQL, and we also had our own web server in there as well.
Obviously, we’re going to need power for those servers, so we had a couple of uninterruptible power supplies. These provide clean power and if the grid power goes down, they’ve got batteries so they’ll continue to provide power for a period of time.
We’re also going to need switches for connectivity between the servers and the PCs in our office. We also needed connectivity out to the internet and our other offices, so we had a router and a firewall for that.
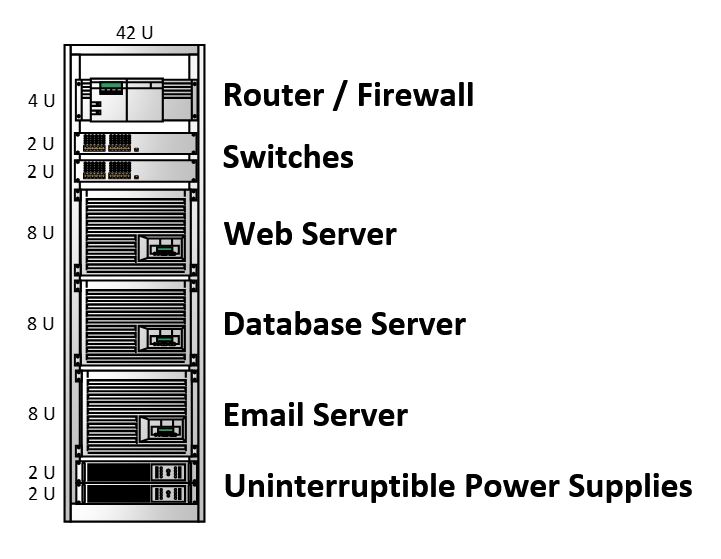
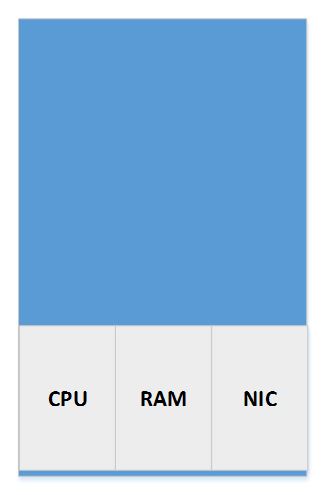
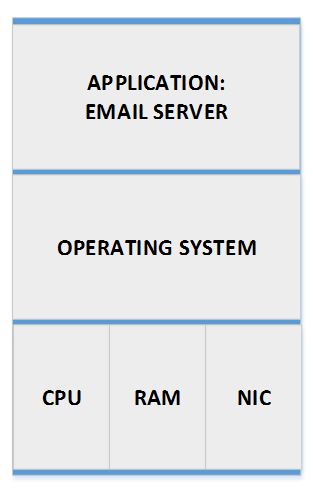
A schematic view of a traditional rack set up is shown below. The blue rectangle represents a single, physical server.

Down at the bottom level, we’ve got the hardware in the server, such as the processor, the RAM memory, and the network interface card for our network connectivity.
We install the operating system directly onto the hardware.
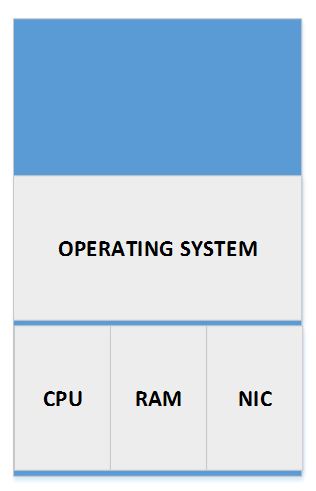
After the operating system has been installed, we’ll install our applications on top. The first instance was our email server.
We have the same architecture for the database server and web server. Three server workloads running on three physically separate pieces of hardware.
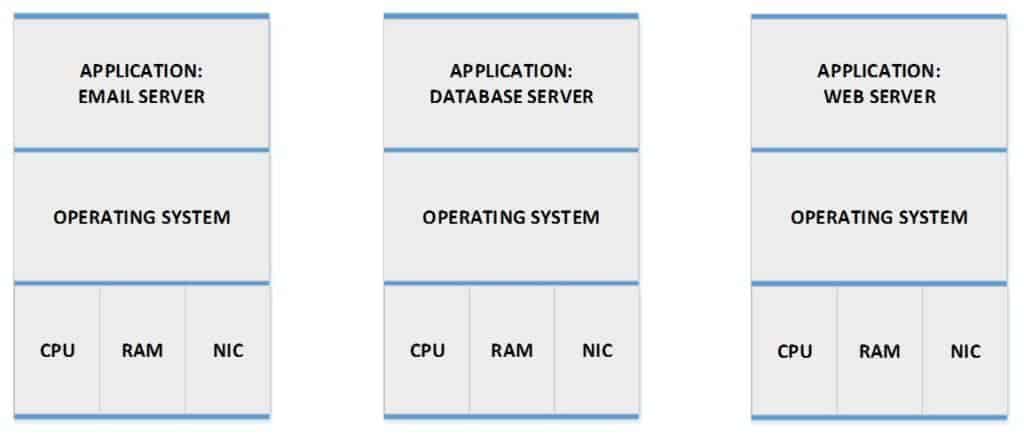
Now, when we do it like this, the server utilisation leaves a lot to be desired. When I say “server utilisation”, I mean how busy the CPU, the RAM, the NIC, etc. are. Typically, when you’re running a single application on a server like this, it’s going to be running at around 15% utilisation, which obviously is not very cost-efficient, particularly as we had to pay for each individual server and they’re all using power, taking up rack space, and requiring cooling.
What I would like to do to get better utilisation is shown in the diagram below.
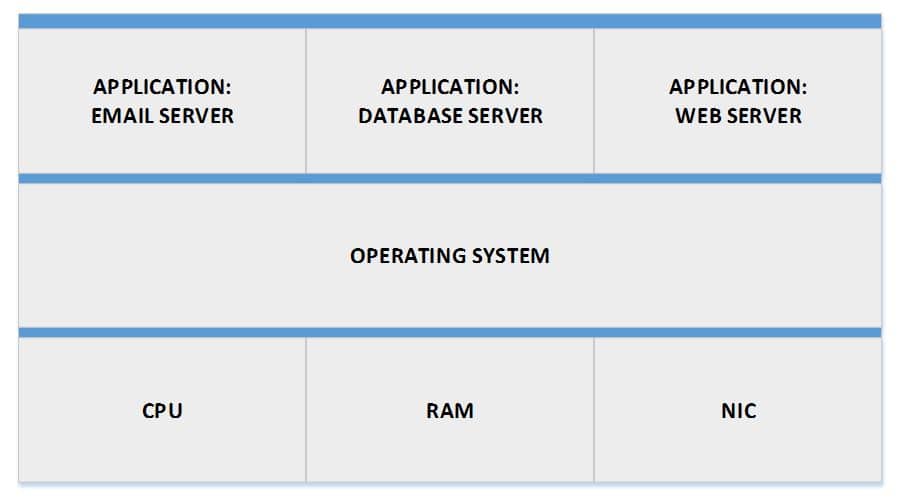
Here again I’ve got one server with the hardware down at the bottom level. I’ve got my operating system installed directly on the hardware, and then on that one server, I’m going to install my mail server application, my database server application, and my web server application as well.
If I did this I’m obviously going to get much better utilisation because rather than having the three servers running on three separate pieces of hardware, I’m now running them all on the same underlying server. That one piece of hardware is doing more work and I can have it running at 45% rather than 15% utilisation.
But putting multiple applications on the same server is very bad practise because if I have a problem with any one of the applications, it’s liable to take all three down. I don’t want to do that.
There is a way that we can actually get the higher utilisation by running all the servers on the same piece of hardware, but without running them all on the same instance in the same operating system. We can do that through server virtualization.
Server Virtualization
The big blue square represents our physical server again.

Again, down at the bottom level we’ve got our hardware resources such as the CPU, RAM, and NIC.
On top of there, rather than installing a normal operating system like Windows, we install a hypervisor. The hypervisor is going to come from one of the server virtualization companies such as VMware. The hypervisor acts as the operating system on the physical server and it also allocates access to the underlying hardware to my virtual machines, which are explained next.
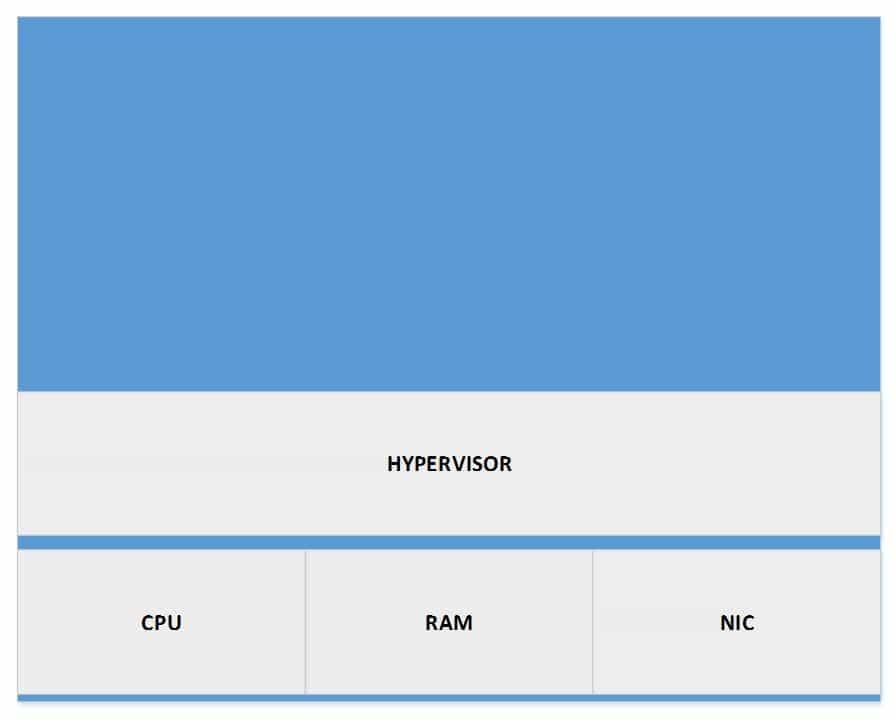
The first virtual machine gets installed in the hypervisor. At the bottom level in the virtual machine is its operating system. In our example Virtual Machine 1 is running Windows.
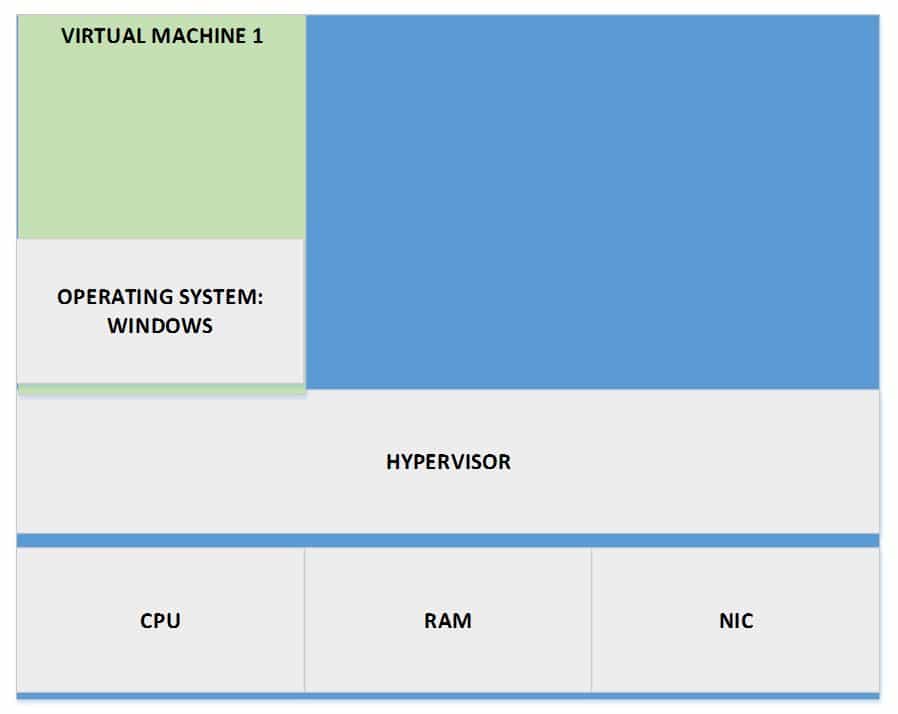
On top of Windows we install the email server application.
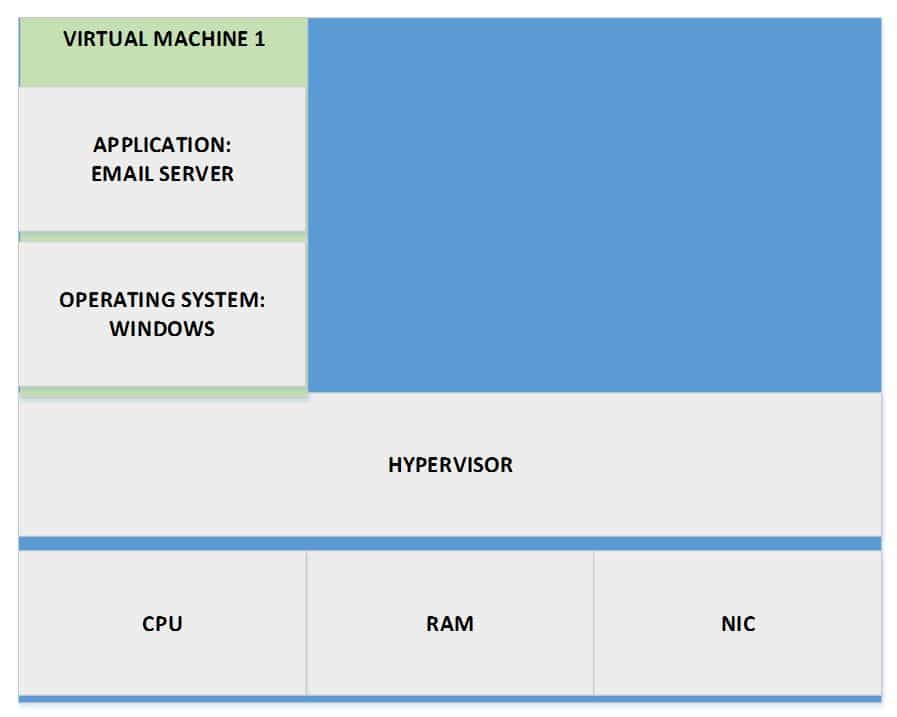
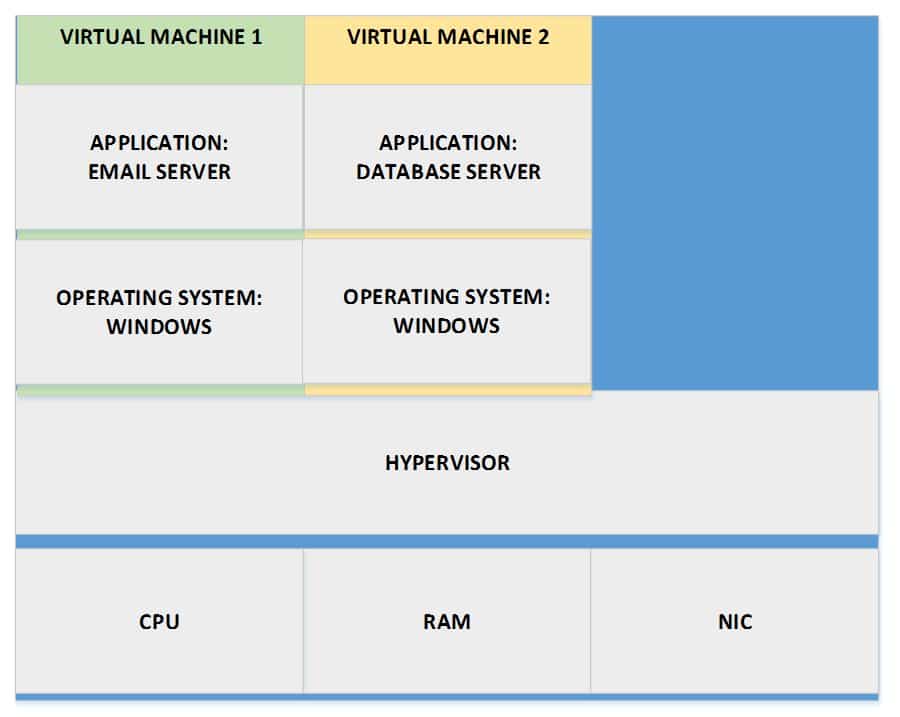
Then we install a second virtual machine onto the same underlying physical server. The second virtual machine is also running Windows as its operating system, but this is a separate instance of the operating system from Virtual Machine 1. The two virtual machines act as two completely separate servers.
Virtual Machine 1 and Virtual Machine 2 don’t know that they’re virtual machines, so there does not need to be any alteration to their standard operating systems.
On top of Windows on Virtual Machine 2, we install the database server application.
Virtual Machine 3 is running Linux as its operating system. On the same the same underlying server, we can have virtual machines that are running different operating systems.
On top of the Linux operating system we install the web server application.
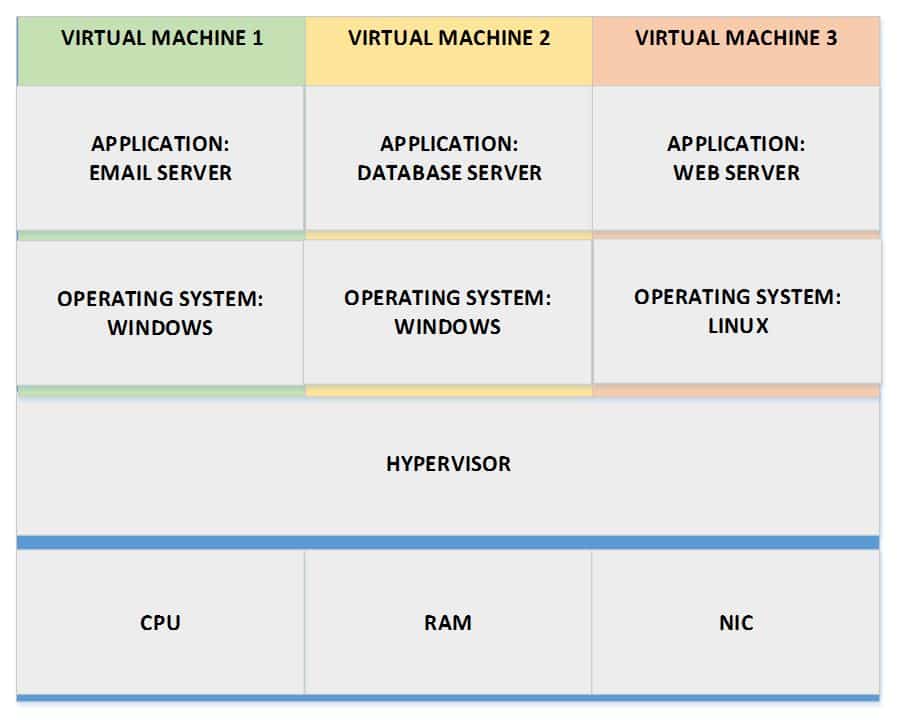
This is similar to what I wanted to achieve before where I’m running all three of the different applications on one box so I get much better utilisation, but this way it fulfils my security, performance and availability issues because the three virtual machines act as completely separate servers.
Virtual Machine Migration
The killer feature of server virtualization is the ability to migrate virtual machines between different underlying physical servers on the fly without requiring to shut them down and start them up again.
To be able to do this, the data for the virtual machine (which is configured as a virtual hard disk) must be housed on an external SAN or NAS storage system. If the virtual disk is located on a hard drive in the underlying physical server then it is tied to that server and cannot be moved.
The way the migration works is the contents of memory are copied from the physical source server to the new destination server. When that has been completed the virtual machine can cut over to the new underlying host. The virtual hard drive stays as is on the external storage. This process is transparent to anybody that’s connected into the virtual machine.
This is great if you’re the server administrator because if you wanted to take a physical host down for hardware maintenance, then you can just move all the virtual machines on the fly to a different host. Also, if you have a hardware failure or power outage of a physical host, you can automatically move all the virtual machines over to a different host. This is a super useful feature.
Type 1 Hypervisors
There’s two types of hypervisor – Type 1 and Type 2. The example above showed a Type 1 hypervisor.
A Type 1 Hypervisor runs directly on the system hardware and acts as the operating system. Its other job is to give out access to the underlying hardware to the different virtual machines.
The most popular popular Type 1 Hypervisors are VMware ESXI, Microsoft Hyper-V, Red Hat KVM, Oracle VMServer, and Citrix XenServer. In Cloud environments, Citrix XenServer is very popular because it’s the cheapest option to use for the Cloud service providers.
Type 2 Hypervisors
A Type 2 Hypervisor runs on top of a normal host operating system.
Popular Type 2 Hypervisors include VMware Workstation and VMware Player for PC, and VMware Fusion for Mac. We also have VirtualBox, QEMU, and Parallels.
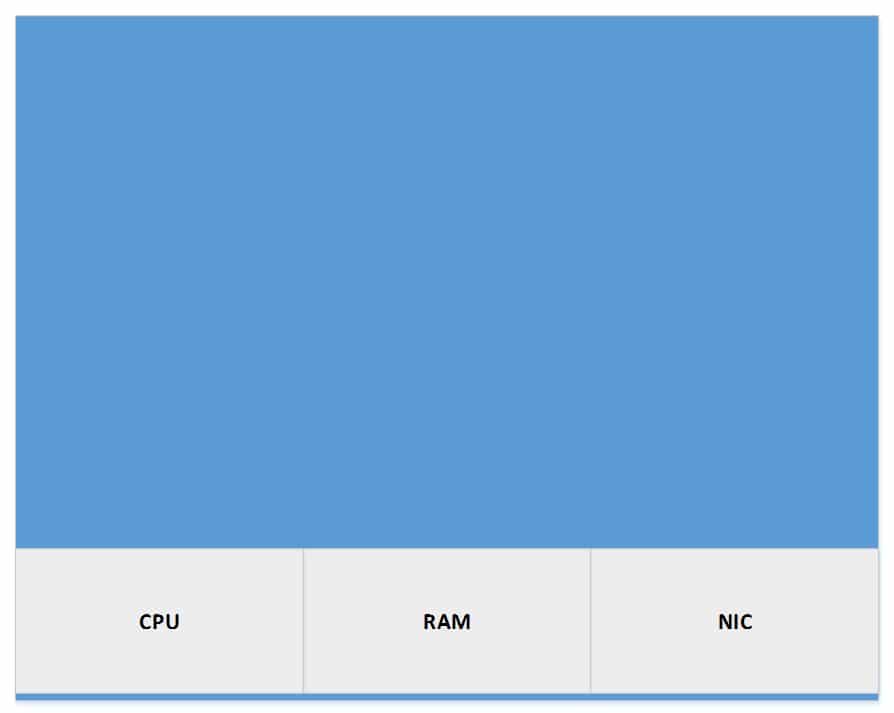
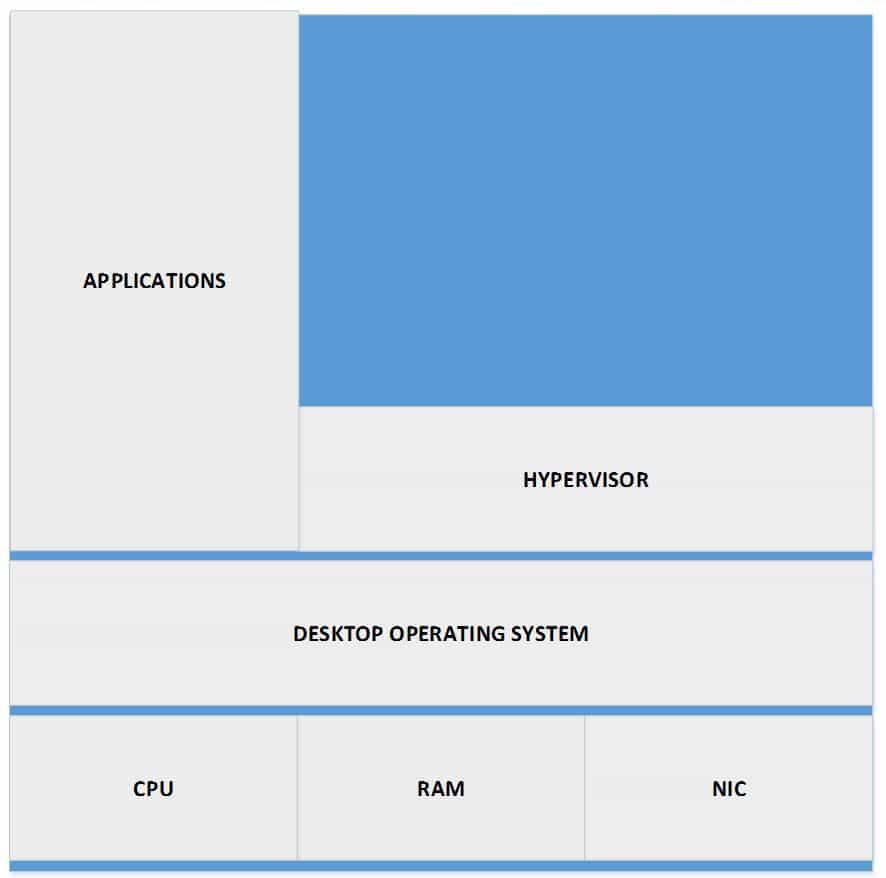
Let’s take a look at how the Type 2 Hypervisor works. The blue box shown below represents your laptop.

You’ve got your underlying hardware like your CPU, your RAM, and your NIC again.
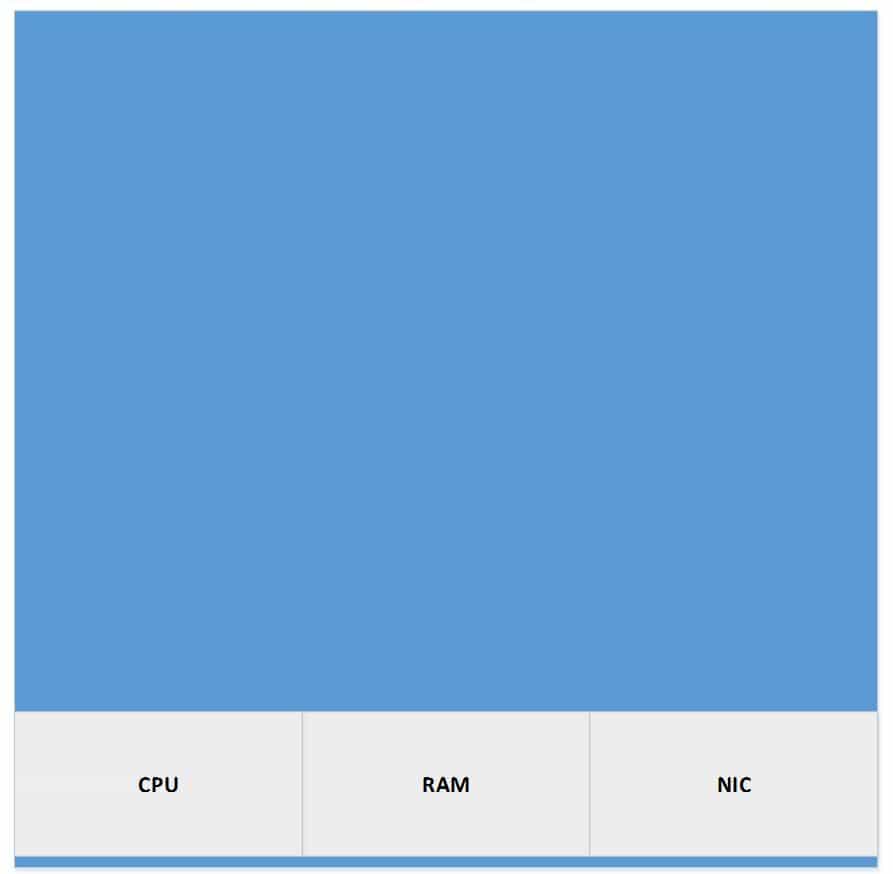
Unlike a Type 1 hypervisor, a Type 2 Hypervisor is not installed directly on top of your hardware. You’ve got your normal desktop operating system on your laptop, probably Windows or Linux or Mac.
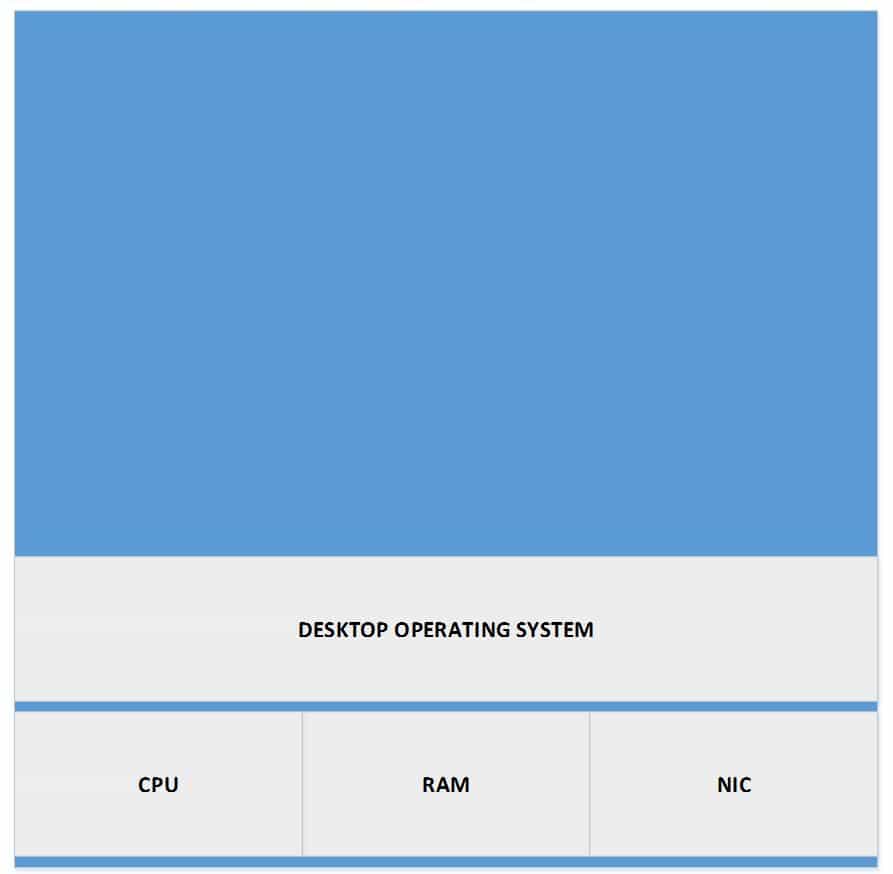
On top of your operating system you’ll have your normal applications like Microsoft Office and Adobe Acrobat etc.
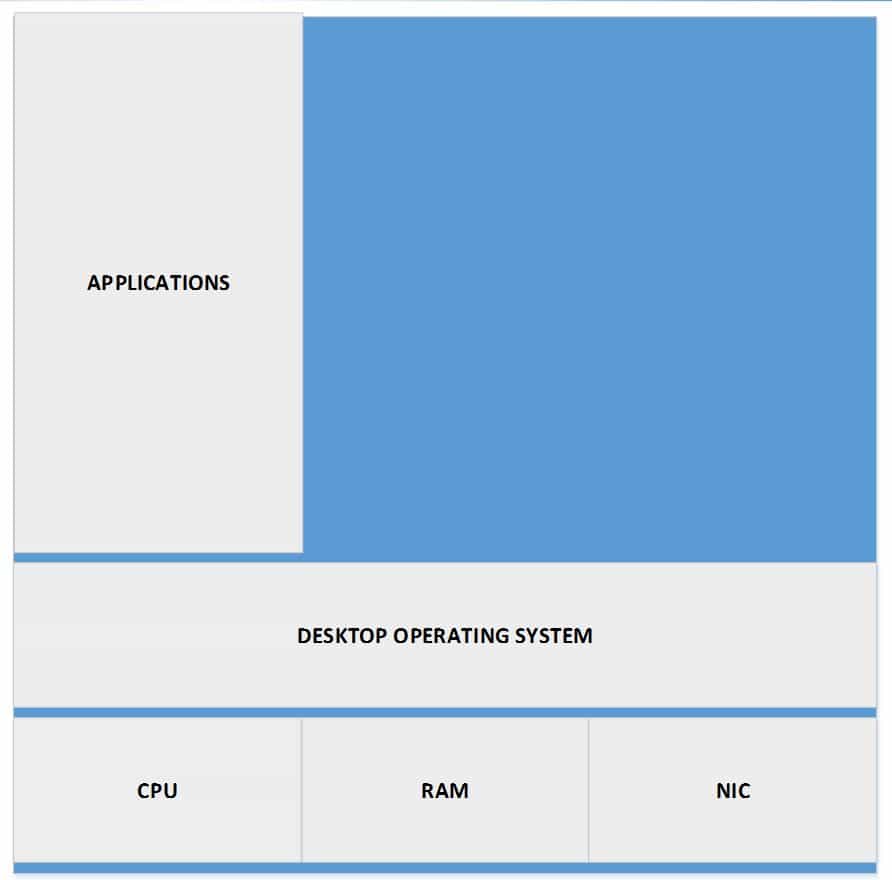
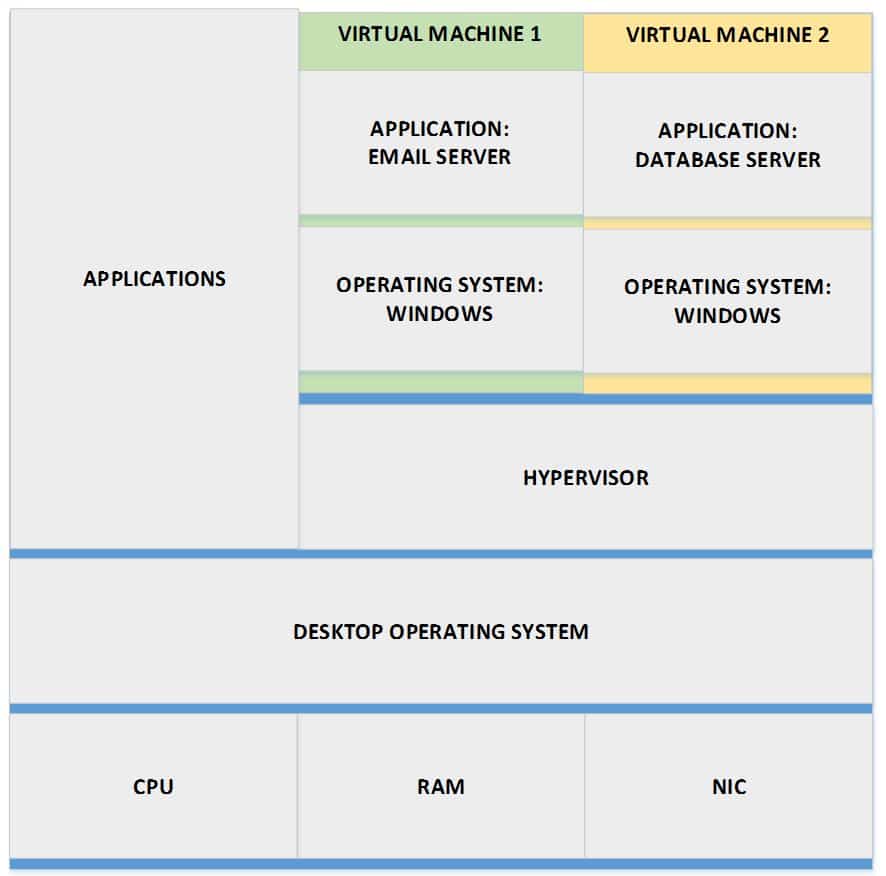
Then we install the Type 2 Hypervisor as another application on top of our normal desktop operating system.
On top of the hypervisor we’ll have our different virtual machines.
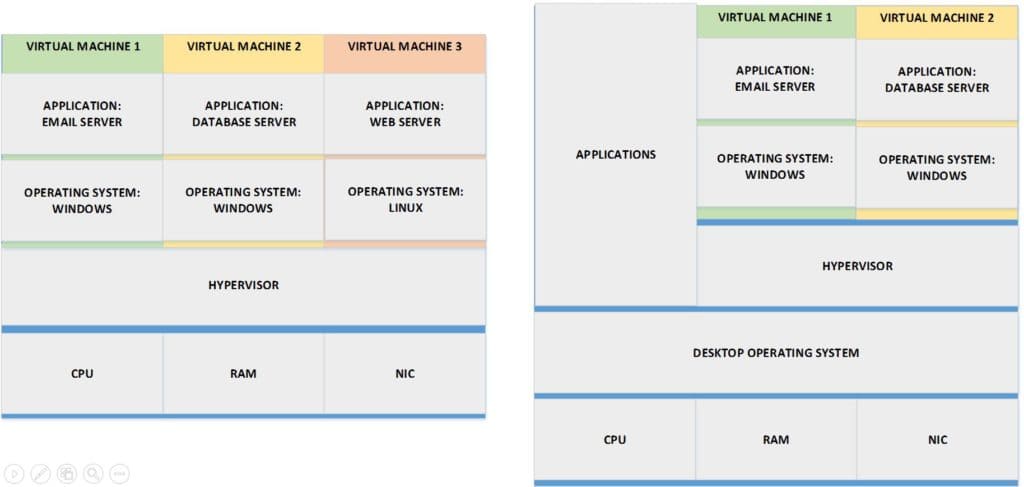
Type 1 vs Type 2 Hypervisors
A Type 1 hypervisor is installed directly on top of the hardware. With a Type 2 Hypervisor, we’ve got a normal desktop operating system installed on the hardware and then we have the hypervisor installed on top of our normal OS.
Type 1 hypervisors are used in a data centre. We use a Type 1 Hypervisor because it’s got the least amount of overhead, with only the hypervisor between the virtual machines and the underlying hardware. Type 1 hypervisors are not suitable to run on your laptop because they only run virtual machines.
Type 2 Hypervisor run on top of your normal desktop operating system so they’re suitable to use on your laptop. They’re not suitable for the data center because they have more overhead – there’s the hypervisor and the desktop operating system between the virtual machines and the underlying hardware. Where this is really useful is if you’re an IT engineer and you want to do some testing on Linux or Windows servers, for example, then you can run that as a virtual machine on your laptop instead of having to install it on separate hardware. Also, maybe you’re in technical sales and you’re selling a product that you’d like to give a demonstration of to your customers and it runs on Linux. Again, you don’t want to have to carry that around to your customer’s offices with you as a separate hardware box.
Additional Resources
How Server Virtualization Works from How Stuff Works
Benefits of Virtualization from Liquid Web