In this NetApp training tutorial, we will discuss the NetApp SyncMirror. NetApp SyncMirror is an optional feature which provides redundancy for our disk shelves. Scroll down for the video and also text tutorial.
NetApp SyncMirror Video Tutorial
Alejandro Carmona Ligeon

This is one of my favorite courses that I have done in a long time. I have always worked as a storage administrator, but I had no experience in Netapp. After finishing this course, even co-workers with more experience started asking me questions about how to set up or fix things in Netapp.
NetApp SyncMirror
There are multiple levels of redundancy for our disks and shelves within a NetApp ONTAP storage system. RAID-DP provides redundancy in case we lose up to two disks in a RAID Group in an aggregate.
Multi-Path High Availability (MPHA) provides redundancy for our connectivity from the controllers to the disk shelves. We have two SAS connections going down to our disk shelves, so if we lose any of the connections or any of the shelves, we can still get to the other functioning shelves.
So RAID-DP gives us redundancy for a couple of disks failing, and MPHA gives us redundancy for our connections, but what if an entire disk shelf fails? We want to have redundancy for that as well. That's where NetApp SyncMirror comes in.
When SyncMirror is enabled on an aggregate, the aggregate is made up of two sets of disks which are mirrored. As a result, whenever we write to that aggregate, we write to both sets of disks at the same time. For this functionality, you're going to need twice as many disks to create your SyncMirror aggregate.
The benefit we get from this is we get data redundancy. If we lose a disk shelf, we don't lose our data. The drawback is it's going to be more expensive because you're going to need twice as many disks.
You don't necessarily need to do this at a system-wide level. You can also do it for targeted aggregates if you prefer, you don't have to do it for all of your aggregates.
Along with controller High Availability, SyncMirror is the enabling technology for MetroCluster which we'll cover in a later tutorial.
Plexes
The two different mirrored sets of disks that make up a SyncMirror aggregate are called Plexes. The two plexes are on different shelves, connected to the system via separate cables because the point of SyncMirror is redundancy for our shelves. There would be little point in running SyncMirror if the disks were on the same shelf. A normal, non-SyncMirrored aggregate contains only one plex.
Pools
We also have pools. To configure SyncMirror, the disks must be divided into two pools by the administrator. The two pools will be Pool 0 and Pool 1. Disks for the first plex in a SyncMirror aggregate are assigned from Pool 0 and disks for the second plex are assigned from Pool 1. There's a one to one relationship between plexes and pools.
When disk auto assignment is turned on (which is the default), all disks are assigned to Pool 0. To configure SyncMirror, you're going to have to disable auto assignment and then manually assign half the disks to Pool 0 and the other half to Pool 1.
NetApp SyncMirror Configuration
The diagram below shows a new system with all of the default settings. All of the disks are in Pool 0. We need to have an Aggregate0 for our system information, which is how it comes configured straight out of the factory. Aggregate0 is made up of three disks configured with RAID-DP.
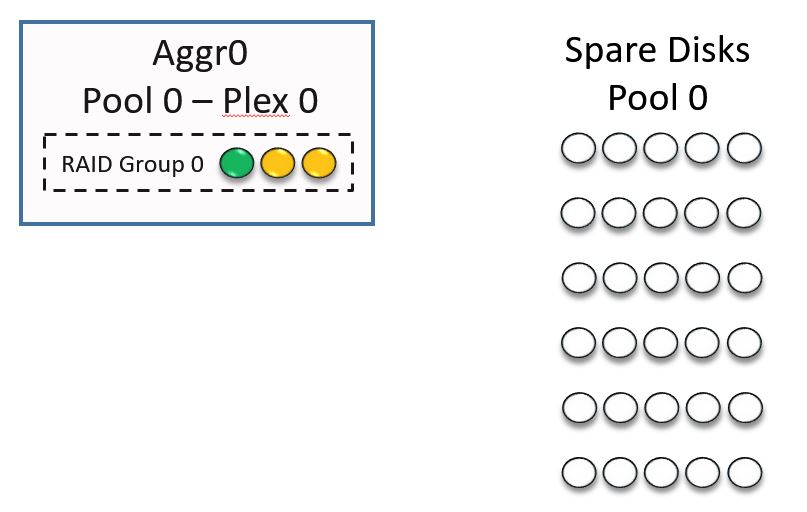
NetApp SyncMirror - New System Default
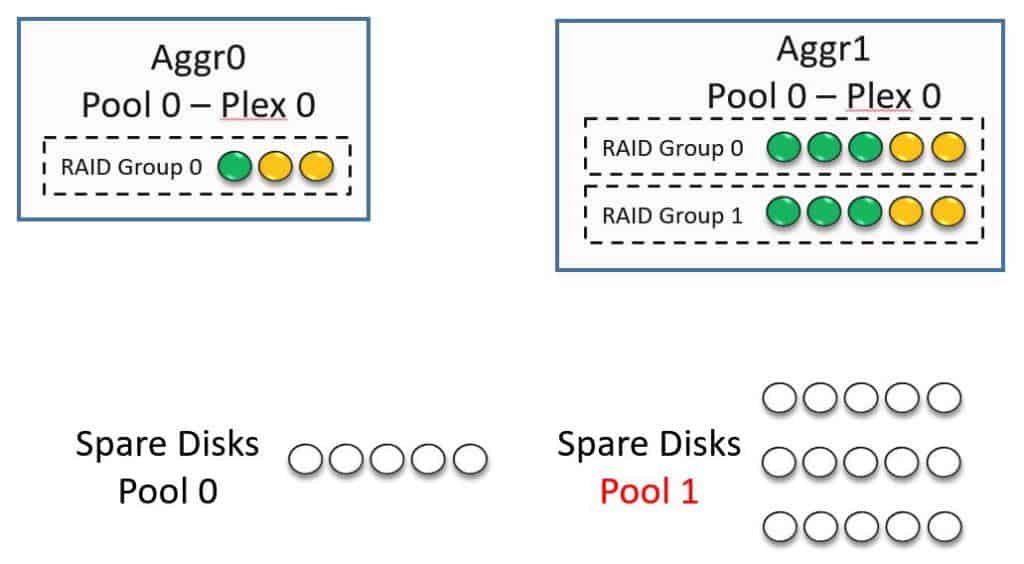
As an administrator, I would then need to create my first aggregate for user data. I've called it Aggregate 1 here. Again, by default, all the disks will come from Pool 0. This is not a mirrored aggregate. In our example, it's made up of a couple of different RAID groups. Notice all my spare disks are in Pool 0.
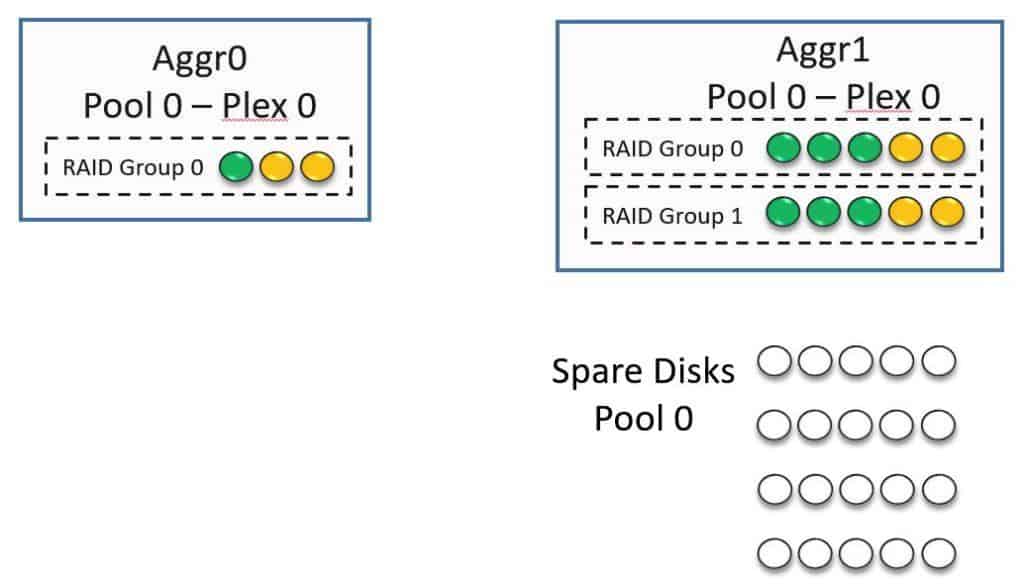
Aggregate1 Created
Now I want to convert Aggregate 1 into a SyncMirror aggregate. To do that, I turn off disk auto assign and I manually assign half of my disks that were in Pool 0 to Pool 1.
Manually assign disks to Pool 1
Next, I convert Aggregate 1 into a SyncMirror aggregate. When I do that I still have the original disk shelf. The data is on there in Pool 0 and Plex 0. I'm now going to be mirroring the data to a different disk shelf, so it's an exact mirror copy of Plex 0.
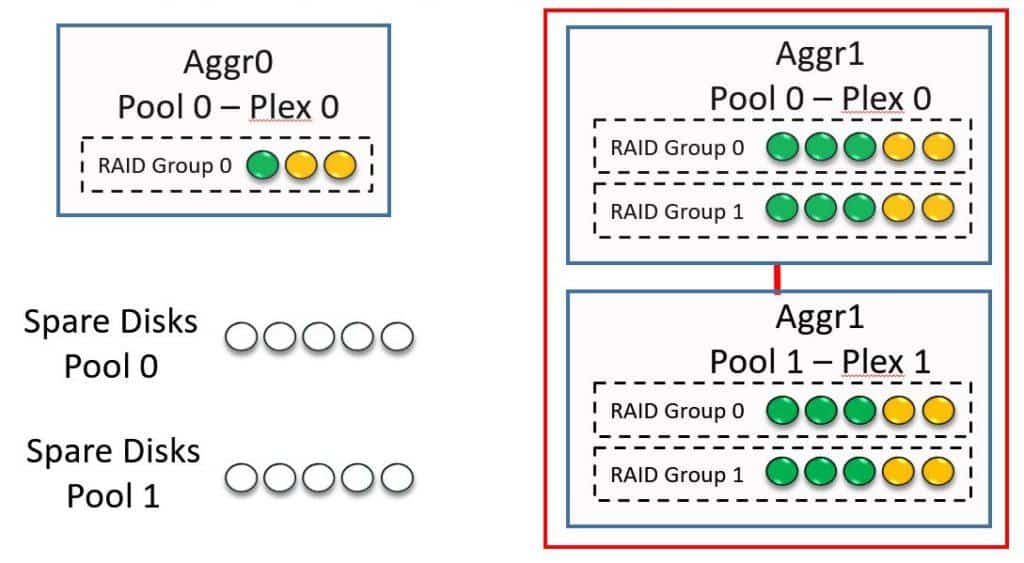
Convert Aggregate to SyncMirror
Now I have Plex 0 on one shelf and Plex 1 on the other shelf. Notice that I have half of my spare disks in Pool 0 and the other half of my spare disks in Pool 1.
In the example here, I converted an existing aggregate into a SyncMirror aggregate. I can also do this for new aggregates when I create them, as long as I have enough available disks in Pool 0 and Pool 1.
NetApp SyncMirror Configuration Example
This configuration example is an excerpt from my ‘NetApp ONTAP 9 Complete’ course. Full configuration examples using both the CLI and System Manager GUI are available in the course.
Want to practice this configuration for free on your laptop? Download your free step-by-step guide ‘How to Build a NetApp ONTAP Lab for Free’

- Verify that the cluster contains aggr0 on both nodes, and aggr1 and aggr2 on node 1.
cluster1::> storage aggregate show
Aggregate Size Available Used% State #Vols Nodes RAID Status
--------- -------- --------- ----- ------- ------ ---------------- --------
aggr0_cluster1_01
1.67GB 660KB 99% online 1 cluster1-01 raid_dp,
normal
aggr0_cluster1_02
855MB 42.12MB 95% online 1 cluster1-02 raid_dp,
normal
aggr1_C1N1 2.64GB 2.61GB 1% online 2 cluster1-01 raid_dp,
normal
aggr2_C1N1 2.64GB 2.64GB 0% online 0 cluster1-01 raid_dp,
normal
4 entries were displayed.
- Verify auto assignment of disk ownership is enabled, all disks are in Pool 0, and that some disks are owned by node 1, and other disks are owned by node 2.
cluster1::> storage disk option show
Node BKg. FW. Upd. Auto Copy Auto Assign Auto Assign Policy
------------- ------------- ------------ ------------- ------------------
cluster1-01 on on on default
cluster1-02 on on on default
2 entries were displayed.
cluster1::> storage disk show
Usable Disk Container Container
Disk Size Shelf Bay Type Type Name Owner
---------------- ---------- ----- --- ------- ----------- --------- -------
NET-1.1 1020MB - 16 FCAL aggregate aggr0_cluster1_01
cluster1-01
NET-1.2 1020MB - 17 FCAL aggregate aggr1_C1N1
cluster1-01
NET-1.3 1020MB - 18 FCAL aggregate aggr1_C1N1
cluster1-01
NET-1.4 1020MB - 19 FCAL aggregate aggr2_C1N1
cluster1-01
NET-1.5 1020MB - 20 FCAL aggregate aggr2_C1N1
cluster1-01
NET-1.6 1020MB - 21 FCAL spare Pool0 cluster1-01
NET-1.7 1020MB - 22 FCAL spare Pool0 cluster1-01
NET-1.8 1020MB - 24 FCAL spare Pool0 cluster1-01
NET-1.9 1020MB - 16 FCAL aggregate aggr0_cluster1_01
cluster1-01
NET-2.1 1020MB - 16 FCAL spare Pool0 cluster1-02
NET-2.2 1020MB - 17 FCAL spare Pool0 cluster1-02
NET-2.3 1020MB - 18 FCAL spare Pool0 cluster1-02
NET-2.4 1020MB - 19 FCAL spare Pool0 cluster1-02
NET-2.5 1020MB - 20 FCAL spare Pool0 cluster1-02
NET-2.6 1020MB - 16 FCAL aggregate aggr0_cluster1_02
cluster1-02
NET-2.7 1020MB - 17 FCAL aggregate aggr0_cluster1_02
cluster1-02
NET-2.8 1020MB - 18 FCAL aggregate aggr0_cluster1_02
cluster1-02
< output truncated >
- Add fourteen virtual 1GB disks on adapter 3 on Cluster 1 Node 2. Assign the disks to Pool 1.
Turn off disk auto assignment first to prevent the disks being automatically added to Pool 0.
cluster1::> storage disk option modify -node cluster1-02 -autoassign off
cluster1::> storage disk option show
Node BKg. FW. Upd. Auto Copy Auto Assign Auto Assign Policy
------------- ------------- ------------ ------------- ------------------
cluster1-01 on on on default
cluster1-02 on on off default
2 entries were displayed.
Next you need to add virtual disks to the simulator. In a real world environment you would simply non-disruptively add new disks.
Unlock the diag user account if you have not already done so.
cluster1::> security login unlock -username diag
cluster1::> security login password -username diag
Enter a new password: Flackbox1
Enter it again: Flackbox1
Enter the system shell on Node 2.
cluster1::> set -privilege diag
Warning: These diagnostic commands are for use by NetApp personnel only.
Do you want to continue? {y|n}: y
cluster1::*> systemshell -node cluster1-02
(system node systemshell)
diag@169.254.23.26's password: Flackbox1
Add the disk tools directory to the command path
cluster1-02% setenv PATH "${PATH}:/usr/sbin"
Change to the /sim/dev directory.
cluster1-02% cd /sim/dev
Add the virtual disks.
cluster1-02% sudo vsim_makedisks -n 14 -t 23 -a 2
Creating ,disks/v2.16:NETAPP__:VD-1000MB-FZ-520:70640100:2104448
Creating ,disks/v2.17:NETAPP__:VD-1000MB-FZ-520:70640101:2104448
Creating ,disks/v2.18:NETAPP__:VD-1000MB-FZ-520:70640102:2104448
Creating ,disks/v2.19:NETAPP__:VD-1000MB-FZ-520:70640103:2104448
Creating ,disks/v2.20:NETAPP__:VD-1000MB-FZ-520:70640104:2104448
Creating ,disks/v2.21:NETAPP__:VD-1000MB-FZ-520:70640105:2104448
Creating ,disks/v2.22:NETAPP__:VD-1000MB-FZ-520:70640106:2104448
Creating ,disks/v2.24:NETAPP__:VD-1000MB-FZ-520:70640107:2104448
Creating ,disks/v2.25:NETAPP__:VD-1000MB-FZ-520:70640108:2104448
Creating ,disks/v2.26:NETAPP__:VD-1000MB-FZ-520:70640109:2104448
Creating ,disks/v2.27:NETAPP__:VD-1000MB-FZ-520:70640110:2104448
Creating ,disks/v2.28:NETAPP__:VD-1000MB-FZ-520:70640111:2104448
Creating ,disks/v2.29:NETAPP__:VD-1000MB-FZ-520:70640112:2104448
Creating ,disks/v2.32:NETAPP__:VD-1000MB-FZ-520:70640113:2104448
Shelf file Shelf:DiskShelf14 updated
Exit back to the Cluster Shell and reboot Node 2.
cluster1-02% exit
logout
cluster1::*> system node reboot cluster1-02 -ignore-quorum-warnings
Warning: Are you sure you want to reboot node "cluster1-02"? {y|n}: y
Verify the disks have been added after the node has rebooted.
cluster1::*> set admin
cluster1::> storage disk show -nodelist cluster1-02
Usable Disk Container Container
Disk Size Shelf Bay Type Type Name Owner
---------------- ---------- ----- --- ------- ----------- --------- --------
NET-2.1 1020MB - 16 FCAL spare Pool0 cluster1-02
NET-2.2 1020MB - 17 FCAL spare Pool0 cluster1-02
NET-2.3 1020MB - 18 FCAL spare Pool0 cluster1-02
NET-2.4 1020MB - 19 FCAL spare Pool0 cluster1-02
NET-2.5 1020MB - 20 FCAL spare Pool0 cluster1-02
NET-2.6 1020MB - 16 FCAL aggregate aggr0_cluster1_02
cluster1-02
NET-2.7 1020MB - 17 FCAL aggregate aggr0_cluster1_02
cluster1-02
NET-2.8 1020MB - 18 FCAL aggregate aggr0_cluster1_02
cluster1-02
NET-2.9 1020MB - 19 FCAL spare Pool0 cluster1-02
NET-2.10 1020MB - 20 FCAL spare Pool0 cluster1-02
NET-2.11 1020MB - 21 FCAL spare Pool0 cluster1-02
NET-2.12 1020MB - 22 FCAL spare Pool0 cluster1-02
NET-2.13 1020MB - 24 FCAL spare Pool0 cluster1-02
NET-2.14 1020MB - 25 FCAL spare Pool0 cluster1-02
NET-2.15 1020MB - 26 FCAL spare Pool0 cluster1-02
NET-2.16 1020MB - 27 FCAL spare Pool0 cluster1-02
NET-2.17 1020MB - 21 FCAL spare Pool0 cluster1-02
NET-2.18 1020MB - 22 FCAL spare Pool0 cluster1-02
NET-2.19 1020MB - 24 FCAL spare Pool0 cluster1-02
NET-2.20 1020MB - 25 FCAL spare Pool0 cluster1-02
NET-2.21 1020MB - 26 FCAL spare Pool0 cluster1-02
NET-2.22 1020MB - 27 FCAL spare Pool0 cluster1-02
NET-2.23 1020MB - 28 FCAL spare Pool0 cluster1-02
NET-2.24 1020MB - 29 FCAL spare Pool0 cluster1-02
NET-2.25 1020MB - 32 FCAL spare Pool0 cluster1-02
NET-2.26 1020MB - 28 FCAL spare Pool0 cluster1-02
NET-2.27 1020MB - 29 FCAL spare Pool0 cluster1-02
NET-2.28 1020MB - 32 FCAL spare Pool0 cluster1-02
NET-2.29 - - 16 FCAL unassigned - -
NET-2.30 - - 17 FCAL unassigned - -
NET-2.31 - - 18 FCAL unassigned - -
NET-2.32 - - 19 FCAL unassigned - -
NET-2.33 - - 20 FCAL unassigned - -
NET-2.34 - - 21 FCAL unassigned - -
NET-2.35 - - 22 FCAL unassigned - -
NET-2.36 - - 24 FCAL unassigned - -
NET-2.37 - - 25 FCAL unassigned - -
NET-2.38 - - 26 FCAL unassigned - -
NET-2.39 - - 27 FCAL unassigned - -
NET-2.40 - - 28 FCAL unassigned - -
NET-2.41 - - 29 FCAL unassigned - -
NET-2.42 - - 32 FCAL unassigned - -
42 entries were displayed.
NET-2.29 to NET-2.42 are the new disks.
Assign one of the disks to Pool 1.
cluster1::> storage disk assign -disk NET-2.29 -owner cluster1-02 -pool 1
Turn disk auto assignment back on for Node 2. Node 2 will be automatically assigned ownership of the rest of the disks. The disks will be placed in Pool 1 to match the disk which was manually assigned.
cluster1::> storage disk option modify -node cluster1-02 -autoassign on
Verify disk assignment has completed correctly. Be patient as it can take up to 5 minutes for the job to run.
cluster1::> storage disk show -nodelist cluster1-02
Usable Disk Container Container
Disk Size Shelf Bay Type Type Name Owner
---------------- ---------- ----- --- ------- ----------- --------- --------
NET-2.1 1020MB - 16 FCAL spare Pool0 cluster1-02
NET-2.2 1020MB - 17 FCAL spare Pool0 cluster1-02
NET-2.3 1020MB - 18 FCAL spare Pool0 cluster1-02
NET-2.4 1020MB - 19 FCAL spare Pool0 cluster1-02
NET-2.5 1020MB - 20 FCAL spare Pool0 cluster1-02
NET-2.6 1020MB - 16 FCAL aggregate aggr0_cluster1_02
cluster1-02
NET-2.7 1020MB - 17 FCAL aggregate aggr0_cluster1_02
cluster1-02
NET-2.8 1020MB - 18 FCAL aggregate aggr0_cluster1_02
cluster1-02
NET-2.9 1020MB - 19 FCAL spare Pool0 cluster1-02
NET-2.10 1020MB - 20 FCAL spare Pool0 cluster1-02
NET-2.11 1020MB - 21 FCAL spare Pool0 cluster1-02
NET-2.12 1020MB - 22 FCAL spare Pool0 cluster1-02
NET-2.13 1020MB - 24 FCAL spare Pool0 cluster1-02
NET-2.14 1020MB - 25 FCAL spare Pool0 cluster1-02
NET-2.15 1020MB - 26 FCAL spare Pool0 cluster1-02
NET-2.16 1020MB - 27 FCAL spare Pool0 cluster1-02
NET-2.17 1020MB - 21 FCAL spare Pool0 cluster1-02
NET-2.18 1020MB - 22 FCAL spare Pool0 cluster1-02
NET-2.19 1020MB - 24 FCAL spare Pool0 cluster1-02
NET-2.20 1020MB - 25 FCAL spare Pool0 cluster1-02
NET-2.21 1020MB - 26 FCAL spare Pool0 cluster1-02
NET-2.22 1020MB - 27 FCAL spare Pool0 cluster1-02
NET-2.23 1020MB - 28 FCAL spare Pool0 cluster1-02
NET-2.24 1020MB - 29 FCAL spare Pool0 cluster1-02
NET-2.25 1020MB - 32 FCAL spare Pool0 cluster1-02
NET-2.26 1020MB - 28 FCAL spare Pool0 cluster1-02
NET-2.27 1020MB - 29 FCAL spare Pool0 cluster1-02
NET-2.28 1020MB - 32 FCAL spare Pool0 cluster1-02
NET-2.29 1020MB - 16 FCAL spare Pool1 cluster1-02
NET-2.30 1020MB - 17 FCAL spare Pool1 cluster1-02
NET-2.31 1020MB - 18 FCAL spare Pool1 cluster1-02
NET-2.32 1020MB - 19 FCAL spare Pool1 cluster1-02
NET-2.33 1020MB - 20 FCAL spare Pool1 cluster1-02
NET-2.34 1020MB - 21 FCAL spare Pool1 cluster1-02
NET-2.35 1020MB - 22 FCAL spare Pool1 cluster1-02
NET-2.36 1020MB - 24 FCAL spare Pool1 cluster1-02
NET-2.37 1020MB - 25 FCAL spare Pool1 cluster1-02
NET-2.38 1020MB - 26 FCAL spare Pool1 cluster1-02
NET-2.39 1020MB - 27 FCAL spare Pool1 cluster1-02
NET-2.40 1020MB - 28 FCAL spare Pool1 cluster1-02
NET-2.41 1020MB - 29 FCAL spare Pool1 cluster1-02
NET-2.42 1020MB - 32 FCAL spare Pool1 cluster1-02
42 entries were displayed.
- Create a mirrored aggregate on Cluster 1 Node 2 named aggr1_C1N2 with 5 FCAL disks in each plex.
cluster1::> storage aggregate create -aggregate aggr1_C1N2 -diskcount 10 -disktype FCAL -node cluster1-02 -mirror true
Info: The layout for aggregate "aggr1_C1N2" on node "cluster1-02" would be:
First Plex
RAID Group rg0, 5 disks (block checksum, raid_dp)
Usable Physical
Position Disk Type Size Size
---------- ------------------------- ---------- -------- --------
dparity NET-2.4 FCAL - -
parity NET-2.11 FCAL - -
data NET-2.5 FCAL 1000MB 1.00GB
data NET-2.12 FCAL 1000MB 1.00GB
data NET-2.17 FCAL 1000MB 1.00GB
Second Plex
RAID Group rg0, 5 disks (block checksum, raid_dp)
Usable Physical
Position Disk Type Size Size
---------- ------------------------- ---------- -------- --------
dparity NET-2.29 FCAL - -
parity NET-2.30 FCAL - -
data NET-2.31 FCAL 1000MB 1.00GB
data NET-2.32 FCAL 1000MB 1.00GB
data NET-2.33 FCAL 1000MB 1.00GB
Aggregate capacity available for volume use would be 2.50GB.
Do you want to continue? {y|n}: y
[Job 36] Job succeeded: DONE
- Verify the aggregate is mirrored and which disks are in which plex.
cluster1::> storage aggregate show -aggregate aggr1_C1N2 -fields mirror,plexes,disklist,mirror-disklist
aggregate mirror disklist mirror-disklist plexes
---------- ------ ------------------------------------------ ----------------------
aggr1_C1N2 true NET-2.4,NET-2.11,NET-2.5,NET-2.12,NET-2.17 NET-2.29,NET-2.30,NET-2.31,NET-2.32,NET-2.33 /aggr1_C1N2/plex0,/aggr1_C1N2/plex1
- Assume Plex 1 is damaged. Destroy plex 1.
cluster1::> storage aggregate plex offline -aggregate aggr1_C1N2 -plex plex1
Plex offline successful on plex: aggr1_C1N2/plex1
cluster1::> storage aggregate plex delete -aggregate aggr1_C1N2 -plex plex1
Warning: Are you sure you want to destroy this plex? {y|n}: y
[Job 37] Job succeeded: DONE
- Verify aggr1_C1N2 is no longer a mirrored aggregate.
cluster1::> storage aggregate show -aggregate aggr1_C1N2 -fields mirror,plexes
aggregate mirror plexes
---------- ------ -----------------
aggr1_C1N2 false /aggr1_C1N2/plex0
- Recreate the mirror for aggr1_C1N2.
Use the ‘storage aggregate mirror’ command to create a mirror for an existing aggregate.
cluster1::> storage aggregate mirror -aggregate aggr1_C1N2
Info: Disks would be added to aggregate "aggr1_C1N2" on node "cluster1-02" in the following manner:
Second Plex
RAID Group rg0, 5 disks (block checksum, raid_dp)
Usable Physical
Position Disk Type Size Size
---------- ------------------------- ---------- -------- --------
dparity NET-2.34 FCAL - -
parity NET-2.35 FCAL - -
data NET-2.36 FCAL 1000MB 1.00GB
data NET-2.37 FCAL 1000MB 1.00GB
data NET-2.38 FCAL 1000MB 1.00GB
Aggregate capacity available for volume use would be 2.50GB.
- Verify aggr1_C1N2 is mirrored again.
cluster1::> storage aggregate show -aggregate aggr1_C1N2 -fields mirror,plexes,disklist,mirror-disklist
aggregate mirror disklist mirror-disklist plexes
---------- ------ ------------------------------------------ ----------------------
aggr1_C1N2 true NET-2.4,NET-2.11,NET-2.5,NET-2.12,NET-2.17 NET-2.38,NET-2.37,NET-2.34,NET-2.35,NET-2.36 /aggr1_C1N2/plex0,/aggr1_C1N2/plex5
Additional Resources
Data mirroring using SyncMirror from NetApp.

Text by Alex Papas, Technical Writer at www.flackbox.com
Alex has been working with Data Center technologies for over 20 years. Currently he is the Network Lead for Costa, one of the largest agricultural companies in Australia. When he’s not knee deep in technology you can find Alex performing with his band 2am