In this NetApp training tutorial, we will cover NetApp SnapVault. Scroll down for the video and also text tutorial.
NetApp SnapVault Video Tutorial

Harkirat Singh

I studied for around 30 hours before clearing the exam.
I was able to get all my doubts cleared. I always go through your training videos for NetApp whenever i want to clear my doubts again and again and to revise concepts in a short span of time.
NetApp SnapVault
NetApp SnapVault is ONTAP's long term disk-to-disk backup solution. You can also use it to offload tape backups from remote systems to a centralised cluster. It has the same functionality as traditional tape backups, but is much faster, more convenient, and requires less storage space. Data is replicated from the source volume to a destination volume on a centralised backup cluster.
Disk-to-Disk Backups
There are two main use cases for NetApp SnapVault. The first is disk-to-disk backups that replace traditional tape.
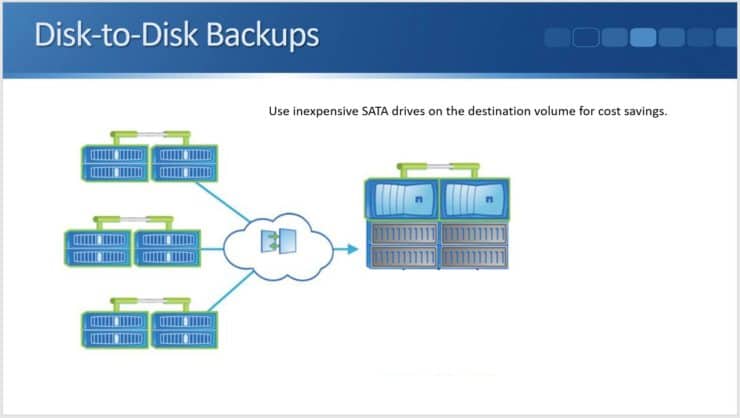
You can see here we've got multiple remote systems and we are using our centralised NetApp SnapVault system as the backup location for all of those different remote locations. It saves us having to put tape devices in the remote locations and the backup is also quicker and more convenient.
In the central NetApp SnapVault location, we would most likely use SATA drives because they would be cheaper than using SAS drives or SSDs. We don't have clients accessing the SnapVault cluster for their data access, so we don't need high performance disks. Capacity is more important.
Staging to Remote Tape
The second main use case for NetApp SnapVault is for staging to remote tape.
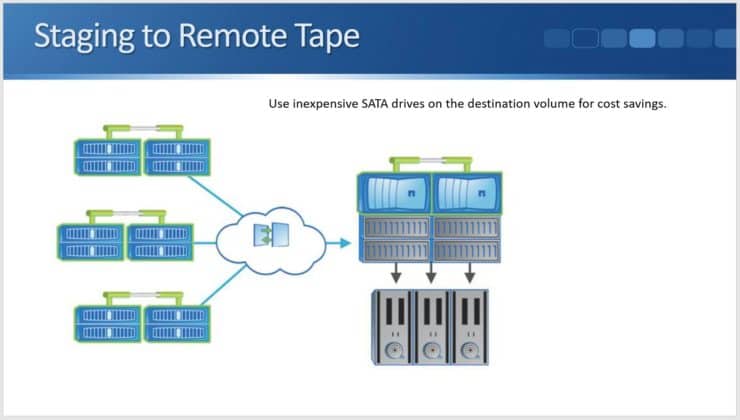
It’s a similar setup in that we have multiple remote systems and they are all sending backups into the central NetApp SnapVault system. The difference is we have a tape device that is attached to the central SnapVault system.
You may be wondering why we would do that. The reasons would be compliance related. If in your industry, there is a requirement that you must backup to tape (not only to disk), you can still use SnapVault.
We could stage the backups to disk on the SnapVault system and then move it down onto tape from there. Again, it would save us having to purchase tape drives for each of the different remote systems. If you are going to do this, you can either use SnapMirror or SnapVault.
NetApp Open Systems SnapVault
When using SnapVault, we will usually be replicating from one NetApp cluster to another. There is another feature available called OSSV (Open Systems SnapVault). With OSSV, you can do backups from an end host onto the SnapVault system rather than doing it from a NetApp system.
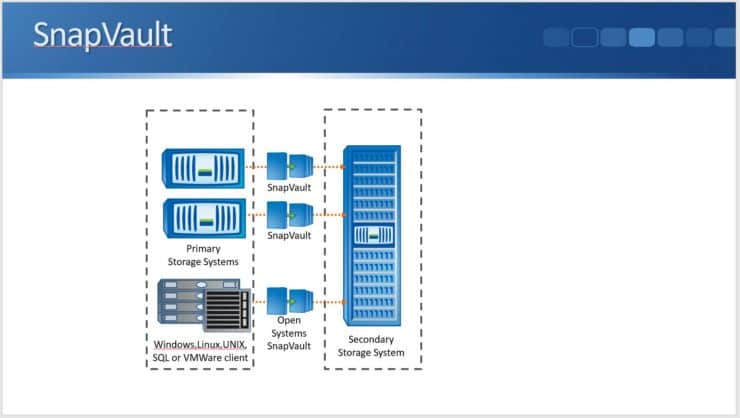
This is software that you install on the host/client. It's supported on Windows, Linux, Unix, SQL, or VMware clients. You install the software on the host/client and it can then back up its own drives to the NetApp SnapVault storage cluster.
NetApp Snapvault Replication
SnapVault uses the SnapMirror engine, so the replication works in exactly the same way our Load Sharing mirrors and Data Protection mirrors do. We do the initial baseline transfer to start off with. A snapshot copy of all data on the source volume is created and then transferred to the destination volume.
After that, we configure either manual or scheduled updates. Our backups should be doing scheduled updates. You could do manual updates on demand if you needed to as well. When the scheduled update is due to run and your snapshot copy is taken, only incremental changes are synchronised from the source to the destination. Data is replicated at the block level.
Problems with Traditional Tape Backups
Let's look at the reasons we would use SnapVault. What are some problems we have with traditional tape backups? Backups and restores from tape are slow. Tape has always been a slow medium.
It also requires the media (the actual tapes) to be unloaded from tape devices, transported offsite, securely stored, and cataloged after your backups have completed. You don't want the tape to be in the same location as the data that you're backing up, because if it is and there is a disaster (like a fire), you've lost your live data as well as your backup.
Long-term backups must be stored in an offsite location. This means having them physically transported to that offsite location, which can be a hassle. Similarly, if you need to restore data, the tape media needs to be found in that offsite location and transported back onsite.
In one of my earlier jobs in IT, I was working for a small company, looking after everything IT related including their backups and restores. This task was the biggest hassle in my role. Every morning I had to go to the server room. We had several servers in there, each with their own tape drive. I had to unload the tape from each of them and then load the new tape. I had to box up the tape, label it, and then pass it to the person who would take it to the offsite location.
Restores were an even bigger hassle. I would have to get in touch with the company that we used for storing our tapes and tell them which tape I needed. They would then have to locate it and transport it to our site. That all took time, and then the actual restore was coming from tape. That took time as well. As you can imagine, it took ages to do any restores and it was just a huge hassle.
Also, if you don't have a long enough window of time on weeknights to back up your data (which is quite common) you'll likely have to take full backups only on weekends and then incrementals on weeknights. Then, if you need to restore a data set, you'll need to restore from the last full backup followed by every incremental.
This means if you had a problem on Friday and had to restore the entire set of data, you’d have to load the tape from Sunday night's full backup, restore it, and then do the same thing with the incrementals from Monday, Tuesday, Wednesday, and Thursday. Very inconvenient and very time-consuming.
NetApp SnapVault Benefits
This is where we get benefits from SnapVault. With SnapVault, only incremental changes are replicated. This is at the block level, and it's to disk, which is much faster than tape. That's much quicker than doing full backups to tape, so your backups can be completed in a much shorter time frame.
Also, only incremental changes are sent across on every replication, not full backups. The capacity requirements can be 90% lower than tape. As we saw earlier, we would prefer to do full backups with tape so we wouldn’t have to load multiple tapes when restoring. But if you are doing full backups it's very time-consuming and takes up a lot of tape space.
When using SnapVault, only incremental changes are replicated to the Secondary, but each Snapshot appears as a full backup when restoring. This gives us the best of both worlds. Each snapshot appears as a full backup, so we're not having to do incremental restores, even though only the incremental changes are being replicated. This makes it very fast and it takes up very little space.
Data can be restored from a SnapVault Secondary volume with less downtime and uncertainty than your traditional tape restores, and the best thing of all for us (the people looking after backups) is that there are no physical media to load, unload, and transport offsite.
How NetApp SnapVault Works
In NetApp SnapVault, the source system is known as the Primary and the destination is the Secondary. Data can be restored from the SnapVault Secondary volume back to the original Primary volume or you can restore to a different volume. This means that if you've lost that original source volume, you can restore it somewhere else, and the entire volume or individual files and lines can be restored.
Here’s how it works when configured. A snapshot policy is applied to the source volume on the Primary cluster. This is a standard snapshot policy, the same kind we use for our normal scheduled snapshot copies on the source volume. Snapshots are going to be retained here for short time periods just as if we weren't using SnapVault (i.e. if we were just configuring a standard Snapshot policy for a volume).
The difference is that a Snapshot label is applied to the scheduled Snapshots within the policy. We're potentially going to have hourly, daily, and weekly Snapshots. We put our label on there as well. Typically, we'll use the same name as the actual schedule, so for daily, we'll use the label “daily”. For weekly, we'll use the label “weekly”. That's done on the source volume that we're going to be backing up.
Then on the destination side, a SnapMirror policy is applied to the destination volume on the Secondary cluster. The policy contains rules which contain Snapshot labels that match the labels on the source side, and they specify how long Snapshots are going to be retained for on the backup SnapVault system.
The Secondary cluster will then pull those Snapshots with matching labels on the source to the destination volume. The difference is that on the source volume, we're only going to keep the snapshots for a short time. On the destination volume, we're going to retain them for long time periods for our long-term backup.
Initial Configuration Steps on Both Clusters
Next, let's have a look at how this is configured. The initial configuration step, which we spoke about earlier in the lesson, is adding the NetApp SnapVault license. We do that on both clusters, both the Primary and the Secondary.
We then need to create our Intercluster LIFs which are used for the replication traffic. We do that on every node on both clusters. We then peer the clusters with a “cluster peer create” command and peer the SVMs with the “vserver peer create” command.
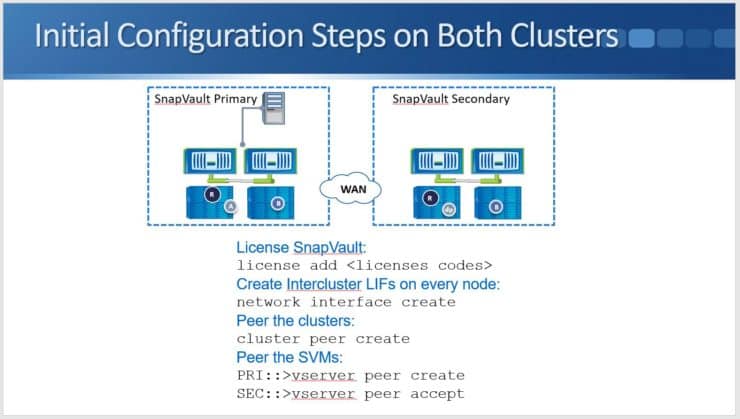
We need to have an SVM created on the SnapVault Secondary system (the destination side) that we can put the destination volume into. We then peer that SVM with the source SVM on the Primary side.
Create Snapshot Policy on Primary Cluster
Next, we create our snapshot policy on the Primary cluster on the source side. We include a SnapMirror label in the policy to control which Snapshots should be pulled to the Secondary.
The command we use here is “snapshot policy create”. We specify the VServer this is for. We give the policy a name. In the example in the diagram I'm going to be backing up vol2, so I've got a policy which is specific for it. I've called it “vol2”.
We must include “-enabled true”, and then I've got “-schedule1 hourly”, “-count1”, and “5”. What that means is I'm going to take snapshots based on my hourly schedule and I'm going to retain five of them here on the source volume.
Then, “-schedule2 daily”, “-count 2”, “5”, and “-snapmirror-label2 daily”. This is saying I'm also going to take snapshots based on the daily schedule. I'm going to retain five of those here on the source volume, and I'm going to put a SnapMirror label on there, specified as “daily”.
I've done this because I'm going to be replicating them over to the SnapVault cluster, so I need to put a label on there. I didn't put a label on the hourly schedule because I'm not going to be replicating that over to the SnapVault Secondary. The SnapVault Secondary is for my long-term backups, so I'm probably not going to want to have hourly Snapshots on there.
Then finally, I'm also taking weekly Snapshots. I have added “-schedule3”, “weekly”, “-count3”, “2”, and “-snapmirror-label3 weekly”, so I'm taking snapshots based on the weekly schedule. I'm going to retain two of them here on the source cluster and put a SnapMirror label on them, which matches the schedule name “weekly”.
I then need to apply the Snapshot policy to the source volume on the Primary cluster. To do that, it's “volume modify –vserver DeptA –volume vol2” and “-snapshot-policy vol2”, the snapshot policy I just created. That's all the config that I need to do on the Primary cluster on the source side.
Create SnapMirror Policy on Secondary Cluster
Next, I move over to the destination side - the Secondary cluster. Here I'm going to create a SnapMirror policy for snapshot copies to be replicated to the Secondary.
If you look at the previous diagram, you'll see the snapshot policy I created on the Primary. On the Secondary, I create a SnapMirror policy. The rules in the SnapMirror policy must match the snapshot label that I created on the Primary in the previous diagram.
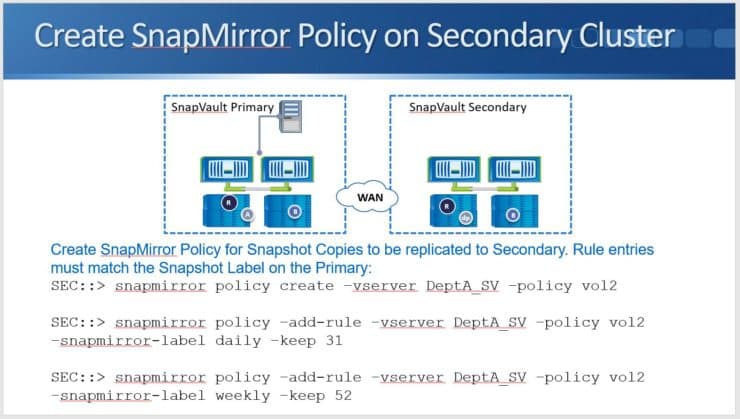
Here, my commands are “snapmirror policy create” for “vserver DeptA_SV”, and it is policy “vol2”. That creates the policy.
Next, I need to add rules to the policy. I've got “snapmirror policy -add-rule” for “vserver DeptA_SV”. I end it with “vol2” to add it to the policy that I just created. Next I say “-snapmirror-label daily” and “-keep 31”. I've also got a “snapmirror policy -add-rule” again, for “-vserver DeptA_SV” and “-policy vol2 -snapmirror-label weekly -keep 52”.
To recap, I've now added two rules to the policy. I'm going to pull daily snapshots across and keep 31 of them, and I'm going to pull weekly snapshots across and I'm going to keep 52 of those.
If we go back to the previous diagram again and look at the Primary side, you will see I’m taking daily snapshots while retaining five of those, and weekly snapshots while retaining two. My short-term backups are on the source volume.
On the destination volume, I'm keeping 31 dailies. This means I'm keeping dailies for a whole month and I'm keeping 52 weeklies, which are being kept for a whole year. I've got my long-term backups on the SnapVault destination volume.
Create and Initialise Volume Mirror Relationship
Next, I need to create and initialise the volume mirror relationship, so I must create the volume for the vault destination on the Secondary SVM.
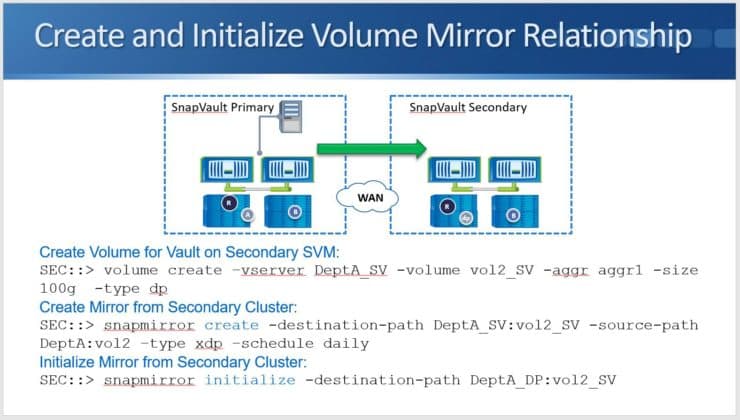
The command for that is “volume create” and this is for “-vserver DeptA_SV”. I'm naming the volume “vol2_SV” and putting it in Aggregate 1. For the size, make it big enough to store all the backups and then add “-type dp”. Again, when you're creating the destination volume for SnapMirror, whether it's Load Sharing mirrors, DP mirrors, or SnapVault, the volume creation must always be of type DP.
I then create the mirror from the Secondary cluster. All the commands on this page again are on the Secondary side (the destination side). I use “snapmirror create”. The destination path is “DeptA_SV”, and it's “vol2_SV”. The source path is “DeptA:vol2”. Now I say “-type xdp” for SnapVault and schedule it daily.
This means I'm going to check for snapshots on the Primary side daily and I'm going to pull over the snapshots that match the labels that were configured in my SnapMirror policy rules.
As mentioned when creating our DP and LS mirrors, using the “snapmirror create” command just creates the relationship. It doesn't actually start the replication. To do that, the command is “snapmirror initialize”, and here I can just include the destination path and nothing else. I don't need to include the source path.
That's the entire configuration done. I'm now going to be replicating my snapshot backups to the destination NetApp SnapVault cluster.
Restore Data to Primary Cluster
If you need to restore an entire volume to the Primary cluster, the command (which is run on the Secondary SnapVault system) is “snapmirror restore”. Specify the source path, the destination path, and the source snapshot that you want to restore from. You need to take the Primary-side volume offline first.
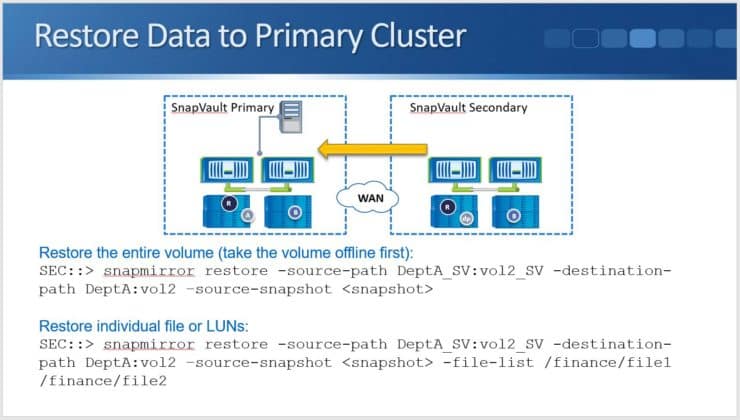
We can also restore individual files or LUNs. To do that we put an additional parameter on the end of the command where we specify the path of the file or folder we want to restore. In the example above, you can see that I'm restoring ‘file 1’ from the Finance folder.
It’s being restored back into the same folder but will be renamed as ‘file 2’. When you use these commands and specify the destination path, you can restore back to the original source volume or into a different volume.
NetApp SnapVault Configuration Example
This configuration example is an excerpt from my ‘NetApp ONTAP 9 Complete’ course. Full configuration examples using both the CLI and System Manager GUI are available in the course.
Want to practice this configuration for free on your laptop? Download your free step-by-step guide ‘How to Build a NetApp ONTAP Lab for Free’

- Create a SnapVault relationship to backup vol1 in the NAS SVM in Cluster1, to a new volume named vol1_m in the NAS_M SVM in Cluster2.
Retain these snapshots of vol1 in Cluster1, in vol1 in Cluster1:
| Take snapshots every: | Retain this many: |
| 1 minute | 2 |
| 2 minutes | 3 |
Retain these snapshots of vol1 in Cluster1, in vol1_m in Cluster2:
| Take snapshots every: | Retain this many: |
| 2 minutes | 4 |
| 3 minutes | 4 |
Note that less frequent schedules would be used in a real world environment. We’re using very frequent schedules here so we don’t have to wait long to see the snapshots being created and replicated.
Use the ‘snapmirror create’ command if performing the configuration using the CLI.
Snapshots which are taken every minute and every 2 minutes should be retained in vol1 in Cluster1. Create schedules to run every minute and every 2 minutes on Cluster1.
cluster1::> job schedule cron create -name 1min -minute 00,01,02,03,04,05,06,07,08,09,10,11,12,13,14,15,16,17,18,19,20,21,22,23,24,25,26,27,28,29,30,31,32,33,34,35,36,37,38,39,40,41,42,43,44,45,46,47,48,49,50,51,52,53,54,55,56,57,58,59
cluster1::> job schedule cron create -name 2min -minute 00,02,04,06,08,10,12,14,16,18,20,22,24,26,28,30,32,34,36,38,40,42,44,46,48,50,52,54,56,58
Snapshots which are taken every 2 minutes and every 3 minutes should be retained in vol1_m in Cluster2. The SnapVault relationship will pull the 2 minute snapshots from Cluster1. 3 minute snapshots are not being taken on Cluster1 though. Create a schedule to run every 3 minutes on Cluster2.
cluster2::> job schedule cron create -name 3min -minute 00,03,06,09,12,15,18,21,24,27,30,33,36,39,42,45,48,51,54,57
Create a snapshot policy on Cluster1 which will take snapshots every minute and retain the last 2 of them, and take snapshots every 2 minutes and retain the last 3 of them. The 2 minute snapshots need a SnapMirror Label as they will be pulled over to Cluster2 by SnapVault.
cluster1::> snapshot policy create -vserver NAS -policy vol1 -enabled true -schedule1 1min -count1 2 -schedule2 2min -count2 3 -snapmirror-label2 2min
Apply the snapshot policy to vol1.
cluster1::> volume modify -vserver NAS -volume vol1 -snapshot-policy vol1
Warning: You are changing the Snapshot policy on volume "vol1" to "vol1". Any Snapshot copies on this volume that do not match any of the prefixes of the new Snapshot policy will not be deleted. However, once the new Snapshot policy takes effect, depending on the new retention count, any existing Snapshot copies that continue to use the same prefixes may be deleted. See the 'volume modify' man page for more information.
Do you want to continue? {y|n}: y
Volume modify successful on volume vol1 of Vserver NAS.
On Cluster2, create a SnapMirror policy. Use the default SnapMirror Policy type of ‘vault’.
cluster2::> snapmirror policy create -vserver NAS_M -policy vol1_m
Pull snapshots with the SnapMirror Label ‘2min’ from Cluster1 and retain the last 4 of them.
cluster2::> snapmirror policy add-rule -vserver NAS_M -policy vol1_m -snapmirror-label 2min -keep 4
Create snapshots on Cluster2 every 3 minutes and keep 4 of them.
cluster2::> snapmirror policy add-rule -vserver NAS_M -policy vol1_m -snapmirror-label 3min -keep 4 -schedule 3min
Warning: The "-schedule" parameter is not a transfer schedule and will not transfer Snapshot copies with the SnapMirror label "3min" from the source. Specifying the "-schedule" parameter will enable independent scheduled Snapshot copy creation on the destination with SnapMirror label "3min".
Do you want to continue? {y|n}: y
Create the destination volume as type DP. The size should be the same as the source volume.
cluster2::> volume create -vserver NAS_M -volume vol1_m -aggregate aggr1_C2N1 -size 300mb -type dp
[Job 80] Job succeeded: Successful
Then create the SnapMirror relationship.
cluster2::> snapmirror create -source-path NAS:vol1 -destination-path NAS_M:vol1_m -type xdp -policy vol1_m -schedule 1min
Operation succeeded: snapmirror create for the relationship with destination "NAS_M:vol1_m".
Then initialize it to perform the first replication.
cluster2::> snapmirror initialize -destination-path NAS_M:vol1_m
Operation is queued: snapmirror initialize of destination "NAS_M:vol1_m".
- Wait for the replication to complete, then verify that the SnapMirror relationship has been configured successfully, it is healthy and data has been replicated to vol1_m.
cluster2::> snapmirror show
Progress
Source Destination Mirror Relationship Total Last
Path Type Path State Status Progress Healthy Updated
----------- ---- ------------ ------- -------------- --------- ------- --------
NAS:vol1 XDP NAS_M:vol1_m Snapmirrored
Idle - true -
cluster2::> volume show
Vserver Volume Aggregate State Type Size Available Used%
--------- ------------ ------------ ---------- ---- ---------- ---------- -----
NAS_M svm_root aggr1_C2N1 online RW 20MB 18.07MB 4%
NAS_M vol1_m aggr1_C2N1 online DP 300MB 284.8MB 5%
cluster2-01
vol0 aggr0_cluster2_01
online RW 807.3MB 397.4MB 48%
3 entries were displayed.
- View the detailed information about the SnapMirror relationship on Cluster2.
cluster2::> snapmirror show -destination-path NAS_M:vol1_m -instance
Source Path: NAS:vol1
Destination Path: NAS_M:vol1_m
Relationship Type: XDP
Relationship Group Type: none
SnapMirror Schedule: 1min
SnapMirror Policy Type: vault
SnapMirror Policy: vol1_m
Tries Limit: -
Throttle (KB/sec): unlimited
Mirror State: Snapmirrored
Relationship Status: Idle
File Restore File Count: -
File Restore File List: -
Transfer Snapshot: -
Snapshot Progress: -
Total Progress: -
Network Compression Ratio: -
Snapshot Checkpoint: -
Newest Snapshot: snapmirror.3985c590-9e95-11e9-9521-000c29adabc3_2154150304.2019-07-04_135107
Newest Snapshot Timestamp: 07/04 13:50:57
Exported Snapshot: snapmirror.3985c590-9e95-11e9-9521-000c29adabc3_2154150304.2019-07-04_135107
Exported Snapshot Timestamp: 07/04 13:50:57
Healthy: true
Unhealthy Reason: -
Destination Volume Node: cluster2-01
Relationship ID: 6534b1e3-9e9d-11e9-9521-
< output truncated >
- After 12 minutes have passed, verify you can see two 1min snapshots and three 2min snapshots in vol1 on Cluster1, and four 2min snapshots and four 3min snapshots in vol1_m on Cluster2.
cluster1::> volume snapshot show -vserver NAS -volume vol1
---Blocks---
Vserver Volume Snapshot Size Total% Used%
-------- -------- ------------------------------------- -------- ------ -----
NAS vol1
2min.2019-07-03_1516 132KB 0% 1%
2min.2019-07-03_1518 136KB 0% 1%
1min.2019-07-03_1519 136KB 0% 1%
2min.2019-07-03_1520 136KB 0% 1%
1min.2019-07-03_1520 128KB 0% 1%
5 entries were displayed.
cluster2::> volume snapshot show -vserver NAS_M -volume vol1_m
---Blocks---
Vserver Volume Snapshot Size Total% Used%
-------- -------- ------------------------------------- -------- ------ -----
NAS_M vol1_m
3min.2019-07-03_1509 180KB 0% 1%
3min.2019-07-03_1512 180KB 0% 1%
2min.2019-07-03_1512 136KB 0% 1%
3min.2019-07-03_1515 180KB 0% 1%
2min.2019-07-03_1514 136KB 0% 1%
3min.2019-07-03_1518 180KB 0% 1%
2min.2019-07-03_1516 184KB 0% 1%
2min.2019-07-03_1518 132KB 0% 1%
8 entries were displayed.
- View SnapMirror destinations from Cluster1.
cluster1::> snapmirror list-destinations
Source Destination Transfer Last Relationship
Path Type Path Status Progress Updated Id
----------- ----- ------------ ------- --------- ------------ ---------------
NAS:vol1 XDP NAS_M:vol1_m Idle - - 37ea8a85-9d12-11e9-9521-000c29adabc3
- Suspend the C2N1 virtual machine and power on the WinA virtual machine. (You can leave C2N1 running if you have at least 18GB RAM on your laptop.)
- On Cluster1, set the date and time to match the WinA client. The example below sets the date and time to 20th March 2019, 09:23am PST.
cluster1::> cluster date modify -dateandtime 201903200923
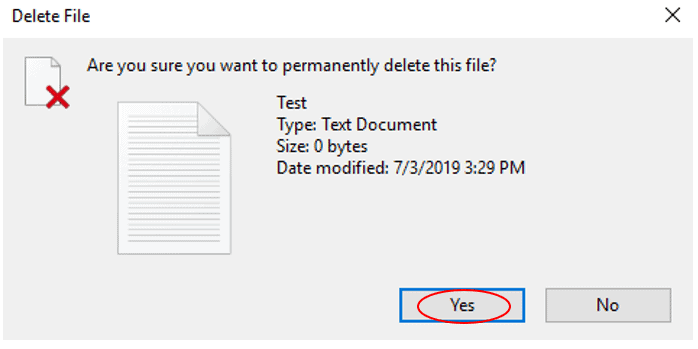
- On the WinA host, delete the Test text file in vol1 on Cluster1. (You have 9 minutes to complete the restore coming up in Step 106 so do not take too long with the following steps.)

- Suspend the WinA virtual machine and power on the C2N1 virtual machine. (You can leave WinA running if you have at least 18GB RAM on your laptop.)
- On Cluster2, set the date and time to match Cluster1. The example below sets the date and time to 20th March 2019, 09:23am PST.
cluster1::> cluster date show
Node Date Time zone
--------- ------------------------- -------------------------
cluster1-01
3/20/2019 09:23:00 -07:00 US/Pacific
cluster1-02
3/20/2019 09:23:00 -07:00 US/Pacific
2 entries were displayed.
Cluster2::> cluster date modify -dateandtime 201903200923
- Restore the Test text file from the 2nd oldest 3min SnapVault snapshot. (Do this in less than 9 minutes since you deleted the Test.txt file in order to make sure the snapshot includes the Test text file.)
Check the snapshots in vol1_m on Cluster2.
cluster2::> volume snapshot show -vserver NAS_M -volume vol1_m
---Blocks---
Vserver Volume Snapshot Size Total% Used%
-------- -------- ------------------------------------- -------- ------ -----
NAS_M vol1_m
3min.2019-07-04_1412 184KB 0% 1%
3min.2019-07-04_1415 184KB 0% 1%
2min.2019-07-04_1414 188KB 0% 1%
2min.2019-07-04_1416 140KB 0% 1%
3min.2019-07-04_1418 188KB 0% 1%
2min.2019-07-04_1418 140KB 0% 1%
3min.2019-07-04_1421 196KB 0% 1%
2min.2019-07-04_1420 136KB 0% 1%
8 entries were displayed.
On Cluster1, restore the Test text file from the 2nd oldest 3min snapshot in SnapVault.
cluster1::> snapmirror restore -source-path NAS_M:vol1_m -destination-path NAS:vol1 -source-snapshot 3min.2019-07-04_1415 -file-list /Test.txt
Warning: This command will overwrite any file on destination "NAS:vol1" that has the same path as any of the files to be restored.
Do you want to continue? {y|n}: y
[Job 79] Job is queued: snapmirror restore from source "NAS_M:vol1_m" for the snapshot 3min.2019-07-04_1415.
- Wait at least 2 minutes (to make sure you don’t restore from a snapshot when the Test.txt file was deleted), then restore the vol1 volume from the latest snapshot in SnapVault.
cluster1::> snapmirror restore -source-path NAS_M:vol1_m -destination-path NAS:vol1
Warning: All data newer than Snapshot copy 1min.2019-07-04_1421 on volume NAS:vol1 will be deleted.
Export policies currently enforced on the qtrees of volume "NAS:vol1" will not change during this operation. If the currently enforced export policies are different from those in Snapshot copy "1min.2019-07-04_1421", reassign the export policies of the qtrees on this volume after this operation.
Do you want to continue? {y|n}: y
[Job 78] Job is queued: snapmirror restore from source "NAS_M:vol1_m".
- Suspend the C2N1 virtual machine and power on the WinA virtual machine. (You can leave C2N1 running if you have at least 18GB RAM on your laptop.)
- Set the date and time on Cluster1 to match the WinA client. The example below sets the date and time to 20th March 2019, 09:23am PST.
Cluster1::> cluster date modify -dateandtime 201903200923
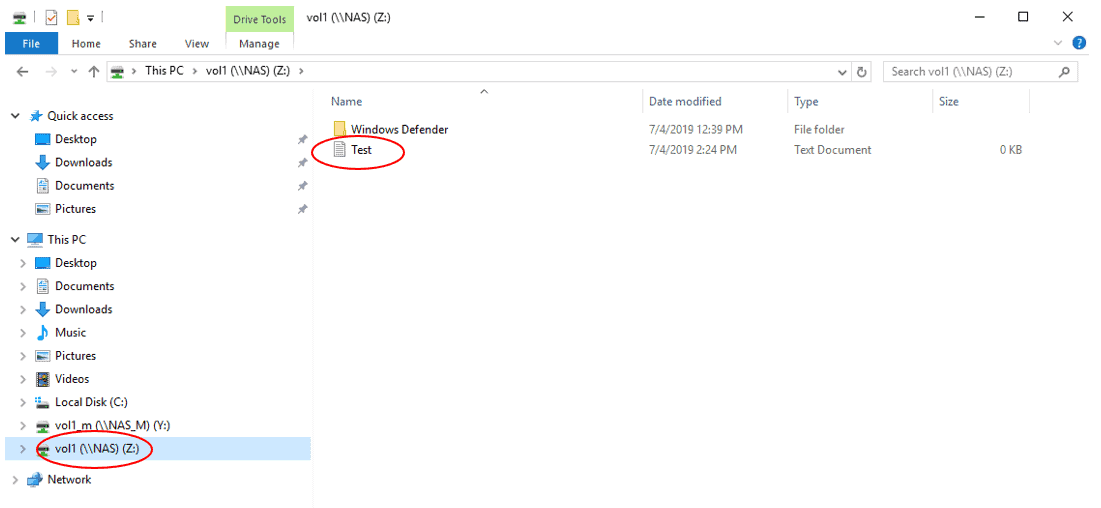
- On the WinA host, verify the Test.txt file you deleted has been restored.
- Suspend the WinA virtual machine and power on the C2N1 virtual machine. (You can leave WinA running if you have at least 18GB RAM on your laptop.)
- On Cluster2, set the date and time to match Cluster1. The example below sets the date and time to 20th March 2019, 09:23am PST.
cluster1::> cluster date show
Node Date Time zone
--------- ------------------------- -------------------------
cluster1-01
3/20/2019 09:23:00 -07:00 US/Pacific
cluster1-02
3/20/2019 09:23:00 -07:00 US/Pacific
2 entries were displayed.
Cluster2::> cluster date modify -dateandtime 201903200923
- Assume Cluster1 has failed. Break the mirror to make vol1_m in Cluster2 a read-write volume. What happens?
SnapMirror break fails because vol1_m is a SnapVault mirror, not a SnapMirror DR mirror.
cluster2::> snapmirror quiesce -destination-path NAS_M:vol1_m
Operation succeeded: snapmirror quiesce for destination "NAS_M:vol1_m".
cluster2::> snapmirror break -destination-path NAS_M:vol1_m
Error: command failed: "snapmirror break" is not allowed on destination "NAS_M:vol1_m" which is the destination of a relationship that has a policy of type "vault" associated with it.
- Remove the SnapMirror relationship on Cluster2 and delete vol1_m.
cluster2::> snapmirror quiesce -destination-path NAS_M:vol1_m
Operation succeeded: snapmirror quiesce for destination "NAS_M:vol1_m".
cluster2::> snapmirror delete -destination-path NAS_M:vol1_m
Operation succeeded: snapmirror delete for the relationship with destination "NAS_M:vol1_m".
cluster2::> volume modify -vserver NAS_M -volume vol1_m -state offline
Warning: Volume "vol1_m" on Vserver "NAS_M" must be unmounted before being taken offline or restricted. Clients will not be able to access the affected volume and related junction paths after that. Do you still want to unmount the volume and continue? {y|n}: y
Volume modify successful on volume vol1_m of Vserver NAS_M.
cluster2::> volume delete -vserver NAS_M -volume vol1_m
Warning: Are you sure you want to delete volume "vol1_m" in Vserver "NAS_M" ? {y|n}: y
[Job 39] Job succeeded: Successful
- On Cluster1, release the SnapMirror relationship, set the snapshot policy to none and delete all snapshots in vol1.
cluster1::> snapmirror release -source-path NAS:vol1 -destination-path NAS_M:vol1_m -force
[Job 121] Job is queued: snapmirror release for destination "NAS_M:vol1_m".
Warning: Snapshot copies on source volume "NAS:vol1" generated by SnapMirror for the purpose of mirroring to destination volume "NAS_M:vol1_m" will be deleted. Once these Snapshot copies are deleted, it will not be possible to re-establish a mirroring relationship between these two volumes unless there are other common Snapshot copies between the source and the destination volumes.
[Job 121] Job succeeded: SnapMirror Release Succeeded
cluster1::> volume modify -vserver NAS -volume vol1 -snapshot-policy none
Warning: You are changing the Snapshot policy on volume "vol1" to "none". Any Snapshot copies on this volume that do not match any of the prefixes of the new Snapshot policy will not be deleted. However, once the new Snapshot policy takes effect, depending on the new retention count, any existing Snapshot copies that continue to use the same prefixes may be deleted. See the 'volume modify' man page for more information.
Do you want to continue? {y|n}: y
Volume modify successful on volume vol1 of Vserver NAS.
cluster1::> volume snapshot show -vserver NAS -volume vol1
---Blocks---
Vserver Volume Snapshot Size Total% Used%
-------- -------- ------------------------------------- -------- ------ -----
NAS vol1
restored.53ca168f-9e90-11e9-afbf-000c296f941d_2156825619.2min.2019-07-04_1420.2019-07-04_142109
892KB 1% 5%
2min.2019-07-04_1436 132KB 0% 1%
2min.2019-07-04_1438 136KB 0% 1%
1min.2019-07-04_1440 136KB 0% 1%
2min.2019-07-04_1440 136KB 0% 1%
1min.2019-07-04_1441 128KB 0% 1%
6 entries were displayed.
cluster1::> volume snapshot delete -vserver NAS -volume vol1 -snapshot restored.53ca168f-9e90-11e9-afbf-000c296f941d_2156825619.2min.2019-07-04_1420.2019-07-04_142109,2min.2019-07-04_1436,2min.2019-07-04_1438,1min.2019-07-04_1440,2min.2019-07-04_1440,1min.2019-07-04_1441
Warning: Deleting a Snapshot copy permanently removes any data that is stored only in that Snapshot copy. Are you sure you want to delete Snapshot copy "restored.53ca168f-9e90-11e9-afbf-000c296f941d_2156825619.2min.2019-07-04_1420.2019-07-04_142109" for volume "vol1" in Vserver "NAS" ?
{y|n}: y
cluster1::> volume snapshot show -vserver NAS -volume vol1
There are no entries matching your query.
Additional Resources
Starting the SnapVault Relationships with Clustered Data ONTAP
Considerations for Creating a SnapVault Backup Relationship

Text by Alex Papas, Technical Writer at www.flackbox.com
Alex has been working with Data Center technologies for over 20 years. Currently he is the Network Lead for Costa, one of the largest agricultural companies in Australia. When he’s not knee deep in technology you can find Alex performing with his band 2am